
Tools & materials you'll need
Affiliate linksAs an Amazon Associate FixlyGuide earns from qualifying purchases — at no extra cost to you. Prices and availability are accurate as of publication and subject to change.
Quick Answer
If you're experiencing a frustrating situation where only one shower in your home delivers no hot water, while faucets and other showers work perfectly, the most likely cause lies within that specific shower's mixing valve. This valve, located behind the shower handle, is responsible for blending hot and cold water to achieve your desired temperature. Issues such as mineral buildup, a stuck piston, or a worn O-ring can prevent the hot water from flowing properly, leaving you with an unexpectedly cold shower. A relatively straightforward DIY fix involves accessing, inspecting, cleaning, and potentially replacing parts of the valve's cartridge.
The Problem
Imagine stepping into your shower, expecting a relaxing stream of warm water, only to be hit with an icy blast. You check the kitchen sink, the bathroom vanity, even another shower – all have hot water without issue. This isolation points directly to the shower unit itself, bypassing the water heater, main supply lines, or broader plumbing infrastructure. The core problem is that the hot water isn't making it past the mixing valve in that single shower, or it's being mixed improperly, resulting in a continuous flow of cold water, or perhaps only a trickle of lukewarm water that quickly fades. This isn't just an inconvenience; it can be a sign of a valve that's nearing failure or is simply clogged with sediment.
How It Works
Understanding how your shower's mixing valve operates is key to troubleshooting. Most modern showers use either a pressure-balancing or thermostatic mixing valve, though the principles for this specific problem are similar. Hot and cold water supply lines feed into the valve body. Inside, a cartridge or spool assembly moves to regulate the proportion of hot and cold water flowing out to the showerhead.
In a pressure-balancing valve, a movable diaphragm or spool reacts to changes in water pressure in the hot and cold lines. If someone flushes a toilet, reducing cold water pressure, the valve will automatically reduce the hot water flow to maintain a consistent temperature, preventing scalding. If the spool gets stuck due to mineral deposits or a damaged O-ring, it might block or restrict the hot water inlet, leaving you with only cold water.
Thermostatic valves are more advanced, using a wax element or bimetallic coil to sense the water temperature and adjust the hot and cold water inlets to maintain a precise temperature, regardless of pressure fluctuations. If this wax element degrades or the internal piston becomes seized, it can similarly prevent hot water from entering the mixing chamber.
Both types rely on internal seals (O-rings) and clear pathways for water flow. Over time, sediment, hard water minerals (calcium and magnesium), and even tiny debris from pipes can accumulate within the cartridge, hindering its movement or blocking the hot water port. When this happens, the valve defaults to cold or ambient temperature water, as the cold water supply often has less restriction or is unaffected by the blockage.
Step-by-Step Fix
1. Gather Your Tools & Shut Off Water — Before you begin any plumbing work, ensure you have all necessary tools and, most importantly, completely shut off the main water supply to your house. This prevents flooding.
- Safety First: Always turn off the main water supply valve. Open a lower-level faucet to drain residual water and relieve pressure.
- Tools: Phillips head screwdriver, flathead screwdriver, adjustable wrench, penetrating oil (optional), needle-nose pliers, utility knife, small brush (like a toothbrush), white vinegar for cleaning, replacement shower valve cartridge kit (if needed – try to find the brand and model number of your existing valve first).
2. Remove the Shower Handle and Trim Plate — Most shower handles are secured by a screw hidden beneath a decorative cap. Carefully pry off the cap (if present), unscrew the handle, and pull it straight off. Then, unscrew the trim plate (escutcheon) from the wall and remove it.
- Tip: Some decorative caps are threaded; others simply snap on. Use a flathead screwdriver gently wrapped in tape to avoid scratching.
- If stiff: If the handle or trim plate is stuck, apply a small amount of penetrating oil around the base and let it sit for 10-15 minutes before trying again.
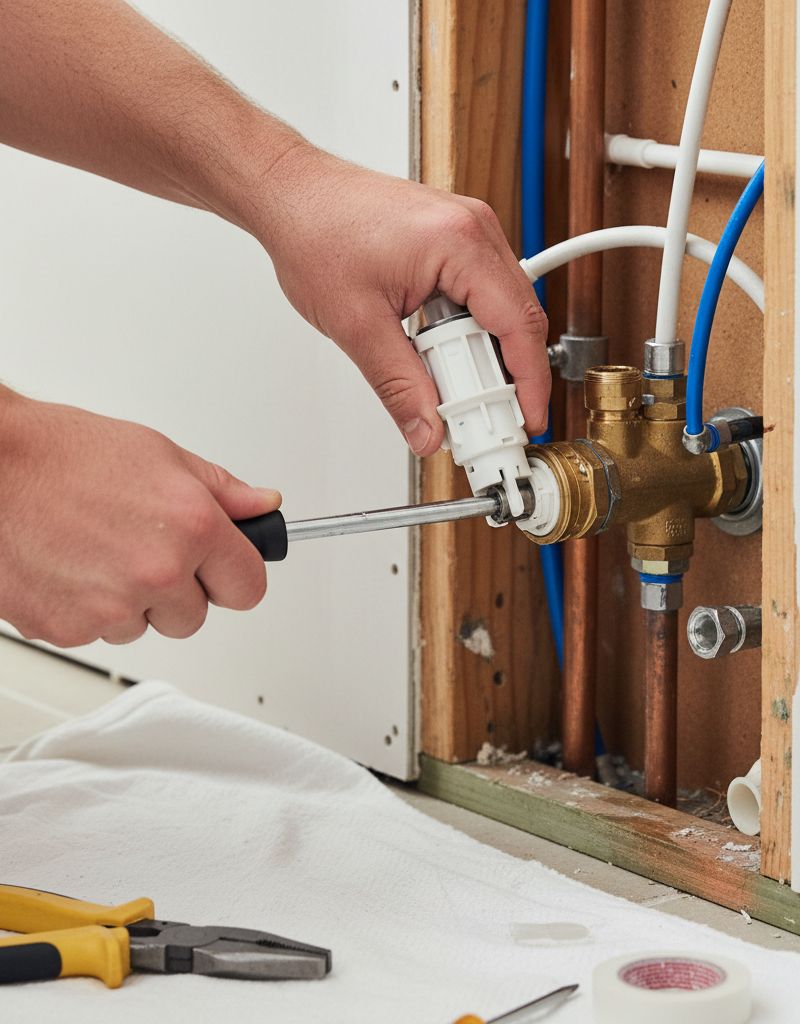
3. Identify and Remove the Valve Cartridge — Once the trim is removed, you'll see the valve's working parts. The cartridge is usually a cylindrical or rectangular component held in place by a retaining clip, screws, or a threaded bonnet nut.
- Retaining Clip: Use needle-nose pliers or a flathead screwdriver to gently pull out the retaining clip (often a U-shaped or horsehoe-shaped pin) that holds the cartridge in place.
- Screws/Bonnet Nut: If screws, unscrew them. If a bonnet nut, use an adjustable wrench to carefully loosen and remove it. Be careful not to strip the threads.
- Extract Cartridge: Carefully pull the cartridge straight out of the valve body. It might require some force if it's seized by mineral buildup. Sometimes, twisting it slightly with pliers can help break it free.
4. Inspect and Clean the Cartridge & Valve Body — Examine the cartridge for obvious damage, mineral buildup, or worn O-rings. Pay close attention to the hot water port (usually marked with an 'H' or red dot).
- Cleaning: Soak the cartridge in a bowl of white vinegar for several hours (or overnight) to dissolve mineral deposits. Use a small brush (like an old toothbrush) to scrub away any remaining gunk.
- Valve Body: Shine a flashlight into the valve body cavity. Look for any debris or mineral buildup inside the cold and especially the hot water inlets. Use your brush or a cotton swab to clean these pathways thoroughly. Ensure no debris falls further into the pipes. Flush briefly with water if possible (after reattaching the cartridge but before sealing fully, be ready for a splash, and have a bucket).
5. Replace Worn O-Rings or the Entire Cartridge — If the O-rings on your existing cartridge look cracked, flattened, or brittle, carefully remove them and replace them with new ones from a repair kit matching your valve model. If the cartridge itself is cracked, severely corroded, or the internal mechanisms feel loose/damaged, it's best to replace the entire cartridge.
- Replacement Part: Take the old cartridge to a home improvement store or plumbing supply shop to ensure you get an exact match. Even slight differences can cause leaks or improper function.
- Lubrication: Before reinserting, apply a thin coat of plumber's grease (silicone-based) to new O-rings and the cartridge body. This helps with installation and prolongs their life.
6. Reassemble the Valve — Carefully insert the cleaned or new cartridge back into the valve body, ensuring it's oriented correctly (there's usually a
Related Articles
Keep troubleshooting with these hand-picked guides from FixlyGuide:
- Your shower sucks? 3 hidden culprits explained. — Low water pressure throughout your house often points to a few common culprits, from a partially closed main shut-off valve to issues with…
- The #1 Mistake Homeowners Make When Diagnosing Low Water Pressure — Discover the most common oversight homeowners make when troubleshooting low water pressure throughout their house and how to fix it with si…
- The $30 Secret to Banishing Ice Dams Without Damaging Your Roof — Discover how a simple, inexpensive trick can safely eliminate dangerous ice dams from your roof and prevent costly damage to your home.
- The #1 Mistake Homeowners Make When Diagnosing Low Water Pressure (It's Not Your Pipes!) — Discover the most overlooked culprit behind low water pressure throughout your entire house and learn how to fix it with simple steps.
- The 3 Hidden Soffit & Fascia Flaws Costing You Thousands — Learn to identify common signs of soffit and fascia damage, perform basic repairs, and implement preventative measures to protect your home…
- The $2 Trick to Stop a Running Toilet (Plumbers Don't Want You to Know) — Discover the simple, two-dollar fix that can stop your running toilet in minutes, saving water and preventing costly repairs.
Recommended for DIYers & woodworkers
Sponsored
The Top 20 Tools for Workshops of Any Budget
No stationary machines or power tools required — plus 3 fundamental tools that can't be bought at any price.
Get the free guide
Ted's Woodworking — The #1 Woodworking Resource
Detailed instructions, dimensioned drawings, materials & cutting lists, and 3D schematics for every skill level.
See the plansSponsored: links above are affiliate links. FixlyGuide may earn a commission on qualifying purchases — at no extra cost to you.
Frequently asked questions
Why does only one shower have no hot water?+
If other fixtures have hot water, the problem is most likely isolated to that specific shower's mixing valve or cartridge, which blends hot and cold water. Mineral buildup or a faulty cartridge can restrict hot water flow to just that shower.
Can I replace a shower valve cartridge myself?+
Yes, for most standard shower setups, replacing a valve cartridge is a moderate DIY task accessible to homeowners. It involves shutting off the water, removing the handle and trim, and carefully extracting and replacing the cartridge. Matching the new cartridge to the old one is crucial.
How do I know what type of shower cartridge I need?+
The best way is to shut off your water, remove the existing cartridge, and take it to a plumbing supply store or a well-stocked home improvement center. They can help you match it exactly. Alternatively, look for brand and model numbers on the existing trim or valve body to research online.
What if cleaning the cartridge doesn't work?+
If cleaning doesn't restore hot water, the internal components of the cartridge might be too worn or damaged. In this case, replacing the entire cartridge is the next logical step. Ensure the hot water supply to that specific valve is open and clear.
Is it dangerous to work on a shower valve?+
Working on a shower valve is generally safe as long as the main water supply to the house is completely shut off beforehand. The primary risks involve accidental flooding if the water isn't off, or damaging threads if tools are used incorrectly. There are no electrical or gas components involved.


Discussion
Loading comments…