
Tools & materials you'll need
Affiliate linksAs an Amazon Associate FixlyGuide earns from qualifying purchases — at no extra cost to you. Prices and availability are accurate as of publication and subject to change.
Quick Answer
If your dryer takes an unusually long time to dry clothes, the most common causes are restricted airflow due to a clogged lint filter or dryer vent, or an overloaded machine. Start by cleaning your lint filter meticulously, then check and clear your dryer's exhaust vent pathway, and finally, ensure you're not overfilling the drum with too many wet items.
The Problem
There's nothing more frustrating than pulling clothes out of the dryer only to find them still damp, or worse, having to run multiple cycles to get a load dry. Beyond the inconvenience, a dryer that's struggling to dry clothes efficiently is wasting energy, costing you money on your utility bills, and can even pose a serious fire risk due to lint buildup and overheating. This extended drying time is almost always a symptom of reduced airflow, which prevents the hot, moist air from escaping the dryer drum effectively.
How It Works
A clothes dryer operates on a simple but effective principle: it combines heat, tumbling action, and airflow to remove moisture from fabrics. First, a heating element (electric) or gas burner generates hot air. This hot air is then drawn into the dryer drum by a powerful fan (blower wheel), a component located behind the drum. As the drum tumbles, the hot air circulates through the wet clothes, absorbing moisture. Crucially, as the air picks up moisture, it becomes saturated. For the drying process to continue, this moist, hot air must be exhausted out of the dryer and to the outside of your home through a vent system. This continuous exchange of moist air for fresh, dry hot air is what allows the clothes to dry. If the pathways for this airflow – from the lint trap, through the dryer's internal ductwork, and all the way to the exterior vent hood – become obstructed, the humid air gets trapped inside the drum. This significantly reduces the dryer's ability to evaporate water, leading to longer drying cycles, inefficient operation, and potentially dangerous overheating.
Step-by-Step Fix
Safety First: Always unplug your dryer from the wall outlet or turn off its circuit breaker before performing any maintenance or inspection.
-
Clean the Primary Lint Filter Thoroughly – The first and easiest check
- Remove the lint screen, typically located inside the dryer door frame or on top of the dryer.
- Peel off any visible lint. For a deeper clean, gently scrub both sides of the screen with a brush, warm water, and a small amount of laundry detergent. Rinse thoroughly and let it air dry completely before returning it to the dryer. This removes invisible residue from fabric softener sheets that can coat the mesh and restrict airflow.
- Pro Tip: Hold the clean, dry filter up to a light. If you can't easily see light through the mesh, it's still partially clogged and needs further cleaning.
-
Inspect the Lint Trap Housing – Even if the filter is clean, buildup can occur underneath.
- With the lint screen removed, use a vacuum cleaner with a crevice attachment to clear out any lint build-up inside the slot or housing where the lint filter sits. Lint can bypass the screen and accumulate in this area over time.
-
Check Dryer Vent Hose for Kinks or Crushes – A very common airflow killer.
- Carefully pull your dryer away from the wall, far enough to access the vent hose at the back.
- Inspect the flexible exhaust hose that connects your dryer to the wall vent. Ensure it's not kinked, crushed, or flattened. These obstructions severely impede airflow. Gently straighten any kinks.
- Warning: Avoid pushing the dryer too close to the wall again after cleaning, as this can easily kink the hose.
-
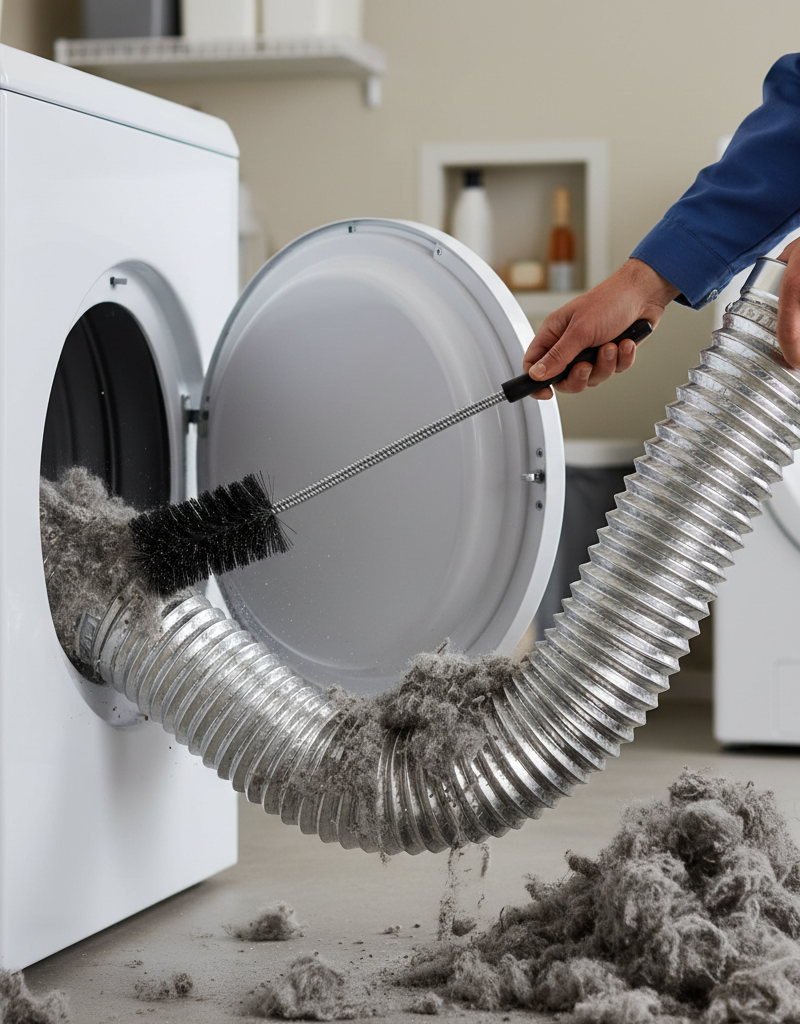
Disconnect and Inspect the Vent Hose for Clogs – Lint inevitably collects here.
- Using a screwdriver or pliers, loosen the clamp (usually a hose clamp or spring clip) securing the vent hose to both the dryer's exhaust port and the wall vent.
- Carefully disconnect the hose at both ends.
- Inspect the inside of the hose for significant lint buildup. A full hose will feel heavy and may appear constricted.
- Use a long, flexible dryer vent brush (available at most hardware stores for $15-$30) to meticulously clean the inside of the hose. Work the brush through the entire length, dislodging lint. You can also use a vacuum to suck out loosened debris.
-
Clean the Dryer's Exhaust Port – Don't forget the machine itself.
- With the vent hose disconnected, look at the round exhaust port on the back of the dryer. Use the vacuum's crevice tool or a small brush to remove any lint clinging to the opening. This is where fresh lint often begins to build up before entering the vent hose.
-
Clear the Wall Vent Duct – The final, and often most overlooked, obstruction.
- If you can access it, clean inside the wall vent duct extending into your home. Attach the dryer vent brush to a drill (if designed for it) and carefully push it into the wall duct from the inside of your home. Slowly work it through, ensuring you reach as far as possible towards the exterior.
- If this doesn't work: Access the exterior vent hood. Clean out any lint accumulation, bird nests, or debris that might be blocking the flap or screen. Some exterior vent hoods have a removable cover for easier cleaning.
-
Inspect the Exterior Vent Hood – The last point of exit.
- Go outside to where your dryer vent terminates. This is usually a flap or louvered cover on an exterior wall.
- Check for any blockages like lint, bird nests, or even insect screens (which are often counterproductive and should be removed if present and causing airflow issues). Ensure the flap opens freely when the dryer is running (you should feel hot air exiting).
- Safety Note: Wear gloves and eye protection if dealing with potential animal nests.
-
Verify Proper Installation and Reconnect – Crucial for safe, efficient operation.
- Ensure the vent hose is properly reconnected and secured with clamps at both the dryer and the wall.
- Avoid using long, flexible vinyl or foil ducting whenever possible. Rigid metal ducting is superior for airflow and fire safety. If you must use flexible, keep it as short and straight as possible.
- Gently push the dryer back into place, taking care not to crush or kink the hose. Leave a few inches of space behind the dryer.
-
Run a Test Load – Confirm your efforts paid off.
- Plug the dryer back in or restore power.
- Run a normal load of laundry. It should now dry in a reasonable amount of time (typically 30-45 minutes for a full load depending on fabric type). Feel the air coming out of the exterior vent – it should be strong and hot.
Common Causes
- Clogged Lint Filter: The most frequent offender. A mesh screen coated with lint (or even fabric softener residue) drastically reduces air intake.
- Blocked Dryer Vent Duct: Lint builds up in the long exhaust duct from the dryer to the outside. This is a significant fire hazard and the primary cause of extended drying times.
- Kinked or Crushed Vent Hose: The flexible hose directly behind the dryer is often squashed when the dryer is pushed too close to the wall.
- Exterior Vent Hood Obstruction: Bird nests, lint buildup, or even snow/ice can block the outside opening of the vent.
- Overloaded Dryer: Too many items in the drum prevent proper tumbling and air circulation, trapping moisture.
- Wet Lint Trap Housing: A rarely thought-of problem, but if the lint trap is wet (e.g., from spilled liquid or a very steamy load), wet lint clings more tightly and restricts airflow.
- Failing Heating Element (Electric Dryers) or Gas Igniter (Gas Dryers): If the dryer runs but produces no heat, this indicates a component failure. However, this is usually obvious as clothes will remain completely cold and wet, unlike the slow drying issue from airflow.
Common Mistakes
- Ignoring the Lint Filter: Many people clean the lint screen inconsistently or not thoroughly enough, allowing fine residue to build up over time.
- Using the Wrong Vent Material: Flexible vinyl or foil ducting has ridges that trap lint and are more prone to kinking. Rigid metal ducting is safer and more efficient.
- Pushing Dryer Too Close to the Wall: This frequently crushes or kinks the flexible vent hose, cutting off airflow.
- Forgetting the Exterior Vent: Homeowners often clean the lint filter and internal hose but neglect to check the outermost point of the vent system for blockages.
- Overloading the Dryer: Stuffing too many items into the dryer to save time actually extends drying time and can damage the machine. Dryers need space for air to circulate and clothes to tumble freely.
- Disregarding Manufacturer Recommendations: Not following the dryer manufacturer's guidelines for installation clearance and regular maintenance can lead to problems.
Cost & Time Breakdown
| Task | DIY Cost | Pro Cost | Time |
|---|---|---|---|
| Lint Filter Cleaning | $0 | $0 | 5 minutes |
| Inspect/Clean Vent Hose | $0–$30 | $100–$200 | 30–60 minutes |
| Clean Wall Vent Duct | $0–$30 | $150–$250 | 1–2 hours |
| Clear Exterior Vent Hood | $0 | Included above | 15–30 minutes |
| Appliance Repair (Heating Elem) | $150–$300 | $250–$500 | 1–3 hours (pro) |
Tips & Prevention
- Clean the Lint Filter Every Single Load: This is the most important preventative measure. A clean filter ensures maximum airflow.
- Deep Clean Lint Filter Monthly: Wash the lint filter with soap and water monthly to remove fabric softener residue that can create an invisible film.
- Check Vent Hose Annually (or more): Disconnect and clean your dryer vent hose and the wall duct at least once a year. If you have pets or do a lot of laundry, consider doing it every 6 months.
- Use Rigid Metal Venting: If possible, replace flexible vinyl or foil ducts with rigid metal ducting for better airflow and fire safety.
- Avoid Overloading: Dry smaller, more manageable loads. This allows clothes to tumble freely and air to circulate efficiently.
- Verify Exterior Vent Function: Periodically check your outdoor vent hood to ensure the flap opens properly and is free of debris. Watch for bird nests, which are common culprits.
- Balance Your Loads: Mix heavy items (like jeans) with lighter items (like t-shirts) in the same load to promote even drying.
When to Call a Professional
If you've thoroughly cleaned your lint filter, inspected and cleared the entire dryer vent system (including the exterior hood and wall duct), ensured the vent hose isn't kinked, and are still experiencing significantly long drying times, it's time to call a qualified appliance repair professional. This indicates an internal mechanical issue, such as a failing heating element, a broken thermistor or thermostat, a malfunctioning blower wheel, or a problem with the dryer's control board. These components require specialized diagnostic tools and expertise to repair safely and effectively. A professional can quickly identify the exact cause and rectify the problem, often extending the life of your appliance and preventing further damage or safety hazards.
Related Articles
Keep troubleshooting with these hand-picked guides from FixlyGuide:
- The #1 Mistake Homeowners Make When Their Dryer Stops Drying (And How to Fix It Free) — If your dryer is taking too long to dry clothes, the most common culprit is a clogged vent, which can be easily fixed with simple tools.
- The Silent Fire Hazard Lurking In Your Laundry Room — Don't let a clogged dryer vent become a silent fire starter. Learn why this common oversight is so dangerous, the clear warning signs to lo…
- Your Oven's 3-Amp Secret: The Real Reason It's So Slow — If your gas oven takes forever to preheat, the culprit is almost certainly a weak igniter that looks fine but fails a critical amperage tes…
- Is Your Refrigerator Buzzing Loudly in the Quiet of Night? — A loud buzzing from your fridge at night often points to the icemaker, a dirty fan, or a vibrating component, many of which are simple home…
- Your 'Clean' Dishes Are Still Dirty? The Culprit Is Hiding — Frustrated by gritty, food-flecked dishes after a full wash cycle? The problem isn't your detergent. Your dishwasher is making dishes dirti…
- The 3 Hidden Reasons Your Deck Boards Warp (and the Easy Fixes) — Deck board warping can ruin your outdoor space, but understanding the root causes and applying simple fixes can restore your deck's beauty.
Get the print-ready PDF of this guide
A clean, ad-free, printable version you can keep on your phone or pin to the workshop wall. Free with a FixlyGuide account.
- Print-optimized layout
- Tools, materials & every step included
- Saved to your account
Frequently asked questions
Why would my dryer suddenly take hours to dry clothes?+
The most common reason for a dryer suddenly taking hours to dry is a significant restriction in airflow. This is almost always due to a heavily clogged lint filter, a severely blocked dryer vent hose or wall duct, or an obstruction at the exterior vent hood. Less commonly, an internal component like the heating element could be failing.
How often should I clean my dryer vent?+
You should clean your dryer's lint filter after every single load. The flexible vent hose behind the dryer and the entire vent duct system to the exterior should be cleaned at least once a year, or more frequently (every 6 months) if you have pets, do a lot of laundry, or notice drying times increasing.
Can a clogged dryer vent cause a fire?+
Yes, absolutely. A clogged dryer vent is a leading cause of household fires. Lint is highly flammable, and when trapped in a vent, it can ignite due to the dryer's heat and static electricity, especially if the dryer is overheating trying to dry clothes with restricted airflow. Regular cleaning is crucial for fire prevention.
What kind of dryer vent hose is best?+
Rigid metal dryer vent ducting (either galvanized steel or aluminum) is considered the safest and most efficient. It has smooth interior walls that resist lint buildup, is less prone to kinking or crushing, and is more fire-resistant than flexible plastic or foil materials. If flexible ducting must be used, choose flexible metal over plastic/foil and keep it as short and straight as possible.


Discussion
Loading comments…