Tools & materials you'll need
Affiliate linksAs an Amazon Associate FixlyGuide earns from qualifying purchases — at no extra cost to you. Prices and availability are accurate as of publication and subject to change.
Quick Answer
A persistent drip from your single-handle faucet is usually the tell-tale sign of a worn-out O-ring, rubber washer, or a damaged cartridge. The good news is that this common household nuisance is one of the easiest and most affordable plumbing repairs a DIYer can tackle. By carefully disassembling the faucet, identifying the culprit component, and replacing it with a new one (often available in a universal kit for just a few dollars), you can restore your faucet to leak-free glory in under an hour. No special tools are typically required beyond basic household items, and the satisfaction of silencing that drip yourself is immense.
The Problem
That rhythmic drip... drip... drip... from your single-handle faucet isn't just an annoyance; it's a constant waste of water and money. A faucet that drips five times a minute wastes over 170 gallons of water a year – enough for over 3,000 drinking glasses! The problem manifests as water slowly but consistently escaping the faucet spout even when the handle is in the 'off' position. Sometimes, the leak might appear around the base of the handle itself, indicating a different, but equally fixable, issue. Ignoring a leaky faucet can lead to visible mineral deposits on the sink or fixture, potential damage to the sink basin, and an unnecessary spike in your water bill. Identifying the specific source of the leak, whether it's coming from the spout or the base, is the first step in diagnosing and successfully repairing the problem.
How It Works
Single-handle faucets operate on a cartridge system, which is a surprisingly elegant piece of engineering. Inside your faucet, a hollow cylinder (the cartridge) contains a series of ports and moving parts, typically ceramic discs or a plastic ball, along with rubber O-rings and spring-loaded seals. When you move the handle, it manipulates this cartridge. For instance, lifting the handle allows water to flow, while rotating it mixes hot and cold water to achieve your desired temperature.
The O-rings are essentially small rubber gaskets that create a watertight seal between different components within the faucet body and around the cartridge. Similarly, spring-loaded seals are strategically placed to ensure a tight fit and prevent water from bypassing the intended flow path when the faucet is closed. Over time, constant exposure to water, fluctuating temperatures, and the mineral content in your water (especially hard water) can cause these rubber or plastic components to degrade. They can harden, crack, or simply lose their elasticity, creating tiny gaps that allow water to seep through, resulting in that irritating drip. The handle itself is often secured by a set screw, which, once removed, allows access to the decorative cap and ultimately the cartridge beneath. Understanding this internal mechanism – how the cartridge controls water flow and how the O-rings and seals maintain watertight integrity – is key to understanding why they are the primary culprits in most single-handle faucet leaks and why their replacement is such an effective fix.
Step-by-Step Fix
1. Shut Off the Water Supply — Always start by turning off the water to the faucet you're working on. Look for two shut-off valves (one for hot, one for cold) under the sink. Turn them clockwise until they are snug. If you can't find them or they don't work, you'll need to turn off the main water supply to your house.
- Safety Note: Open the faucet to drain any residual water from the lines after turning off the supply. This confirms the water is off and prevents unexpected drips during the repair.
2. Cover the Drain — Prevent small parts from disappearing down the drain. Place a towel or a drain stopper in the sink basin.
3. Remove the Handle — Locate the set screw that secures the faucet handle. This is usually on the front, back, or side of the handle, often covered by a decorative cap or a small plastic plug. Use an Allen wrench (hex key) of the appropriate size or a small flathead screwdriver to remove the screw. Then, lift the handle straight up and off.
- Tip: Keep track of all screws and small parts. A magnetic parts tray or even a small cup can be very helpful.
4. Access the Cartridge or Ball Assembly — Once the handle is off, you'll likely see a decorative cap or dome that covers the main faucet body. Unscrew or pry this off carefully. Beneath it, you'll find the main retaining nut or collar that holds the cartridge or ball assembly in place. Use pliers or an adjustable wrench to loosen and remove this nut.
- If this doesn't work: Some older faucets might have a threaded collar that you simply unscrew by hand or with channel locks. Be gentle to avoid scratching the finish.
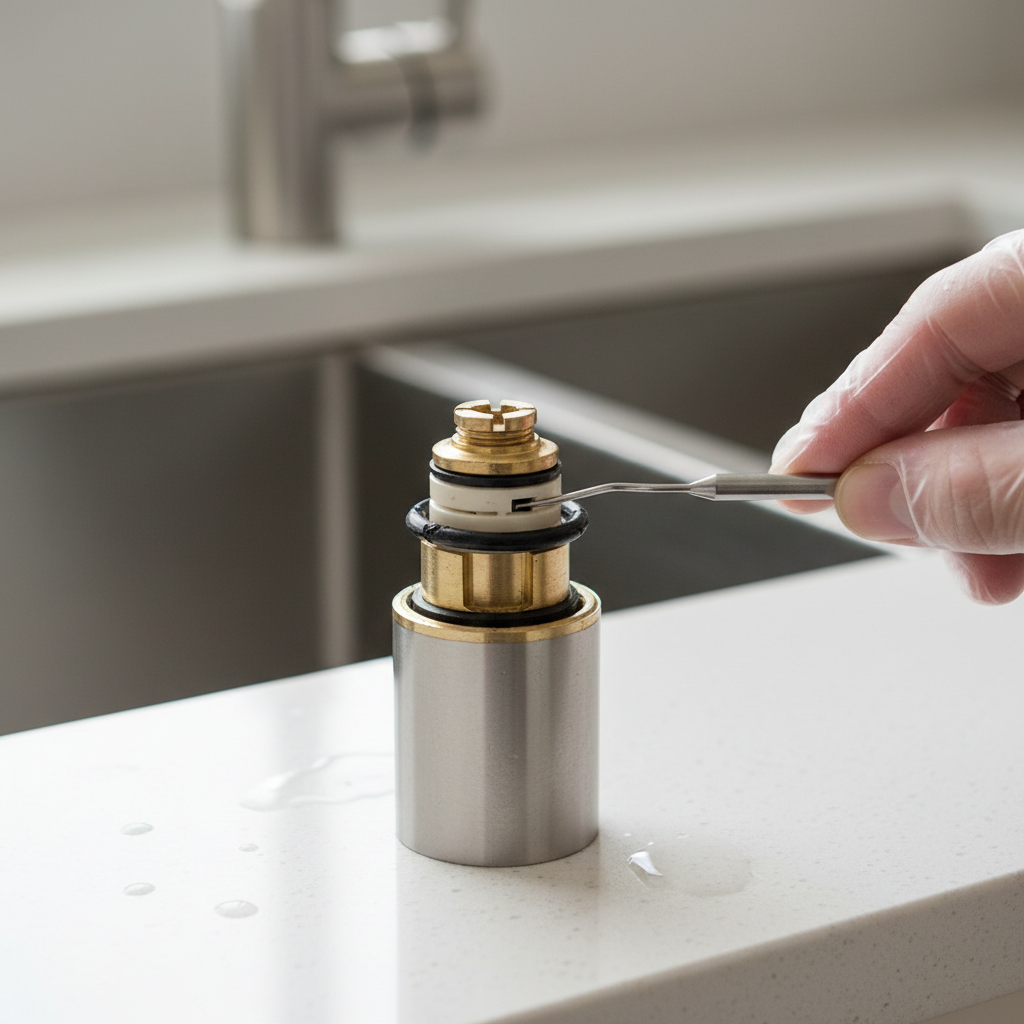
5. Remove the Cartridge or Ball Assembly — Depending on your faucet model, you'll either lift out a cylindrical cartridge or a ball assembly with springs and rubber seals. Gently pull it straight up. Some cartridges might require a slight twist to dislodge them.
- Important: Note the orientation of the cartridge as you remove it; some have specific alignments for reinstallation. If it's a ball assembly, carefully extract the ball, then the small springs and rubber seals from their seats.
6. Inspect and Replace Worn Parts — Examine the removed cartridge or ball assembly. Look for visible cracks, wear, mineral deposits, or hardened O-rings. If you have a cartridge, it's often easiest to replace the entire unit. If you have a ball assembly, the problem is most likely the small rubber O-rings and springs. Carefully pry off the old O-rings from the cartridge or remove the old springs and seals from their seats.
- Material: Take the old parts to a hardware store to ensure you get an exact match. Faucet repair kits are widely available and often include various O-rings, springs, and seals.
7. Install New Parts — Lubricate new O-rings with plumber's silicone grease before installing them onto the cartridge. Ensure they sit snugly in their grooves. If replacing springs and seals, drop a spring into each seat first, then place a new rubber seal on top of each spring.
- Pro Tip: Silicone grease helps create a better seal and makes reassembly smoother. Do NOT use petroleum jelly, which can degrade rubber.
8. Reassemble the Faucet — Place the new or refurbished cartridge/ball assembly back into the faucet body, ensuring it's correctly oriented (if applicable). Tighten the retaining nut or collar securely, but do not overtighten. Replace the decorative cap and then the handle, securing it with the set screw.
9. Restore Water Supply and Test — Slowly turn the hot and cold water supply valves back on under the sink. Check for leaks immediately. Then, turn the faucet on and off several times, testing both hot and cold water, to ensure proper operation and that the drip has stopped.
Common Causes
- Worn O-Rings: These small rubber rings create a watertight seal. Over time, they can dry out, crack, or become compressed, losing their ability to seal effectively.
- Damaged Faucet Cartridge: The cartridge contains the main mixing mechanism. Internal components or the seals within the cartridge itself can wear out, leading to leaks. This is especially true for ceramic disc cartridges.
- Worn Spring-Loaded Seals: In some ball-type faucets, small springs push rubber seals against the rotating ball. These springs can weaken, or the seals can degrade, causing drips.
- Mineral Buildup: Hard water can leave mineral deposits on internal components, interfering with their smooth operation and preventing a complete seal.
- Loose Packing Nuts: While less common in modern single-handle designs, older models might have packing nuts that loosen over time, allowing water to escape from the stem.
Common Mistakes
- Forgetting to Turn Off Water: This is the most common and messiest mistake. Always double-check that the water supply to the faucet is completely off before starting any disassembly.
- Overtightening Components: While you want a snug fit, overtightening screws, nuts, or the cartridge can strip threads, crack plastic parts, or damage the new seals you just installed, leading to more leaks or costly repairs.
- Incorrect Part Replacement: Using the wrong size or type of O-ring, spring, or cartridge will not fix the leak and might even cause new problems. Always take the old parts to the hardware store for an exact match, or consult your faucet's manual.
- Skipping Lubrication: Not lubricating new O-rings with plumber's silicone grease can make them harder to install, cause them to pinch, and potentially lead to premature wear or a less effective seal.
- Losing Small Parts: The tiny set screws, springs, and seals are easy to lose, especially if they fall down the drain. Always cover the drain and keep a dedicated container for small components.
- Ignoring Faucet Brand/Model: While many parts are universal, some cartridges are specific to certain faucet brands and models. Knowing your faucet's make and model can save you a trip to the store and ensure you get the right replacement parts the first time.
Cost & Time Breakdown
| Task | DIY Cost | Pro Cost | Time |
|---|---|---|---|
| Replacement O-rings/Seals | $5–$15 | N/A | 30-60 min |
| Replacement Cartridge | $20–$50 | Incorporated* | 45-90 min |
| Plumber Callout | N/A | $150–$300+ | 1–2 hours |
| Tools (if purchased) | $10–$30 | N/A | One-time |
*Pro cost for parts is incorporated into the overall service fee, rarely itemized separately for small components.
Tips & Prevention
- Identify Your Faucet: Before starting any repair, try to identify the manufacturer and model of your faucet. This information is invaluable for finding the correct replacement parts quickly.
- Keep a Spare Parts Kit: Many hardware stores sell universal faucet repair kits that contain various common O-rings, springs, and seals. Having one on hand can allow for immediate repairs.
- Regular Cleaning: Periodically clean aerators and visible components to prevent mineral buildup, which can sometimes extend the life of internal seals.
- Avoid Harsh Cleaners: abrasive cleaners can damage the finish and potentially degrade external rubber seals over time.
- Don't Overtighten: When turning off water supply valves or reassembling faucet components, tighten only until snug. Overtightening can damage internal seals and connections.
- Watch for Warning Signs: A sudden increase in effort required to turn the handle, a gritty feeling, or a persistent slow drip are all signs that internal components are wearing out and may need attention soon.
When to Call a Professional
While a leaky single-handle faucet is typically a straightforward DIY fix, there are several situations where calling a licensed plumber is the wiser choice. If you've attempted the repair yourself and the leak persists, it could indicate a more complex issue, such as damage to the faucet body itself or an underlying problem with your home's water pressure. Similarly, if the faucet is old or corroded and components are seized, attempting to force them can lead to stripped screws, broken parts, or even damage to your plumbing lines, turning a small drip into a major flood. Any signs of water damage under the sink, persistent low water pressure after the repair, or if the leak seems to be coming from inside the wall, warrant immediate professional attention. Plumbers have specialized tools and expertise to diagnose and repair issues safely and efficiently, ensuring your plumbing system remains intact and leak-free.
Related Articles
Keep troubleshooting with these hand-picked guides from FixlyGuide:
- The 5-Minute Trick to Stop a Dripping Single-Handle Faucet (No Plumber Needed) — A persistent drip from your single-handle faucet is usually caused by a worn-out cartridge, a repair you can typically complete yourself in…
- The 5-Minute Trick to Restore Your Kitchen Sink Sprayer's Lost Pressure — Restore your kitchen sink sprayer's low pressure with a quick, simple trick that often takes less than five minutes and requires no special…
- The $5 Secret to Fixing Your Drip: Why Single-Handle Faucets Leak (and the O-Ring Trick) — A persistent drip from your single-handle faucet is often caused by worn-out O-rings or seals, a common issue with a simple, inexpensive DI…
- The #1 Mistake Homeowners Make When Their AC Drain Clogs (And The $5 Fix) — Discover the most common error homeowners make when tackling a clogged AC drain line and learn a simple, inexpensive solution to prevent co…
- The 3 Hidden Reasons Your Toilet Tank Fills Slowly (And How to Fix Each) — Discover the common culprits behind a slow-filling toilet tank, from crucial valve issues to subtle obstructions, and learn how to restore…
- Is Your Gutter Sagging After Every Storm? The Hidden Flaw Most Homeowners Miss — Discover the overlooked reason your gutters sag after every storm and learn the lasting fix that most homeowners miss.
Frequently asked questions
Why is my single-handle faucet dripping?+
The most common reason for a dripping single-handle faucet is worn-out rubber O-rings, seals, or a damaged internal cartridge. These components degrade over time due to normal wear and tear, mineral buildup, and constant exposure to water, losing their ability to create a watertight seal.
Can I fix a leaky faucet myself?+
Yes, fixing a leaky single-handle faucet is one of the most common and easiest DIY plumbing repairs. With basic tools like an Allen wrench, screwdriver, and pliers, and an inexpensive repair kit, most homeowners can fix a dripping faucet in under an hour.
What tools do I need to fix a leaky faucet?+
You'll typically need an Allen wrench (hex key), a Phillips head or flathead screwdriver, pliers (slip-joint or adjustable), and possibly an adjustable wrench or basin wrench, depending on your faucet model. A flashlight and a small container for parts are also helpful.
How much does it cost to fix a leaky single-handle faucet?+
DIY repair is very inexpensive, usually costing $5 to $50 for replacement O-rings, seals, or a new cartridge. Hiring a professional plumber for this specific issue can range from $150 to $300 or more, primarily for their labor.


Discussion
Loading comments…