Tools & materials you'll need
Affiliate linksAs an Amazon Associate FixlyGuide earns from qualifying purchases — at no extra cost to you. Prices and availability are accurate as of publication and subject to change.
Quick Answer
A smelly compost pile is often a cry for help from your microbial workforce, signaling an imbalance in the essential 'greens' (nitrogen-rich materials like food scraps and grass clippings) and 'browns' (carbon-rich materials like dead leaves and wood chips), insufficient aeration, or excessive moisture. Addressing these issues promptly, often through a combination of turning, adding dry brown materials, and checking moisture levels, can transform a putrid pile into a pleasant, earthy-smelling hub of decomposition within a week.
The Problem
There's nothing quite like the smell of a truly rotten compost pile to sour your gardening enthusiasm. Instead of the rich, earthy aroma of healthy soil, you're met with the reek of ammonia, sulfur (rotten eggs), or general putrefaction. This isn't just unpleasant; it's a clear indicator that your composting process has gone awry. When a compost pile smells bad, it usually means anaerobic decomposition is taking over. This happens when the beneficial, odor-neutralizing aerobic bacteria – the ones that thrive with oxygen – are crowded out by anaerobic bacteria, which flourish in oxygen-deprived, often wet, environments. These anaerobic microbes produce methane, hydrogen sulfide (the rotten egg smell), and ammonia, among other unpleasant gases. If left unaddressed, a smelly pile will decompose very slowly, attract pests, and may not produce the high-quality compost you're aiming for. It's a common issue, even for experienced composters, but fortunately, it's almost always fixable with a few targeted adjustments.
How It Works
Composting is essentially a controlled process of decomposition, orchestrated by a vast community of microorganisms, including bacteria, fungi, and actinomycetes. These microscopic workers break down organic matter into humus, a stable, nutrient-rich soil amendment. For this process to work efficiently and without foul odors, three main elements must be in balance: carbon-to-nitrogen ratio, moisture, and oxygen.
Carbon (Browns) and Nitrogen (Greens): Carbon provides energy for the microbes, while nitrogen is essential for building their proteins and enzymes. An ideal carbon-to-nitrogen (C:N) ratio for composting is generally around 25-30 parts carbon to 1 part nitrogen (25-30:1). 'Brown' materials like dry leaves, wood chips, straw, and shredded paper are rich in carbon. 'Green' materials such as fresh grass clippings, food scraps, coffee grounds, and manures are rich in nitrogen. When the C:N ratio is too high (too many browns), decomposition slows down, as microbes lack enough nitrogen to reproduce rapidly. When the C:N ratio is too low (too many greens), excess nitrogen is converted into ammonia gas, leading to a strong, pungent odor. The microbes literally have more nitrogen than they can use, and it off-gasses.
Moisture: Compost needs to be moist, like a wrung-out sponge. Water is critical for microbial activity, helping to transport nutrients and facilitate chemical reactions. However, too much moisture saturates the air pockets within the pile, displacing oxygen and creating an anaerobic environment, leading to foul odors. Too little moisture slows down decomposition significantly.
Oxygen (Aeration): Aerobic decomposition, the desirable kind, requires plenty of oxygen. Oxygen allows the beneficial microbes to break down organic matter efficiently and without producing noxious gases. Without sufficient oxygen, anaerobic bacteria take over, leading to slow decomposition and the characteristic smells of methane and hydrogen sulfide. Turning the pile regularly introduces oxygen, mixes materials, and helps maintain optimal conditions.
Heat: Heat is a byproduct of microbial activity. A healthy, actively decomposing compost pile will generate heat, especially in its core, reaching temperatures between 130°F and 160°F (55°C to 70°C). This heat helps break down materials faster, kills weed seeds and pathogens, and is another sign of a robust aerobic process. A cold, smelly pile indicates stalled or anaerobic decomposition.
Understanding these basic principles helps diagnose and fix a smelly compost pile. It's not magic; it's microbiology.
Step-by-Step Fix
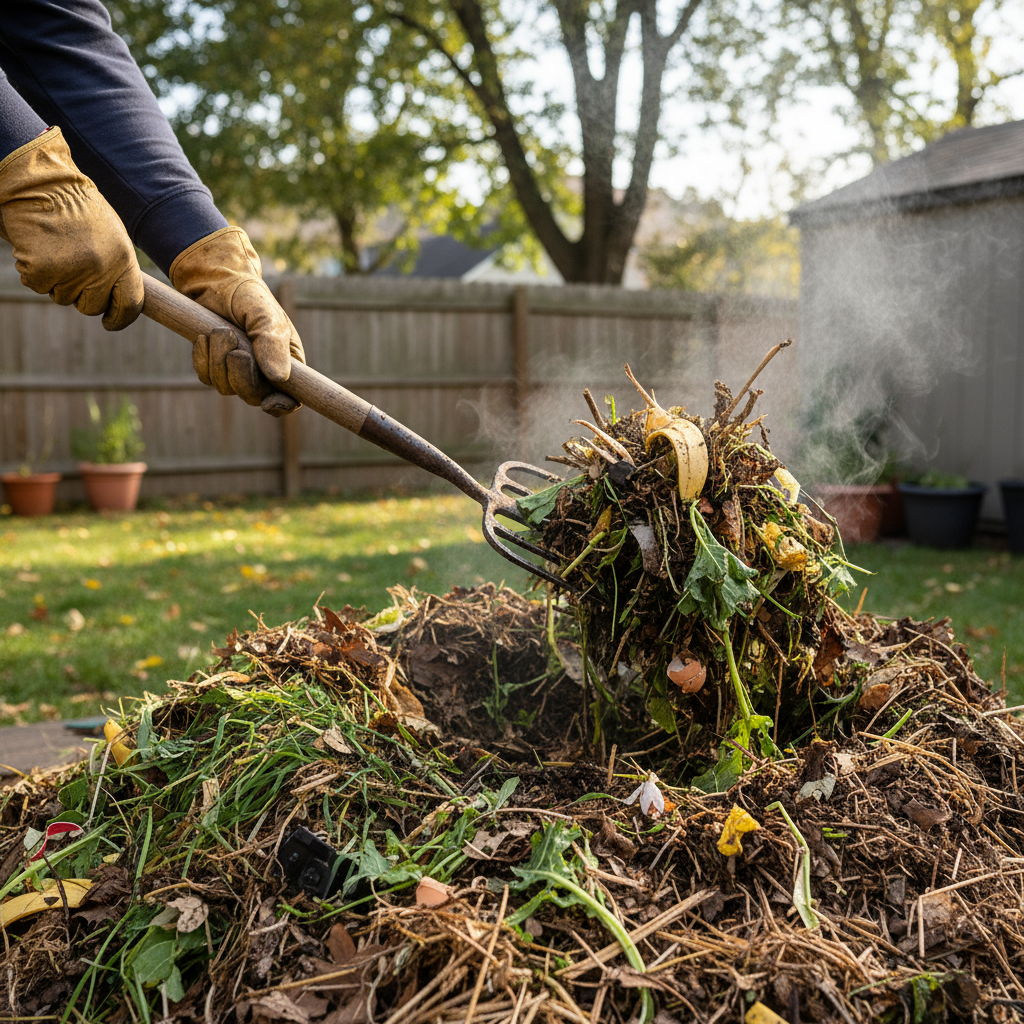
1. Gear Up Safely — Before you dig into a smelly compost pile, protect yourself.
Gather heavy-duty gardening gloves, a pitchfork or compost aerator, a dust mask, and possibly safety glasses. Compost can harbor bacteria and fungi, and an active, smelly pile might release unpleasant gases or dust. Gloves protect your hands from potential irritants and sharp objects, while a mask prevents inhalation of spores or dust. Safety glasses are a good idea if you anticipate a lot of material kicking up.
2. Assess the Odor — Identify the specific smell to pinpoint the problem.
Stick your nose near the pile (but not directly in it, especially if it's very pungent). A strong ammonia smell indicates too much nitrogen ('greens') and insufficient carbon ('browns'). A rotten egg or sulfurous smell points to extreme anaerobic conditions, often due to excessive moisture and lack of oxygen. A general putrid or garbage-like smell also suggests anaerobic activity, likely from an imbalance and compaction. The more precise you are with the smell, the better you can target your fix.
3. Turn the Pile Thoroughly — Introduce oxygen to wake up aerobic microbes.
Use your pitchfork or aerator to turn the entire pile. Aim to move the outer, cooler material to the center and bring the inner, hotter material to the outside. Break up any compacted clumps. This is the single most important step for quickly reviving an anaerobic pile. Turning aerates the material, distributing oxygen throughout, which immediately helps beneficial aerobic bacteria rebound. It also mixes moisture and carbon/nitrogen materials more evenly. Commit to turning the pile completely, ensuring every section gets exposed to air. If you have a compost tumbler, give it 5-10 good rotations.
4. Adjust Moisture Levels — Ensure the pile is like a damp, wrung-out sponge.
As you turn, check the moisture. If it's dripping wet, it's too moist. Add dry, carbon-rich materials like shredded cardboard, newspaper, straw, or sawdust. These 'browns' will absorb excess moisture. If the pile is bone dry, decomposition will stall. Lightly spray with water as you turn until it's consistently damp, but not soggy. The goal is even moisture distribution. For overly wet piles, focus on adding bulking agents that create air pockets while absorbing water. For dry piles, adding water alone might not be enough; consider adding some fresh 'greens' along with the water, as fresh greens have a high water content and can help rehydrate the pile.
5. Add Carbon-Rich 'Browns' (If Ammonia Smell Present) — Balance the C:N ratio to stop nitrogen off-gassing.
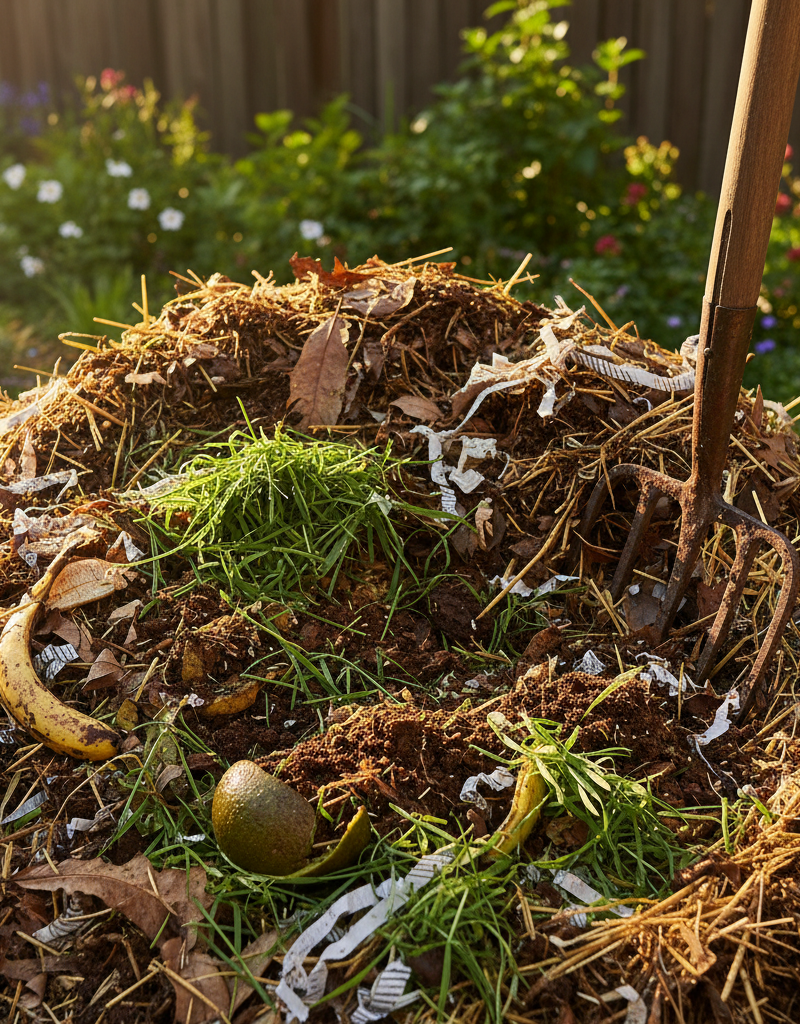
If you detected an ammonia smell, your pile has too much nitrogen and needs a significant infusion of carbon. Good sources include dry leaves, straw, wood chips (untreated), shredded paper (non-glossy, black ink only), cardboard, and sawdust. Add a layer of these materials, about 4-6 inches thick, for every new layer of 'greens' you typically add. Mix them thoroughly into the existing pile as you turn. Aim for a ratio of roughly 2-3 parts browns to 1 part greens by volume for ongoing maintenance or more browns if you're correcting an imbalance.
6. Add Bulking Agents (Especially for Slime or Compaction) — Improve airflow and prevent future anaerobic pockets.
If your pile is particularly slimy, dense, or smells strongly of rotten eggs, it's likely very compacted and lacking structural integrity to hold air. Incorporate coarser 'brown' materials that create larger air pockets, such as wood chips, small branches (shredded or chopped), or even scrunched-up cardboard. These materials prevent the pile from settling into an impenetrable mass, promoting better airflow throughout. This step is crucial for long-term health, as it establishes a robust structure.
7. Monitor and Repeat (The 7-Day Trick) — Consistent attention yields rapid results.
Over the next 7 days, check your compost pile daily. If the smell persists, repeat steps 3-6. You should notice a significant improvement within 2-3 days, with the foul odors diminishing and being replaced by a more earthy scent. For tough cases, a second thorough turning and adjustment on day 3 or 4 can make all the difference. The '7-day trick' isn't just about speed; it's about active management to re-establish a healthy microbial environment. Continue to turn your pile every few days or at least weekly moving forward to prevent recurrence and accelerate decomposition.
Safety Note: Always wear gloves and a dust mask when handling compost, especially a working pile. Wash your hands thoroughly afterward. Avoid composting pet waste, meat, or dairy products in backyard bins, as these can attract pests and harbor pathogens.
Common Causes
- Too Many 'Greens', Not Enough 'Browns': This is the most frequent culprit, leading to an excess of nitrogen and the characteristic ammonia smell. Fresh grass clippings and food scraps, if added in large quantities without balancing browns, will quickly turn putrid.
- Too Much Moisture: A waterlogged pile displaces oxygen, creating anaerobic conditions. This can result from heavy rain, adding very wet materials (like soaked food scraps), or insufficient drainage at the bottom of the bin.
- Lack of Aeration/Turning: Without regular turning, the materials compact, and oxygen cannot penetrate the pile. This smothers aerobic microbes and allows anaerobic ones to thrive, leading to the rotten egg or sulfurous smell.
- Large, Unchopped Materials: Big pieces of organic matter break down slowly. If the pile consists mostly of large items, it creates dense pockets where air circulation is poor, hindering decomposition and causing odors.
- Wrong Materials: Adding materials like meat, dairy, oily foods, or pet waste can attract pests and putrefy quickly, producing very foul odors and drawing unwanted visitors. These should never be added to a home compost pile.
- Pesticide/Herbicide Contamination: While less common, some chemicals present in treated grass or plant matter can harm beneficial microbes, stalling decomposition and potentially leading to unpleasant smells as materials slowly rot.
Common Mistakes
- Ignoring the Smell: Many beginners hope the smell will just go away. It won't without intervention. A bad smell is a diagnostic tool, not just an annoyance.
- Adding Too Many 'Greens' at Once: Dumping a huge batch of fresh grass clippings or kitchen scraps without layering them with browns is almost guaranteed to lead to an ammonia smell and slimy compaction.
- Not Turning Enough: Infrequent turning is the primary cause of anaerobic conditions. Aim for at least once a week, or more frequently if your pile is active and heating up.
- Watering Incorrectly: Either letting the pile dry out completely or drenching it until it's soggy are both detrimental. The 'wrung-out sponge' consistency is key.
- Forgetting Structural Browns: Just adding dry leaves for carbon might not be enough. Incorporate coarser, bulkier browns like wood chips or straw to ensure consistent air channels within the pile.
- Ignoring Particle Size: Throwing in whole vegetable scraps or large branches slows total decomposition and can create problematic anaerobic pockets. Chopping materials into smaller pieces (1-2 inches) dramatically speeds up the process and improves airflow.
- Composting Prohibited Items: Meat, dairy, fats, and pet waste should be avoided in backyard compost piles. They attract pests, smell awful as they break down, and can harbor pathogens that aren't typically killed in home composting temperatures.
Cost & Time Breakdown
| Task | DIY cost | Pro cost | Time |
|---|---|---|---|
| Diagnosing the smell | $0 | N/A | 5–10 minutes |
| Turning the compost pile | $0 | N/A | 20–45 minutes |
| Adding 'brown' materials | $0–$10 | N/A | 10–20 minutes |
| Adjusting moisture | $0 | N/A | 5–15 minutes |
| Ongoing monitoring & turning | $0 | N/A | 10 minutes/day |
| Total initial fix | $0–$10 | N/A | 30–60 minutes |
Tips & Prevention
- Layering is Key: When adding new materials, aim for layers – a thin layer of 'greens' (like kitchen scraps), followed by a thicker layer of 'browns' (like dry leaves or shredded paper). This helps maintain the C:N balance from the start.
- Smaller is Better: Chop or shred all materials into smaller pieces (ideally no more than 1-2 inches). This increases the surface area for microbes to work on, speeding up decomposition and preventing anaerobic pockets.
- Regular Turning Schedule: Aim to turn your compost pile at least once a week. If you have a particularly active, hot pile, you can turn it more frequently. Consistent aeration is your best defense against odors and slow decomposition.
- Maintain Moisture: Periodically check the moisture level of your pile. If it feels dry, lightly water it. If it seems too wet, add more dry 'browns' and turn it thoroughly. The 'wrung-out sponge' test is your guide.
- Bury Food Scraps: Always bury fresh food scraps deep within the pile, covering them with at least 6-8 inches of existing compost or 'brown' materials. This helps deter pests and allows them to be quickly broken down in the hotter, more active core.
- Balanced Inputs: Be mindful of what you're adding. If you generate a lot of grass clippings, collect and store dry leaves in the fall to have on hand as a balancing 'brown' material throughout the year. Avoid dumping large quantities of any single material.
- Use a Compost Thermometer: While not strictly necessary for odor control, a compost thermometer can help you monitor the activity of your pile. A hot, steaming pile indicates healthy aerobic decomposition.
When to Call a Professional
While composting is a highly rewarding DIY activity, there's rarely a scenario where you'd need to call a professional for a smelly compost pile itself. The issues causing odors are almost always related to imbalances that a homeowner can correct with basic tools and knowledge. However, if your composting efforts consistently attract an unusual number of large pests like rats or raccoons that you cannot deter, despite following best practices (burying food scraps, avoiding meat/dairy), you might consider contacting a local pest control service. Additionally, if you're dealing with extensive yard waste and prefer not to compost, a professional junk removal or landscaping service can haul away organic debris (though this misses the benefits of creating your own soil amendment). For general guidance on improving your composting technique, local extension offices or master gardener programs are excellent, free resources, not paid professionals.
Related Articles
Keep troubleshooting with these hand-picked guides from FixlyGuide:
- The 3 Compost Pile Mistakes Even Experienced Gardeners Make — Avoid common pitfalls and build a thriving backyard compost pile with the right mix of greens, browns, and proper aeration for nutrient-ric…
- The 3 Compost Pile Mistakes Sabotaging Your Soil (And How to Fix Them) — Unlock nutrient-rich soil by avoiding common composting errors and learn the simple steps to a thriving backyard compost pile.
- The #1 Mistake Killing Your Compost Pile (and How to Fix It in 10 Minutes) — If your backyard compost pile isn't breaking down, the most common culprit is an imbalance of 'greens' and 'browns,' easily remedied with p…
- The #1 Pruning Mistake Homeowners Make (And How to Fix It) — Learn the most common pruning mistake homeowners make and how to properly prune shrubs for healthier growth and more abundant blooms.
- The #1 Mistake Killing Your Summer Lawn (It's Not What You Think) — Uncover the surprising truth behind your yellow summer lawn and learn how to fix the most common, yet overlooked, culprit: overwatering.
- The 4 Hidden Reasons Your Chimney Leaks in Rain (And the Smart Fixes) — A leaky chimney during rain can hint at several underlying issues, from a faulty chimney cap to damaged flashing, all of which require prom…
Frequently asked questions
Why does my compost pile smell like ammonia?+
An ammonia smell indicates too much nitrogen ('greens') relative to carbon ('browns'). Your microbes have more nitrogen than they can process, and the excess off-gasses as ammonia. To fix it, add plenty of dry, carbon-rich materials like dry leaves, straw, or shredded paper, and turn the pile thoroughly.
Why does my compost pile smell like rotten eggs?+
A rotten egg or sulfurous smell is a clear sign of extreme anaerobic conditions, usually caused by too much moisture and not enough oxygen. The pile is essentially putrefying. Turn the pile immediately and incorporate dry, bulky 'brown' materials like wood chips or straw to absorb excess moisture and create air pockets.
How often should I turn my compost pile to prevent smells?+
For an active pile, aim to turn it at least once a week. If your pile is getting very hot, you can turn it more frequently. Regular turning introduces oxygen, preventing anaerobic conditions and ensuring even decomposition. For a smelly pile, turn it daily for a few days until the odor subsides.
What happens if compost is too wet?+
If compost is too wet, oxygen is displaced from the air pockets within the pile, leading to anaerobic decomposition. This results in foul odors (rotten eggs, putrid smells), slowed decomposition, and can attract pests. To fix it, add dry, carbon-rich 'brown' materials and turn the pile to aerate it.
Can I add just grass clippings to my compost?+
Adding large quantities of only grass clippings is a common mistake that leads to smelly, slimy compost. Grass clippings are very high in nitrogen ('greens') and moisture. They will compact and become anaerobic quickly if not balanced with an equal or greater volume of carbon-rich 'browns' like dry leaves or shredded paper.


Discussion
Loading comments…