
Tools & materials you'll need
Affiliate linksAs an Amazon Associate FixlyGuide earns from qualifying purchases — at no extra cost to you. Prices and availability are accurate as of publication and subject to change.
Quick Answer
To properly caulk a bathtub, you must first completely remove all old caulk and clean the joint with denatured alcohol. The most critical step is to fill the tub with water before applying a 100% silicone sealant; this pre-stresses the joint, preventing future cracks. After tooling the bead for a smooth finish, allow the caulk to cure for at least 24-48 hours before exposing it to water.
The Problem
You see it in almost every bathroom after a few years: the caulk around the bathtub is a cracked, yellowed, grimy mess. Maybe it’s pulling away from the wall, or worse, dotted with stubborn black and pink spots of mold and mildew. This isn't just an eyesore; it’s a critical failure of your bathroom's waterproofing system. That humble bead of caulk is the only barrier preventing hundreds of gallons of water per year from seeping into the gap between your tub and the wall surround.
Once that seal is broken, water inevitably finds its way into the wall cavity. This seemingly small issue quickly escalates into a homeowner's nightmare. Trapped moisture behind your tiles or tub surround creates a perfect breeding ground for a massive, hidden mold colony. This doesn't just impact your air quality; it slowly destroys the structural materials of your home. The wood studs and backerboard begin to rot and weaken, turning to a soft, spongy pulp. You might notice tiles becoming loose or grout cracking elsewhere as the wall loses its integrity. In severe cases, you could see water stains on the ceiling of the room below. What starts as a $10 tube of failing caulk can easily spiral into a multi-thousand-dollar bathroom tear-out, involving mold remediation, structural repairs, and new tile work. Addressing failing bathtub caulk isn't a cosmetic fix; it's essential preventative maintenance to protect your home from catastrophic water damage.
How It Works
To understand how to properly caulk a bathtub, you need to understand what the joint is actually doing. The gap between your tub and the tile wall is not static; it’s a dynamic joint that is constantly in motion. When you fill the tub with hundreds of pounds of water and a person, the tub flexes and settles downward, widening the gap. As temperatures in the bathroom fluctuate, the different materials (acrylic or cast iron tub, ceramic tile, wood studs) expand and contract at different rates. The caulk’s job is to be a flexible, waterproof gasket that can handle all this movement without cracking or pulling away.
This is why material selection is non-negotiable. Cheaper acrylic latex or "tub and tile" caulks are often marketed for bathrooms, but they cure to a relatively hard, rigid state. When the tub moves, they can’t stretch; they simply tear, creating the cracks you see so often. A 100% silicone caulk, however, cures into a durable, rubber-like material that remains permanently flexible, easily handling the joint’s movement for years.
The secret to a long-lasting, crack-free seal lies in applying the caulk when the joint is at its widest point. By filling the tub with water before you caulk, you are simulating the maximum stress the joint will ever be under. The caulk is then applied and cures in this "stretched" state. When you later drain the tub, the joint narrows, and the silicone bead compresses slightly. This is ideal; the caulk is always in a state of rest or compression. Without this step, the caulk is applied in a neutral state. The first time someone takes a bath, the joint widens and puts the new caulk under tension, an unforgiving force that immediately tries to rip it apart, leading to premature failure.
Step-by-Step Fix
1. Gather Your Supplies — Before you start, ensure you have all the necessary tools and materials on hand. Having everything within reach makes the process smoother and prevents you from having to stop mid-task. A complete list is provided in the Tools & Materials section below.
2. Fill the Bathtub Completely — This is the most crucial step for a durable, crack-free seal. Fill the tub to the overflow drain with water. This weight mimics the load of a person taking a bath, causing the tub to settle and widening the gap between the tub deck and wall to its maximum size. You will leave the water in the tub for the entire process, including the initial curing period.
3. Remove the Old Caulk — Using a caulk removal tool or a sharp utility knife, carefully slice through the top and bottom edges of the old caulk bead. Work in sections, pulling out the old caulk with pliers as you go. Be patient and methodical to avoid scratching your tub or tile surfaces.
4. Scrape Away All Residue — After the main bead is gone, a thin, stubborn film of old silicone will remain. Use a razor blade scraper held at a low angle to meticulously scrape this residue off. For acrylic or fiberglass tubs, use a plastic razor blade to prevent scratching the more delicate surface. A clean joint is critical for the new caulk to adhere properly.
5. Deep Clean the Joint with Denatured Alcohol — This step is essential for a waterproof seal. Wipe the entire joint area—both the tub deck and the tile surface—with a clean rag saturated in denatured alcohol. The alcohol removes all soap scum, oils, and mold spores and then evaporates completely, leaving a perfectly clean and dry surface for the new caulk to bond to.
6. Apply Painter's Tape for a Perfect Edge — For a professional-looking finish, place two parallel strips of painter's tape, masking off the joint. Leave a gap of about 1/8-inch to 3/16-inch. This creates a channel for your caulk bead and guarantees perfectly straight, clean lines.
7. Cut and Prepare the Caulk Tube — Using your utility knife, cut the nozzle of your 100% silicone caulk tube at a 45-degree angle. The size of the opening should be just slightly smaller than the taped-off gap you created. Puncture the inner foil seal of the tube using a long nail or the built-in poker on your caulking gun.
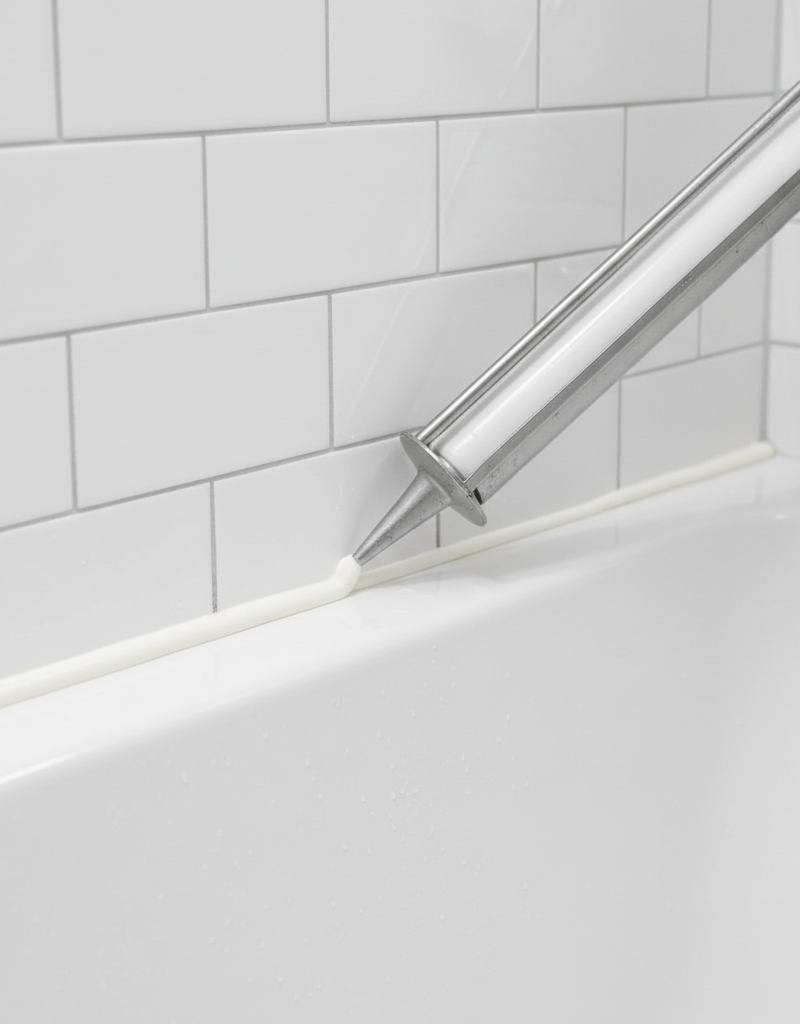
8. Apply the New Silicone Caulk Bead — Insert the tube into the caulking gun. Holding the gun at a 45-degree angle to the joint, apply steady, consistent pressure to the trigger. Move the gun in a smooth "pulling" motion along the entire length of the joint, forcing a uniform bead of caulk into the gap.
9. Tool the Caulk Bead Immediately — As soon as you've laid the bead, "tool" it to create a smooth, concave surface that sheds water. You can use a dedicated caulk finishing tool or your fingertip, dipped in a bit of denatured alcohol to prevent sticking. Press firmly enough to force the silicone into the joint for a complete bond and wipe away the excess on a paper towel.
10. Remove the Painter's Tape — While the caulk is still wet, immediately and carefully remove the painter's tape. Pull the tape slowly, at a 45-degree angle away from the freshly caulked joint. This will leave a razor-sharp, professional-looking edge.
11. CURE! Do Not Touch for 24-48 Hours — Silicone caulk cures by reacting with moisture in the air. This process is not instant. Keep the water in the tub for at least the first 12-24 hours. Do not use the shower or allow any water to touch the new caulk for at least 24 hours, and ideally 48 hours, to ensure it has fully cured into a durable, waterproof seal.
Common Causes of Caulk Failure
- Using the Wrong Caulk: The most common mistake is using acrylic latex caulk. It hardens, becomes brittle, and cannot withstand the natural movement of a bathtub, leading to cracks and seal failure.
- Improper Surface Preparation: Applying new caulk over microscopic soap scum, dirt, or old caulk residue is a recipe for disaster. The new bead cannot form a strong bond and will peel away quickly.
- Applying to a Wet Surface: Any moisture left in the joint will prevent silicone from adhering and get trapped behind the new bead, leading to mold growth from day one.
- Skipping the "Fill the Tub" Step: When you caulk an empty tub, the seal is put under tension the first time someone uses it. This stretching force is the primary cause of premature cracking along the length of the bead.
- Applying Too Little Caulk: A bead that is too thin lacks the body and flexibility needed to absorb movement. It will tear more easily than a properly sized bead.
- Insufficient Curing Time: Exposing new caulk to water before it has fully hardened (a process that can take up to 48 hours) will wash away uncured polymers and compromise the seal's integrity and longevity.
Common Mistakes to Avoid
- Never caulk over old caulk. It seems like a quick fix, but the new bead will not stick to the old, slick surface. It traps moisture and mold underneath and will fail in a matter of weeks. The old layer must be 100% removed.
- Don't cheap out on the caulk. Avoid "painter's caulk" or basic acrylic latex. Spending a few extra dollars on a high-quality, 100% silicone sealant is the best investment you can make for a long-lasting job.
- Forgetting to fill the tub with water first. This is the number one reason new caulk cracks. Simulating the tub's "loaded" state by filling it with water pre-stresses the joint correctly, ensuring the caulk is in compression, not tension, during its life.
- Creating a messy or oversized bead. Using painter's tape is a simple trick that separates amateur results from professional ones. It controls the final size and shape of the bead for a clean look that is easy to tool.
- Rushing the cleaning phase. Soap scum and body oils leave behind a residue that repels silicone. Cleaning with denatured alcohol is a critical, non-negotiable step for ensuring a permanent bond.
- Using the shower too soon. Be patient. Respect the 24-48 hour curing window recommended by the manufacturer. Using the shower early can ruin all your hard work.
Cost & Time Breakdown
| Task | DIY Cost | Pro Cost | Time |
|---|---|---|---|
| Caulk Removal & Cleaning | $10 - $20 | $75 - $125 | 1-2 hours |
| Taping & Masking | $5 - $10 | (Included in labor) | 30 mins |
| Applying New Silicone Caulk | $10 - $15 | $100 - $175 | 30-45 mins |
| Curing Time (Passive) | $0 | $0 | 24-48 hours |
| Total | $25 - $45 | $175 - $300 | 2-3 hours + Curing |
Tips & Prevention
- After every shower, use the bathroom exhaust fan for at least 30 minutes to vent humid air and promote drying.
- Wipe down the caulk line with a squeegee or microfiber towel after use to prevent water from sitting on the bead.
- Clean the caulk regularly (weekly) with a pH-neutral cleaner or a 50/50 vinegar-water solution. Avoid harsh, abrasive chemicals that can degrade the silicone over time.
- Choose a 100% silicone caulk that is specifically labeled as "mold-proof" or "mildew-resistant." These formulas contain biocides (fungicides) that actively inhibit mold and mildew growth.
- When tooling the bead, aim for a slightly concave profile. This shape actively sheds water down into the tub, whereas a flat or convex bead can allow water to pool on its top edge.
- Perform a quick inspection of your bathtub caulk every few months. If you see a tiny pinhole or a small area pulling away, clean it and apply a small touch-up before it becomes a major failure.
When to Call a Professional
While learning to caulk a bathtub is a valuable DIY skill, certain situations warrant calling a professional tile setter or bathroom remodeler. If, while removing the old caulk, you find that the tiles are loose, the wall feels soft or spongy, or the grout is crumbling, these are red flags for a larger, underlying water damage issue. Simply applying new caulk over this problem will only hide it temporarily and allow the damage to worsen.
Furthermore, if you see water stains on the ceiling of the floor below your bathroom, you have an active and significant leak that needs immediate attention. A professional can diagnose the source of the leak, which may be from the plumbing, drain, or a complete failure of the waterproofing system. While the cost is higher—typically $175 to $300 for a standard recaulking job—a pro’s experience ensures a perfect, long-lasting seal and, more importantly, they can identify and address these deeper issues before they lead to a full-blown structural catastrophe that costs thousands to repair.
Related Articles
Keep troubleshooting with these hand-picked guides from FixlyGuide:
- That 'Wet Edge' Trick: Paint a Room in a Single Day — Tired of paint jobs that drag on all weekend? The secret to a flawless, fast finish isn't working harder—it's using the pro 'wet edge' syst…
- That Peeling Caulk Hides a $2,000 Mistake. Here's the Fix. — Stop re-caulking your shower every year. Discover the professional method, from meticulous prep to the right materials, for a waterproof ba…
- Your Deck Stain Is Peeling? The #1 Prep Step DIYers Skip — Tired of watching your hard work flake away? Peeling deck stain is rarely the stain's fault. We reveal the #1 most-skipped prep step that l…
- Your Floating Shelves Sag? The 3 Drywall Mistakes You're Making — Learn how to install floating shelves into drywall securely and prevent common issues like wobbling or damage with the right tools and tech…
- The Giant Drywall Hole: Why Spackle Won't Work (And the Right Way to Fix It) — Don’t reach for spackle or joint compound when facing a large drywall hole; learn the correct reinforcement method for a seamless, lasting…
- The #1 Caulk Mistake That Leads to Mold (And How to Fix It Right) — Discover the most common caulk mistake that causes frustrating mold growth around your bathtub and learn the simple, effective way to recau…
Recommended for DIYers & woodworkers
Sponsored
The Top 20 Tools for Workshops of Any Budget
No stationary machines or power tools required — plus 3 fundamental tools that can't be bought at any price.
Get the free guide
Ted's Woodworking — The #1 Woodworking Resource
Detailed instructions, dimensioned drawings, materials & cutting lists, and 3D schematics for every skill level.
See the plansSponsored: links above are affiliate links. FixlyGuide may earn a commission on qualifying purchases — at no extra cost to you.
Frequently asked questions
How long should bathtub caulk last?+
When done correctly using 100% silicone caulk and the proper preparation method (including filling the tub with water), a new caulk job should last between 5 and 10 years. Cheaper acrylic caulks may fail in as little as one year.
Silicone vs. Latex Caulk: What's the real difference for a tub?+
100% Silicone caulk is the only choice for a bathtub. It is completely waterproof, remains highly flexible to accommodate tub movement, and is inorganic, which helps prevent mold growth. Latex or 'tub & tile' caulk is only water-resistant, cures to a harder, less flexible state, and can degrade and feed mold when exposed to constant moisture.
Can I just put new caulk over old caulk?+
No, you should never apply new caulk over old caulk. The new bead will not adhere to the slick surface of the old caulk, resulting in a weak seal that will fail very quickly. It also traps old mold and moisture, making the problem worse.
Why did my new caulk crack within a month?+
The most common reason for new caulk to crack is that the bathtub was not filled with water before application. When someone gets in the empty tub, the weight causes the joint to expand, putting the new caulk under tension and tearing it. This is why filling the tub is a critical, non-negotiable step.


Discussion
Loading comments…