
Tools & materials you'll need
Affiliate linksAs an Amazon Associate FixlyGuide earns from qualifying purchases — at no extra cost to you. Prices and availability are accurate as of publication and subject to change.
How it works
The joint between a bathtub and its wall surround is a dynamic gap, not a static one. A bathtub, especially when filled with hundreds of pounds of water and an occupant, deflects and settles by a small but meaningful amount. Building materials like wall studs and drywall also expand and contract with seasonal changes in temperature and humidity. Caulk acts as a flexible, waterproof gasket specifically designed to bridge this moving gap and accommodate these subtle shifts.
The primary function of bathtub caulk is to create an impassable, waterproof seal that directs all water from the shower and tub deck back into the basin. Without it, water inevitably finds its way into the wall cavity and subfloor. Modern bathtub sealants are formulated for high performance in this demanding environment. The superior choice is 100% silicone caulk, prized for its exceptional flexibility (allowing it to stretch up to 500% of its original size without tearing), outstanding adhesion to non-porous surfaces like tile and acrylic, and inherent resistance to water and mildew. Its main alternative, acrylic latex caulk with added silicone, is easier to apply and can be painted, but it lacks the long-term flexibility and water-resistance of pure silicone, making it prone to premature cracking and failure in a high-moisture, high-movement joint like a tub surround. A successful caulk job depends on both adhesion (the caulk’s ability to stick to the tub and tile) and cohesion (the caulk’s internal strength to resist splitting).
Step-by-Step Fix
This process requires meticulous attention to detail, especially during preparation. A flawless prep stage is 90% of the job and is the primary difference between a seal that lasts one year and one that lasts a decade. Ensure no one will need to use the shower for at least 48 hours to allow for work and curing time.
1. Gather Tools and Materials — em-dash — Assembling everything first prevents interruptions. You will need a dripless caulk gun, a tube of 100% silicone kitchen and bath caulk with mold inhibitors, a utility knife with fresh blades, a dedicated caulk removal tool (plastic or metal), painter's tape, denatured alcohol, lint-free cloths, a stiff scrub brush, and a vacuum with a crevice tool.
- Safety Gear: Wear safety glasses to protect from flying debris and nitrile gloves to keep silicone and cleaners off your skin. Ensure good ventilation by opening a window or running the exhaust fan.
- Caulk Choice: Select a color that matches your tub and grout. White and translucent are the most common. Do not use acrylic latex or "paintable" caulk for this application.
2. Excise the Old Caulk — em-dash — Using a sharp utility knife, carefully score the top and bottom edges of the old caulk bead. Keep the blade at a low angle to the surface to avoid scratching the tub or tile. Make two or three passes to cut completely through the caulk down to the joint.
- If you're hesitant with a knife: A dedicated caulk removal tool often has guides that help prevent scratches. Use this to hook under the caulk and pull it away from the wall and tub. The goal is to get the bulk of the old bead out in long, continuous strips.
3. Scrape and Vacuum All Residue — em-dash — This is the most critical and tedious step. Use a plastic razor blade or the scraper edge of your caulk tool to methodically scrape away every last bit of remaining silicone residue from the tub deck and tile face. Silicone does not stick to old, cured silicone, so the surfaces must be absolutely pristine.
- Technique: Use short, firm strokes. As residue comes loose, use a vacuum with a crevice tool to suck up the debris immediately so it doesn't get ground back into the joint.
4. Deep Clean and Kill Mildew — em-dash — Once all visible caulk residue is gone, scrub the joint and surrounding surfaces with a stiff brush and a solution of 1 part bleach to 10 parts water, or a commercial mold-killing product. This eliminates any invisible mold spores and soap scum. Let the solution sit for 15 minutes to fully sanitize the area, then rinse thoroughly with clean water and a cloth.
- Ventilation is critical: Bleach fumes are caustic. Ensure your bathroom fan is running and a window is open during this step.
5. Thoroughly Dry the Joint — em-dash — Water is the enemy of adhesion. The joint and surrounding surfaces must be bone-dry before proceeding. First, wipe the area with a dry cloth, then use a hair dryer or a heat gun on its lowest setting, moving it constantly along the joint for 5-10 minutes.
- Be patient: To be absolutely certain the joint is dry, it is best practice to wait at least 4-6 hours, or ideally overnight, before applying new caulk. Any trapped moisture will turn to vapor and cause the new caulk bead to bubble or fail to adhere.
6. Purify Surfaces and Mask the Joint — em-dash — Wipe the joint one last time with a lint-free cloth dampened with denatured alcohol. This removes any final oils, soap films, or fingerprints that could interfere with the silicone's bond and evaporates quickly without leaving a residue. Next, apply high-quality painter's tape to create the exact boundaries for your new caulk bead, leaving a clean 1/8-inch to 3/16-inch gap over the joint.
- Tape Tip: Press the edges of the tape down firmly with a putty knife or your fingernail to prevent any caulk from bleeding underneath. This single step is the key to achieving sharp, professional-looking lines.
7. Fill the Tub (The Pro Tip) — em-dash — Before applying caulk, fill the bathtub about halfway with water. This weight simulates the tub in use, opening the joint to its maximum width. Applying caulk in this state ensures that when the tub is empty, the caulk is in slight compression; when full, it moves to a neutral state or slight tension rather than being over-stretched, which prevents tearing.
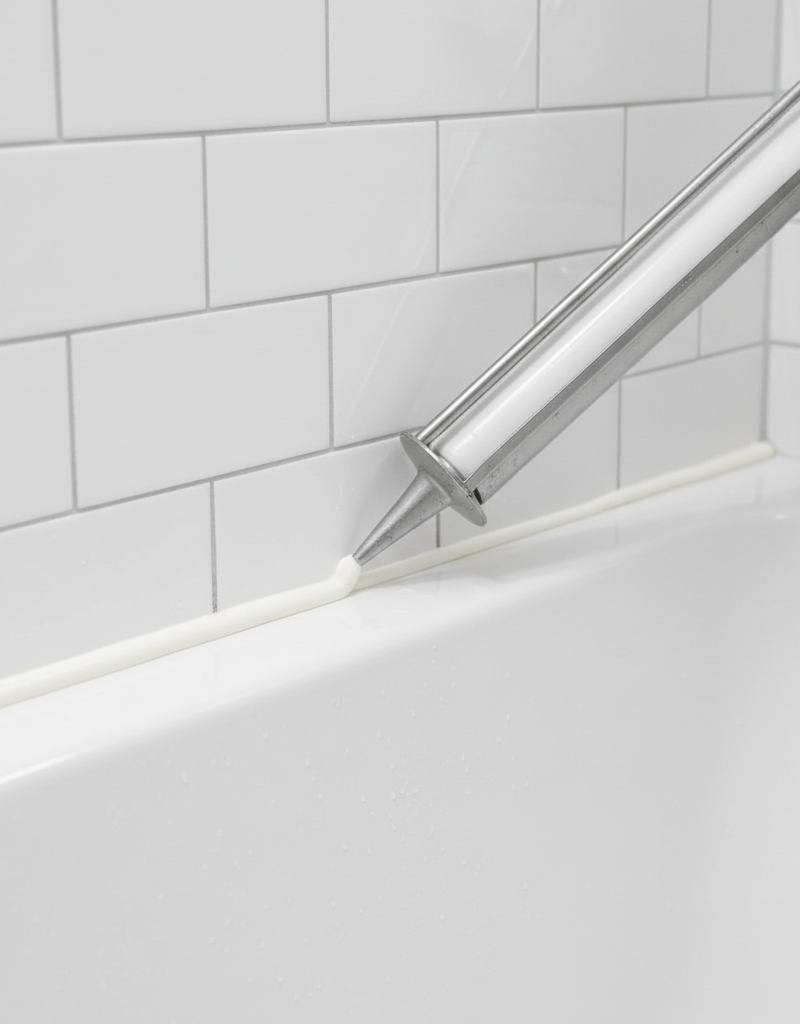
8. Apply the New Silicone Bead — em-dash — Cut the tip of the caulk tube nozzle at a 45-degree angle, creating an opening that matches the width of your taped-off gap. Puncture the tube's inner foil seal, load it into the caulk gun, and apply a small amount of pressure until caulk appears at the tip. Starting in a corner, apply a continuous, even bead by pushing the gun smoothly along the joint, forcing the silicone deep into the gap.
- Pace Yourself: Move at a steady pace, about one foot every 3-5 seconds. It is better to move a little too slow and have excess to tool away than to move too fast and leave voids in the joint.
9. Tool the Bead for a Perfect Seal — em-dash — Immediately after applying the caulk, smooth or "tool" the bead. You can use a dedicated caulk tooling spatula, the back of a small plastic spoon, or a gloved finger dipped in denatured alcohol (not water) to prevent sticking. Press lightly and pull the tool along the bead in one continuous motion, creating a smooth, concave profile that will shed water.
- Function: Tooling forces the silicone into intimate contact with both surfaces for maximum adhesion and removes excess material, creating a clean look. Wipe excess caulk from your tool onto a paper towel between passes.
10. Remove Tape and Let Cure — em-dash — While the caulk is still wet, immediately and carefully remove the painter's tape. Pull the tape up and away from the fresh caulk bead at a 45-degree angle to avoid smudging your perfect line. Now, leave the area completely undisturbed for the manufacturer’s recommended cure time—typically 24 hours before it can tolerate light water contact, and up to 3-7 days for a full, durable cure.
- Final Step: Only after the initial 24-hour cure period is complete should you drain the water from the tub. Do not use the shower or allow any cleaning chemicals to contact the caulk until the full cure time has passed.
Common mistakes
Avoiding these frequent errors is crucial for a durable, long-lasting repair.
- Caulking over old caulk. New silicone will not chemically bond to old, cured silicone. This shortcut guarantees failure. The new bead will peel away within weeks because it has no adhesion to the old, slick surface underneath. You must completely remove every trace of the old material.
- Using the wrong caulk. Applying acrylic latex caulk in a shower is a common mistake. It lacks the flexibility to handle tub movement and will quickly degrade, crack, and become a food source for mildew when exposed to constant moisture. Always use 100% silicone labeled for "Kitchen & Bath" in wet areas.
- Inadequate surface preparation. Skipping the deep cleaning and drying steps is the number one cause of caulk failure. Any soap scum, body oil, mold spore, or microscopic film of moisture left in the joint will act as a bond-breaker, preventing the new silicone from adhering properly.
- Skipping the painter's tape. Many DIYers attempt to freehand the caulk bead, resulting in a wavy, uneven, and unprofessional finish. Taping guarantees a straight, uniform bead of a consistent width (ideally 1/8" to 3/16"), which not only looks better but also performs better.
- Ignoring cure times. Using the shower before the caulk has fully cured will wash out the sealant or compromise its internal structure and adhesive bond. You must enforce a "no-use" period for at least 24-48 hours, and preferably longer, as directed by the manufacturer's instructions.
Cost & time breakdown
Recaulking a bathtub is a high-value DIY project. The primary investment is time and patience, not money. Professional costs reflect the tedious nature of proper preparation.
| Task | DIY Cost | Pro Cost | Time |
|---|---|---|---|
| Tools & Materials | $40 - $75 | (Included in labor) | 30 minutes |
| Old Caulk Removal | $0 | $75 - $150 | 1 - 3 hours |
| Cleaning & Prep | $0 | $50 - $100 | 1 - 2 hours |
| New Caulk Application & Tooling | $0 | $50 - $75 | 30 - 45 minutes |
| Cure Time (inactive period) | $0 | $0 | 24 - 72 hours |
| Total | $40 - $75 | $175 - $325 | Active: 2.5 - 6 hours |
When to call a pro
While recaulking is a manageable DIY job, certain signs indicate a larger problem that requires professional intervention. Stop work and call a plumber or general contractor if you encounter any of the following:
- Damaged Backing Materials: After removing the old caulk, you see that the drywall behind it is soft, swollen, or crumbling, or the grout lines in the tile are disintegrating. This is evidence of a long-term leak that has compromised the wall structure. Patching it with caulk will only hide the rot, which will continue to worsen.
- Soft or Spongy Floor: You notice soft spots in the subfloor next to the bathtub. This is a critical red flag for significant water damage and potential rot in the floor joists, requiring immediate structural assessment and repair.
- Loose Bathtub: The tub itself moves, rocks, or flexes significantly when you push on its edge. A loose tub cannot be effectively sealed with caulk, as the movement will be too great for the bead to handle. The tub must be re-secured to the wall studs, a job that often involves removing tile.
- Extensive Mold Growth: Beyond some surface mildew on the old caulk, you find significant black mold growth on the drywall or wood inside the wall cavity. This poses a health risk and requires professional remediation to safely remove the mold and fix the underlying moisture source.
Prevention & maintenance
A properly executed caulk job can last for many years with simple, routine care. Follow these steps to maximize its lifespan.
- Promote Drying: Always use your bathroom's exhaust fan during and for 20-30 minutes after every shower. This removes humid air, allowing the caulk bead and tile surfaces to dry completely and discouraging mildew growth.
- Gentle Cleaning: Clean the caulk bead weekly using a soft cloth and a pH-neutral cleaner or a simple 50/50 solution of white vinegar and water. Avoid using abrasive powders, stiff brushes, or harsh, bleach-based daily shower sprays, which can chemically degrade silicone over time.
- Annual Inspection: At least once a year, perform a close visual and tactile inspection of the entire caulk line. Look for any pinholes, shrinking, discoloration, or areas where the edge of the bead has begun to pull away from the tub or tile.
- Address Failures Immediately: If you discover a small area of failure, do not ignore it. A tiny gap is all water needs. Cut out a 2-inch section of the compromised caulk, thoroughly clean and dry the area with denatured alcohol, and apply a small patch of new silicone, carefully tooling it to blend with the existing bead.
- Proactive Replacement: Even the best caulk has a limited lifespan, typically 5 to 10 years in a frequently used shower. If the caulk is becoming brittle, discolored, or showing multiple points of failure despite cleaning, plan to replace the entire bead proactively before it leads to a damaging leak.
Related Articles
Keep troubleshooting with these hand-picked guides from FixlyGuide:
- That Musty Smell From Your Fan? It's Not Just Dust — A musty smell from your bathroom fan is a major red flag for hidden mold and mildew growth in the fan housing or ductwork, often caused by…
- That melting ice could cost you $20,000 in water damage — Safely removing ice dams is critical to prevent water from backing up under your shingles and causing catastrophic leaks, rot, and mold inside your attic and walls.
Recommended for DIYers & woodworkers
Sponsored
The Top 20 Tools for Workshops of Any Budget
No stationary machines or power tools required — plus 3 fundamental tools that can't be bought at any price.
Get the free guide
Ted's Woodworking — The #1 Woodworking Resource
Detailed instructions, dimensioned drawings, materials & cutting lists, and 3D schematics for every skill level.
See the plansSponsored: links above are affiliate links. FixlyGuide may earn a commission on qualifying purchases — at no extra cost to you.
Frequently asked questions
How often should I recaulk my bathtub?+
You should typically recaulk your bathtub every 3-5 years, or sooner if you notice visible signs of wear such as cracking, peeling, discoloration, or mildew growth. High-traffic bathrooms or those with poor ventilation may require more frequent recaulking.
What kind of caulk is best for bathtubs?+
For bathtubs, 100% silicone caulk is generally recommended due to its superior flexibility, water resistance, and mildew-inhibiting properties. Acrylic latex caulk with silicone additives is an alternative that's easier to clean up and paintable, but it may not last as long in high-moisture environments.
Do I need to remove all the old caulk?+
Yes, it is crucial to remove all of the old caulk before applying a new bead. Leaving old caulk behind can prevent the new caulk from adhering properly, leading to a weak, leaky seal and potential mold growth underneath the new layer.
How long does bathtub caulk need to dry before use?+
The drying time for bathtub caulk varies by product, but most silicone caulks require at least 12-24 hours before exposure to water. Acrylic latex caulks may cure faster, but always check the manufacturer's instructions for the specific drying and curing times to ensure a lasting seal.


Discussion
Loading comments…