Tools & materials you'll need
Affiliate linksAs an Amazon Associate FixlyGuide earns from qualifying purchases — at no extra cost to you. Prices and availability are accurate as of publication and subject to change.
Quick Answer
When your refrigerator ice maker decides to go on strike, the most common offender is a blockage in the water supply pathway, specifically a frozen fill tube or a completely clogged water filter. These issues prevent water from reaching the ice mold, halting production. A quick troubleshooting process involving a visual inspection of the fill tube for ice blockages and a check of the water filter's age can often pinpoint the problem. Many times, a simple thaw or filter replacement can restore your ice maker to full operation within minutes, saving you the cost and wait of a professional repair.
The Problem
Picture this: a hot summer day, and you reach for a refreshing glass of ice water, only to find your ice maker stubbornly empty. This frustrating scenario is more common than you might think. A defunct ice maker isn't just an inconvenience; it can disrupt daily routines, especially for households that rely on a steady supply of ice for drinks, coolers, or even minor first aid. While the symptoms are clear – no ice, or very little ice – the underlying problem can range from a simple obstruction to a more complex mechanical failure. Ignoring the issue often leads to more extensive repairs down the line, as minor blockages can exacerbate into component damage if left unaddressed. Understanding the mechanisms behind ice production is the first step toward diagnosing and solving this common appliance headache.
How It Works
Your refrigerator's ice maker is a marvel of engineering, a miniature factory designed to reliably deliver ice on demand. The process begins with the water supply line, usually a small copper or plastic tube connected to your home's main water supply. This line typically runs through a water filter, which removes impurities before the water reaches the ice maker.
Once filtered, water enters the fill tube, a narrow conduit that directs a precise amount of water into the ice mold. This mold, usually made of plastic or metal, is located within the freezer compartment. Inside the mold, a heating element briefly warms the mold to loosen the ice cubes, and then a motor-driven ejector arm rotates, scooping the newly formed ice cubes out of the mold and depositing them into the ice bin below.
A crucial component in this cycle is the feeler arm (or an optical sensor in some models). This arm, often a wire or plastic lever, extends into the ice bin. When the ice bin is full, the feeler arm is pushed up, signaling the ice maker to stop production. As ice is used and the level in the bin drops, the feeler arm lowers, initiating a new cycle of water filling, freezing, and ejecting. If any part of this intricate system—from the water supply to the ejector arm—malfunctions, ice production will cease.
Step-by-Step Fix
Safety First — Unplug the Refrigerator
Before attempting any repair, always unplug your refrigerator from the wall outlet. This prevents accidental shocks or damage to the appliance while you're working. Make sure the refrigerator is completely de-energized.
Check Water Supply & Shut-Off Valve — Ensure Water is Flowing
Locate the water supply line behind your refrigerator. It's usually a thin plastic or copper tube. Follow it back to the shut-off valve, which is often under the sink or behind the refrigerator itself. Ensure the valve is fully open. If the valve is closed or partially closed, sufficient water won't reach the ice maker. Check for any kinks or damage in the supply line itself that could restrict water flow.
Inspect the Water Filter — Is it Clogged or Expired?
The refrigerator's water filter is a common culprit. If it's old, clogged, or not seated correctly, it will restrict water flow. Locate your filter (often inside the fridge compartment, in the grille at the bottom, or behind the fridge). Remove it and visually inspect it. Most manufacturers recommend replacing filters every six months. If your filter is expired or looks discolored, try replacing it. Some refrigerators have a bypass plug if you want to test the ice maker without the filter. If replacing the filter doesn't work, proceed to the next step.
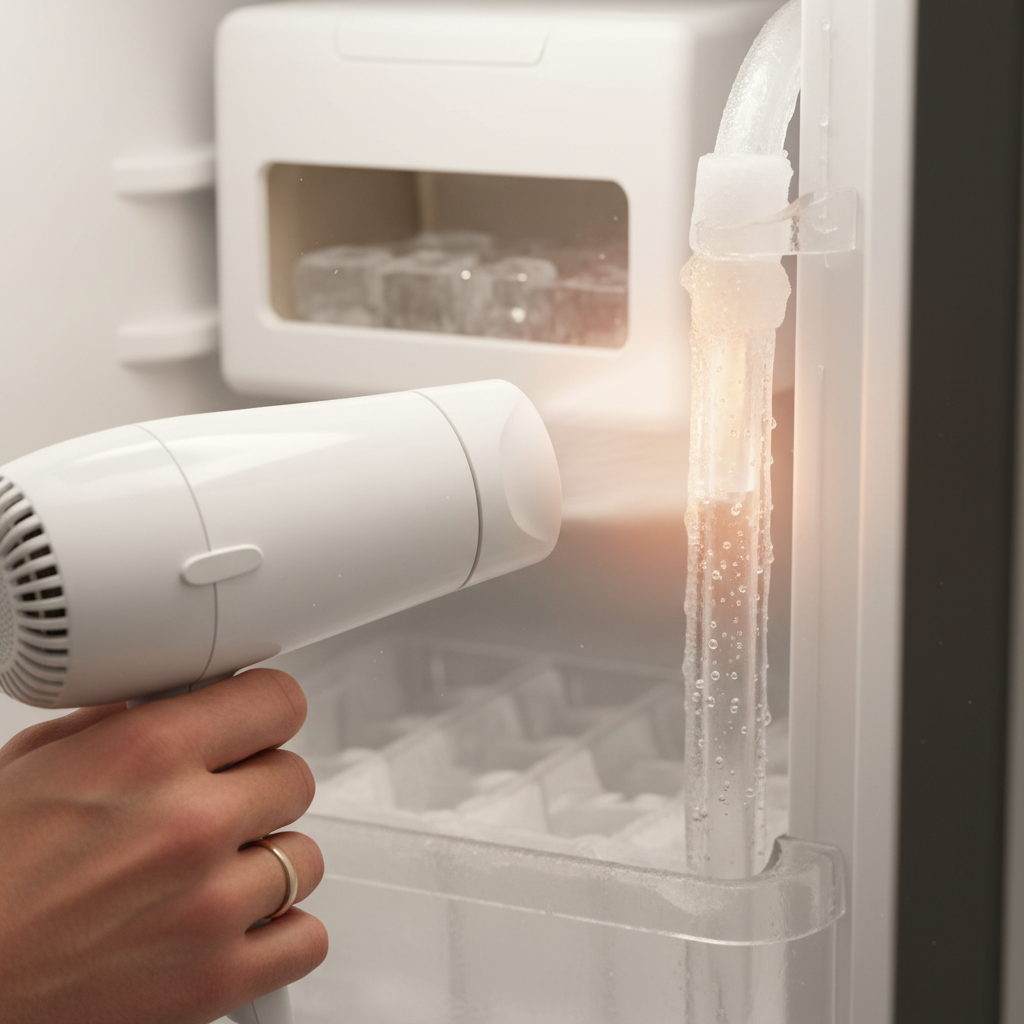
Identify and Thaw a Frozen Fill Tube — The Most Common Problem
This is the most frequent cause of ice maker failure. Open your freezer door and locate the fill tube, a small plastic or rubber tube that delivers water to the ice maker mold. It's typically above or slightly behind the ice maker unit. Look for any visible ice blockage within or around the tube. If you see ice, you'll need to thaw it. You can use a hairdryer on a low setting (keep it moving to prevent overheating plastic), a warm, damp cloth, or even a turkey baster filled with warm water to gently melt the ice. Place a towel below to catch any drips. Be patient and thorough; ensure all ice is melted.
Examine the Ice Maker Feeler Arm/Sensor — Is it Stuck?
The feeler arm, a metal wire or plastic lever, tells the ice maker if the bin is full. If it's stuck in the 'up' position (indicating a full bin), the ice maker won't produce ice. Gently lower it to ensure it moves freely. If your model uses an optical sensor (two small infrared lights on either side of the ice maker), ensure they are clean and unobstructed by ice or debris. Clean them with a cotton swab.
Check the Ice Ejector Mechanism — Free Movement is Key
Inspect the ejector arms (the arms that push ice out of the mold). Sometimes, old ice cubes or debris can jam them. Manually rotate the ejector arms (if possible, usually by pressing a test button or slowly rotating the gear if the unit is unplugged) to ensure they move freely without obstruction. If there's a jam, carefully remove the obstruction. Some models have a reset button on the ice maker unit itself—consult your owner's manual for its location and how to use it.
Inspect Water Inlet Valve — A Less Common but Possible Culprit
The water inlet valve, usually located on the back of the refrigerator where the main water line connects, controls the flow of water into the fill tube. If you've checked everything else and still have no water, this valve might be faulty. With the refrigerator still unplugged, visually inspect the valve for any signs of damage or leaks. If you're comfortable with electrical testing and have a multimeter, you can test for continuity across the solenoid coils (consult your specific fridge model's service manual for correct readings). This step often requires basic electrical knowledge; if unsure, call a professional.
Perform an Ice Maker Reset — Sometimes All It Needs
Many ice makers have a reset function. This can vary by model. Some units have a red reset button on the side or bottom of the ice maker assembly. Others may require unplugging the fridge for 5-10 minutes and then plugging it back in. Refer to your owner's manual for the specific reset procedure for your model. After a reset, it may take several hours for the ice maker to produce its first batch of ice.
Common Causes
- Frozen Water Fill Tube: This is by far the most common cause. A small amount of water can freeze in the tube, creating a blockage that prevents subsequent water from reaching the mold.
- Clogged Water Filter: An old, dirty, or incorrectly installed water filter restricts water flow to the ice maker, just like a blocked artery.
- Kinked Water Supply Line: The flexible line supplying water to the fridge can become kinked, especially if the refrigerator is pushed too close to the wall or moved incorrectly.
- Faulty Water Inlet Valve: This electromagnetic valve opens to allow water into the ice maker. If it fails, water won't flow.
- Malfunctioning Feeler Arm/Optical Sensor: If the ice level sensor is stuck in the 'full' position or obstructed, the ice maker won't produce more ice.
- Ice Maker Module Failure: Less common, but the electronic or mechanical components within the ice maker assembly itself can fail, requiring replacement of the entire module.
Common Mistakes
- Forgetting to Check the Shut-Off Valve: Many homeowners overlook this simple step, assuming water is flowing, when the valve behind the fridge or under the sink is actually closed.
- Ignoring the Water Filter's Age: Believing a water filter lasts indefinitely is a common error. Filters have a limited lifespan and efficiency, typically 6 months. An overdue filter is a slow death for your ice maker.
- Aggressive Thawing Methods: Using sharp objects or excessive heat to thaw a frozen fill tube can puncture the tube or melt plastic components, leading to leaks and greater damage.
- Not Unplugging the Refrigerator: Attempting repairs or even simple inspections without unplugging the appliance is a significant safety hazard and can damage sensitive electronic components.
- Assuming Mechanical Failure Too Soon: Many people jump to the conclusion that the ice maker unit itself is broken before checking the water supply, filter, or fill tube, which are far more common and easier fixes.
- Overlooking a Full Ice Bin/Stuck Feeler Arm: Sometimes the simplest explanation is the right one—the ice maker stopped because it thought the bin was full, either due to actual fullness or a stuck sensor.
Cost & Time Breakdown
| Task | DIY Cost | Pro Cost | Time |
|---|---|---|---|
| Thaw Frozen Fill Tube | $0 | $75–$150 | 15–30 minutes |
| Replace Water Filter | $20–$50 | $100–$180 | 5–10 minutes |
| Check/Clear Water Line Kink | $0 | $75–$150 | 5–15 minutes |
| Replace Water Inlet Valve | $30–$80 | $150–$300 | 30–60 minutes |
| Replace Ice Maker Module | $80–$200 | $200–$400 | 30–90 minutes |
Tips & Prevention
- Regular Filter Replacement: Mark your calendar to replace the water filter every 4-6 months, or as recommended by the manufacturer. This is the single best preventative measure.
- Proper Refrigerator Placement: Ensure your refrigerator isn't pushed too tightly against the wall, which can kink the water supply line. Leave a few inches of clearance.
- Monitor Ice Production: Pay attention to reduced ice production. It's often an early warning sign of an impending issue like a partially clogged filter or forming ice blockage in the fill tube.
- Seasonal Thaw: If you live in an area with high humidity, consider a proactive minor thaw of your fill tube once a year, particularly before the hottest months, to prevent buildup.
- Use the Ice Maker: Regular use prevents ice from clumping in the bin and ensures the ejector mechanism stays active. Don't let the bin sit full and unused for long periods.
When to Call a Professional
While many ice maker issues are manageable for a DIY enthusiast, there are clear indicators when it's time to call in a licensed appliance repair technician. If you've methodically worked through all the troubleshooting steps outlined above—checking the water supply, filter, fill tube, and feeler arm—and your ice maker still isn't producing, the problem likely lies with internal electrical components, the water inlet valve requiring electrical testing, or a complete failure of the ice maker module itself. If you're uncomfortable dealing with specific electrical tests (such as checking voltage to a water inlet valve solenoid) or disassembling the freezer interior to access the ice maker unit, it's always best to defer to an expert. Additionally, any persistent leaks after your troubleshooting attempts warrant professional attention, as water damage can quickly escalate. A professional has the specialized tools, diagnostic equipment, and experience to efficiently identify and rectify more complex electrical or mechanical faults, ensuring a safe and lasting repair without risking further damage to your appliance or home.
Related Articles
Keep troubleshooting with these hand-picked guides from FixlyGuide:
- The #1 Mistake Homeowners Make When Their Ice Maker Stops (And the Easy Fix) — Is your refrigerator ice maker on strike? Often, a simple oversight or minor clog is the culprit, easily fixable with basic tools.
- The Silent Killer of Your Ice Maker: Why Most Homeowners Miss This Easy Fix — A non-functioning ice maker is a common refrigerator issue, often due to a clogged water line or a faulty fill valve, which homeowners can…
- The #1 Reason Your Ice Maker Stopped (It's Not Clogged!) — Discover the most overlooked culprit behind a non-working ice maker and how a simple fix can restore fresh ice to your freezer.
- The #1 Mistake Homeowners Make When Their Dryer Stops Drying (And How to Fix It Free) — If your dryer is taking too long to dry clothes, the most common culprit is a clogged vent, which can be easily fixed with simple tools.
- The #1 Mistake Homeowners Make When Their Ice Maker Stops (And the Easy Fix) — Before you call for service, learn the most common and easily fixable reason your refrigerator's ice maker isn't producing ice.
- The Secret Culprit Behind Your Leaky Refrigerator (It’s Not Always a Hose) — Discover the hidden causes of your refrigerator leaking water and how to fix them with our comprehensive troubleshooting guide.
Frequently asked questions
How do I reset my refrigerator ice maker?+
The most common way to reset a refrigerator ice maker is to unplug the refrigerator for 5-10 minutes, then plug it back in. Some models also have a small red 'reset' button on the ice maker assembly itself; consult your owner's manual for specific instructions for your model.
Why is there no water going to my ice maker?+
No water flow to your ice maker usually points to a few common issues: a closed or kinked water supply line, a clogged or expired water filter, a frozen water fill tube, or a faulty water inlet valve on the back of the refrigerator.
How often should I change my refrigerator's water filter?+
Most refrigerator manufacturers recommend changing the water filter every six months. If you notice a decrease in water pressure or ice production before then, it might be a sign to replace it sooner.


Discussion
Loading comments…