
Tools & materials you'll need
Affiliate linksAs an Amazon Associate FixlyGuide earns from qualifying purchases — at no extra cost to you. Prices and availability are accurate as of publication and subject to change.
Quick Answer
Baseboards separating from the wall are a common aesthetic issue in many homes, often caused by the natural expansion and contraction of wood due to humidity changes, the settling of the house's foundation, or original improper installation techniques. The good news is that for most cases, this issue is a straightforward DIY repair. You can typically resecure the baseboards using a combination of finish nails, strong construction adhesive, or strategically placed shims, followed by recaulking to seal any visible gaps and provide a clean, finished appearance. Understanding the underlying cause will help you choose the most effective and long-lasting solution.
The Problem
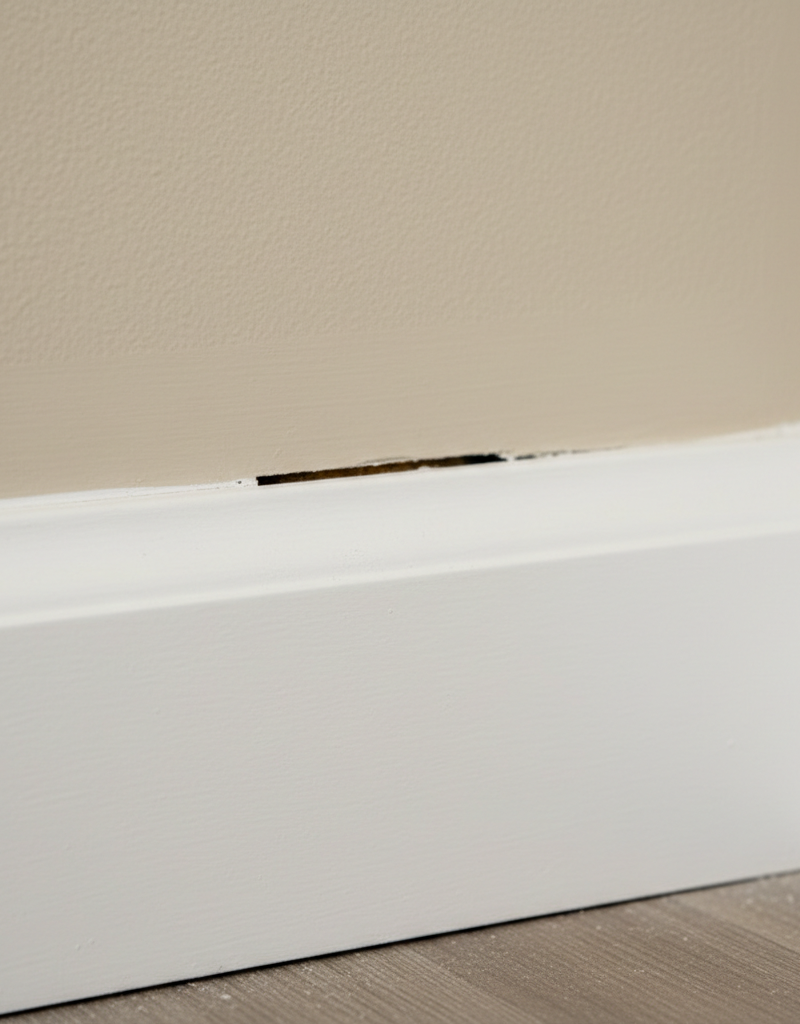
There's nothing quite like a clean, crisp line where your walls meet your floors. So, when your baseboards start to pull away, creating unsightly gaps, it can ruin the aesthetic of an otherwise well-maintained room. These gaps aren't just an eyesore; they can also allow drafts, dust, and insects into your living space, making your home feel less comfortable and less clean. This common home repair issue can manifest in various ways: a small crack appearing between the top edge of the baseboard and the wall, the entire length of a section bowing outward, or even corners pulling apart at mitered joints. While it might seem like a significant structural problem, more often than not, it's a superficial concern that a homeowner can tackle with basic tools and a bit of know-how. Ignoring these gaps can lead to them worsening over time, potentially requiring more extensive repairs down the line.
How It Works
To understand why baseboards separate, it’s helpful to think about the natural movement within a house. Your home isn't a static structure; it's constantly responding to environmental factors. The primary culprit is often wood movement. Baseboards, typically made of wood or MDF (medium-density fiberboard), are hygroscopic, meaning they absorb and release moisture from the air. In summer, with higher humidity, they swell slightly. In winter, with drier air (especially with heating systems running), they contract. This continuous cycle of expansion and contraction can slowly work nails loose or pull the baseboard away from the wall. Imagine a piece of wood gently expanding and pushing against a nail, then contracting and pulling away from it, repeatedly over years. Eventually, the nail loses its grip.
Another major factor is house settling. All homes settle over time, especially newer constructions. As the foundation shifts incrementally, walls can move slightly, and the framing behind the drywall can flex. Since baseboards are anchored to the wall studs (or sometimes just the drywall), these subtle movements can cause the trim to detach. Similarly, poor original installation can be a factor. If the baseboards weren't securely nailed into studs or if an insufficient amount of adhesive was used, they are more prone to separating. Sometimes, the nails might have missed the stud entirely, only penetrating the drywall, which offers very little holding power. Understanding these forces helps you choose the right repair method – one that accounts for movement and ensures a secure, lasting fix.
Step-by-Step Fix
Here’s how to bring those rogue baseboards back into line and restore a seamless look to your rooms.
1. Assess the Damage and Underlying Cause — Identify why your baseboard is separating.
Before you start, gently push on the baseboard in different spots. Is it loose along its entire length, or just in specific sections? Can you see old nail holes that are now empty? Does the gap appear only at the top, or is the entire board bowing? This assessment will guide your repair strategy. A small, consistent gap might only need caulk, while a large, bowed section will require reattachment.
2. Prepare the Area — Clean the wall and baseboard for better adhesion.
Use a putty knife to carefully remove any old caulk or paint in the gap between the baseboard and the wall. A utility knife can help score stubborn caulk. Then, wipe down both the wall and the baseboard with a damp cloth to remove any dust, dirt, or grease. Allow the surfaces to dry completely. Good preparation ensures your new caulk or adhesive will bond properly.
3. Re-secure with Finish Nails — For sections that are loose but not significantly bowed.
If the baseboard is only slightly loose and you can push it back against the wall without much effort, use a nail gun or hammer and 1.5-inch to 2-inch 18-gauge or 16-gauge finish nails. Aim to drive nails into studs, which are typically 16 or 24 inches on center. Use a stud finder to locate them. If no stud is available, angle two nails (a technique called 'toenailing') into the drywall at slight opposing angles to create a stronger hold. Sink the nail heads slightly below the surface using a nail set.
- Safety Note: Always wear safety glasses when using a hammer or nail gun.
- If this doesn't work: If the baseboard still feels loose or pulls away easily, you might need to use construction adhesive in addition to nails, or consider shimming.
4. Re-secure with Construction Adhesive — For longer sections or areas without studs.
For sections that are very loose or where you can't easily hit a stud, construction adhesive is your best friend. Apply a continuous bead of high-quality construction adhesive (designed for trim or subflooring) to the back of the baseboard where it will meet the wall. Press the baseboard firmly against the wall. You may need to use painter's tape or temporary braces to hold it in place while the adhesive cures (check product instructions for specific curing times, typically 24-48 hours).
- Tip: Don't use too much adhesive, as it can squeeze out and create a mess. A bead about 1/4-inch thick is usually sufficient.
5. Address Bowed Sections with Shims and Nails/Adhesive — For baseboards that have significantly pulled away and created a substantial gap.
If a section of baseboard has significantly bowed outward, creating a gap too large for simple nailing or adhesive, you'll need to use shims. Gently pull the bowed section away slightly, insert thin wood shims (door/window shims work well) into the gap behind the baseboard, positioning them to push the baseboard flush against the wall. Once the baseboard is flush, you can then nail through the baseboard and shim into the stud (if available) or use construction adhesive. Trim any excess shim material flush with the top of the baseboard using a utility knife before nailing or gluing.
6. Fill Nail Holes and Gaps (If Necessary) — Create a smooth, seamless surface.
Once the baseboards are securely reattached, use a small amount of spackle or wood putty to fill any nail holes you created. For mitered corners that have separated, you can also fill these with wood putty. Allow the putty to dry completely, then lightly sand smooth with fine-grit sandpaper (180-220 grit). Wipe away any sanding dust.
7. Caulk the Top Edge — Seal the final gap for a professional finish.
Apply a thin, even bead of paintable acrylic latex caulk with silicone to the seam where the top edge of the baseboard meets the wall. Use a caulk gun with a steady hand. Immediately after applying, run a wet finger or a caulk tool along the bead to smooth it out and wipe away any excess. This creates a clean, sealed line and prevents future dust and drafts.
- Safety Note: Always ensure good ventilation when working with caulk and adhesives.
8. Paint (Optional) — Blend the repair seamlessly with your decor.
If you've used caulk, spackle, or wood putty, you'll likely need to paint over these areas to match your existing baseboard and wall color. Mask off the floor with painter's tape to protect it. Apply one or two thin coats of paint, allowing adequate drying time between coats.
Common Causes
- Seasonal Wood Movement: As discussed, the natural expansion and contraction of wood and MDF baseboards due to humidity changes is the leading cause. This constant movement slowly loosens fasteners over time.
- House Settling: Foundation movement, especially in new homes or areas with unstable soil, can cause walls to shift slightly, pulling baseboards away.
- Improper Installation: If baseboards were only nailed into drywall without hitting studs, or if insufficient nails/adhesive were used, they lack the necessary holding power from the start.
- Incorrect Nail Placement: Nailing too close to the edge of the baseboard or at an incorrect angle can lead to the wood splitting or the nail failing to hold securely.
- Water Damage/Moisture Issues: While less common for separation from the wall (it usually causes swelling or warping), prolonged moisture exposure can weaken the wood and fasteners. Check for leaks if separation is accompanied by discoloration or softness.
- Temperature Fluctuations: Extreme temperature swings, particularly in unheated or poorly insulated rooms, can exacerbate the expansion and contraction cycle.
Common Mistakes
- Not Cleaning the Surface: Applying caulk or adhesive over dusty or greasy surfaces will result in poor adhesion and a repair that won't last. Always clean thoroughly.
- Using the Wrong Caulk: Standard painter's caulk works fine for interiors, but using a non-paintable silicone caulk when you intend to paint will create issues. Conversely, using a caulk without any flexibility on a moving joint will lead to it cracking again quickly. Choose a paintable acrylic latex caulk with silicone for flexibility.
- Missing the Studs: Nailing only into drywall provides very little holding power. Always use a stud finder and aim for those solid wood studs for the most secure attachment. If no stud is available, toenail or rely more heavily on construction adhesive.
- Over-applying Caulk/Adhesive: Too much caulk creates a messy, amateurish look. Too much adhesive can squeeze out and be difficult to clean, potentially damaging wall or floor finishes. Use it sparingly and cleanly.
- Not Using a Nail Set: Failing to sink nail heads below the surface means they'll be visible and catch on cleaning cloths, and they make painting difficult. Always use a nail set for a professional finish.
- Ignoring the Underlying Cause: Simply recaulking a severely bowed baseboard without resecuring it will only be a temporary fix. Address the root cause of the separation for a lasting repair.
Cost & Time Breakdown
| Task | DIY Cost | Pro Cost | Time |
|---|---|---|---|
| Materials (Caulk, Putty, Nails) | $15–$30 | N/A | 15–30 minutes |
| Tools (Nail Gun, Caulk Gun) | $0–$100 (if buying) | N/A | 5–10 minutes |
| Labor (prep, reattach, caulk) | $0 | $75–$150/hour (min. 2 hrs) | 1–2 hours per room |
| Painting Touch-up (optional) | $5–$10 | Included with labor | 30–60 minutes |
Tips & Prevention
- Maintain Stable Humidity: Using a humidifier in dry winter months and a dehumidifier in humid summer months can significantly reduce wood movement and prevent baseboard separation. Aim for 35-55% relative humidity indoors.
- Proper Nailing during Installation: When installing new baseboards, ensure nails are driven into studs whenever possible. Use long enough nails (at least 1.5 inches) and angle them slightly for increased holding power.
- Use Construction Adhesive: For long-term stability, apply a thin bead of construction adhesive to the back of the baseboard in addition to nails during initial installation.
- Regular Inspections: Periodically walk through your home and check baseboards, especially during seasonal changes. Catching small separations early makes them much easier to fix.
- Mind the Gap (Caulk): Fresh caulk every few years not only looks good but also provides a flexible seal that can absorb minor movements without separating.
When to Call a Professional
While most baseboard separation issues are DIY-friendly, there are certain situations where calling a professional is wise. If you notice severe or widespread separation throughout your entire home, especially if accompanied by other signs like cracked drywall, sticking doors or windows, or sloping floors, this could indicate a more serious foundation issue. A structural engineer or foundation repair specialist would be needed to assess and address the underlying problem. Similarly, if the baseboards are separating due to significant water damage, such as from a burst pipe or prolonged leak, you'll want to address the water source and potential mold issues with a plumber or restoration specialist before attempting cosmetic repairs. A handyman or trim carpenter is an excellent choice if you have extensive baseboard separation in many rooms and lack the time or inclination to tackle it yourself, particularly if precise miter cuts at corners are involved. They can resecure and caulk the trim efficiently and professionally, ensuring a top-quality finish without the headache of a full structural evaluation.
Related Articles
Keep troubleshooting with these hand-picked guides from FixlyGuide:
- The 3 Hidden Reasons Your Baseboards Are Pulling Away (And How to Fix It FAST) — Don't ignore separating baseboards—they’re not just an eyesore. Learn the surprising culprits behind the gaps and how to permanently fix th…
- The 3 Hidden Reasons Your Baseboards Are Pulling Away (And How to Fix It Right) — Don’t just nail it back! Discover the real reasons your baseboards are separating from the wall and how to achieve a lasting repair.
- The #1 Mistake When Fixing Baseboards That Pull Away From Walls — Discover the crucial mistake homeowners make when reattaching baseboards and how to properly secure them for a lasting fix.
- The Tiny Gap Behind Your Baseboards That Costs You $100s in Drafts — Discover why your baseboards are pulling away from the wall and the simple, inexpensive fixes that can seal drafts and improve your home's…
- The #1 Mistake Homeowners Make When Spotting Soffit Damage — Ignoring early signs of soffit and fascia damage can lead to costly structural issues. Learn to identify and fix common problems the right…
- The #1 Mistake Homeowners Make After Finding Missing Shingles (And How to Fix It Right) — Discover the crucial steps to take after a storm rips shingles from your roof, ensuring a proper, lasting repair and preventing costly futu…
Recommended for DIYers & woodworkers
Sponsored
The Top 20 Tools for Workshops of Any Budget
No stationary machines or power tools required — plus 3 fundamental tools that can't be bought at any price.
Get the free guide
Ted's Woodworking — The #1 Woodworking Resource
Detailed instructions, dimensioned drawings, materials & cutting lists, and 3D schematics for every skill level.
See the plansSponsored: links above are affiliate links. FixlyGuide may earn a commission on qualifying purchases — at no extra cost to you.
Frequently asked questions
Why do my baseboards keep pulling away from the wall?+
Baseboards typically pull away due to the natural expansion and contraction of wood with changes in humidity, the settling of your house's foundation, or if they were not securely installed initially. This constant movement can loosen fasteners over time.
What's the best way to reattach loose baseboards?+
For slightly loose sections, use 1.5-2 inch finish nails driven into wall studs. For larger gaps or areas without studs, apply a strong construction adhesive to the back of the baseboard, pressing it firmly against the wall and using temporary braces until it cures. Finishing with caulk seals the gap.
Can I just caulk the gap without reattaching the baseboard?+
While caulking can temporarily hide small, minor gaps, it's not a lasting solution for significantly separated or loose baseboards. If the baseboard still moves, the caulk will likely crack and separate again quickly. Always resecure the baseboard first for a durable repair.
What tools do I need to fix separating baseboards?+
You'll typically need a caulk gun, caulk, finish nails (and a hammer or nail gun), a nail set, wood putty or spackle, sandpaper, and potentially a utility knife and a stud finder. Construction adhesive may also be necessary for very loose sections.
How can I prevent baseboards from separating in the future?+
Maintaining consistent indoor humidity levels (35-55% relative humidity) using humidifiers/dehumidifiers can minimize wood movement. During installation, ensure baseboards are securely nailed into studs and consider using construction adhesive in addition to nails for extra hold.

Discussion
Loading comments…