
Tools & materials you'll need
Affiliate linksAs an Amazon Associate FixlyGuide earns from qualifying purchases — at no extra cost to you. Prices and availability are accurate as of publication and subject to change.
Quick Answer
Baseboards separating from walls are a common issue often caused by seasonal humidity fluctuations that make wood expand and contract, or by the natural settling of your home's foundation. Addressing these gaps is crucial not only for aesthetics but also to prevent drafts and potential pest entry. Most fixes involve cleaning the area and then using either caulk, wood filler, or strategically placed finishing nails to re-secure the trim to the wall studs.
The Problem
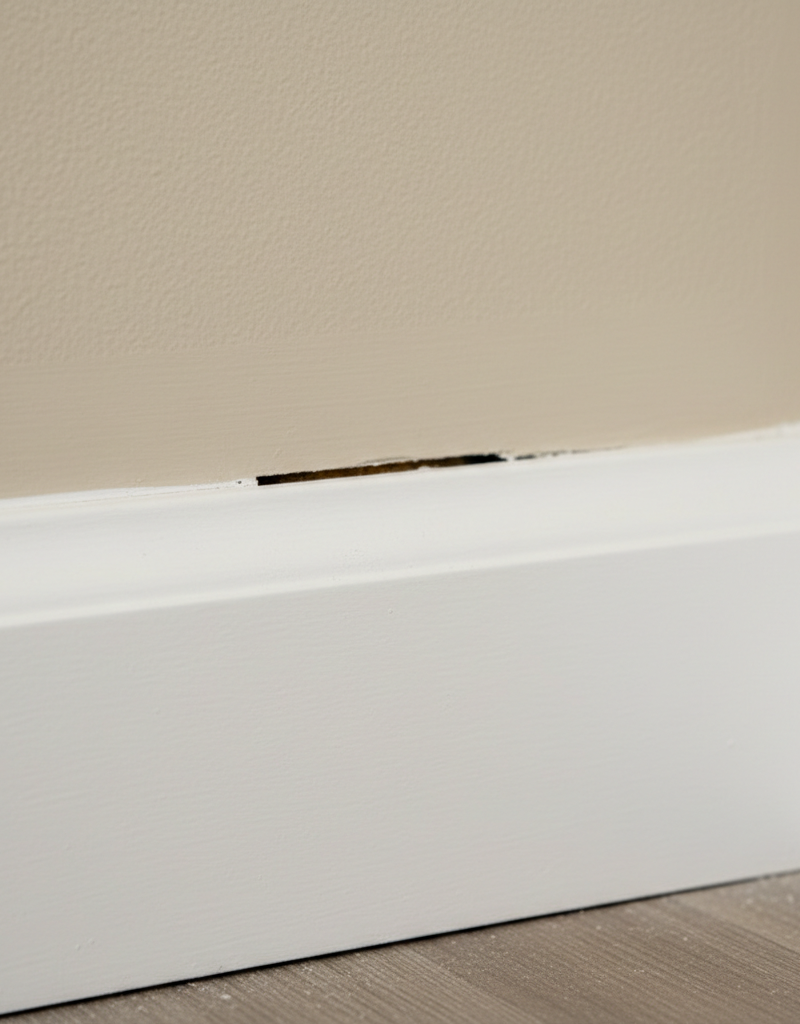
You walk into a room and notice it – that unsightly gap between your baseboard and the wall. What might seem like a minor cosmetic flaw can actually point to larger issues or create new ones. A separating baseboard is more than just an eyesore; it can be a significant source of drafts, allowing cold air in during winter and cool air out during summer, leading to higher energy bills. These gaps can also become entry points for dust, dirt, and even small insects, making your home less clean and less comfortable. Over time, recurring movement can also cause paint to crack or chip, further degrading the appearance of your trim.
The most common culprits behind this separation are changes in temperature and humidity, which cause the wood in your baseboards to expand and contract. During dry periods, the wood shrinks, pulling away from the wall. During humid periods, it expands, but may not fully return to its original position. House settling, especially in older homes, can also contribute, as floors and walls subtly shift over decades. Less commonly, improper installation – such as not nailing into studs or using too few nails – can be the root cause.
How It Works
To understand why baseboards separate, it helps to visualize how they're installed and how building materials interact. Baseboards are typically made of wood (solid, MDF, or finger-jointed pine) and are fastened to wall studs – the vertical framing timbers behind your drywall. Finish nails, either driven by hand or with a nail gun, secure the trim to these studs, usually along the top edge and sometimes along the bottom. The top edge where the baseboard meets the drywall is then typically "caulked" with an acrylic latex caulk to create a seamless, finished look and seal against air infiltration.
Wood Movement: Wood is a hygroscopic material, meaning it absorbs and releases moisture from the air. As humidity rises, wood takes on moisture and expands. As humidity falls, it releases moisture and shrinks. This expansion and contraction, known as "wood movement," is a primary reason for gaps. Baseboards are often installed when a house is first built or renovated, and the wood may not be fully acclimatized to the home's specific humidity levels. Over seasons, as your HVAC system runs and outdoor conditions change, the wood repeatedly expands and contracts. If the nails aren't perfectly secure or if the caulk isn't flexible enough, these movements can cause the baseboard to pull away from the wall or the caulk to crack and break free.
House Settling: All houses settle to some degree, especially in their first few years. This settling involves minute shifts in the foundation, framing, and subflooring. As these structural components shift, the walls move slightly, which can exert stress on rigid finishes like baseboards. If a wall stud subtly bows or if a section of the subfloor sags, it can pull the attached baseboard along with it, creating a visible gap.
Improper Installation: While less common than wood movement or settling, poor installation can exacerbate the problem. If a baseboard isn't nailed deeply enough into the studs, or if nails miss the studs entirely (only going into drywall), the connection will be weak. Over time, even minor wood movement will easily overcome this weak attachment, leading to separation.
Step-by-Step Fix
Step 1: Assess the Gap & Gather Tools – Determine the size and nature of the gap to choose the right repair method.
First, carefully examine the separation. Is it a hairline crack along the top edge? A consistent gap along the entire length? Or a larger, intermittent gap? Push gently on the baseboard – does it flex easily? This assessment will guide your choice of materials. For hairline gaps (up to 1/8 inch), caulk is usually sufficient. For gaps between 1/8 inch and 1/4 inch, a flexible wood filler might be better. For larger, persistent separations where the baseboard feels loose, re-nailing is often necessary.
- Small Gaps (up to 1/8"): Caulk, painter's tape, utility knife.
- Medium Gaps (1/8"-1/4"): Flexible wood filler, putty knife, damp rag.
- Large Gaps (over 1/4") or Loose Baseboard: Finishing nails (1.5" to 2" long, 18-gauge), nail gun or hammer and nail set, stud finder, shims.
Step 2: Clean the Area – Remove old caulk, dust, and debris for a strong bond.
Use a utility knife or a dedicated caulk removal tool to carefully cut and scrape away any old, cracked caulk from the top edge of the baseboard. Be gentle to avoid damaging the wall or the trim. Once the old caulk is removed, thoroughly vacuum the area to get rid of dust, dirt, and any loose debris. Wipe down the entire work surface with a damp cloth and allow it to dry completely. A clean surface is essential for proper adhesion of new caulk or filler.
Step 3: For Small Gaps: Caulk Application – Create a smooth, sealed joint with flexible caulk.
For gaps up to 1/8 inch, acrylic latex caulk with silicone is ideal because it's paintable and offers good flexibility. Apply painter's tape above the baseboard on the wall and below it on the baseboard itself, leaving only the gap exposed. Cut the tip of the caulk tube at a 45-degree angle, making an opening just slightly larger than your gap. Apply a continuous, even bead of caulk into the gap, maintaining consistent pressure. Immediately after applying a section (about 2-3 feet), wet your finger or a caulk tool and smooth the bead, pressing it firmly into the joint. Remove the painter's tape before the caulk skins over, usually within 5-10 minutes. Allow the caulk to cure fully according to manufacturer instructions before painting.
Step 4: For Medium Gaps: Wood Filler Application – Fill wider gaps with a sandable, paintable wood filler.
For gaps between 1/8 and 1/4 inch, a flexible, paintable wood filler (like elastomeric wood patch) works well, especially if the baseboard isn't actively loose. Using a putty knife, press the wood filler firmly into the gap, ensuring it fills the entire void. Overfill slightly, then smooth off the excess with the putty knife. Allow the filler to dry completely, following product instructions. Once dry, lightly sand the area smooth with fine-grit sandpaper (180-220 grit). Wipe away dust with a damp cloth before painting.
Step 5: For Large Gaps or Loose Baseboards: Re-Nail – Secure loose baseboards firmly to wall studs.
Safety Note: Always use a stud finder to locate wall studs before nailing. Nailing into electrical wires or plumbing pipes can cause serious injury or damage.
If the baseboard is loose or has a gap larger than 1/4 inch, re-nailing is the best solution. Use a stud finder to locate the vertical studs behind your drywall. Mark these locations lightly with a pencil just above where the baseboard will sit. When nailing, aim for these marks. Use 1.5-inch to 2-inch 18-gauge finishing nails. Drive nails at a slight downward angle through the baseboard and into the center of the stud. Place nails every 16 to 24 inches. If using a hammer, finish driving the nail head just below the surface with a nail set. If there's a large gap at the bottom of the baseboard, you might temporarily place a thin shim behind the baseboard, against the stud, to push it forward before nailing, then remove the shim. Fill nail holes with wood putty or spackle after securing, then sand smooth.
Step 6: Paint or Touch-Up – Restore a uniform, finished appearance.
Once the caulk or filler has cured and any re-nailed areas are smoothed, it's time to paint. If you’ve only caulked a small, clean line, you might be able to get away with just touching up the paint along the seam with a small brush. For larger repairs involving wood filler or re-nailing, you'll likely need to paint the entire length of the repaired baseboard section to achieve a consistent finish. Use the same paint color and sheen as the existing trim for the best results.
Common Causes
- Wood Movement (Humidity Changes): The most frequent cause. As humidity fluctuates seasonally, wood absorbs and releases moisture, leading to expansion and contraction, which pulls baseboards away from walls or cracks existing caulk.
- House Settling: Over time, especially in newly constructed homes or older homes experiencing minor ground shifts, the foundation and framing can settle, causing walls and floors to shift slightly and separating trim from its original position.
- Improper Installation: If baseboards were not adequately nailed into wall studs (e.g., missed studs entirely, used too few nails, or nails were too short), the trim won't be securely fastened and will easily pull away.
- Foundation Issues (Severe): While less common for simple baseboard separation, significant foundation problems (cracked slabs, shifting footings) can cause extensive wall movement, leading to large, persistent gaps in trim, doorways, and windows.
Common Mistakes
- Using Non-Flexible Caulk: Applying rigid caulk (like silicone-free painter's caulk) in an area prone to movement will only lead to it cracking again quickly. Always choose an acrylic latex caulk with silicone or an elastomeric sealant for flexibility.
- Skipping Cleaning: Not removing old caulk, dust, and debris before applying new caulk or filler will prevent proper adhesion, leading to the new material failing prematurely.
- Overfilling Gaps with Caulk: Trying to fill very wide gaps (over 1/4 inch) with caulk alone. Caulk is designed for seams and smaller gaps; for larger voids, wood filler or re-nailing is more appropriate for long-term stability.
- Not Nailing Into Studs: When re-nailing, failing to locate and hit the wall studs will result in the nails only going into the drywall, offering no secure attachment. This is a waste of effort and will not solve a loose baseboard problem.
- Ignoring the Root Cause: Simply filling a gap without addressing a truly loose baseboard (by re-nailing) means the problem will likely recur as the loose trim continues to move.
Cost & Time Breakdown
| Task | DIY Cost | Pro Cost | Time |
|---|---|---|---|
| Clean & Caulk Small Gaps | $5–$15 | $100–$250 | 20–40 min/room |
| Clean & Fill Medium Gaps | $10–$25 | $150–$300 | 30–60 min/room |
| Re-nail Loose Baseboards | $15–$50 | $200–$400 | 1–2 hours/room |
| Total (multiple rooms, varied tasks) | $20–$75+ | $300–$800+ | 2–8 hours/project |
Tips & Prevention
- Maintain Stable Humidity: Using a whole-house humidifier in dry months (winter) and a dehumidifier in humid months (summer) can help stabilize indoor humidity, reducing wood movement and preventing future baseboard separation.
- Use Flexible Sealants: When performing any trim work, always opt for high-quality acrylic latex caulk with silicone additives or elastomeric fillers designed for flexibility. These materials can better withstand minor expansion and contraction.
- Proper Nail Placement: If installing new baseboards or re-securing old ones, ensure nails are always driven into wall studs at appropriate intervals (16-24 inches) to provide a strong, lasting hold.
- Monitor for Warning Signs: Periodically inspect your baseboards, especially during seasonal changes. Look for new hairline cracks or slight separations. Addressing these early can prevent them from becoming larger, more problematic gaps.
- Acclimatize Wood: If installing new wood baseboards, allow the material to sit in the room where it will be installed for several days (or even a week) before cutting and installing. This lets the wood adjust to the room's humidity and temperature, reducing post-installation movement.
When to Call a Professional
While most baseboard separation issues are DIY-friendly, there are specific situations where calling a professional is warranted. If you notice unusually large or widening gaps (over 1/2 inch consistently), particularly in multiple areas of your home, or if the separation is accompanied by other signs like cracked drywall, sticking doors or windows, or sloping floors, it could indicate significant foundation issues. A structural engineer or a licensed contractor specializing in foundation repair should be consulted immediately. Additionally, if the separation involves water damage, rot, or mold, a professional carpenter or remediation specialist should assess the extent of the damage and ensure proper repair and moisture control. For persistent issues after trying DIY fixes, a professional finish carpenter can provide a more robust and lasting solution, including potentially re-installing baseboards with more secure fastening methods.", meta_title="The Tiny Gap Behind Your Baseboards That Costs You $100s in Drafts", meta_description="Discover why your baseboards are pulling away from the wall and the simple, inexpensive fixes that can seal drafts and improve your home
Related Articles
Keep troubleshooting with these hand-picked guides from FixlyGuide:
- The $30 Secret to Banishing Ice Dams Without Damaging Your Roof — Discover how a simple, inexpensive trick can safely eliminate dangerous ice dams from your roof and prevent costly damage to your home.
- The Secret Cause of Your Constantly Dying LED Bulbs (It's Not Overheating!) — Discover the surprising reasons why your LED bulbs might be failing prematurely, and how simple fixes can save you money and hassle.
- The Tiny Gap That Destroys Your Bathtub's Structure (and How to Seal It) — Recaulking your bathtub correctly is crucial to prevent water damage, mold growth, and structural issues in your bathroom.
- The #1 Mistake Homeowners Make When Diagnosing Low Water Pressure (It's Not Your Pipes!) — Discover the most overlooked culprit behind low water pressure throughout your entire house and learn how to fix it with simple steps.
- One Shower, No Hot Water? The Hidden Mixing Valve Trick Plumbers Use — Discover why only one shower in your home might lack hot water and the simple internal fix for a common mixing valve issue, saving you a pl…
- The Secret Culprit Behind Your Dishwasher Not Draining (It's Not Always a Clog) — Your dishwasher not draining can stem from simple fixes to more complex issues, often involving the air gap, drain hose, or filter.
Recommended for DIYers & woodworkers
Sponsored
The Top 20 Tools for Workshops of Any Budget
No stationary machines or power tools required — plus 3 fundamental tools that can't be bought at any price.
Get the free guide
Ted's Woodworking — The #1 Woodworking Resource
Detailed instructions, dimensioned drawings, materials & cutting lists, and 3D schematics for every skill level.
See the plansSponsored: links above are affiliate links. FixlyGuide may earn a commission on qualifying purchases — at no extra cost to you.
Frequently asked questions
Why do baseboards separate from the wall?+
Baseboards typically separate due to changes in humidity, causing the wood to expand and contract, or from the natural settling of your home. Sometimes, improper installation can also be a factor.
Can I just caulk a separating baseboard?+
For hairline cracks or gaps up to 1/8 inch, caulk is an effective solution. For wider gaps or loose baseboards, wood filler or re-nailing into studs provides a more durable fix.
How do I prevent baseboards from separating again?+
Maintaining stable indoor humidity with a humidifier/dehumidifier, using flexible caulk, ensuring proper nailing into studs during installation, and acclimatizing new wood can help prevent future separation.
When should I call a professional for baseboard separation?+
If gaps are excessively wide (over 1/2 inch), widespread, or accompanied by other signs of structural issues like cracked drywall, sticking doors, or sloping floors, consult a structural engineer or licensed contractor. Also, for water damage or persistent issues after DIY attempts, call a professional.
What kind of caulk is best for baseboards?+
An acrylic latex caulk with silicone additives is generally best for baseboards. It offers good flexibility to accommodate wood movement and is paintable, allowing for a seamless finish.

Discussion
Loading comments…