
Tools & materials you'll need
Affiliate linksAs an Amazon Associate FixlyGuide earns from qualifying purchases — at no extra cost to you. Prices and availability are accurate as of publication and subject to change.
Quick Answer
Drafty windows are a common but often overlooked source of energy loss and discomfort in homes. The good news is that many of the underlying issues are simple to diagnose and fix with basic DIY skills and readily available materials. By addressing common culprits like worn-out weatherstripping, cracked caulk, loose sashes, or deteriorating glazing, you can significantly reduce drafts, lower your energy bills, and create a more comfortable indoor environment. A simple diagnostic test, such as the smoke test, will help you pinpoint the precise location of air leaks, allowing for targeted and effective repairs.
The Problem
That chilly breeze near your window isn't just annoying; it's a direct route for your heated or air-conditioned air to escape, and for outdoor temperatures to invade. This constant air exchange forces your HVAC system to work harder, leading to higher energy bills and uneven temperatures throughout your home. Beyond the financial impact, drafts can make rooms feel cold and uncomfortable, especially during the colder months. Many homeowners assume drafty windows mean expensive replacement, but often the problem stems from minor issues that can be resolved with a few hours of work and minimal material cost. Identifying and sealing these drafts improves energy efficiency, reduces noise, and enhances overall home comfort.
How It Works
Windows are designed to create a barrier between your indoor and outdoor environments. This barrier isn't just the glass itself; it's a multi-component system that includes the frame, sash, and various sealing elements. Modern windows utilize double-pane or even triple-pane insulated glass units (IGUs) that trap a layer of inert gas between the panes, limiting heat transfer. However, the most critical elements for preventing drafts are the seals around the moving and stationary parts. Weatherstripping, typically made of foam, felt, vinyl, or rubber, is installed along the edges of the window sash where it meets the frame. Its purpose is to compress and create an airtight seal when the window is closed. Over time, weatherstripping can become brittle, compressed, torn, or simply fall out of place, losing its ability to seal effectively.
Caulk, a flexible sealant, is used to create a continuous bond between the window frame and the exterior siding or interior trim. It prevents air and moisture from infiltrating around the perimeter of the window. Exposure to UV light, temperature fluctuations, and house movement can cause caulk to dry out, crack, shrink, or pull away from the surfaces it's meant to seal.
Beyond these seals, the integrity of the window's structure itself plays a role. Window sashes (the part holding the glass) can become loose in their tracks or frames due to worn-out hardware or settling. This creates small gaps that allow air to bypass the weatherstripping. Furthermore, older single-pane windows or those with wooden sashes often rely on window glazing putty to seal the glass directly to the frame. This putty can crack, crumble, or detach, creating direct pathways for drafts. Understanding these components helps in accurately diagnosing and fixing draft issues.
Step-by-Step Fix
Before you begin, perform a simple draft test: on a breezy day, hold an incense stick or lit candle around the edges of your closed window. If the smoke wavers or the flame flickers, you've found a draft. Mark these spots with painter's tape.
1. Inspect and Replace Old Weatherstripping – Targeting drafts around the moving sash
- Examine thoroughly – Open your window and carefully inspect the weatherstripping along all edges of the sash and frame. Look for areas that are flattened, cracked, torn, or missing. Pay close attention to corners and where the sash meets the sill.
- Clean the channel – If removing old adhesive-backed weatherstripping, carefully peel it away. For channel-mounted types, gently pull it out. Use a putty knife or scraper to remove any remaining adhesive or debris. Clean the channel thoroughly with rubbing alcohol to ensure good adhesion for the new material.
- Choose the right replacement – Measure the thickness and width of your existing weatherstripping. Take a piece to the hardware store to match it. Common types include adhesive-backed foam, V-strip (tension seal), fin seal, or tubular rubber. For channel-mounted weatherstripping, ensure you get the correct profile (e.g., bulb, pile, or leaf).
- Install new weatherstripping – For adhesive types, cut to size, peel the backing, and press firmly into place, ensuring continuous coverage. For channel types, gently push the new stripping into the channel using a flat-head screwdriver or putty knife, working it in securely. Test the window closure to ensure the new weatherstripping compresses properly and creates a tight seal without making the window difficult to operate. A little resistance is good; excessive resistance might mean it's too thick.
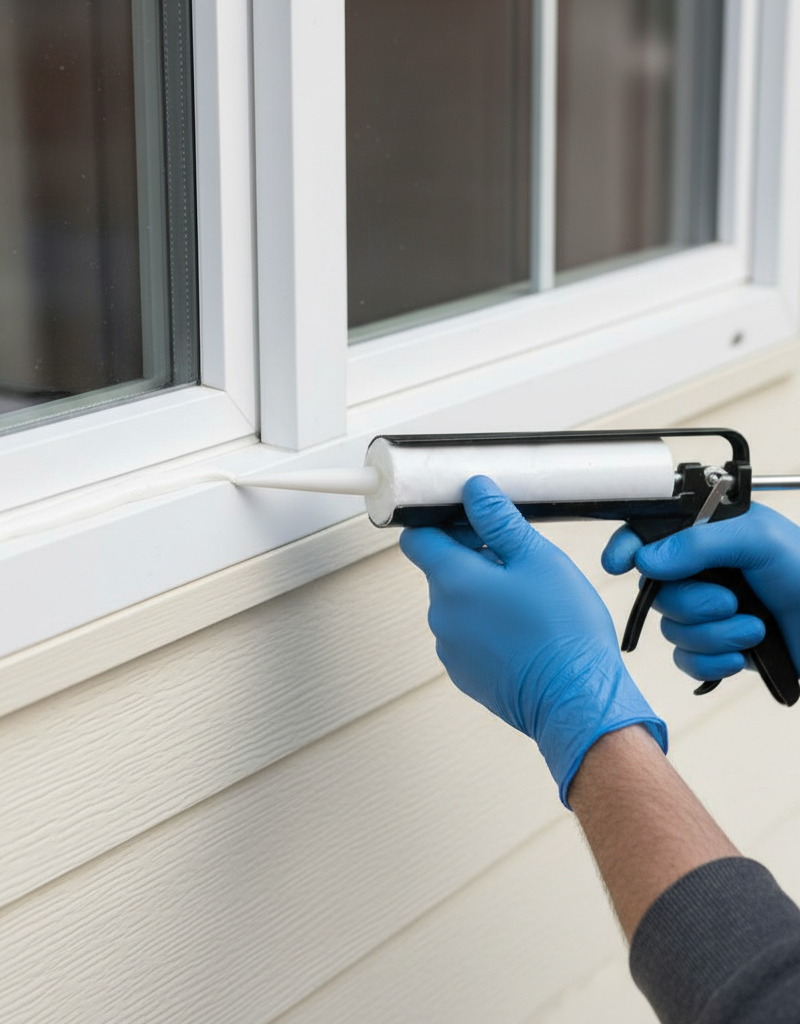
2. Re-caulk the Exterior Window Frame – Sealing gaps between the frame and house siding
- Safety First – When working on exterior windows, especially on upper floors, use a stable ladder and have a spotter. Wear appropriate safety glasses.
- Prepare the surface – Carefully use a utility knife or caulk removal tool to scrape away all old, cracked, or loose caulk from around the exterior perimeter of the window frame where it meets the siding. Ensure the surface is clean, dry, and free of any debris, paint chips, or mold. Use a wire brush if necessary and wipe with a damp cloth, then let dry completely.
- Choose the right caulk – Opt for an exterior-grade, paintable, silicone or acrylic latex caulk. Silicone offers superior flexibility and weather resistance but can be harder to paint over. Acrylic latex caulk is easier to work with and paintable. Look for formulas designed for windows and doors that offer good adhesion and flexibility.
- Apply a smooth bead – Cut the tip of the caulk tube at a 45-degree angle, making an opening slightly smaller than the gap you're filling. Puncture the inner seal. Apply a continuous, even bead of caulk along all seams, pulling the caulk gun rather than pushing it for better control. Maintain a consistent speed and pressure. Immediately smooth the caulk with a wet finger, a caulk tool, or a damp cloth for a clean finish. Allow the caulk to cure fully according to manufacturer instructions before painting or exposing to heavy rain.
3. Tighten Loose Window Sashes and Hardware – Addressing structural movement and gaps
- Locate loose hardware – Examine all screws, hinges, and latches on the window sash and frame. For double-hung windows, check the screws holding the sash into the tracks. For casement or awning windows, inspect the crank mechanisms and hinges. For sliding windows, check the rollers and track guides.
- Tighten all screws – Use a Phillips head or flat-head screwdriver (or appropriate bit for power drill) to gently tighten any loose screws. Be careful not to overtighten, which can strip the screw hole or crack the frame material. If a screw spins freely, the hole may be stripped. In this case, remove the screw, insert a wooden toothpick or small dowel with wood glue into the hole, let it dry, trim flush, and then reinsert the screw. This provides new material for the screw threads to grip.
- Adjust sash fit – Some windows, particularly older wooden models, may have adjustable stops or spring-loaded balances that can be tweaked to better secure the sash. Consult your window's manufacturer guide if available. For sliding windows, ensure rollers are clean and lubricated with silicone spray to allow the sash to seat fully when closed.
4. Repair or Replace Damaged Glazing – Sealing around the glass panes
- Identify glazing type – Older single-pane windows often use glazing putty to seal the glass to the wood sash. Newer windows use rubber or vinyl glazing beads/gaskets.
- Remove old putty/beads – For putty: carefully chip out old, cracked, or crumbling glazing putty using a putty knife or chisel. Wear safety glasses and gloves to protect against glass shards. For beads/gaskets: use a utility knife to carefully pry out deteriorated rubber or vinyl glazing beads. Be gentle to avoid damaging the frame or glass.
- Clean the rabbet – Once the old material is removed, thoroughly clean the rabbet (the groove where the glass sits) of the window frame. Remove all debris, old paint, or dust. Ensure the surface is dry.
- Apply new glazing – For traditional putty: knead the new glazing putty until pliable. Roll it into thin ropes and press it firmly into the rabbet against the glass and frame. Use a putty knife at a 45-degree angle to create a smooth, consistent beveled edge. For glazing beads/gaskets: cut the new rubber or vinyl material to size and carefully press it into the channel, ensuring a tight fit. You may need to use a rubber mallet or specialty tool to seat it fully. Allow putty to cure as per manufacturer instructions before painting (typically 7-14 days). Rubber or vinyl beads usually provide an immediate seal.
Common Causes
- Degraded Weatherstripping: The most frequent culprit. Over time, exposure to elements and repeated compression causes weatherstripping to crack, shrink, become brittle, or lose its elasticity, creating gaps for air to enter.
- Failing Exterior Caulk: The sealant around the window frame's exterior loses its flexibility, cracks, or pulls away from the siding or trim due to UV exposure, temperature extremes, and house settling. This opens pathways for air infiltration.
- Loose Window Sashes or Hardware: Screws holding window sashes, hinges, or latches can loosen over time with use and vibration, allowing the sash to sit improperly or move within the frame, compromising the seal.
- Cracked or Missing Glazing Putty/Beads: For older windows, the putty that seals the glass to the frame can dry out and fall away. In newer windows, rubber or vinyl glazing beads can shrink or become dislodged, creating direct air leaks around the glass.
- Warped Window Frames: Less common but more severe, wooden window frames can warp due to moisture absorption or extreme temperature changes, creating persistent gaps that are difficult to seal with basic methods.
- Improper Installation: If windows were not installed level, plumb, and square, or if builder's shims were not properly insulated, gaps can exist from day one, often manifesting as drafts around the entire frame.
Common Mistakes
- Not fully removing old caulk/weatherstripping: Applying new sealant over old, degraded material will not create a lasting seal and the new material will fail prematurely. Always start with a clean surface.
- Using the wrong type of caulk: Interior caulk won't stand up to exterior elements. Using non-paintable caulk when you intend to paint will lead to a messy finish. Always choose an exterior-grade sealant for outside applications.
- Incorrect weatherstripping profile: Trying to force ill-fitting weatherstripping can make the window difficult to operate or lead to an ineffective seal. Measure and match carefully.
- **Ignoring the
Related Articles
Keep troubleshooting with these hand-picked guides from FixlyGuide:
- The 3 Hidden Reasons Your Door Won't Latch (And the Easy DIY Fixes) — Don't live with a door that refuses to latch; discover simple, DIY solutions for common door latch problems and restore security and privac…
- The 3 Hidden Reasons Your Window Won't Stay Up (And the Easy Fixes) — Before you call a repairman, learn the three most common reasons your double-hung window won't stay open and how to fix them yourself.
- The 3 Hidden Reasons Your Door Won't Latch (And the Easy DIY Fixes) — Frustrated by a door that refuses to latch? Discover the common culprits behind this annoying problem and learn simple, effective DIY fixes…
- The 3 Hidden Reasons Your Interior Door Sticks (and the Easy Fixes) — Your interior door sticking isn't just annoying; it's often a symptom of underlying issues that are surprisingly easy to fix with the right…
- The 3 Hidden Reasons Your Door Won't Latch (And the 10-Minute Fix) — Discover the common culprits behind a door that won't latch properly and learn how to fix it in just 10 minutes, restoring security and pea…
- The 3 Hidden Mistakes That Make Your Deck Sealer Fail (And How to Fix Them) — Properly sealing your wood deck protects it from the elements, but common mistakes often lead to early failure. Learn how to reseal your de…
Recommended for DIYers & woodworkers
Sponsored
The Top 20 Tools for Workshops of Any Budget
No stationary machines or power tools required — plus 3 fundamental tools that can't be bought at any price.
Get the free guide
Ted's Woodworking — The #1 Woodworking Resource
Detailed instructions, dimensioned drawings, materials & cutting lists, and 3D schematics for every skill level.
See the plansSponsored: links above are affiliate links. FixlyGuide may earn a commission on qualifying purchases — at no extra cost to you.
Frequently asked questions
How do I find out where my window is drafty?+
The easiest way is a smoke test. On a breezy day, hold an incense stick or lit candle around the edges of your closed window. If the smoke wavers or the flame flickers, you've found an air leak. Mark the spot for repair.
What's the best caulk for sealing outdoor window drafts?+
For exterior drafts, use an exterior-grade, paintable, silicone or acrylic latex caulk. Silicone offers superior flexibility and weather resistance, while acrylic latex is easier to work with and paint over. Ensure it's labeled for 'windows and doors'.
Can I use temporary window film to fix drafts?+
Yes, temporary window insulation film kits can provide a quick and effective fix for drafts, especially for older or single-pane windows. They create an insulating air pocket and block leaks. While effective, they are a seasonal solution and don't address the root cause of the draft.
How often should I check my window seals?+
It's a good practice to inspect your window weatherstripping and exterior caulk annually, ideally in the fall before colder weather sets in. Look for cracks, shrinkage, or signs of deterioration and address them promptly to maintain energy efficiency and comfort.


Discussion
Loading comments…