
Tools & materials you'll need
Affiliate links- AmazonExterior-grade silicone or acrylic latex caulk1-2 tubes
- AmazonInterior-grade paintable acrylic latex caulk1 tube
- AmazonSelf-adhesive foam or V-seal weatherstripping1 roll or pack
- AmazonGlazing compound (for older windows)1 small tub
- AmazonCleaning supplies (rags, mild detergent)
- AmazonPainter's tape1 roll
As an Amazon Associate FixlyGuide earns from qualifying purchases — at no extra cost to you. Prices and availability are accurate as of publication and subject to change.
Quick Answer
Drafty windows are a common complaint for homeowners, leading to uncomfortable indoor temperatures and increased heating and cooling costs. The most frequent culprits are gaps in the existing caulk around the window frame, deteriorated or missing weatherstripping, sashes that don't close tightly, or cracks in the window glazing. Fortunately, most of these issues are inexpensive and relatively easy for a homeowner to identify and fix using readily available materials like silicone caulk, self-adhesive weatherstripping, or insulating film, often costing less than $20 per window and requiring minimal specialized tools.
The Problem
That chilling whisper of air near your window isn't just an annoyance; it's a silent energy thief. Drafty windows can account for anywhere from 20% to 30% of a home's heat loss or gain, seriously impacting your utility bills. Beyond the financial drain, drafts create hot and cold spots, making rooms feel less comfortable and forcing your HVAC system to work harder unnecessarily. Over time, persistent moisture infiltration through these gaps can even contribute to mold growth, wood rot in window sills and frames, and damage to interior finishes like paint and drywall. Identifying and sealing these drafts isn't just about saving money; it's about preserving your home's structure and comfort.
How It Works
Windows, at their core, are designed to keep the elements out while letting light in. They consist of several key components that work in harmony to maintain an airtight seal. The sash is the part of the window that holds the glass and opens or closes. The frame is the stationary structure embedded in the wall that the sash fits into. Between the movable sash and the stationary frame, weatherstripping creates a flexible seal, preventing air and moisture from passing through. Along the exterior where the window frame meets the house siding or trim, caulk forms a watertight and airtight barrier. Inside, a bead of caulk or paint typically seals the interior trim to the wall. The glass itself is held in place by glazing, which can be putty in older windows or a rubberized seal in newer ones. When any of these components—the caulk, weatherstripping, or glazing—deteriorates, cracks, shrinks, or becomes damaged, small gaps or pathways are created, allowing conditioned air to escape and unconditioned outdoor air to infiltrate. Wind pressure exacerbates these issues, forcing air through even the tiniest pinholes. Understanding where these seals are located is the first step in diagnosing why your window is drafty.
Step-by-Step Fix
Before you begin any sealing work, it's crucial to thoroughly clean the window frame and sash surfaces. Dust, dirt, and old peeling paint can prevent new caulk or weatherstripping from adhering properly. Use a stiff brush or a putty knife to scrape away loose paint or old caulk, then wipe down all surfaces with a damp cloth and mild detergent. Allow everything to dry completely before proceeding.
1. The Smoke Test Diagnostic – *Identify hidden air leaks with a simple trick.
Safety Note: Ensure good ventilation when using an incense stick or lit candle. Keep flammable materials away from an open flame.
- Gather materials: Grab an incense stick or a lit candle. A very windy day can make this test less accurate, so choose a calmer day if possible.
- Perform the test: On a day when drafts are noticeable, or when your HVAC is running, hold the lit incense stick or candle about an inch from various points around your closed window. Pay close attention to the seams where the sash meets the frame, around the window's perimeter where the frame meets the wall, and near any weep holes or joints. Watch for the smoke to waver or the flame to flicker, indicating an air current. Mark these spots withpainter's tape or a pencil for later repair.
- Troubleshooting: If the smoke test doesn't reveal much, but you still suspect a draft, consider a thermal leak detector (available for rent at some home improvement stores) for a more precise reading. On some older windows, drafts might be coming from cracks in the glass or failing glazing putty.
2. Re-caulk Exterior Gaps – *Seal the outside perimeter where frame meets siding.
- Remove old caulk: Using a utility knife or caulk removal tool, carefully cut and peel away all old, cracked, or loose exterior caulk. This is crucial for a lasting seal. Be gentle not to damage the siding or window frame.
- Clean the surface: Scrape away any residue and wipe the area clean with a damp cloth. Allow it to dry completely.
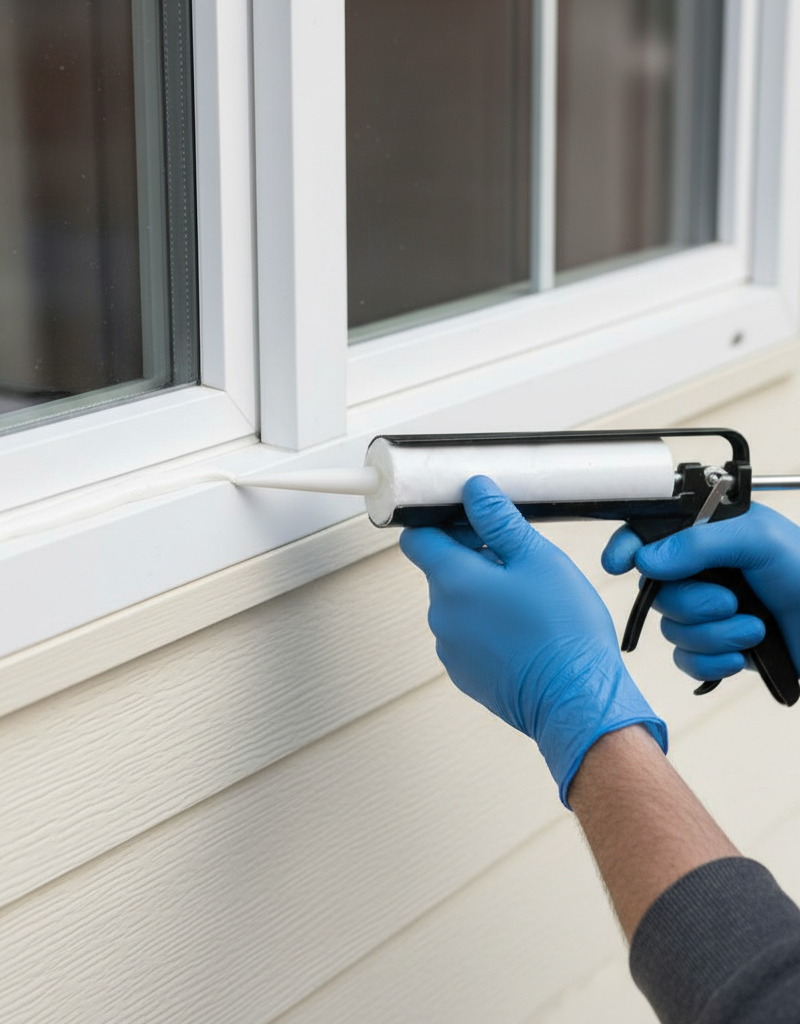
- Apply new caulk: Load a tube of exterior-grade, paintable silicone or acrylic latex caulk into a caulk gun. Cut the tip of the caulk tube at a 45-degree angle, making an opening just wide enough to fill the gap. Apply a continuous, even bead of caulk along the entire perimeter where the window frame meets the exterior wall or trim. Work slowly and maintain consistent pressure. Smooth the caulk bead with a damp finger or a caulk tool for a clean finish within 5-10 minutes of application. For gaps wider than 1/4 inch, you might need backer rod first to fill the void before applying caulk.
3. Replace Worn Weatherstripping – *Restore the seal where sashes meet the frame.
- Identify weatherstripping type: Open your window and inspect the existing weatherstripping. It could be foam, felt, tension-seal (metal or plastic strips), or rigid vinyl. Note its location (on the sash, in the frame) and how it's attached (adhesive, staples, or friction fit).
- Remove old weatherstripping: Gently peel away adhesive-backed stripping. If it's stapled or nailed, use a pry tool or needle-nose pliers to remove fasteners. For tension-seal types, carefully pull them out of their channels.
- Clean channels/surfaces: Thoroughly clean any channels or surfaces where the new weatherstripping will be applied, ensuring no residue remains.
- Install new weatherstripping: Purchase new weatherstripping that matches the old type or one that will effectively fill the gap. For compression-type weatherstripping, press it firmly into the sash or frame channels. For adhesive-backed foam or V-seal weatherstripping, apply it along the top, bottom, and sides of the sash or frame where air leaks were detected, ensuring it compresses when the window is closed but doesn't prevent proper closure. If your window has metal or vinyl tension strips, carefully insert new ones into the grooves. You may need to trim pieces to size with scissors.
- Test closure: Close and open the window several times to ensure the new weatherstripping doesn't bind and allows for smooth operation and a tight seal.
4. Seal Interior Gaps – *Address drafts from inside the home.
- Evaluate existing caulk/paint: Examine the interior perimeter where the window trim meets the wall. Look for hairline cracks, separated paint, or gaps. These are often smaller than exterior gaps but can still contribute significantly to drafts.
- Prepare the surface: Scrape away loose paint or old caulk, and clean the area thoroughly. Masking tape can be used to create clean lines for caulking.
- Apply interior caulk: Use an interior-grade, paintable acrylic latex caulk. Apply a thin, continuous bead along the joint between the window trim and the wall. Smooth with a damp finger or tool immediately. This not only seals drafts but also gives a finished look to painted trim. Allow it to cure fully before painting, if desired. For very small gaps (.05 inches or less), a bead of paintable acrylic latex painter's caulk might be sufficient to seal them.
5. Address Glazing Leaks – *Seal the glass within the sash.
- Inspect glazing: For older single-pane windows, inspect the putty or glazing compound that holds the glass in the frame. Look for cracks, crumbling, or missing sections. For newer windows, check rubber gaskets around the glass.
- Repair glazing putty (older windows): Carefully remove loose or crumbling old putty using a chisel or putty knife. Clean the area. Apply new glazing compound with a putty knife, pressing it firmly into the rabbet against the glass. Smooth it at a 45-degree angle to create a neat, weather-tight seal. Allow it to cure for several days before painting.
- Address rubber gaskets (newer windows): If rubber gaskets are shrunken or cracked, they may need to be replaced. This can be a more involved process and might require specific replacement parts from the window manufacturer. Temporarily, clear silicone sealant can be carefully applied on the exterior side where the gasket meets the glass to mitigate drafts.
6. Consider Window Film – *A temporary but effective solution.
- Clean window thoroughly: Wash the interior window glass and frame thoroughly and let it dry completely.
- Apply double-sided tape: Apply the specialized double-sided tape (included in film kits) around the entire interior perimeter of the window frame, ensuring it's flat and pressed firmly.
- Cut and apply film: Carefully unroll and cut the plastic insulating film, leaving a few inches of overlap on all sides. Starting from the top, gently press the film onto the tape, working your way down and to the sides, smoothing out any wrinkles as you go. Ensure the film is taut but not stretched so tightly it tears.
- Shrink with hairdryer: Once the film is fully attached, use a hairdryer on a warm setting, sweeping it evenly across the film. The heat will cause the film to shrink and pull taut, creating a clear, insulating air pocket. This method creates a temporary but effective seal that can significantly reduce drafts and improve insulation for the winter months. Remember to remove it carefully in the spring to avoid damaging paint.
Common Causes
- Aged or Cracked Caulk: Over time, exterior caulk exposed to UV radiation, temperature fluctuations, and moisture can dry out, crack, shrink, and pull away from the window frame or siding, creating significant air gaps.
- Degraded Weatherstripping: The flexible strips designed to seal the meeting rails and side jambs of a window sash can become brittle, compressed, torn, or fall off due to age and repeated window operation, leaving gaps for air infiltration.
- Loose or Damaged Glazing: On older windows, the putty or compound holding the glass in the sash can crack, shrink, or fall out, allowing air to leak directly around the glass panes. In newer windows, rubber gaskets can shrink or degrade.
- Gaps in Window Frame Installation: Sometimes, during installation, the shims or insulation around the rough opening of the window are insufficient or settle, leading to hidden gaps between the window frame and the house's framing. These require more invasive repair from the inside or outside.
- Poorly Latching or Warped Sashes: If a window sash doesn't close completely or latch tightly, it won't compress the weatherstripping effectively, leading to air leaks. This can be due to hardware issues, a warped sash, or the house settling.
- Building Settling: As homes age, they settle. This minor shifting can cause window frames to move slightly, creating new gaps around the perimeter or causing sashes to no longer fit perfectly square within their frames.
Common Mistakes
- Applying New Caulk Over Old: Many DIYers simply apply a fresh bead of caulk over existing, cracked caulk. This is a temporary fix at best. The new caulk won't adhere properly to the old, unstable caulk layer, and the seal will fail quickly. Always remove old, degraded caulk completely before applying new.
- Using the Wrong Type of Caulk: Interior caulk (typically acrylic latex) is not suitable for exterior use as it lacks the flexibility and weather resistance needed to withstand outdoor elements. Exterior caulk (silicone, polyurethanefor specific uses but usually basic siliconized acrylic latex) is durable but can be harder to paint. Match the caulk type to its application (interior vs. exterior, paintable vs. clear).
- Not Cleaning Surfaces Properly: Dust, dirt, grease, and old paint flakes prevent new sealants and weatherstripping from adhering securely. Failing to properly clean and dry surfaces before application will result in a weak bond and premature failure of your repair. Always clean surfaces thoroughly with a degreaser or mild detergent and let them dry.
- Over-Caulking Windows Shut: Applying caulk directly to movable sashes or between movable parts of the window can permanently seal the window shut, rendering it inoperable for ventilation or emergency escape. Caulk should only be applied to stationary joints, never between moving parts.
- Ignoring the Smoke Test: Guessing where drafts originate wastes time and materials. The smoke test is a simple, effective diagnostic tool. Always use a diagnostic method like the smoke test to pinpoint exact leak locations before starting repairs.
- Neglecting Interior Seals: Focusing solely on exterior drafts overlooks a common source of air infiltration: gaps between interior window trim and the wall. These interior leaks might not be visible from outside but contribute significantly to discomfort and energy loss. Address both interior and exterior perimeters of the window for a comprehensive seal.
Cost & Time Breakdown
| Task | DIY Cost | Pro Cost (per window) | Time (per window) |
|---|---|---|---|
| Diagnostic Smoke Test | $0 (incense) | N/A | 5–10 minutes |
| Remove old caulk & clean | $0–$5 (tools) | $20–$40 | 15–30 minutes |
| Apply new exterior caulk | $5–$15 | $40–$70 | 10–20 minutes |
| Replace weatherstripping | $10–$25 | $30–$60 | 20–40 minutes |
| Apply interior caulk/sealant | $5–$10 | $20–$40 | 10–15 minutes |
| Apply window insulation film | $15–$30 (kit) | N/A | 30–45 minutes |
| Total DIY (typical) | $15–$50 | $70–$200 | 1–2 hours |
Tips & Prevention
- Annual Inspection: Make it a habit to inspect your windows annually, ideally in the fall before cold weather sets in. Look for cracked caulk, shrunken weatherstripping, and loose panes.
- Cleanliness is Key: Keep window frames and sashes clean. Dirt and debris can interfere with weatherstripping's effectiveness and caulk's adhesion over time.
- Proper Window Operation: Ensure your windows latch securely when closed. A loose latch can prevent the sash from fully compressing the weatherstripping.
- Consider Storm Windows: For older, single-pane windows, installing interior or exterior storm windows can add an extra layer of insulation, significantly reducing drafts and improving energy efficiency without replacing the entire window.
- Curtains and Blinds: While not a
Related Articles
Keep troubleshooting with these hand-picked guides from FixlyGuide:
- That Ceiling Stain Isn't a Leak: 5 Hidden Causes — A mysterious ceiling stain can be alarming, especially when there's no active leak. The real culprits are often hidden issues like attic co…
- The 3-Minute Trick That Fixes a Finicky Garage Door (And Saves a Service Call) — Don’t let a garage door that won't close all the way frustrate you—a simple adjustment to your opener's travel limits might be all it needs.
- The 5-Minute Trick That Often Fixes a Dead Doorbell (No Electrician Needed) — Before you call an electrician for a dead doorbell, learn the surprising common culprit homeowners overlook and how to fix it in minutes.
- That Drywall Hole Isn't Just Ugly, It's a Bat Signal — Learn the pro-approved method for patching drywall holes of any size. We cover the surprising science behind a lasting repair and common mi…
- That ONE Reason Your Closet Door Keeps Derailing — Stop just putting your sliding closet door back on the track. We reveal the hidden—and surprisingly simple—hardware issue that causes 90% o…
- The 3 Hidden Reasons Your Gas Burner Won't Light (Beyond a Clog) — Before you call a technician, discover the most common culprits behind a gas stove burner that refuses to ignite and learn how to fix them…
Recommended for DIYers & woodworkers
Sponsored
The Top 20 Tools for Workshops of Any Budget
No stationary machines or power tools required — plus 3 fundamental tools that can't be bought at any price.
Get the free guide
Ted's Woodworking — The #1 Woodworking Resource
Detailed instructions, dimensioned drawings, materials & cutting lists, and 3D schematics for every skill level.
See the plansSponsored: links above are affiliate links. FixlyGuide may earn a commission on qualifying purchases — at no extra cost to you.
Frequently asked questions
Why are my windows so drafty?+
Drafty windows are usually caused by deteriorated caulk around the frame, worn-out weatherstripping between the sash and frame, or cracks in the glazing putty. Over time, these seals break down, creating pathways for air to enter or escape your home.
What is the best way to seal drafty windows?+
The best approach involves a multi-step process: first, identify the exact leak locations using a smoke test. Then, remove old, degraded caulk and weatherstripping. Apply new, exterior-grade caulk to outside gaps, replace worn weatherstripping on sashes, and seal interior trim with paintable caulk. For temporary relief, insulating window film can be very effective.
How much does it cost to fix drafty windows yourself?+
Fixing drafty windows yourself is very affordable, often costing between $15 and $50 per window. This includes materials like a tube of caulk ($5-$15), a roll of weatherstripping ($10-$25), and potentially a window film kit ($15-$30), depending on the specific repairs needed.
Can I use caulk on my windows indoors?+
Yes, you can use caulk indoors, but ensure you choose an interior-grade, paintable acrylic latex caulk. This type is easier to clean up with water, less flexible than exterior silicone (which isn't needed indoors), and can be painted to match your trim for a seamless finish. Apply it where your window trim meets the wall.
How often should I re-caulk my windows?+
Exterior caulk typically lasts 5-10 years, depending on the caulk type and exposure to the elements. Inspect your caulk annually for cracks or separation, and re-caulk as needed. Interior caulk can last much longer, often 10-20 years, but should be replaced if it appears cracked or pulled away from the surface.


Discussion
Loading comments…