
Tools & materials you'll need
Affiliate linksAs an Amazon Associate FixlyGuide earns from qualifying purchases — at no extra cost to you. Prices and availability are accurate as of publication and subject to change.
Quick Answer
A persistent drip or continuous leak from your single-handle faucet is most commonly caused by a worn-out or defective faucet cartridge. This internal component regulates water flow and temperature. Replacing the cartridge is a straightforward DIY repair that can usually be completed in about 30 minutes with basic tools, saving you the cost of a plumber and preventing further water waste.
The Problem
You've got a leaky single-handle faucet, maybe a slow, rhythmic drip, or perhaps a more continuous, annoying trickle. Beyond the irritating sound, a leaky faucet can waste hundreds of gallons of water per year, leading to higher utility bills and potential water damage to your sink, vanity, or even your subfloor if left unaddressed. While several issues can cause a leak, the most frequent culprit in single-handle faucets is a compromised cartridge. This part is critical for controlling both the volume and temperature of water flow. When it fails, the seal is broken, allowing water to escape even when the faucet is in the 'off' position.
How It Works
Single-handle faucets, whether they're in your kitchen or bathroom, utilize a sophisticated internal mechanism to control the hot and cold water supply and mix them to your desired temperature. At the heart of this system is the cartridge. This small, often cylindrical component houses a series of ports and ceramic discs or rubber seals. When you move the faucet handle, it manipulates the cartridge.
Inside the cartridge, precision-engineered ceramic discs with openings slide against each other. As the handle moves, these openings align to varying degrees, allowing more or less hot or cold water to flow through. For instance, pushing the handle back might align the cold water port, while pulling it forward aligns the hot water port. Moving the handle from side to side adjusts the flow rate by increasing or decreasing the size of the combined opening. When the handle is in the 'off' position, these discs theoretically create a watertight seal, preventing any water from passing through. However, over time, these ceramic discs can wear down, develop micro-scratches, or the rubber seals surrounding them can harden, crack, or accumulate mineral deposits. When this happens, the perfect seal required to stop water flow is compromised, resulting in a drip or a steady leak from the spout. Some cartridges also incorporate spring-loaded seals or o-rings that can degrade, further contributing to leaks. The water supply from your house enters the faucet body, passes through the mixing chamber controlled by the cartridge, and then exits through the spout. Any failure within the cartridge's sealing mechanism means water bypasses this control, leading to the dreaded drip.
Step-by-Step Fix
Safety First! Always turn off the water supply to the faucet before beginning any plumbing repair. This prevents accidental flooding. Have a bucket and towels ready for any residual water.
1. Shut Off the Water Supply – Locate and close the shut-off valves.
Underneath your sink, you'll find two shut-off valves—one for hot water and one for cold water. Turn both valves clockwise until they are fully closed. Turn on the faucet to drain any remaining water in the lines and ensure the water supply is indeed off.
2. Remove the Handle – Access the cartridge by removing the handle cap and screw.
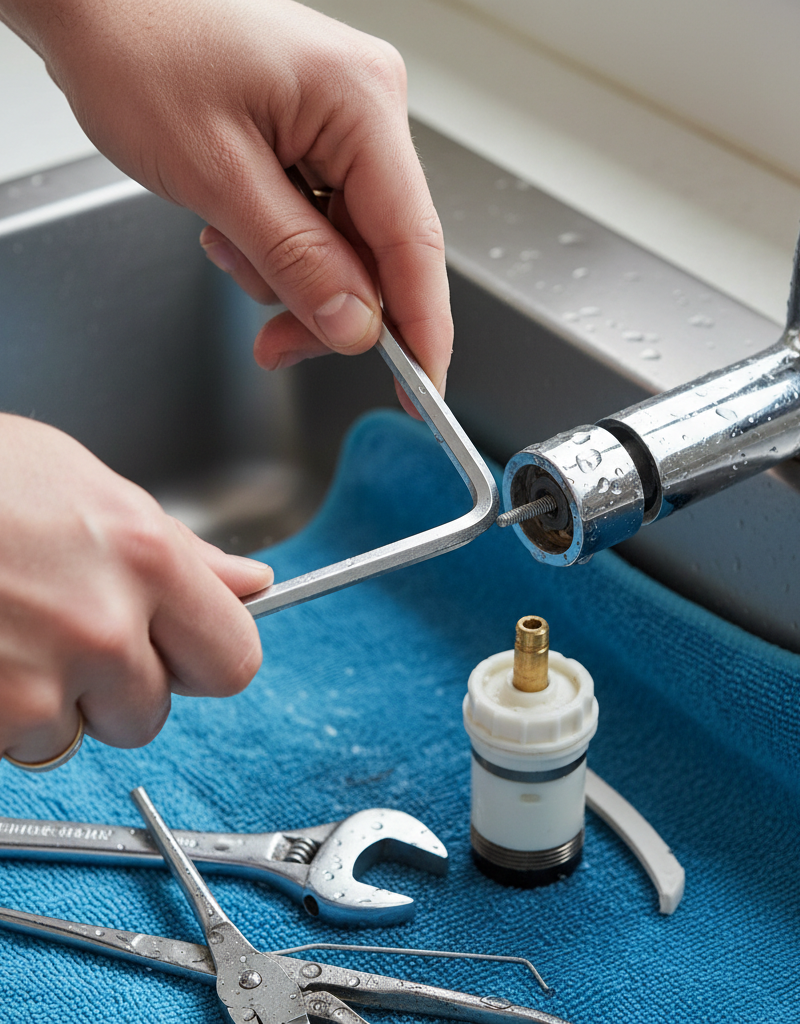
Look for a small decorative cap or plug on the top or front of the faucet handle. This often conceals a set screw. Pry off the cap gently with a small flathead screwdriver or your fingernail. Use a Phillips or Allen wrench to loosen and remove the set screw. Once the screw is out, carefully lift the handle straight up and off the faucet body. If the handle is stiff, a gentle wiggle might help. Set the screw and cap aside in a safe place.
3. Remove the Faucet Escutcheon and Retaining Nut – Expose the cartridge assembly.
Depending on your faucet model, there might be a decorative escutcheon (a large nut or cover plate) that holds the cartridge in place. Unscrew this escutcheon by hand or with an adjustable wrench. Beneath it, you'll likely find a retaining nut or a cartridge nut. Use channel-lock pliers or an adjustable wrench to carefully loosen and remove this nut. Take care not to scratch the faucet finish. Some newer faucets might use a clip instead of a nut; consult your faucet's manual if unsure.
4. Extract the Old Cartridge – Carefully pull out the faulty component.
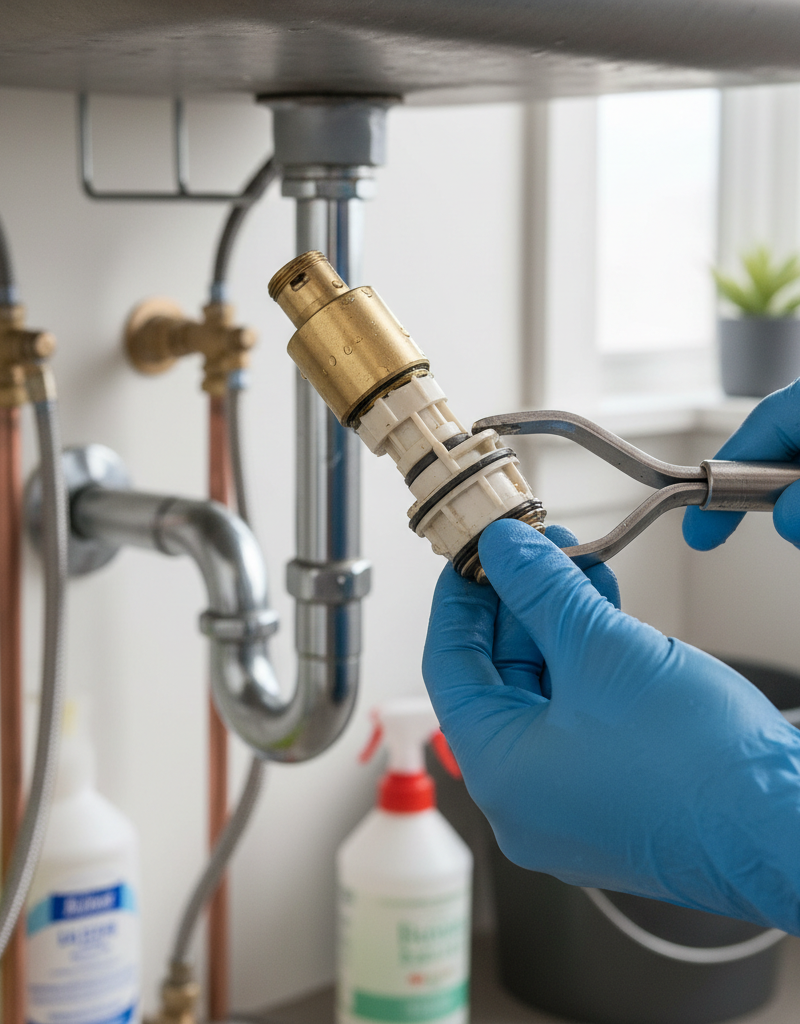
Once the retaining nut or clip is removed, the cartridge should be exposed. Some cartridges have a small tab that needs to be aligned for removal. You might be able to pull it out by hand, or you may need needle-nose pliers or the specific cartridge removal tool (sometimes provided with new faucets or cartridges). Gently twist and pull the cartridge straight up and out. Note its orientation—some cartridges have specific 'front' markings or notches that need to be aligned when installing the new one. If the cartridge is stuck, apply a penetrating lubricant and let it sit for a few minutes before trying again. Be careful not to damage the faucet body.
5. Identify and Purchase a Replacement Cartridge – Match the old part with a new one.
This is a critical step. Take the old cartridge to a hardware store or plumbing supply store. Faucet cartridges are highly specific to brand and model. An exact match is essential for proper fit and function. If you can't find an exact match, take photos of your faucet and the old cartridge from different angles, noting the faucet brand and model number if possible (often found on the underside of the faucet or in the manual). Some manufacturers have universal replacement kits, but an OEM (Original Equipment Manufacturer) part is always best. While at the store, consider picking up some plumber's grease or silicone lubricant, especially designed for plumbing, to help with installation and seal longevity.
6. Install the New Cartridge – Carefully insert the replacement component.
Before inserting the new cartridge, clean the inside of the faucet body where the cartridge sits. Use a small brush or a paper towel to remove any mineral deposits or debris. Apply a thin layer of plumber's grease or silicone lubricant to the O-rings and rubber seals on the new cartridge. Carefully insert the new cartridge into the faucet body, ensuring it's oriented correctly (aligning any tabs or notches with the faucet body). It should fit snugly and slide in without excessive force. Do not force it.
7. Reassemble the Faucet – Reverse the disassembly steps.
Replace the retaining nut or clip and tighten it securely, but do not overtighten (this can damage the cartridge or faucet body). Replace the escutcheon, if applicable. Reattach the handle, aligning it properly so that the set screw hole lines up. Insert and tighten the set screw, then snap the decorative cap back into place.
8. Restore Water Supply and Test – Check for leaks and proper function.
Slowly turn the hot and cold water shut-off valves back on (counter-clockwise). Turn them on only halfway initially. Check under the sink for any immediate leaks. Then, turn the faucet on and off several times, checking for drips from the spout and around the base of the handle. Test both hot and cold water flow and temperature mixing. If you notice any leaks, turn off the water again and re-check all connections and the cartridge installation. If the leak persists, slightly tighten the retaining nut, but again, avoid overtightening. If the leak is still there, you may have a faulty new cartridge, or the issue is not the cartridge.
Common Causes
- Worn-Out Cartridge: This is by far the most common cause. The internal ceramic discs or rubber seals within the cartridge degrade over time due to normal wear and tear, mineral deposits from hard water, or sediment in the water supply. This prevents them from forming a watertight seal when the faucet is closed.
- Damaged O-Rings: Many cartridges, especially older compression-style ones (though less common in single-handle), rely on O-rings to create seals. These rubber rings can harden, crack, or become displaced, leading to leaks. Even modern cartridges often have O-rings on their exterior to seal against the faucet body.
- Mineral Deposits: Hard water is a significant enemy of plumbing components. Over time, calcium, magnesium, and other minerals can build up on the cartridge's internal mechanisms and sealing surfaces. These deposits create abrasive surfaces or block seals, causing drips.
- Loose or Corroded Retaining Nut/Screws: If the nut that holds the cartridge in place is loose, or if screws holding parts together have corroded and loosened, the cartridge may not be seated tightly enough to prevent leaks.
- Cracked Faucet Body: While less common, extreme temperature changes or physical impact can cause hairline cracks in the metal or plastic body of the faucet, leading to leaks that are much harder to diagnose and fix. This usually requires faucet replacement.
Common Mistakes
- Not Shutting Off Water Completely: Forgetting to turn off both hot and cold water supplies can lead to a sudden, unexpected gush of water, causing a mess and potential damage. Always double-check.
- Using the Wrong Replacement Cartridge: Faucet cartridges are not universal. Installing a cartridge that isn't the exact match for your faucet's brand and model will result in continued leaks, improper function, or impossibility to install.
- Overtightening Components: While it's important for nuts and screws to be snug, overtightening can strip threads, crack plastic components, or deform the new cartridge, leading to new leaks or permanent damage.
- Damaging the Faucet Finish: Using improper tools or being careless when prying off caps or unscrewing nuts can scratch or mar the visible surfaces of your faucet. Use a cloth or masking tape to protect finished surfaces.
- Ignoring Proper Cartridge Orientation: Many cartridges have specific alignment tabs or notches. Forcing a cartridge in incorrectly can damage both the cartridge and the faucet body, necessitating further repairs or replacement.
- Not Cleaning the Faucet Body: Leaving mineral deposits or debris inside the faucet body before installing a new cartridge can compromise the new seals and lead to immediate or premature failure of the new cartridge.
Cost & Time Breakdown
| Task | DIY Cost | Pro Cost | Time |
|---|---|---|---|
| Diagnose Leak | $0 | $75–$150 | 5–10 minutes |
| Purchase New Cartridge | $15–$50 | $15–$50 (part) | 15–30 minutes |
| Replace Cartridge | $0 | $100–$250 (labor) | 20–30 minutes |
| Clean Faucet Internals | $0 | Included | 5 minutes |
| Test and Cleanup | $0 | Included | 5–10 minutes |
| Total Estimated | $15–$50 | $190–$450 | 45–85 minutes |
Tips & Prevention
- Know Your Faucet: Before a leak happens, try to identify your faucet's brand and model (check under the sink for a sticker or search online based on its appearance). This information will be invaluable for quick cartridge replacement.
- Keep Your Manual: Most new faucets come with an instruction manual and a parts diagram. Store this in a safe place, as it will specify the exact cartridge part number you need.
- Use Water Filters: If you have exceptionally hard water, a whole-house water filter or point-of-use filter can reduce mineral buildup in your plumbing, extending the life of faucet cartridges and other components.
- Avoid Harsh Cleaners: Chemical-based cleaners can deteriorate rubber seals and finishes over time. Stick to mild soaps and water for routine faucet cleaning.
- Gentle Operation: While single-handle faucets are designed for ease of use, avoid slamming the handle to the 'off' position. Gentle operation can reduce wear and tear on the internal cartridge components.
- Act Quickly: Don't ignore a small drip. A minor leak can quickly worsen, waste significant water, and potentially lead to more extensive damage or higher repair costs if left unaddressed.
When to Call a Professional
While a cartridge replacement is a common DIY fix, there are several situations where calling a licensed plumber is the wisest choice. If the leak persists after you've replaced the cartridge, it could indicate a more complex issue, such as a hairline crack in the faucet body itself or a problem with the water supply lines that isn't immediately obvious. If you encounter seized or stripped screws that prevent disassembly, or if you're unable to locate the correct replacement part despite thorough searching, a professional will have the specialized tools and expertise to handle these challenges. Furthermore, if you're uncomfortable working with plumbing, including turning off water supplies or disassembling faucet components, or if you suspect the leak is coming from inside the wall rather than the faucet itself, it's always best to err on the side of caution and enlist professional help to prevent potential water damage or exacerbate the problem. A plumber can efficiently diagnose the root cause and provide a lasting solution.
Related Articles
Keep troubleshooting with these hand-picked guides from FixlyGuide:
- The 5-Minute Trick to Stop a Dripping Single-Handle Faucet (No Plumber Needed) — A persistent drip from your single-handle faucet is usually caused by a worn-out cartridge, a repair you can typically complete yourself in…
- The $5 Secret to Silencing That Annoying Dripping Faucet (Single-Handle Fix) — Stop a dripping single-handle faucet with a simple and inexpensive DIY fix by replacing a worn-out o-ring or washer.
- The $5 Secret to Fixing Your Drip: Why Single-Handle Faucets Leak (and the O-Ring Trick) — A persistent drip from your single-handle faucet is often caused by worn-out O-rings or seals, a common issue with a simple, inexpensive DI…
- The 5-Minute Trick to Restore Your Kitchen Sink Sprayer's Lost Pressure — Restore your kitchen sink sprayer's low pressure with a quick, simple trick that often takes less than five minutes and requires no special…
- The 90-Minute Hidden Danger of a Frozen Pipe (And the DIY Fix) — Thawing a frozen pipe quickly and safely is crucial to prevent bursting and extensive water damage to your home.
- The #1 Mistake Homeowners Make When Diagnosing Low Water Pressure (It's Not Your Pipes!) — Discover the most common, often overlooked culprit behind low water pressure impacting your entire home and how to easily fix it.
Frequently asked questions
How do I know if my single-handle faucet needs a new cartridge?+
The most common signs are a constant drip from the spout even when the faucet is off, difficulty controlling water temperature, or a handle that feels loose or grinds when moved. Sometimes, water might leak from the base of the handle, indicating seals around the cartridge have failed.
Are all faucet cartridges the same?+
No, faucet cartridges are highly specific to the brand and model of your faucet. It's crucial to remove your old cartridge and take it to a hardware store or plumbing supply store to ensure you get an exact match. Universal cartridges exist, but an OEM part is generally recommended for the best fit and performance.
What if my faucet still leaks after replacing the cartridge?+
If your faucet still leaks after a new cartridge installation, double-check that the cartridge is seated correctly and the retaining nut is snug (but not overtightened). The issue might also be damaged O-rings elsewhere in the faucet body, a cracked faucet body, or, less commonly, an issue with water pressure or supply lines. In such cases, it's best to consult a professional plumber.
How long does a faucet cartridge typically last?+
The lifespan of a faucet cartridge can vary significantly based on water quality (hard water can shorten life), frequency of use, and manufacturing quality. On average, a cartridge might last anywhere from 5 to 10 years, though some can fail much sooner or last considerably longer. Regular maintenance and avoiding harsh chemical cleaners can help prolong its life.

Discussion
Loading comments…