
Tools & materials you'll need
Affiliate links- AmazonPowdered graphite or talcum powder1 container
- AmazonConstruction adhesive (e.g., Liquid Nails)If you have basement/crawl space access
- AmazonWooden shims1 pack · If you have basement/crawl space access
- AmazonFinish nails1 box (2-inch or 2.5-inch, 15 or 16 gauge)
- AmazonWood puttyMatching floor color
As an Amazon Associate FixlyGuide earns from qualifying purchases — at no extra cost to you. Prices and availability are accurate as of publication and subject to change.
Quick Answer
Most floor squeaks result from movement and friction between different layers of your floor assembly – typically the subfloor, individual floorboards, or the joists beneath. The good news is that many of these irritating noises can be effectively resolved without the daunting task of pulling up floorboards. By strategically applying lubricants, fasteners, or even shims from above or in an accessible crawl space/basement, you can often quiet a noisy floor, restoring peace to your home.
The Problem
You know the sound: that familiar groan or high-pitched whine that accompanies every step across a certain section of your floor. This isn't just an annoyance; a persistent squeak indicates friction and movement where there shouldn't be. Over time, as wood naturally expands and contracts with changes in temperature and humidity, the nails holding floorboards to joists or the subfloor to joists can loosen. This creates tiny gaps, allowing wood components to rub against each other, generating that characteristic squeak. It's not usually a structural issue, but it's a clear signal that something isn't firmly secured.
How It Works
To understand how to fix a squeak, it helps to visualize your floor's anatomy. The typical floor construction starts with floor joists – the strong horizontal beams forming the framework. On top of these joists is the subfloor, usually sheets of plywood or OSB, which provides a stable base. Finally, the finished flooring (hardwood, laminate, carpet, etc.) sits on the subfloor.
Squeaks primarily arise from two scenarios:
- Floorboard-on-Subfloor Friction: Individual flooring planks (especially common with older hardwood) can separate slightly from the subfloor. As you step, the plank flexes, rubbing against the subfloor or the head of a nail, causing a squeak.
- Subfloor-on-Joist Friction: The subfloor itself can become loose from the joists. The nails or screws meant to secure the subfloor can back out or lose their grip due to wood movement, leading to the subfloor rubbing against the top edge of the joist.
- Joist-on-Joist/Subfloor-on-Joist Movement (Rare but Possible): Less common, but sometimes the joists themselves might move against a header or a nearby joist, or a loose subfloor might pivot on a fastener, causing a squeak at the joist line.
The goal of a non-invasive fix is to either eliminate the friction by introducing a buffer (lubrication) or by re-securing the loose components without requiring demolition. This involves tactics like driving new fasteners from above, using specialized tools to pull boards down, or reinforcing from below if access is available.
Step-by-Step Fix
Here are several methods to tackle squeaky floors without removing boards, starting with the least invasive:
1. Pinpoint the Exact Squeak Source – A crucial first step for effective repair
- Walk the Area: Have a helper walk slowly across the squeaky section of the floor. Get down on your hands and knees and listen intently. Try to identify the precise board or area where the sound originates.
- Apply Pressure: Once you've narrowed it down, apply pressure with your hands or knees directly around the suspected spot. Can you replicate the squeak? This helps confirm the exact point of friction.
- Mark the Spot: Use painter's tape or a piece of chalk to clearly mark the center of the squeak. This prevents you from losing your target.
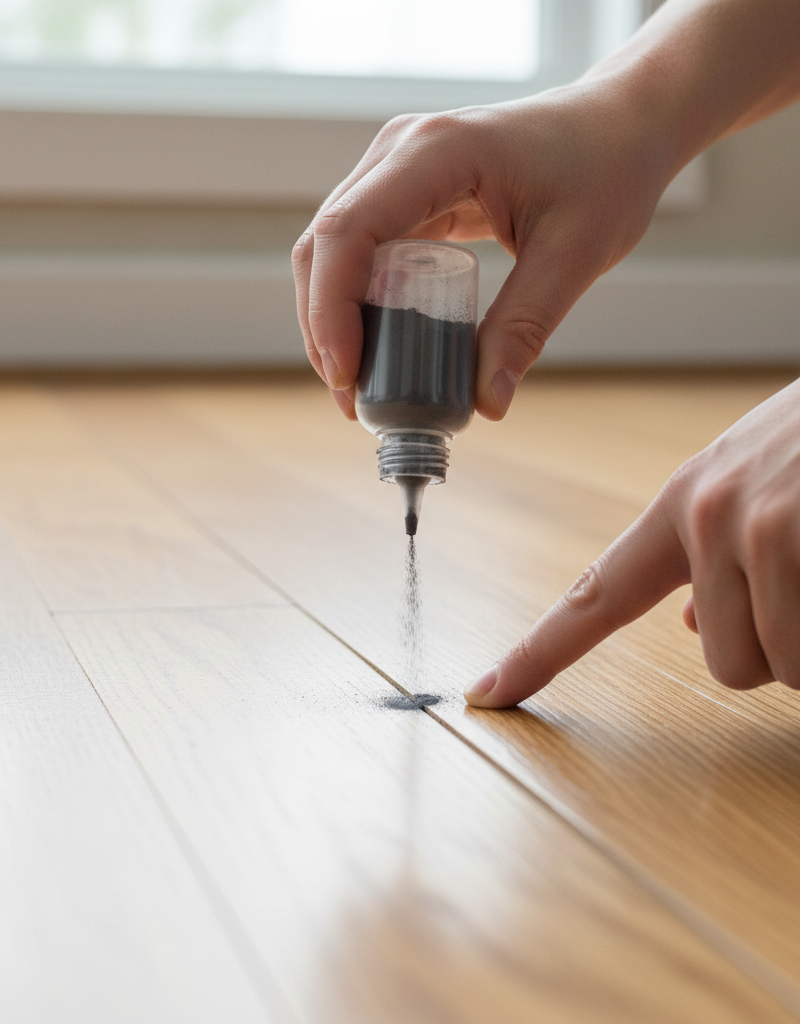
2. Lubricate with Powdered Graphite or Talcum Powder – The simplest, least invasive approach
- Clean the Gap: Use a utility knife or a thin piece of feeler gauge to very gently clean out any debris in the tiny gaps between the squeaky floorboards. Be careful not to damage the finish.
- Apply Lubricant: Sprinkle a generous amount of powdered graphite or talcum powder directly over the squeak. Focus on the seams where boards meet.
- Work it In: Gently walk back and forth over the area, allowing the powder to work its way down into the gaps. The fine particles will act as a dry lubricant, reducing friction.
- Repeat & Test: Reapply and repeat the walking process several times. Test the squeak. If it's reduced or gone, wipe away any excess powder with a damp cloth.
- If this doesn't work, the movement is likely too significant for simple lubrication and requires fastening.
3. Use Construction Adhesive from Below (If Accessible) – For subfloor-to-joist or joist-to-joist squeaks
- Access the Area: If you have an unfinished basement or crawl space below the noisy floor section, go there with a bright light.
- Locate the Squeak: Have your helper walk above, while you listen below to pinpoint the exact joist and subfloor area causing the noise.
- Apply Adhesive: Identify the gap between the subfloor and the joist where the movement is occurring. Apply a generous bead of construction adhesive (like Liquid Nails Floor Squeak Eliminator) into the gap. You're aiming to fill the void and bond the two surfaces.
- Secure Temporarily (Optional but Recommended): Use a wooden shim or a scrap piece of wood gently wedged between the joist and a stronger brace below to apply upward pressure while the adhesive cures. Remove after 24 hours.
- Safety Note: Wear eye protection and gloves when working with construction adhesive.
- If the gap is too large for adhesive, consider shimming.
4. Shim Gaps from Below (If Accessible) – To stabilize subfloor or joists against each other
- Identify Gaps: From below, locate any visible gaps between the subfloor and the top of a joist, or between a joist and a cross brace, that seems to be associated with the squeak.
- Prepare Shims: Use thin wooden shims (cedar or pine shims work well). You want them to be just thick enough to fill the gap without forcing or jacking up the subfloor.
- Gently Insert: Apply a small amount of wood glue to one side of the shim. Tap the shim gently into the gap using a hammer until it's snug, but not overly tight. The goal is to eliminate movement, not to lift the floor.
- Trim Excess: Once the glue is dry and the squeak is gone, score the shim with a utility knife and snap off any excess that protrudes below the joist.
- If you cannot access the subfloor from below, you'll need to use methods from above.
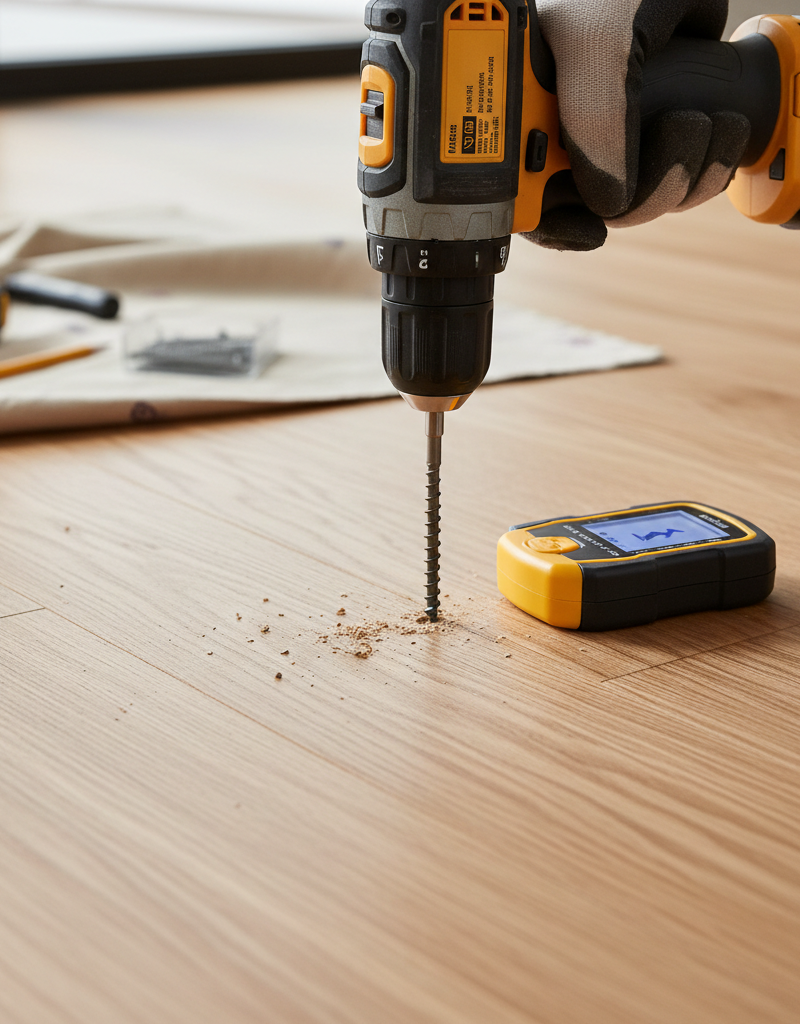
5. Drive Finish Nails into Joists – For squeaks where the joist can be precisely located
- Locate Joists: Use a stud finder set to 'deep scan' or 'joist scan' to accurately locate the center of the floor joists beneath the squeaky section. Mark the joist path with painter's tape.
- Pilot Holes (Optional but Recommended for Hardwood): For hardwood floors, use a small drill bit (slightly smaller than your finish nail) to drill pilot holes through the floorboard and subfloor, aiming for the center of the joist. This prevents splitting.
- Drive Nails: Using 2-inch or 2.5-inch finish nails (15 or 16 gauge) and a hammer, drive nails through the floorboard, subfloor, and securely into the joist. Aim for an angle if possible for better grip. Drive the nail head just below the surface with a nail set.
- Fill Holes: Fill the resulting small holes with wood putty that matches your floor color. Let dry and buff smooth.
- If you are dealing with a thick carpet, this method is very difficult and not recommended without removing carpet sections.
6. Use Squeak Eliminator Screws – A specialized tool for silent fastening
- Identify Squeak: Precisely locate the squeak using the method in Step 1.
- Kit Instructions: Purchase a squeak eliminator screw kit (e.g., O'Berry Squeeeek No More or Counter-Snap). These kits come with specialized screws and a fixture that allows you to break off the screw head below the surface.
- Attach Fixture: Place the screw fixture over the squeak. It typically has a guide that helps aim the screw.
- Drive Screw: Drive the specialized screw through the fixture, through the floorboard and subfloor, and into the joist below. The screw's design pulls the floor layers together tightly.
- Break Off Head: Once the screw is fully driven to the proper depth, use the breaking tool provided in the kit to snap off the screw head just below the surface of the floor.
- Fill Hole: Fill the tiny remaining hole with wood putty. This method creates a very strong, permanent hold.
- This method is excellent for carpeted floors as well, as the tool allows the screw to go through carpet without visible damage.
7. Add Blocking Between Joists (Advanced, From Below) – For joist movement or bridging larger gaps
- Identify Problem: From below, if you observe a joist that flexes excessively or notice significant gaps between joists and subfloor that shims can't fix, blocking might be needed.
- Cut Blocking Material: Cut pieces of dimensional lumber (e.g., 2x8 or 2x10, matching your joist size) to fit snugly between two existing joists, perpendicular to them. These are called
Related Articles
Keep troubleshooting with these hand-picked guides from FixlyGuide:
- The Secret $7 Fix for Squeaky Floors (No Demolition Needed!) — Silence annoying floor squeaks using simple, non-invasive methods that don't require ripping up your flooring.
- The Weird Trick to Silence a Squeaky Floor (Without Tearing Anything Up) — Learn how to effectively silence a squeaky floor without the invasive and costly process of removing floorboards, often using simple tools…
- The Squeaky-Floor Truth Contractors Never Tell You (And the $10 Solution) — Discover the real reasons behind squeaky floors and how a common overlooked issue can be fixed with simple tools and materials.
- The #1 Reason Your Doorbell Suddenly Dies (and the 10-Minute Fix) — A non-functioning doorbell is often caused by a tripped transformer, a simple issue homeowners can usually resolve in minutes.
- Your Squeaky Floor's Secret: It's Not the Wood, It's the Gap — Tired of that persistent floor squeak? Discover the hidden causes of noisy floorboards and learn several easy, DIY methods to silence them…
- The 3 Hidden Reasons Your Baseboards Are Pulling Away (And How to Fix It FAST) — Don't ignore separating baseboards—they’re not just an eyesore. Learn the surprising culprits behind the gaps and how to permanently fix th…
Recommended for DIYers & woodworkers
Sponsored
The Top 20 Tools for Workshops of Any Budget
No stationary machines or power tools required — plus 3 fundamental tools that can't be bought at any price.
Get the free guide
Ted's Woodworking — The #1 Woodworking Resource
Detailed instructions, dimensioned drawings, materials & cutting lists, and 3D schematics for every skill level.
See the plansSponsored: links above are affiliate links. FixlyGuide may earn a commission on qualifying purchases — at no extra cost to you.
Frequently asked questions
What causes floorboards to squeak?+
Floorboards squeak primarily due to friction between loose components in the floor assembly. As wood naturally expands and contracts with changes in humidity and temperature, the fasteners (nails or screws) securing the floorboards to the subfloor or the subfloor to the joists can loosen. This allows the wood to move and rub against itself or the fasteners, creating the characteristic squeaking sound.
Can I fix a squeaky floor without accessing underneath?+
Yes, many squeaks can be addressed from above the floor. Methods include lubricating gaps between boards with talcum powder or powdered graphite, driving finish nails or specialized squeak eliminator screws into joists, or using shims to tighten loose boards. The success depends on the specific cause and location of the squeak.
Is a squeaky floor a sign of structural damage?+
In most residential situations, a squeaky floor is not a sign of major structural damage. It's usually a minor issue caused by loose fasteners or wood friction due to seasonal movement. However, if the floor is excessively bouncy, sagging, or accompanied by visible cracks in walls or ceilings, it's wise to have a professional inspect it for potential structural concerns.
What's the best way to find the exact source of a squeak?+
The most effective way is a two-person job. Have one person walk slowly and deliberately over the squeaky area while another person listens closely, ideally with their ear to the floor or from the accessible space below (if available). Apply pressure directly to small sections to pinpoint the exact point of friction. Marking the spot with painter's tape helps in focusing your repair efforts.
How long do non-invasive floor squeak repairs last?+
The longevity of a non-invasive repair varies. Lubrication with powder is often a temporary fix, lasting months to a few years. Driving new fasteners (nails or screws) into joists or using dedicated squeak eliminator screws tends to be a more permanent solution. Repairs made from below with shims or construction adhesive can also be very durable, often resolving the squeak for many years, provided the underlying wood movement is stabilized.

Discussion
Loading comments…