
Tools & materials you'll need
Affiliate linksAs an Amazon Associate FixlyGuide earns from qualifying purchases — at no extra cost to you. Prices and availability are accurate as of publication and subject to change.
Quick Answer
Squeaky floors are often a symptom of wooden components – floor joists, subfloor, or the finished flooring itself – rubbing against each other as your house settles, or due to changes in humidity causing wood to expand and contract. The good news is that many squeaks can be silenced with surprisingly simple and inexpensive fixes, often involving specialized screws or shims to eliminate movement between these components. While some require access to the floor joists from a basement or crawl space, others can be remedied from the living space above.
The Problem
That annoying squeak every time you step on a particular spot isn’t just a minor irritation; it’s a sign of movement. Over time, the wood in your home, especially flooring components, can shift, shrink, or settle. Nails can lose their grip, subfloor panels can separate from joists, or even individual floorboards can rub against each other or the subfloor. This friction creates the distinctive squeaking sound. Understanding why it's happening in your specific case is the first step to a successful repair, which often saves you from expensive professional intervention for minor issues.
How It Works
To understand a squeak, imagine your floor as a layered system. At the bottom, you have the main structural beams, then the floor joists running perpendicular (or sometimes parallel) to those beams. On top of the joists sits the subfloor, typically sheets of plywood or OSB, which are nailed or screwed into the joists. Finally, the finished flooring (hardwood, laminate, carpet with padding) rests on the subfloor.
Wood is an organic material, and it’s constantly reacting to its environment. When humidity rises, wood absorbs moisture and expands; when humidity drops, it dries out and shrinks. This expansion and contraction, while subtle, creates significant forces over time. If the fasteners (nails or screws) securing the subfloor to the joists, or the finished flooring to the subfloor, loosen or break their grip, tiny gaps can form. When you step on the floor, the pressure causes these now-loose components to rub against each other or the fasteners themselves, generating the squeak.
Another common culprit is unevenness. If a joist is slightly higher or lower than its neighbors, or if a subfloor panel isn't perfectly flush, stresses build up. The weight of someone walking across the floor causes the subfloor or finished floor to flex and rub against the high spots or the edges of adjacent panels, leading to noise. Old-fashioned nails, in particular, are prone to loosening over decades, allowing for more play and more squeaks. Modern construction often uses screws for subflooring for this very reason, as they provide a much stronger, more resistant hold against movement.
Step-by-Step Fix
Safety Note: Always wear eye protection when working with power tools or in tight spaces where dust or debris might fall. If working in a crawl space, wear a dust mask and gloves. Ensure adequate ventilation. If you suspect any electrical wiring or plumbing is near your work area, proceed with extreme caution or consult a professional.
Step 1: Pinpoint the Squeak's Location – The critical first diagnostic
- How to: Have a partner walk slowly over the squeaky area upstairs while you listen from below (if possible, in a basement or crawl space). If you can't access from below, methodically test each square foot of the floor, noting where the squeak is loudest. Use painter's tape to mark the precise spot on the finished floor.
- If this doesn't work: If the squeak is difficult to isolate, try sitting on the floor and wiggling gently to see if you can reproduce it from different angles and pressures. Sometimes, it's not a single point but an edge or seam.
Step 2: Access from Below (If Possible) – The optimal approach for structural squeaks
- Tools: Work light, pry bar, shims, construction adhesive, drill, wood screws (1 1/2-inch to 2-inch)
- How to: If you have access to the underside of the subfloor (from a basement or crawl space), this is often the easiest and most effective method. Have your partner walk above again to pinpoint the exact joist and subfloor section causing the noise. Look for gaps between the subfloor and the joist, or movement when pressure is applied from above.
- Option A: Shimming a Gap: If there's a small gap between the subfloor and the top of a joist, gently tap thin wood shims (cedar shingles work well) into the gap until snug. Don't force them too tightly, as this can push up the finished floor. Apply a bead of construction adhesive to the shim before tapping it in to help secure it long-term. Trim any excess shim with a utility knife.
- Option B: Screwing Subfloor to Joist: If shimming isn't feasible or the gap is too large, use a drill and 1 1/2-inch to 2-inch wood screws to fasten the subfloor directly to the joist. Countersink the screw head slightly below the surface of the joist. Be careful not to use screws that are too long and penetrate the finished flooring above. For typical 3/4-inch subfloor and 1 1/2-inch joists, a 1 1/2-inch or 1 1/4-inch screw is usually sufficient.
- Option C: Bridging a Gap Between Joists: If subfloor panels are rubbing together or a squeak is mid-span, you can add blocking. Cut a piece of 2x lumber to fit snugly between two joists, directly under the squeak. Secure it to both joists with screws or joist hangers. Then, drive a screw from the subfloor down into this new blocking.
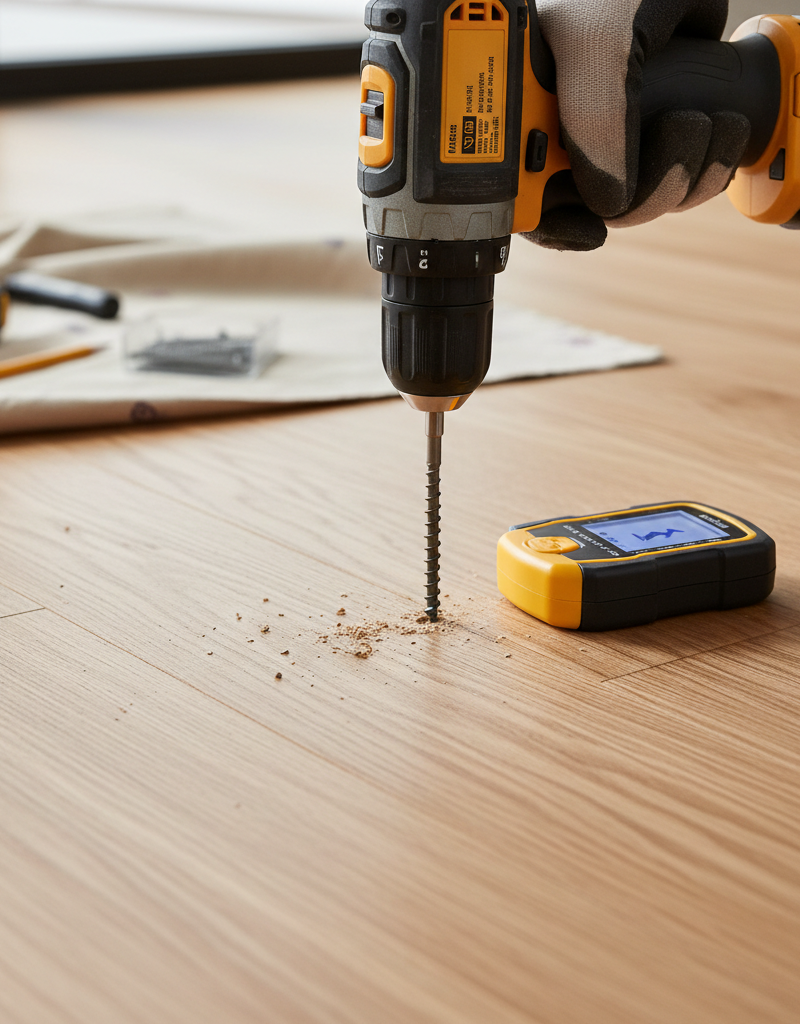
Step 3: Fixing Squeaks from Above (No Basement Access) – When an underside fix isn't an option
- Tools: Drill, specialized squeak-repair kit (e.g., Squeak-No-More or similar), wood filler, sandpaper, touch-up stain/paint, stud finder.
- How to: This method requires careful work as it involves penetrating the finished flooring. Use a stud finder to locate the joists beneath the squeaky area. Mark the joist locations with painter's tape.
- Option A: Squeak-Repair Kit: These kits often include specialized screws designed to pull the subfloor (and sometimes the finished floor) tightly to the joist without leaving a visible screw head. Follow the kit's instructions precisely. Typically, you drill a pilot hole, drive a screw until a specific point, and then snap off the screw head just below the surface, leaving a tiny, easily concealable hole. This is especially good for carpeted floors.
- Option B: Drilling & Plugging (for Hardwood Floors): For hardwood floors where aesthetics are crucial, locate the joist. Drill a thin pilot hole (smaller than your finish nail) through the hardwood and subfloor into the joist. Secure with a finish nail or small screw (if using a screw, pre-drill adequately and counter-sink). Then, fill the hole with wood filler that matches your floor, sand lightly, and touch up with stain or clear coat. This is a more involved aesthetic repair.
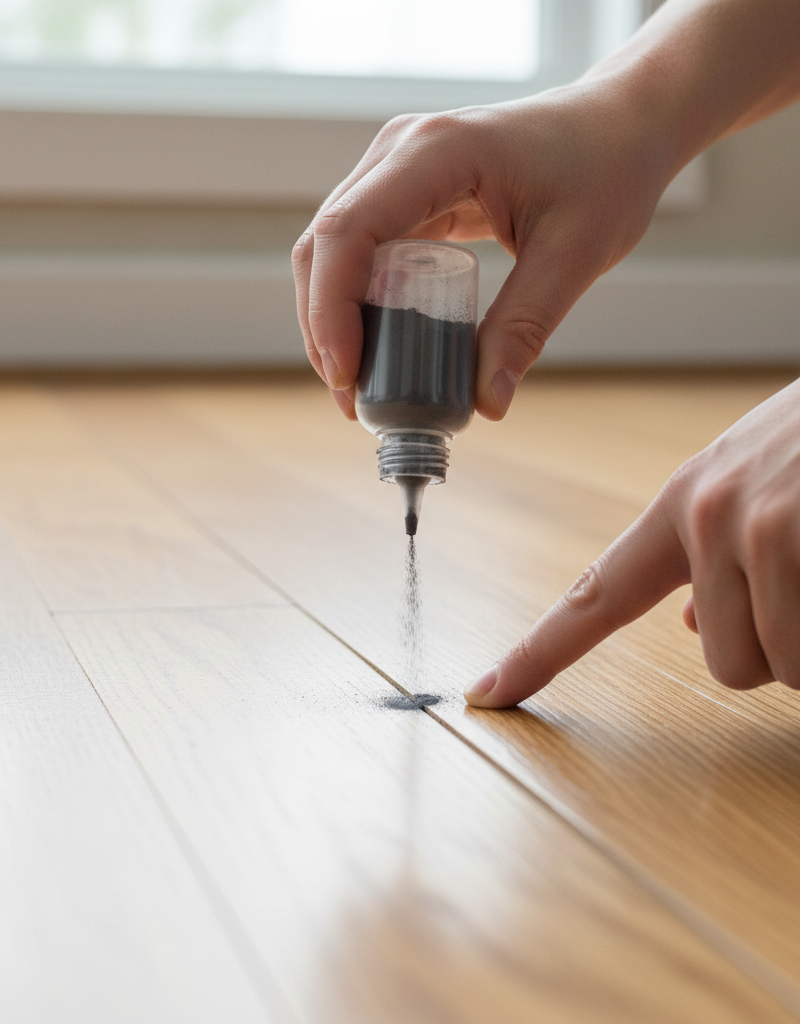
- Option C: Powdered Lubricant (Temporary Fix for Board-on-Board Rubbing): If the squeak is clearly individual floorboards rubbing against each other (not indicating a deeper subfloor issue), you can try sprinkling a very fine powdered lubricant like talcum powder or powdered graphite into the seams between the boards. Work it in with a stiff brush. This is generally a temporary fix but can provide immediate relief.
Step 4: Evaluate the Fix – Confirming success
- How to: After each repair attempt, walk over the area again, applying pressure. Have your partner listen from below if possible. If the squeak persists, you might have multiple sources of friction or need to apply a slightly different technique in an adjacent spot.
Common Causes
- Seasonal Wood Movement: As humidity levels change throughout the year, wood expands and contracts. This constant movement can loosen fasteners and create gaps. This is the most prevalent cause in older homes, especially during dry winter months when wood shrinks.
- Loose Subfloor to Joist Connection: The most common mechanical cause. Nails or screws that hold the subfloor to the joists can work their way loose, allowing the subfloor to rub against the joist or the shank of the fastener.
- Uneven Joists: Joists that aren't perfectly level can put stress on the subfloor, causing it to flex and squeak when stepped on. This is especially true if a joist has warped or twisted over time.
- Finished Flooring Rubbing: Individual floorboards, especially older strip hardwood, can rub against each other or against loose nails if they aren't tightly T&G (tongue and groove) or are installed without proper expansion gaps.
- Subfloor Panel Rubbing: Edges of subfloor panels can rub against each other if they weren't installed with adequate expansion gaps or if they’ve become warped or delaminated over time.
- Insufficient Fastening: In some older constructions, subfloor or finished flooring may have been installed with an inadequate number of fasteners, leading to increased movement and squeaking.
Common Mistakes
- Ignoring the Source: Just trying to
Related Articles
Keep troubleshooting with these hand-picked guides from FixlyGuide:
- Your Squeaky Floor's Secret: It's Not the Wood, It's the Gap — Tired of that persistent floor squeak? Discover the hidden causes of noisy floorboards and learn several easy, DIY methods to silence them…
- The 3 Hidden Reasons Your Door Won't Latch (And the Easy DIY Fixes) — Frustrated by a door that refuses to latch? Discover the common culprits behind this annoying problem and learn simple, effective DIY fixes…
- That Corner Crack Is Back? It's Not the Drywall's Fault — Discover the real reasons that annoying drywall crack in the corner keeps returning. It's often a sign of deeper issues than just bad mud o…
- The 5-Minute Trick to Fix a Window That Won't Stay Open (No Tools Needed!) — Discover the surprisingly simple reasons why your window keeps sliding shut and how to fix it in minutes, often without any tools.
- The 3 Hidden Reasons Your Door Won't Latch (And the Easy DIY Fixes) — Don't live with a door that refuses to latch; discover simple, DIY solutions for common door latch problems and restore security and privac…
- The 7 Critical Roof Flaws You Can Spot From Your Yard (Before They Cost You Thousands) — Learn how to spot critical roof damage from the safety of your yard, identifying issues like missing shingles and blocked gutters before th…
Recommended for DIYers & woodworkers
Sponsored
The Top 20 Tools for Workshops of Any Budget
No stationary machines or power tools required — plus 3 fundamental tools that can't be bought at any price.
Get the free guide
Ted's Woodworking — The #1 Woodworking Resource
Detailed instructions, dimensioned drawings, materials & cutting lists, and 3D schematics for every skill level.
See the plansSponsored: links above are affiliate links. FixlyGuide may earn a commission on qualifying purchases — at no extra cost to you.
Frequently asked questions
Why do my floors squeak more in winter?+
Floors often squeak more in winter due to lower humidity. As the air dries out, the wood components in your floor (joists, subfloor, finished flooring) shrink, creating small gaps and increased friction between surfaces that were snug during more humid months.
Can I fix squeaky floors myself?+
Yes, many squeaky floors can be fixed by a homeowner with basic tools and some patience. Common DIY methods involve securing loose subfloor to joists with screws or shims, either from below (basement/crawl space) or from above using specialized repair kits.
What's the best way to find a squeak?+
The best way to pinpoint a squeak is to have one person slowly walk over the suspected area while another person listens carefully, ideally from the floor below (basement or crawl space). This allows you to identify the exact spot and often the specific components causing the friction.
When should I call a professional for squeaky floors?+
You should call a professional if squeaks are accompanied by noticeable sagging, cracked drywall, or doors that no longer close properly, as these can indicate serious structural issues. Also, if you lack access to the subfloor or are uncomfortable working with power tools near wiring or plumbing, a professional can provide a safe and effective solution.

Discussion
Loading comments…