
Tools & materials you'll need
Affiliate linksNo materials required.
As an Amazon Associate FixlyGuide earns from qualifying purchases — at no extra cost to you. Prices and availability are accurate as of publication and subject to change.
How it works
A conventional storage-tank water heater is a thermally insulated cylinder designed to heat and store water. The process begins when cold municipal water enters your home and is directed into the tank via a cold water inlet pipe. Inside the tank, a long plastic tube called a dip tube extends from this inlet down to the bottom of the tank. This ensures cold water is introduced where the heating occurs, preventing it from immediately mixing with the ready-to-use hot water at the top.
The heating mechanism sits at the bottom of the tank. In a gas water heater, a burner assembly underneath the tank ignites to heat the tank's metal floor, transferring thermal energy to the water via conduction. In an electric water heater, one or two immersed heating elements—metal rods containing high-resistance wire—convert electrical energy directly into heat.
As the water heats, it becomes less dense and rises to the top of the tank, a process known as convection. The hottest water collects here, ready for use. When you open a hot water tap, pressure from the incoming cold water pushes this hot water out through the hot water outlet pipe at the top of the tank and into your home's plumbing. A thermostat monitors the water temperature, signaling the burner or elements to activate when the temperature drops below a set point (typically 120-140°F).
The problem addressed by flushing originates from minerals dissolved in your water supply, primarily calcium and magnesium carbonates. When heated, these minerals precipitate out of the solution and settle as fine, sand-like particles at the bottom of the tank. Over months and years, this sediment can harden into a thick layer of scale. This scale insulates the water from the heat source, forcing the heater to run longer and use more energy to achieve the target temperature. It also traps pockets of water against the super-heated tank bottom, causing them to boil and create the characteristic rumbling or popping sounds of a sediment-filled heater. This process, known as kettling, puts extreme stress on the tank's metal and welds, significantly shortening the unit's lifespan.
Step-by-Step Fix
Safety Precautions: This procedure involves hot water and either gas or high-voltage electricity. Water temperatures above 125°F can cause severe burns in seconds. Always shut down the power/gas supply and allow adequate cooling time. Wear protective gloves and safety glasses.
-
Shut Down the Power or Gas Supply — This is the first and most critical safety step. Do not proceed until you have confirmed the heat source is off.
- For electric water heaters: Locate your home's main electrical panel (breaker box). Find the double-pole circuit breaker dedicated to the water heater. It is typically a 30-amp breaker and may be labeled "Water Heater" or "Hot Water." Flip the breaker to the full "OFF" position. For verification, you can use a non-contact voltage tester near the wires entering the top of the water heater; it should not light up or beep.
- For gas water heaters: Locate the gas control valve on the front of the unit, which has a dial or knob. Turn this dial from the "ON" or "HOT" position to "PILOT." This stops the main burner from firing but keeps the pilot light lit. If you prefer, you can turn it to the full "OFF" position, but you will have to relight the pilot later.
-
Allow the Water to Cool — The water inside the tank is dangerously hot. To prevent scalding, allow the tank to cool for at least 3-4 hours after shutting off the heat source. If you are short on time, you can open a hot water tap and run the water until it is no longer hot, but this wastes heated water. A longer passive cooling time is recommended.
-
Shut Off the Cold Water Inlet — Locate the cold water pipe that enters the top of your water heater. It should have a shutoff valve, typically with a blue handle or a round, wheel-like handle. Turn this valve clockwise until it is fully closed. This stops new water from entering the tank as it drains.
-
Open a Hot Water Faucet — Go to a sink or bathtub inside the house—a bathtub is ideal as it can safely handle a large volume of water. Open the hot water side of the faucet and leave it open. This allows air to enter the plumbing system as the tank drains, breaking the vacuum and allowing the water to flow out smoothly. You will hear air being drawn into the faucet as the tank begins to drain.
-
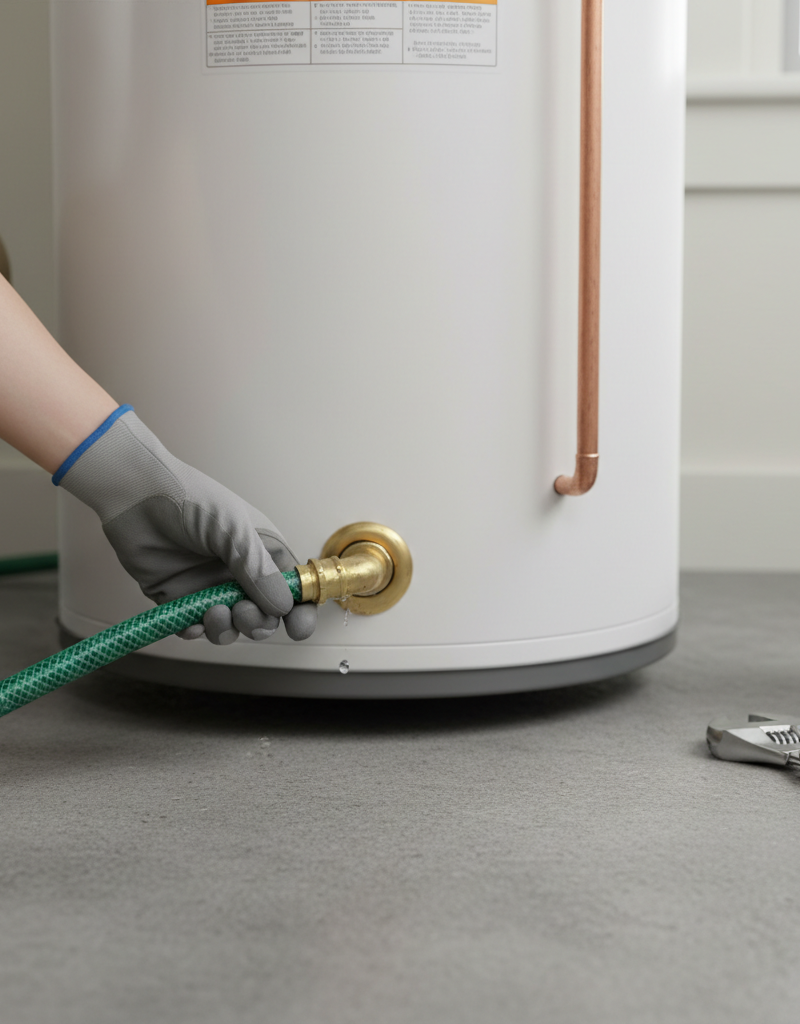
Connect a Garden Hose — Attach a heavy-duty garden hose to the drain valve located near the bottom of the water heater tank. Ensure the threaded connection is tight to prevent leaks. Run the other end of the hose to a suitable drainage point, such as a floor drain, a large utility sink, or outside to a driveway or lawn area away from your home's foundation. Be aware that the initial outflow will contain sediment and may stain concrete.
-
Open the Drain Valve — The drain valve is often made of plastic and may have a slot for a flathead screwdriver or a small, T-shaped handle. Using channel-lock pliers or a screwdriver, turn the valve counter-clockwise about a quarter turn to open it. Water should begin to flow through the hose. If no water flows, the valve may be clogged with sediment.
- If the valve is clogged: Close the drain valve. Have a helper briefly open and close the main cold water supply valve a few times. The burst of pressure can often dislodge the sediment blocking the drain. Re-open the drain valve.
-
Drain the Tank Completely — Allow the tank to drain until the flow of water stops. This can take anywhere from 15 to 45 minutes, depending on the size of your tank (typically 40-50 gallons). You will likely see discolored, cloudy, or sandy water coming out of the hose, especially at the beginning. This is the sediment you want to remove.
-
Power Flush the Remaining Sediment — This is the most important step for an effective flush. Simply draining the tank leaves the heaviest, most compacted sediment behind. With the drain valve still open and the hose in place, have a helper turn the cold water supply valve on for 15-20 seconds at a time. This will send a blast of water into the bottom of the tank, stirring up the remaining sediment and forcing it out the drain hose. Repeat this process 4-5 times, or until the water exiting the hose runs consistently clear.
-
Close the Drain and Begin Refilling — Once the water runs clear, fully close the drain valve at the bottom of the tank. Make sure it is snug, but do not overtighten, especially if it is a plastic valve. Leave the hot water faucet in the house open. Now, fully open the cold water supply valve to begin refilling the tank.
-
Purge Air From the System — As the tank fills, it will push the remaining air out through the open hot water faucet you left on in step 4. Let the water run at this faucet. You will hear hissing and sputtering as air is purged from the tank and pipes. Once water flows from the faucet in a steady, uninterrupted stream, the tank is full. At this point, you can turn off that faucet.
-
Check for Leaks — Carefully inspect the drain valve and the water line connections at the top of the tank for any drips or leaks. If you notice any, you may need to tighten the connection slightly or replace a worn-out hose washer.
-
Restore Power and Test — Once you have confirmed the tank is completely full of water and free of air (Step 10), and there are no leaks, you can restore power.
- For electric heaters: Go back to the breaker panel and flip the water heater's circuit breaker back to the "ON" position. CAUTION: Never restore power to an electric water heater before it is completely full of water. This will cause the upper heating element to "dry fire" and burn out instantly.
- For gas heaters: Turn the gas control valve dial back to the "ON" position. If you turned the pilot off completely, follow the manufacturer's lighting instructions printed on the side of the tank. You should hear the main burner ignite within a few minutes as it begins to heat the new tank of cold water.
Common mistakes
- Dry Firing an Electric Heater: The most common and costly mistake is restoring power to an electric water heater before it is full. The upper heating element is not submerged until the tank is nearly full. If energized while exposed to air, it will overheat and burn out in seconds, requiring replacement. Always purge all air from a hot water tap before turning the breaker back on.
- Forgetting to Open a Hot Water Faucet: If you don't open a nearby hot water tap before draining, a vacuum will form inside the tank. This will slow the draining process to a trickle or stop it completely, making you think the drain valve is clogged when it's actually a pressure issue.
- Only Draining, Not Flushing: Many homeowners simply drain the water and call it a day. This leaves behind a significant amount of caked-on sediment. The crucial step is the "power flush," where you repeatedly blast cold water into the semi-empty tank to vigorously stir up and expel the debris.
- Creating a Scalding Hazard: Draining a tank immediately after use sends 120-140°F water through the garden hose. This can easily cause severe burns if the hose ruptures or disconnects. Always turn off the heat source and allow several hours for the water to cool to a safe temperature.
- Damaging the Drain Valve: Older plastic drain valves become brittle. Applying excessive force with large pliers can easily snap the handle or strip the threads. Use gentle, steady pressure. If the valve is seized or leaking, the best long-term solution is to replace it with a more durable quarter-turn brass ball valve.
Cost & time breakdown
This table outlines the typical costs and time commitment for flushing a residential water heater.
| Task | DIY Cost | Pro Cost | Time Commitment |
|---|---|---|---|
| Annual Water Heater Flush | $0 | $150 - $400 | 2-5 hours (including cooling time) |
| Required & Optional Materials | |||
| Garden Hose (if not owned) | $20 - $40 | (Included) | N/A |
| Protective Gloves & Glasses | $10 - $20 | (Included) | N/A |
| Brass Ball Valve Upgrade (Optional) | $15 - $25 | $100 - $150 (part + labor) | +30 minutes during flush |
| Total Project | $0 - $55 | $150 - $400 | 2-5 hours |
When to call a pro
While flushing a water heater is a manageable DIY task, certain situations warrant a professional plumber's expertise to avoid causing more significant damage or safety risks.
Call a professional if you observe any of the following:
- The drain valve is broken, seized, or leaking. If the valve won't open or close, or if it snaps during the process, it must be replaced. This involves draining the tank fully and can be difficult if the valve is already compromised. A plumber can quickly replace a faulty plastic valve with a more reliable brass ball valve.
- Water is leaking from the tank itself. If you see rust trails or dripping water coming from the seams or bottom of the steel tank (not from the pipes or valves connected to it), the tank has failed internally. It cannot be repaired and must be replaced immediately.
- You suspect a gas leak. If you smell gas near your gas water heater at any point, do not touch any electrical switches or try to turn the unit off. Leave the area immediately, and call your gas utility's emergency number from a safe distance.
- The T&P (Temperature & Pressure) relief valve is leaking or seized. This critical safety device can fail. If it weeps continuously or is corroded shut, it needs professional replacement.
- Post-flush problems persist. If, after a thorough flush, the heater still makes loud rumbling noises, produces discolored water, or fails to deliver enough hot water, it may indicate a more severe issue like a broken dip tube or a failed heating element that requires professional diagnosis.
Prevention & maintenance
Consistent maintenance is the key to maximizing your water heater's efficiency and lifespan, which can be 10-15 years or more with proper care.
- Flush Annually: Perform the flush procedure outlined above at least once a year. In regions with very hard water, a flush every six months is recommended to prevent heavy sediment from compacting.
- Inspect the Anode Rod: Every 2-3 years, inspect the sacrificial anode rod. This magnesium or aluminum rod is designed to corrode instead of your tank's steel lining. A plumber can check it for you, or you can do it yourself by turning off the water, releasing pressure, and unscrewing it from the top of the tank with a 1 1/16-inch socket. If it's less than 1/2-inch thick or coated in heavy scale, it should be replaced.
- Test the T&P Valve: Once a year, test the temperature and pressure relief valve. Place a bucket under the discharge pipe and lift the lever for five seconds. A burst of hot water should come out. If it only trickles out or continues to leak after the test, the valve must be replaced by a professional.
- Set Temperature to 120°F: Most water heaters are factory-set to 140°F, but 120°F is sufficient for most households. Lowering the temperature reduces standby heat loss, slows mineral buildup, and significantly decreases the risk of scalding.
- Consider a Water Softener: If you live in an area with extremely hard water, the most effective long-term solution is a whole-house water softener. It removes calcium and magnesium before the water ever reaches your water heater, preventing sediment buildup in the first place and protecting all of your plumbing and water-using appliances.
Related Articles
Keep troubleshooting with these hand-picked guides from FixlyGuide:
- The Surprising Reason Your Hot Water Heater Dies Young (And the 20-Minute Fix) — Discover how a simple 20-minute annual flush can prevent premature water heater failure, restore heating efficiency, and improve your hot w…
- That 5-Minute Shower? Your Water Heater's Secret Problem — Your hot water is likely running out quickly due to a broken internal dip tube, a massive buildup of mineral sediment, or a failing heating…
- Your shower's cold shock: 1 broken part is the secret culprit. — Tired of your shower going from hot to cold in minutes? Sediment buildup, a failed dip tube, or a bad thermostat in your water heater is li…
- Dishwasher Not Draining? Easy Fixes for a Clogged Drain — A dishwasher that won't drain at the end of a cycle is a common problem, often caused by simple clogs or blockages that homeowners can fix…
- Your Bathroom Sink Stinks: The 3 Culprits Hiding Inside — A foul odor from your bathroom sink drain is often caused by a buildup of gunk and bacteria. This guide will walk you through simple steps…
- [Your shower sucks? 3 hidden culprits explained.](/article/fix-low-water-
Get the print-ready PDF of this guide
A clean, ad-free, printable version you can keep on your phone or pin to the workshop wall. Free with a FixlyGuide account.
- Print-optimized layout
- Tools, materials & every step included
- Saved to your account
Frequently asked questions
How often should I flush my water heater?+
Most manufacturers and plumbers recommend flushing your water heater annually, or more frequently if you live in an area with hard water.
What happens if I don't flush my water heater?+
Not flushing your water heater allows sediment to build up, leading to reduced efficiency, higher energy bills, less hot water, strange noises, and a shortened lifespan for the unit.
Do tankless water heaters need flushing?+
Yes, tankless water heaters also require periodic flushing to remove mineral buildup, typically every 1-2 years, to maintain efficiency and reliability.


Discussion
Loading comments…