
Tools & materials you'll need
Affiliate links- AmazonNew toilet flapperMatch your toilet's model or use a universal type
As an Amazon Associate FixlyGuide earns from qualifying purchases — at no extra cost to you. Prices and availability are accurate as of publication and subject to change.
How it works
A toilet tank is a simple gravity-fed water reservoir designed to release a specific volume of water quickly to clear the bowl. Its operation depends on the coordinated action of a few key components. The process begins after a flush, when the tank is empty. The fill valve (historically called a ballcock) detects the low water level via a float. This drop opens the valve, allowing fresh water from the supply line to enter the tank. As the water level rises, so does the float, which eventually shuts off the fill valve once the tank is full. A small, flexible refill tube connected to the fill valve directs a stream of water down the overflow tube to replenish the water in the toilet bowl, re-establishing the trap seal that blocks sewer gases.
The flush itself is initiated by the flush valve assembly, the large drain opening at the bottom of the tank. This opening is sealed by a flapper, a rubber or silicone stopper connected to the toilet's handle by a lift chain. When you press the handle, the lever lifts the chain and pulls the flapper off the flush valve seat. The weight of 1.28 to 1.6 gallons of water rushes through the opening into the bowl, creating a powerful siphon that pulls waste down the drain. As the tank empties, the flapper loses its buoyancy and settles back onto the valve seat, sealing the tank. A running toilet occurs when this seal is incomplete, allowing water to leak slowly from the tank into the bowl. This constant water loss causes the tank's water level to drop, triggering the fill valve to run intermittently or continuously in an attempt to refill it.
Step-by-Step Fix
The following steps diagnose and resolve the most common cause of a running toilet: a faulty seal between the flapper and the flush valve.
1. Diagnose the Leak — First, confirm the source of the running water. Remove the tank lid and add 5-10 drops of food coloring or a dye tablet to the tank water. Do not flush the toilet. Wait for 20-30 minutes. If colored water appears in the toilet bowl, the leak is coming from the flapper or the flush valve seat. If the water level in the tank drops but no color enters the bowl, the issue may be a misadjusted fill valve allowing water to drain directly into the overflow tube.
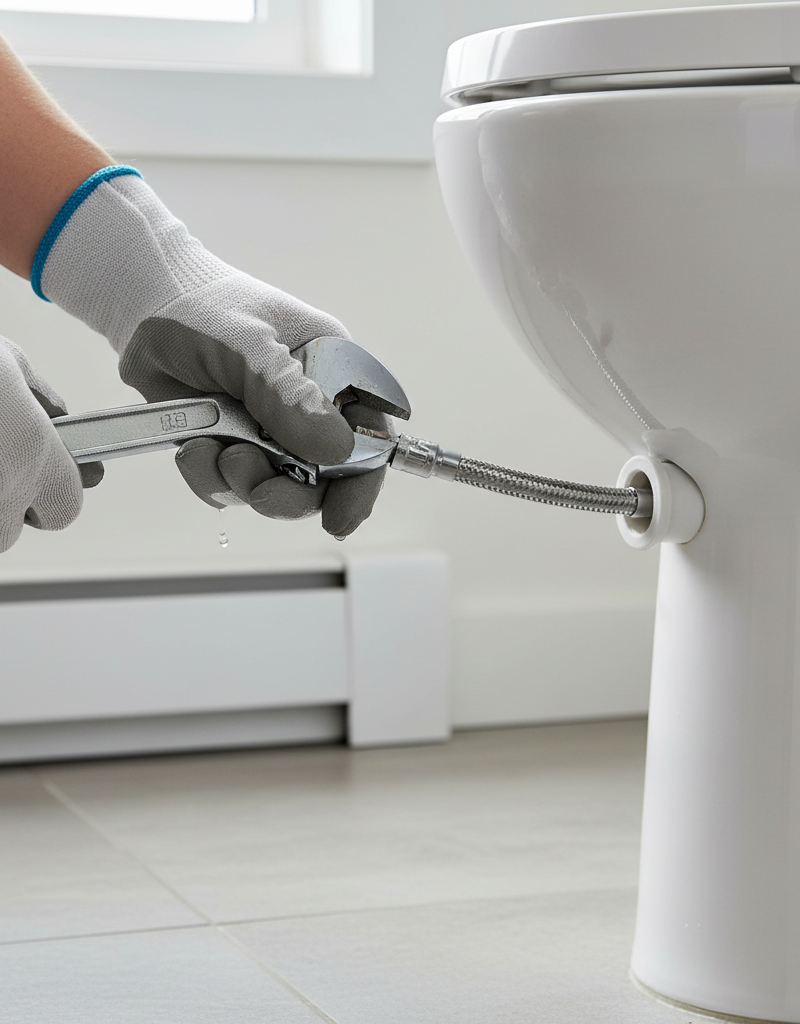
2. Shut Off the Water Supply — Locate the water shut-off valve, typically an oval-shaped handle on the wall or floor behind the toilet. Turn the handle clockwise until it stops. This isolates the toilet from the main water line, preventing water from refilling the tank during the repair. If the valve is stuck, do not force it with excessive pressure; this may require a separate repair.
3. Empty the Tank — Flush the toilet to drain nearly all the water from the tank. There will be about an inch of water remaining at the bottom. Use a sponge or a small towel to soak up this residual water and wring it into a bucket. A dry, clean workspace makes inspection and repair much easier.
4. Remove and Inspect the Old Flapper — Unhook the flapper's lift chain from the toilet handle's lever arm inside the tank. Then, gently unhook the flapper itself. Most flappers have two flexible "ears" that attach to small posts on either side of the overflow tube. Some may have a ring that slides over the tube. Once removed, inspect the flapper in your hands. Look for signs of warping, brittleness, blistering, or mineral buildup, any of which can compromise its seal.
5. Clean the Flush Valve Seat — This step is critical. The flush valve seat is the smooth, circular rim that the flapper presses against. Mineral deposits, sediment, or slime can build up here and prevent a perfect seal. Using a non-abrasive scrub sponge or a cloth, carefully clean the entire rim until it is perfectly smooth to the touch. Avoid using steel wool or harsh abrasives that could scratch the plastic or brass surface.
6. Purchase the Correct Replacement Flapper — Not all flappers are created equal. Take your old flapper to a hardware or home improvement store to find an exact match. Note the make and model of your toilet, often stamped inside the tank or near the bowl's hinges. The most important distinction is size: most toilets made before 2005 use a 2-inch flapper, while many newer high-efficiency toilets use a larger 3-inch flapper. Using the wrong size will guarantee a leak.
7. Install the New Flapper — Attach the new flapper the same way you removed the old one. Hook its ears onto the two posts on the overflow tube, ensuring it is centered directly over the flush valve opening. The flapper should be able to move up and down without catching on any other component.
8. Attach and Adjust the Chain — Connect the new chain to the flush handle lever. The chain's length is crucial. It should have just enough slack to allow the flapper to rest completely flat on the valve seat, but not so much that it can get tangled or caught underneath the flapper. A good rule of thumb is approximately ½ inch of slack. Trim any excess chain links with wire cutters to prevent them from interfering with the seal.
9. Check the Fill Valve Height — Before turning the water back on, inspect the fill valve. The water level it maintains should be set about 1 inch below the top of the overflow tube. If the level is set too high, water will constantly spill into the overflow tube, mimicking a leak. Most modern fill valves have an adjustment screw or a sliding clip on the float mechanism to raise or lower the shut-off level.
10. Restore Water and Observe — Slowly turn the water supply valve counter-clockwise to open it fully. The tank will begin to fill. Listen as it fills; the sound should stop completely and decisively once the float reaches its set height. If you hear any hissing, trickling, or intermittent refilling sounds, the problem has not been resolved.
11. Test the Flush and Seal — Let the full tank sit undisturbed for 10-15 minutes. Check the bowl for any ripples that indicate a slow leak. Afterwards, perform several test flushes. Observe the flapper's action: it should lift fully, allow a complete flush, and then drop squarely back onto the valve seat. The chain should not catch or tangle. If all components operate smoothly and the water remains off after refilling, the repair is complete.
Common mistakes
- Installing the Incorrect Flapper Size. The most frequent error is mismatching the flapper to the flush valve. Toilets predominantly use either a 2-inch or 3-inch valve. Installing a 2-inch flapper on a 3-inch valve will leave gaps, causing a major leak. Always take the old flapper to the store or measure the diameter of the flush valve opening before purchasing a replacement.
- Neglecting to Clean the Valve Seat. Swapping in a new flapper without thoroughly cleaning the valve seat is a wasted effort. Even microscopic mineral deposits or a thin layer of biofilm on the rim will prevent the new flapper from creating a watertight seal. The seat must be perfectly smooth.
- Setting the Chain Length Incorrectly. A chain with too little slack will hold the flapper slightly open, causing a constant, slow leak. A chain with too much slack may fail to lift the flapper high enough for a full flush or, more commonly, will get caught between the flapper and the valve seat upon closing, propping it open. Aim for approximately ½ inch of slack and trim the excess.
- Misplacing the Refill Tube. The small rubber refill tube must be positioned to spray water into the overflow tube, not just dropped inside it. Most fill valves come with a clip to attach the tube to the lip of the overflow tube. If the tube is pushed too far down into the overflow pipe, it can create a siphon effect that pulls water directly from the tank, causing the fill valve to cycle continuously.
- Over-tightening Connections. When replacing a fill valve or the entire tank-to-bowl connection, there is a temptation to tighten nuts and bolts as much as possible. This is a mistake. Porcelain is brittle and can easily crack under pressure. Tighten connections until they are snug, then add another quarter-turn. Hand-tightening is often sufficient for plastic nuts.
Cost & time breakdown
This table outlines the typical investment in time and money for common toilet repairs, comparing a DIY approach with professional service. Pro costs include a trip charge and labor.
| Task | DIY Cost | Pro Cost | Time Estimate |
|---|---|---|---|
| Flapper & Chain Replacement | $8 - $20 | $120 - $225 | 20-45 minutes |
| Fill Valve Replacement | $15 - $40 | $150 - $275 | 45-75 minutes |
| Complete Tank Rebuild Kit | $25 - $60 | $250 - $450 | 1.5 - 2.5 hours |
| Flush Valve Replacement (Tank Removal) | $40 - $75 | $300 - $500 | 2-3 hours |
| Plumber Diagnostic Visit | N/A | $85 - $150 (trip charge only) | 30 minutes |
When to call a pro
While most running toilet issues are simple DIY fixes, certain situations warrant a professional plumber. If you have replaced the flapper and fill valve, meticulously cleaned the valve seat, and adjusted all components, but the toilet still runs, a more elusive problem may exist that a professional can diagnose more quickly.
Call a licensed plumber if you encounter any of the following:
- A Cracked Tank or Bowl: Any visible crack in the porcelain is a critical failure. This is not repairable and requires a full toilet replacement.
- A Damaged Flush Valve Seat: If the plastic or brass rim of the valve seat is chipped, cracked, or severely pitted, a simple flapper won't seal it. Replacing the entire flush valve assembly is a complex job that requires removing the tank from the bowl.
- A Seized or Leaking Shut-Off Valve: If the water supply valve behind the toilet won't turn, breaks, or leaks when you operate it, it must be replaced by a professional. This often involves shutting off water to the entire house.
- Leaks at the Toilet Base or Tank Bolts: Water pooling around the base of the toilet indicates a failed wax ring. Leaks from the bolts connecting the tank to the bowl suggest worn-out gaskets. Both are manageable but can be messy and tricky for a novice. A pro can handle these repairs efficiently and ensure a proper seal.
Prevention & maintenance
- Perform an Annual Dye Test. Once a year, place a few drops of food coloring into your toilet tank and wait 30 minutes without flushing. If any color leaches into the bowl, you have a silent leak that needs immediate attention. Catching it early saves hundreds of gallons of water.
- Avoid Corrosive In-Tank Cleaners. While the promise of a clean bowl is tempting, in-tank tablets containing bleach or chlorine are highly destructive. They significantly accelerate the deterioration of rubber and plastic parts like flappers, gaskets, and seals, leading to premature failure. Use bowl cleaners that are applied directly to the bowl surface instead.
- Conduct Periodic Visual Inspections. Every few months, lift the tank lid and take a look inside. Check that the chain is hanging freely, the flapper appears pliable and well-seated, and the water level is correct (about an inch below the overflow tube). This 30-second check can help you spot developing problems.
- Exercise the Shut-Off Valve. Twice a year, gently turn the water supply shut-off valve behind the toilet fully clockwise to close it, then fully counter-clockwise to open it again. This simple action prevents mineral buildup from seizing the valve, ensuring it will work when you need it for a repair.
- Know Your Water Type. If you have very hard water, be aware that mineral buildup will be your primary challenge. You may need to clean the valve seat and other components more frequently. Consider a whole-home water softener for a long-term solution.
Related Articles
Keep troubleshooting with these hand-picked guides from FixlyGuide:
- Why Is My Toilet Running? 7 Quick Fixes Before Calling a Plumber — A constantly running toilet wastes up to 200 gallons of water a day. Here are the 7 most common causes and how to fix each one yourself in…
- The 30-Second Toilet Fix Plumbers Don't Want You to Know — Stop that phantom-flushing toilet with this quick guide to diagnosing and fixing the most common silent water leaks.
- The Secret Culprit Behind Your Waning Kitchen Sprayer Pressure (It’s Not Clogging) — Low water pressure from your kitchen sink sprayer often stems from a surprisingly simple issue: a clogged diverter valve or a faulty O-ring…
- The 3 Hidden Reasons Your Toilet Tank Fills Slowly (And How to Fix Each) — Discover the common culprits behind a slow-filling toilet tank, from crucial valve issues to subtle obstructions, and learn how to restore…
- How to Fix a Leaky Faucet (Single-Handle and Two-Handle) — A dripping faucet wastes 3,000+ gallons a year. Whether you have a single-handle cartridge or an old two-handle compression faucet, here's…
- The #1 Reason Your Doorbell Suddenly Dies (and the 10-Minute Fix) — A non-functioning doorbell is often caused by a tripped transformer, a simple issue homeowners can usually resolve in minutes.
Frequently asked questions
Why is my toilet running constantly?+
The most common reason is a faulty or worn-out flapper valve at the bottom of the toilet tank. It prevents a proper seal, allowing water to continuously leak into the bowl.
How do I know if my toilet flapper is bad?+
You can check by looking for visible cracks, stiffness, or discoloration on the flapper. Another test is to put a few drops of food coloring into the tank and wait 15-20 minutes. If the color appears in the toilet bowl without flushing, your flapper is leaking.
Can I replace a toilet flapper myself?+
Yes, replacing a toilet flapper is a common and relatively easy DIY plumbing repair. Most hardware stores carry universal flappers or specific models that fit your toilet.
How much does it cost to fix a running toilet?+
If you do it yourself, the cost is typically just for a new flapper, which ranges from $5 to $20. If you call a plumber, expect to pay for parts plus labor, which can range from $75 to $200 or more depending on the issue and your location.
How do I stop my toilet from running at night?+
Temporarily, you can lift the tank lid and gently push down on the flapper, or jiggle the flush handle. For a permanent fix, you'll need to diagnose and repair the underlying issue, most often a faulty flapper or fill valve.


Discussion
Loading comments…