Tools & materials you'll need
Affiliate linksAs an Amazon Associate FixlyGuide earns from qualifying purchases — at no extra cost to you. Prices and availability are accurate as of publication and subject to change.
Quick Answer
Experiencing a noticeable drop in water pressure across all fixtures in your home can be incredibly frustrating. While many assume a complex issue, the most frequent offender is a malfunctioning pressure reducing valve (PRV). This crucial device protects your plumbing from excessively high municipal water pressure by stepping it down to a safe, consistent level. When a PRV fails, it restricts water flow, leading to low pressure everywhere. Replacing or adjusting a PRV is often a DIY-friendly fix that can restore your home's water flow.
The Problem
Imagine stepping into the shower only to be met with a weak trickle instead of a invigorating spray, or struggling to fill a pot for dinner because the kitchen faucet barely drips. When this low water pressure affects every faucet, shower, and appliance in your house, it points to a problem at the very beginning of your home's water supply system. This isn't just an inconvenience; consistently low water pressure can impact the efficiency of your dishwasher and washing machine, make basic tasks take longer, and indicate a larger issue that could worsen over time. Many homeowners immediately suspect a clogged aerator or a single failing fixture, only to be baffled when checking those components yields no improvement. The real issue is typically much deeper than that, affecting the entire water distribution from the moment it enters your property.
How It Works
Your home's water enters through a main service line, typically from the street. In many municipalities, especially those with hilly terrain or high demand, the water pressure in these main lines can be quite high—sometimes exceeding 80–100 PSI (pounds per square inch). While high pressure might sound good, it can actually be detrimental to your home's plumbing system. Excessively high pressure can prematurely wear out appliances, burst pipes, and cause leaks in faucets, toilets, and water heaters. This is where the pressure reducing valve (PRV) comes into play.
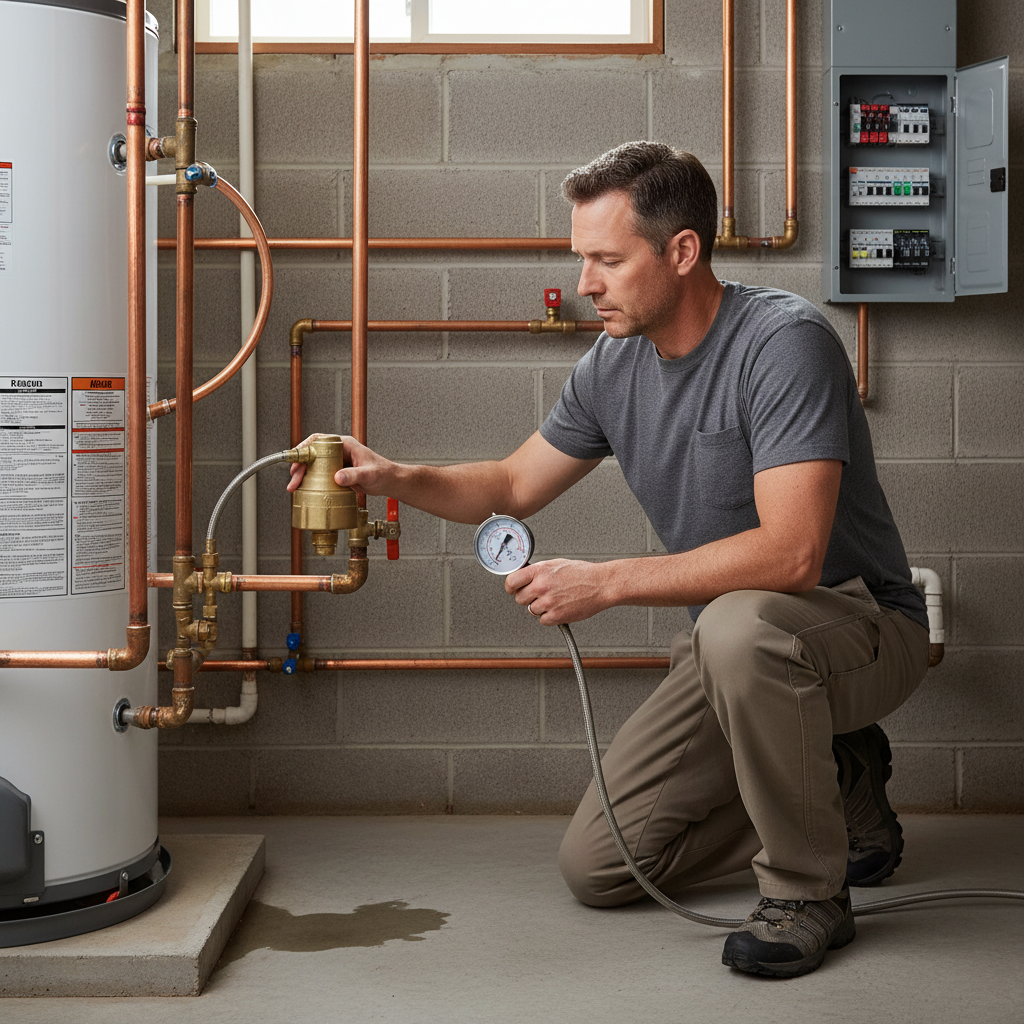
A PRV is a bell-shaped brass device usually located after your main water shut-off valve, where the water service line enters your home, often in the basement, crawl space, or utility closet. Inside the PRV, a spring-loaded diaphragm or piston mechanism senses the incoming water pressure. When the incoming pressure exceeds a preset level (typically 50-70 PSI for residential homes), the valve automatically constricts to reduce the flow and pressure downstream. This ensures that all the pipes, fixtures, and appliances inside your house receive water at a safe and consistent pressure. Over time, however, these internal components can degrade. The spring can lose tension, the diaphragm can crack, or mineral deposits and sediment can build up within the valve, causing it to stick partly closed. When this happens, the PRV restricts the water flow more than it should, resulting in uniformly low water pressure throughout the entire house. It’s essentially a bottleneck at the very beginning of your home’s water journey.
Step-by-Step Fix
Safety First: Before beginning any work involving your home's water supply, locate and turn off the main water shut-off valve. This is critical to prevent flooding. Also, be aware that you'll be working with water lines; ensure any electrical components nearby are protected from splashes or consider turning off power to the immediate area if necessary.
-
Understand Your Current Pressure — *Check what you're dealing with.
- Attach a water pressure gauge (available at hardware stores for $10-20) to an outdoor hose spigot or a utility sink faucet.
- Turn on the water fully and note the reading. A healthy residential pressure is usually between 40-80 PSI. Anything consistently below 40 PSI is considered low. If your pressure is above 80 PSI, your PRV might be failing in the opposite way (allowing too much pressure) or you might not have one, which should be addressed by a professional.
-
Locate the Pressure Reducing Valve (PRV) — *Find the culprit.
- The PRV is typically a bell-shaped brass fitting located on your main water line, usually after the main shut-off valve and before the water meter (if indoors). It often has a screw or bolt on the bell-shaped top for adjustment.
- Inspect it for signs of corrosion, leaks, or if it looks significantly older than the rest of your plumbing.
-
Test the PRV (Bypass Method) — *Confirm the PRV is the issue.
- WARNING: Only attempt this if you are confident your municipal water pressure is not excessively high (e.g., if you're in a neighborhood with known low pressure issues or if a neighbor reports normal pressure without a PRV). Bypassing a PRV in an area with very high pressure can damage your plumbing. If in doubt, skip this step and go to adjustment or replacement.
- If your PRV has a bypass valve (often a small lever or gate valve on a bypass line around the PRV itself), carefully open it to bypass the PRV.
- Go to a faucet and check the water pressure. If the pressure significantly increases, the PRV is indeed the problem. Close the bypass valve immediately after testing to prevent potential damage from high pressure.
-
Attempt PRV Adjustment — *Sometimes a simple tweak is all it needs.
- Most PRVs have an adjustment screw on the top. Loosen the locknut (if present) with an adjustable wrench.
- Turn the adjustment screw clockwise a quarter turn at a time to increase pressure or counter-clockwise to decrease pressure.
- After each quarter turn, re-tighten the locknut (if applicable), open a faucet in the house to release any trapped air and allow new pressure to equalize, then re-check the pressure with your gauge.
- Repeat until you reach a desirable pressure (e.g., 50-60 PSI). Do not exceed 75-80 PSI.
-
Prepare for PRV Replacement — *When adjustment isn't enough.
- Tools & Materials: Have your new PRV (ensure it matches your pipe size, typically 3/4 or 1 inch), two large adjustable wrenches, pipe dope or PTFE thread sealant tape, and a bucket ready.
- Safety: Turn off the main water supply and open several faucets in the house (both hot and cold) to drain the system and relieve pressure. Have towels ready.
-
Remove the Old PRV — *Careful with the existing connections.
- Using two adjustable wrenches, hold one side of the pipe firmly while turning the union nut or connection on the other side of the PRV. This prevents twisting and damaging the pipes.
- Once both sides are disconnected, carefully remove the old PRV. Be prepared for some residual water to drain out – have your bucket ready.
-
Install the New PRV — *Watch for the flow direction.
- Examine the new PRV for an arrow indicating the direction of water flow. This is crucial for correct installation. The arrow should point in the direction of water entering your home from the main line.
- Apply pipe dope or wrap PTFE thread sealant tape clockwise around the male threads of the pipe connections leading into the PRV. This ensures a watertight seal.
- Thread the new PRV onto the pipes, ensuring proper alignment. Hand-tighten first, then use your two adjustable wrenches to firmly tighten the connections. Do not overtighten, as this can damage the valve or pipes.
-
Restore Water and Test — *The moment of truth.
- Slowly open the main water shut-off valve. Listen for any leaks around the new PRV.
- Once the system is repressurized, go to the highest faucet in your house (e.g., an upstairs bathroom) and slowly open it to release air from the lines until water flows smoothly. Repeat for other faucets.
- Finally, re-check the water pressure with your gauge at an outdoor spigot or utility sink to ensure it's within the desired range (40-80 PSI, ideally 50-60 PSI).
Common Causes
- Failing Pressure Reducing Valve (PRV): The most common cause for house-wide low pressure. Internal components wear out, get clogged, or the spring loses tension, restricting water flow. This accounts for a significant majority of all-house low pressure issues in homes equipped with a PRV.
- Partially Closed Main Shut-Off Valve: Sometimes, after plumbing work or maintenance, the main water shut-off valve is not fully reopened. It's an easy check but often overlooked. Confirm the handle is turned completely open.
- Clogged Main Water Filter: If your home has a whole-house sediment filter, a severely clogged filter cartridge can drastically reduce water flow and pressure. This is particularly common in homes with hard water or well water.
- Municipal Water Supply Issues: Occasionally, the problem isn't in your home but with the municipal supply line itself. Issues like main breaks, seasonal demand spikes, or work being done on your street's water lines can temporarily reduce pressure to your property. Neighbors experiencing the same issue is a strong indicator of this.
- Corroded or Kinked Main Supply Line: Older homes, especially those with galvanized steel pipes, can suffer from internal corrosion and mineral buildup within the main water supply line, restricting flow. A significant kink in a flexible supply line can also cause this.
Common Mistakes
- Assuming a Single Fixture Problem: Many homeowners start by checking clogged aerators or individual showerheads when the low pressure is house-wide. This wastes time and doesn't address the root cause.
- Over-tightening PRV Connections: When replacing a PRV, over-tightening the pipe connections can strip threads, crack the new valve, or damage existing pipes, leading to leaks.
- Incorrect PRV Flow Direction: Installing a new PRV backward (against the water flow direction) will block water entirely or severely restrict it, leaving you with no pressure or even less than before.
- Ignoring the Main Shut-Off Valve: Failing to fully turn off the main water supply before working on the PRV can lead to immediate flooding and potential water damage.
- Not Testing Pressure After Adjustment/Replacement: Without verifying the pressure with a gauge, you're guessing if the fix was successful or if you've set the pressure too high or too low, potentially causing other problems.
Cost & Time Breakdown
| Task | DIY Cost | Pro Cost | Time |
|---|---|---|---|
| Diagnose with pressure gauge | $10–$20 | Included | 5–10 minutes |
| Adjust existing PRV | $0 | $75–$150 | 15–30 minutes |
| Replace PRV (parts) | $80–$250 | Included | 1–1.5 hours |
| Full PRV Replacement (DIY) | $80–$250 | $300–$700 | 1.5–3 hours |
| Pro hourly labor (if needed) | N/A | $75–$200/hour | Varies |
Tips & Prevention
- Regular Pressure Checks: Periodically check your home's water pressure with a gauge (once a year) to catch a failing PRV or other issues before they become severe. Aim for 50-60 PSI.
- Inspect Your PRV Annually: Look for leaks, corrosion, or unusual noises coming from the PRV. Addressing minor issues early can prevent failure.
- Know Your Main Shut-Off: Ensure everyone in the household knows where the main water shut-off valve is and how to operate it in an emergency.
- Consider a Whole-House Filter: If you have hard water or sediment, a whole-house filter can protect your plumbing and PRV from mineral buildup and clogs. Remember to change the filter cartridge regularly per manufacturer instructions.
- Stay Informed About Municipal Work: If you notice a sudden, inexplicable drop in pressure, check local utility websites or social media for announcements about water main breaks or planned maintenance in your area.
When to Call a Professional
While tackling a PRV adjustment or replacement can be a rewarding DIY project, there are specific situations where calling a licensed plumber is the wisest course of action. If, after checking your PRV, the issue persists, or if you suspect the problem lies with the main water line where it connects to the municipal supply (e.g., a suspected underground leak or severely corroded main pipe), a professional is necessary. Plumbers have specialized tools to diagnose difficult main line issues, trace leaks, and perform repairs that may require excavation or working with city water infrastructure. Furthermore, if you're uncomfortable working with plumbing, lack the necessary tools, or encounter unexpected complications like severely seized pipes or an old, unfamiliar PRV type, stop immediately and contact a professional. An improperly installed PRV can lead to leaks, property damage, and ongoing pressure problems, making the initial savings from DIY negligible in the long run. Lastly, if your home does not have a PRV and your municipal pressure is consistently above 80 PSI, a plumber should install one to protect your entire plumbing system.
Related Articles
Keep troubleshooting with these hand-picked guides from FixlyGuide:
- The #1 Mistake Homeowners Make When Diagnosing Low Water Pressure (It's Not Your Pipes) — Discover the most common, overlooked culprit behind low water pressure impacting your entire home and learn how to fix it yourself with bas…
- The #1 Mistake Homeowners Make When Diagnosing Low Water Pressure (It's Not Your Pipes!) — Discover the most common, often overlooked culprit behind low water pressure impacting your entire home and how to easily fix it.
- The #1 Mistake Homeowners Make When Diagnosing Low Water Pressure (and What to Check First) — Before you call a plumber, learn the most common overlooked cause of low water pressure affecting your entire home and how to easily check…
- The #1 Hidden Culprit Behind Your Whole-House Low Water Pressure (It's Not Your City!) — Discover the most common, overlooked cause of low water pressure throughout your entire home and how to easily diagnose and fix it yourself.
- The #1 Mistake Homeowners Make When Diagnosing Low Water Pressure (It's Not Your Pipes!) — Low water pressure throughout your house often points to a single, easily overlooked culprit: your main water shut-off valve.
- The #1 Mistake Homeowners Make When a Gas Burner Won't Light (And the Easy Fix) — Before you call a technician, discover the most common, overlooked reason your gas stove burner isn't lighting and how to fix it yourself i…
Get the print-ready PDF of this guide
A clean, ad-free, printable version you can keep on your phone or pin to the workshop wall. Free with a FixlyGuide account.
- Print-optimized layout
- Tools, materials & every step included
- Saved to your account
Recommended for DIYers & woodworkers
Sponsored
The Top 20 Tools for Workshops of Any Budget
No stationary machines or power tools required — plus 3 fundamental tools that can't be bought at any price.
Get the free guide
Ted's Woodworking — The #1 Woodworking Resource
Detailed instructions, dimensioned drawings, materials & cutting lists, and 3D schematics for every skill level.
See the plansSponsored: links above are affiliate links. FixlyGuide may earn a commission on qualifying purchases — at no extra cost to you.
Frequently asked questions
What is a pressure reducing valve (PRV) and why is it important?+
A pressure reducing valve (PRV) is a plumbing device installed on your home's main water line, typically after the main shut-off valve. Its purpose is to reduce the incoming high municipal water pressure to a safe, consistent level (usually 50-70 PSI) for your home's internal plumbing. This protects pipes, fixtures, and appliances from damage due to excessive pressure, preventing leaks and premature wear.
How can I tell if my PRV is failing?+
The primary symptom of a failing PRV is a noticeable drop in water pressure throughout your entire house, affecting all faucets and showers equally. You might also hear strange noises coming from the valve, or see visible corrosion or leaks. Testing your water pressure with a gauge before and after the PRV, or attempting to adjust it, can help confirm if it's the culprit.
Can I replace a PRV myself?+
Yes, replacing a PRV is a common DIY plumbing project for homeowners with basic tools and plumbing experience. It involves turning off the main water supply, draining the system, unscrewing the old valve, and installing a new one. However, it's crucial to select the correct size PRV, install it with the proper flow direction, and use thread sealant to prevent leaks. If you're unsure, it's always best to consult a professional plumber.
What should my home's water pressure be?+
For most residential homes, ideal water pressure is between 40 and 80 PSI (pounds per square inch). Many plumbers recommend aiming for 50-60 PSI as a good balance. Pressure below 40 PSI is generally considered low, while consistent pressure above 80 PSI can be damaging to your plumbing system over time.
What if replacing the PRV doesn't fix the low pressure?+
If replacing the PRV doesn't resolve your house-wide low water pressure, the problem may lie elsewhere. Investigate a partially closed main water shut-off valve, a clogged whole-house water filter, or potential issues with the municipal water supply (check with neighbors or your water utility). In older homes, corroded main supply lines can also restrict flow. For persistent issues, contacting a licensed plumber is recommended to diagnose more complex problems.


Discussion
Loading comments…