
Tools & materials you'll need
Affiliate linksAs an Amazon Associate FixlyGuide earns from qualifying purchases — at no extra cost to you. Prices and availability are accurate as of publication and subject to change.
Quick Answer
If you're facing the frustrating problem of a shower that suddenly runs cold, even when other fixtures in your home still have hot water, the most likely culprit is not your water heater. Instead, focus your attention on the shower itself, specifically the mixing valve cartridge. This internal component, often equipped with an anti-scald feature, can become clogged with mineral deposits or simply fail, restricting or completely blocking the flow of hot water to the showerhead. A relatively straightforward DIY repair involves disassembling the handle, removing the old cartridge, and installing a new one.
The Problem
You're ready for a relaxing hot shower, only to be blasted with icy cold water. But here's the kicker: your kitchen sink, bathroom vanity, and even the tub spout (if it's a separate fixture) are all delivering plenty of hot water. This specific diagnostic clue – hot water everywhere but a single shower – immediately directs your investigation away from your water heater and onto the shower valve itself. This situation is incredibly common, causing unnecessary panic about expensive water heater replacements when the true fix is far simpler and cheaper.
How It Works
Understanding how your shower valve operates is key to diagnosing and fixing the issue. Most modern showers (installed after the mid-1990s) utilize a single-handle faucet with a pressure-balancing or thermostatic mixing valve. This valve's primary function is safety: to prevent sudden temperature spikes (scalding) if, for example, someone flushes a toilet or turns on a different faucet while you're showering. It achieves this by maintaining a consistent ratio of hot and cold water entering the showerhead, even if the pressure in one line temporarily drops.
Inside the shower handle assembly, there's a cartridge – a complex component containing O-rings, springs, and shuttle valves. When you turn the handle, this cartridge rotates or slides, opening ports that allow hot and cold water to mix. The anti-scald feature, often built into this cartridge, senses pressure changes. If the cold water pressure drops rapidly (e.g., someone flushes a toilet), the valve automatically reduces the hot water flow to prevent a sudden burst of scalding water. Conversely, if the hot water pressure drops (less common in isolation), it should reduce the cold water flow. Over time, mineral deposits from hard water can build up within this cartridge, especially in the hot water channels, partially or completely obstructing the flow. The internal O-rings and plastic components can also degrade, leading to blockages or improper mixing. A common failure mode is for the anti-scald mechanism to become stuck in a position that restricts hot water flow, even when there are no actual pressure fluctuations. The temperature limit stop, another component often integrated into or around the cartridge, can also be accidentally adjusted, preventing the handle from turning far enough to access full hot water. By understanding these internal workings, you can appreciate why a localized lack of hot water points directly to this intricate, yet accessible, part.
Step-by-Step Fix
1. Safety First – Turn off the water supply.
Before you begin any work on your shower valve, it's crucial to shut off the main water supply to your house or, if available and you're confident in identifying it, the hot and cold water shut-off valves for the shower specifically. This prevents accidental flooding when you remove the cartridge. Test the water by turning on the shower to ensure no water comes out.
2. Remove the Handle – Access the valve components.
Most shower handles are secured by a screw (often a Phillips head or Allen key) located either on the underside of the handle or hidden beneath a decorative cap on the front. Carefully pry off any caps with a small flat-head screwdriver, unscrew the retaining screw, and pull the handle straight off. Set all removed parts aside in a safe place, such as a small bowl, to prevent losing them.
3. Remove the Trim Plate – Expose the cartridge.
After the handle, you'll likely see a trim plate or escutcheon that's held on by a few screws. Remove these screws and carefully pull the trim plate away from the wall. You might need to gently cut any caulk seal around the edge with a utility knife first. This will reveal the valve body and the cartridge assembly.
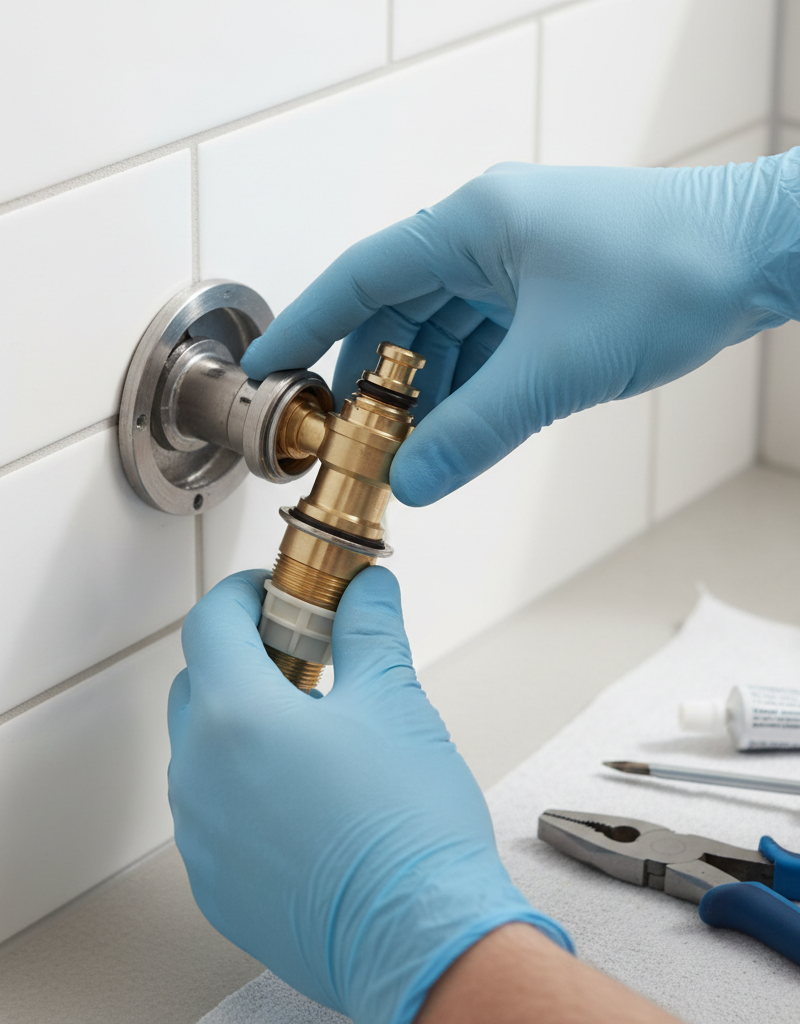
4. Identify and Remove the Cartridge – The core of the problem.
This is the most critical step. The cartridge is usually a cylindrical component inserted into the valve body. Its appearance varies significantly by manufacturer (Moen, Delta, Kohler, Pfister, etc.).
- Moen: Often secured by a retaining clip (U-shaped or crescent-shaped pin) that needs to be pulled out with needle-nose pliers. Once the clip is removed, the cartridge can be pulled straight out, sometimes requiring a special cartridge puller tool for older or stubborn cartridges.
- Delta: Many models have a nut or bonnet nut that needs to be unscrewed (often counter-clockwise) with a wrench or adjustable pliers. Once the nut is off, the cartridge can be lifted out. Some newer Delta cartridges may also have a retaining clip.
- Kohler/Pfister: These brands can have various designs, often involving screws to remove a face plate, then clips or nuts securing the cartridge. It's often helpful to take a picture before and during disassembly to aid reassembly.
Carefully note the orientation of the cartridge as you remove it – mark the top with a permanent marker if necessary. If the cartridge is stuck, a cartridge puller tool (specific to certain brands like Moen) can be invaluable. Twist and pull gently but firmly. You may hear a 'pop' as it comes free.
5. Inspect and Clean (or Replace) the Cartridge – The fix.
- Inspection: Examine the old cartridge for visible mineral buildup, cracks, or worn o-rings. Even if no obvious damage is present, internal clogs are common.
- Cleaning: If the cartridge is relatively new and appears intact, you can try soaking it in a vinegar solution for several hours to dissolve mineral deposits. Use a small brush (like a toothbrush) to scrub away any debris. Flush it thoroughly with water.
- Replacement: In most cases, especially if the cartridge is old or cleaning doesn't resolve the issue, replacement is the most reliable solution. Take the old cartridge to a hardware store or plumbing supply store to ensure you get an exact match. There are hundreds of variations, and an incorrect cartridge will not work or will leak. Ensure the new cartridge comes with fresh O-rings and any necessary lubricant.
6. Check the Temperature Limit Stop – A common oversight.
Before installing the new or cleaned cartridge, locate the temperature limit stop. This is often a plastic ring, a small tab, or a dial that sits around or on the cartridge. It prevents the handle from turning past a certain point, limiting how hot the water can get. If it's accidentally set too low, your shower will never get truly hot. Ensure it's set to allow the full range of motion for your handle. Consult your cartridge's packaging or the manufacturer's website for specific instructions on adjusting it for your model.
7. Install the New/Cleaned Cartridge – Careful reassembly.
Lubricate new O-rings on the cartridge with plumber's grease (silicone-based, not petroleum jelly). Carefully insert the cartridge into the valve body, making sure it's fully seated and correctly oriented. Align any notches or tabs with the valve body. Reinstall the retaining clip, nut, or screws that secured the cartridge in place.
8. Reassemble the Trim and Handle – Putting it all back together.
Reverse the steps for disassembly. Screw the trim plate back on, reattach the handle, and tighten its retaining screw. Don't forget any decorative caps. If you removed caulk around the trim plate, reapply a thin bead of silicone caulk to prevent water intrusion into the wall.
9. Restore Water Supply and Test – The moment of truth.
Slowly turn the main water supply back on (or the shower's specific shut-off valves). Check for any immediate leaks around the trim plate. Then, turn on the shower and incrementally test the water temperature, ensuring you have a full range from cold to hot. Adjust the temperature limit stop if needed to achieve your desired maximum hot water temperature without scalding.
Common Causes
- Worn or Damaged Cartridge: Over time, the internal components (O-rings, springs, plastic shuttles) within the mixing valve cartridge degrade, crack, or become misaligned, preventing proper hot and cold water mixing.
- Mineral Buildup/Sediment: Hard water can lead to calcium and magnesium deposits accumulating within the narrow passages of the cartridge, particularly restricting the hot water port. This is the most prevalent cause, gradually reducing hot water flow.
- Misadjusted Temperature Limit Stop: This safety feature, designed to prevent scalding, can be accidentally nudged or incorrectly set, limiting how far the handle can turn towards the hot side, even if the cartridge itself is fine.
- Failed Pressure-Balancing Mechanism: The anti-scald feature within the cartridge can malfunction, incorrectly sensing a pressure drop and disproportionately reducing hot water flow.
- Debris in Hot Water Line: Less common but possible, a piece of sediment or pipe scale could bypass the cartridge and lodge just before the showerhead, though this usually affects flow more than temperature balance.
Common Mistakes
- Failing to Turn Off Water Supply: This is a critical safety and mess-prevention step. Forgetting it will lead to significant flooding when the cartridge is removed. Always confirm the water is off by testing another faucet.
- Forgetting Cartridge Orientation: Many cartridges have a specific way they must be inserted. Forgetting to note the 'top' or 'front' before removal can lead to incorrect reinstallation and continued problems or leaks. Take a photo!
- Using the Wrong Replacement Cartridge: Shower valve cartridges are highly specific to the faucet brand and sometimes even the model. Using a generic or incorrect cartridge will lead to leaks, improper function, or impossibility to install. Always match the old cartridge exactly.
- Over-tightening Screws: When reassembling, over-tightening screws for the trim plate or handle can strip threads, crack plastic components, or deform parts, leading to leaks or future difficulty in disassembly.
- Neglecting the Temperature Limit Stop: Many DIYers replace the cartridge, only to find the shower still isn't hot enough, not realizing the limit stop needs adjustment. Always check and reset it.
- Ignoring Caulk: Forgetting to re-caulk the trim plate's perimeter after reassembly allows water to seep behind the wall, potentially causing significant mold and water damage over time.
Cost & Time Breakdown
| Task | DIY Cost | Pro Cost | Time |
|---|---|---|---|
| New Shower Cartridge | $30 – $150 | Included in labor | 10–20 minutes |
| Basic Tool Rental/Purchase | $0 – $50 | Included in labor | N/A |
| Professional Service Call | N/A | $150 – $400 | 1–2 hours |
| Total DIY | $30 – $200 | N/A | 1–2 hours |
| Total Professional | N/A | $150 – $400+ | 1–3 hours |
Note: Costs can vary significantly based on cartridge brand/model and local labor rates. Expect to pay more for specialized parts or emergency service.
Tips & Prevention
- Identify Your Faucet Brand: Before you even need a repair, know the brand and model of your shower faucet (look for logos on the trim plate). This makes finding replacement parts much easier. Keep the manual if you have it.
- Replace Worn Cartridges Proactively: If your shower is showing signs of inconsistent temperature or reduced flow, don't wait for it to fail completely. Addressing it early can prevent a cold surprise.
- Consider a Water Softener: If you live in an area with hard water, installing a whole-house water softener can significantly extend the life of your plumbing fixtures, including shower cartridges, by preventing mineral buildup.
- Regular Cleaning: Periodically remove your showerhead and soak it in a vinegar solution to remove mineral deposits, which can sometimes impact perceived water temperature or flow.
- Check Temperature Limit Stop Annually: If you have young children, you might intentionally set the limit stop lower. As they grow, or if your preferences change, ensure it's adjusted to your desired hot water limit.
- Keep Spare O-Rings: For common faucet brands, having a basic O-ring repair kit on hand can save you a trip to the hardware store for minor leaks or flow issues.
When to Call a Professional
While replacing a shower cartridge is a manageable DIY task for many, there are clear instances where professional help is warranted. If, after replacing the cartridge, you still have no hot water, or if you encounter significant difficulty removing a stubborn cartridge (especially if it feels like you might damage the valve body), it's time to call a licensed plumber. Additionally, if you're uncomfortable with basic plumbing tasks, cannot identify your specific valve components, or if the lack of hot water is affecting all fixtures in your home (indicating a potential water heater issue), a professional can diagnose and repair the problem safely and efficiently. Plumbers have specialized tools, diagnostic expertise, and can quickly identify other underlying issues like supply line clogs or main water heater failures that might mimic a shower valve problem.
Related Articles
Keep troubleshooting with these hand-picked guides from FixlyGuide:
- The 4 Hidden Reasons Your Entire Home Has Low Water Pressure (And the Easy Fixes) — Low water pressure throughout your entire home can be a frustrating and often misunderstood problem, with several common culprits. Learn to…
- The 4 Hidden Reasons Your Shower Runs Cold – And How to Fix It FAST — Learn the surprising causes behind a cold shower and discover simple, effective DIY fixes to restore hot water quickly.
- The 4 Hidden Signs Your Soffit & Fascia Are Failing (And What To Do) — Spotting early signs of soffit and fascia damage can prevent costly repairs and protect your home's structure from water and pest intrusion.
- The $30 Trick to Melting Ice Dams (Before They Destroy Your Roof) — Discover how to safely remove ice dams from your roof instantly with common household items, preventing costly damage. Stay safe while tack…
- The Secret Culprit Behind Your Whole-House Low Water Pressure (It's Not Always the City) — Whole-house low water pressure can be a frustrating and complex issue, ranging from simple fixes homeowners can do to signs that require a…
- The $5 Secret to Silencing That Annoying Dripping Faucet (Single-Handle Fix) — Stop a dripping single-handle faucet with a simple and inexpensive DIY fix by replacing a worn-out o-ring or washer.
Recommended for DIYers & woodworkers
Sponsored
The Top 20 Tools for Workshops of Any Budget
No stationary machines or power tools required — plus 3 fundamental tools that can't be bought at any price.
Get the free guide
Ted's Woodworking — The #1 Woodworking Resource
Detailed instructions, dimensioned drawings, materials & cutting lists, and 3D schematics for every skill level.
See the plansSponsored: links above are affiliate links. FixlyGuide may earn a commission on qualifying purchases — at no extra cost to you.
Frequently asked questions
Why is there no hot water in my shower but everywhere else in the house?+
If all other fixtures have hot water, the problem is almost certainly isolated to the shower's mixing valve cartridge. This internal component, which controls the hot and cold water mix and often includes an anti-scald feature, can be clogged with mineral deposits or fail internally, blocking hot water flow.
How do I know if my shower cartridge is bad?+
Signs of a bad shower cartridge include inconsistent water temperature, difficulty turning the handle, a slow drip or leak from the handle, reduced water pressure, or the most common symptom: no hot water from the shower while other faucets have it.
Can a clogged shower cartridge cause no hot water?+
Yes, absolutely. Mineral buildup from hard water can accumulate within the narrow passages of the cartridge, particularly blocking the hot water inlet. This prevents hot water from mixing properly or flowing to the showerhead at all.
How much does it cost to replace a shower cartridge DIY?+
Replacing a shower cartridge yourself typically costs between $30 and $150 for the new cartridge itself. The cost varies significantly by brand and model. If you don't already have basic tools, you might spend an additional $0-$50.


Discussion
Loading comments…