
Tools & materials you'll need
Affiliate linksAs an Amazon Associate FixlyGuide earns from qualifying purchases — at no extra cost to you. Prices and availability are accurate as of publication and subject to change.
Quick Answer
Ice dams are thick ridges of ice that form at the eaves of your roof, preventing melting snow from draining properly. This trapped water can back up under shingles, causing significant damage to roofs, gutters, insulation, and interior walls. The safest and most effective methods for homeowners to address existing ice dams involve using a long-handled roof rake to remove snow before it can melt and refreeze, or applying calcium chloride ice melt strategically to create drainage channels. Long-term prevention is key, focusing on improving attic insulation and ventilation to create a 'cold roof' that minimizes snowmelt.
The Problem
Many homeowners dread the sight of icicles hanging from their gutters after a snowy winter, but the real danger lurks behind them: ice dams. These solid formations of ice along the edge of your roof prevent melting snow from draining off the roof properly. Instead, the water pools behind the dam, seeping under shingles and into your attic, walls, and even down to your ceilings, causing extensive water damage, mold growth, and structural issues. The cost to repair ice dam damage can range from hundreds to thousands of dollars, making proactive removal and prevention crucial. Understanding why they form is the first step in effectively combating them and protecting your home from winter's wrath.
How It Works
Ice dams are a direct consequence of uneven roof temperatures, specifically when the upper parts of your roof are warm enough to melt snow while the eaves remain below freezing. Here's a breakdown of the physics at play:
1. Heat Loss from the Home: Your home, even with good insulation, naturally loses some heat through the ceiling and into the attic space. In an ideal scenario, a well-insulated and properly ventilated attic should remain close to the outdoor temperature.
2. Snow on the Roof: When snow falls and accumulates on the roof, it acts as an additional insulating layer. This layer traps heat escaping from the attic, further warming the roof surface beneath the snow.
3. Melting Snow: As heat from the attic warms the roof deck, snow on the upper, warmer parts of the roof begins to melt, even if the outdoor air temperature is below freezing. This meltwater flows downhill, under the insulating blanket of snow.
4. Refreezing at the Eaves: When the meltwater reaches the colder eaves, which are typically unheated and extend beyond the exterior walls of the house, it refreezes. This happens because the eaves are exposed to the ambient cold air from both above and below, rapidly dropping the water's temperature below freezing. This creates a small ridge of ice.
5. Dam Formation: As more meltwater flows down and hits this initial ridge, it also refreezes, gradually building up the ice dam. The dam grows thicker and taller, creating a barrier. Behind this barrier, subsequent meltwater has nowhere to go. It pools, creating hydrostatic pressure, and can then push up and under the shingles, through nail holes, and into the roof decking, fascia, soffits, and interior of your home. The cycle of melting, flowing, and refreezing repeats, exacerbating the problem and expanding the dam. The structural components most at risk include roof sheathing, rafters, insulation, and even wall studs and drywall.
Step-by-Step Fix
Safety Note: Always prioritize your safety when working on your roof. Never climb onto a very steep, icy, or snow-covered roof. If you are uncomfortable with heights, or if the ice dam is extensive and difficult to reach from the ground, call a professional. Wear appropriate winter clothing, non-slip footwear, and use a sturdy ladder. Watch out for overhead power lines.
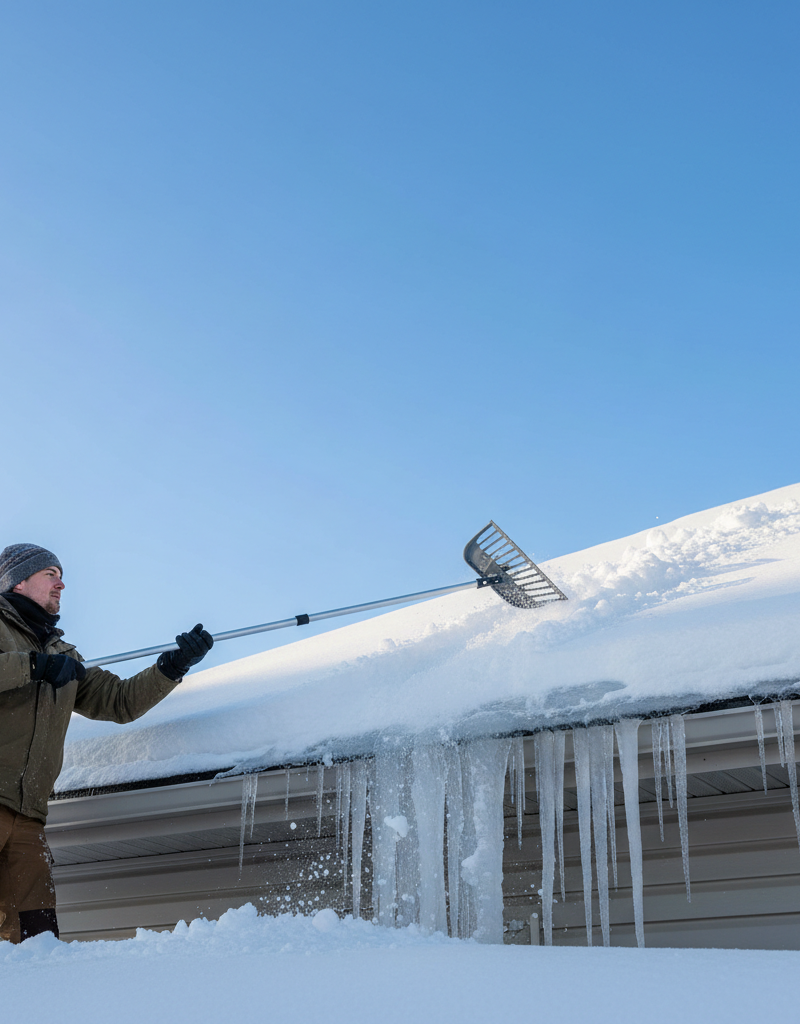
1. Clear the Snow – The First Line of Defense
Immediate snow removal is the most crucial step in preventing ice dam formation or growth. Use a roof rake to pull fresh snow off the first 3 to 6 feet of your roof, starting from the eaves upwards. This removes the material that would otherwise melt and contribute to the dam.
- Tool Tip: A lightweight aluminum roof rake with an extendable handle is ideal for reaching high areas from the ground.
- Technique: Pull snow down in small sections rather than trying to clear large swathes at once. Be gentle to avoid damaging shingles or gutters.
2. Create Drainage Channels with Ice Melt – A Temporary Solution
If an ice dam has already formed, you can use calcium chloride ice melt to open channels for trapped water. Do NOT use rock salt (sodium chloride) as it can damage your roof, gutters, and landscaping.
- Materials: Purchase calcium chloride ice melt, often available in pellet or flake form.
- Method: Fill old nylon stockings or socks with calcium chloride and place them across the ice dam, perpendicular to the eave. The calcium chloride will slowly melt through the ice, creating channels for the trapped water to escape. Place them approximately every 5-10 feet along the dam.
- Warning: Calcium chloride works best when the temperatures are not exceptionally low. It also should not be left on shingles for extended periods, as it can potentially cause discoloration or minor etching. Remove the stockings once the channels are formed.
3. Attack with a Steam Cleaner (Pro Recommended, DIY with Caution) – For Stubborn Dams
Professional ice dam removal often involves hot water pressure washers or steam cleaners. While powerful, these tools can damage your roof if not used correctly. For DIY, only consider low-pressure steam units and exercise extreme caution.
- DIY Considerations: If you use a consumer-grade steam cleaner, ensure it's designed for outdoor use and has appropriate nozzle attachments. Maintain a safe distance from the roof surface (at least 6-12 inches) and move the nozzle constantly to avoid concentrating heat on one area, which can dislodge or damage shingles.
- Pro Decision: For large or deeply frozen ice dams, or if you're uncomfortable using high-pressure equipment, call a professional ice dam removal service. They have specialized low-pressure steam equipment that effectively melts the ice without damaging your roof.
4. Improve Attic Ventilation – Long-Term Prevention Starts Here
Proper attic ventilation is crucial for maintaining a cold roof. This involves a continuous flow of outside air through the attic, entering through soffit vents and exiting through ridge or other exhaust vents.
- Check Vents: Ensure soffit vents are not blocked by insulation. Use a flashlight to inspect them from inside the attic.
- Clear Blockages: Remove any debris, leaves, or bird nests that might be obstructing exterior vent openings.
- Add Vents: If your attic lacks adequate ventilation, consider installing additional soffit, ridge, or gable-end vents. A general rule of thumb is 1 square foot of net free vent area for every 300 square feet of attic floor space, with a 50/50 split between intake and exhaust.
5. Boost Attic Insulation – Sealing the Heat Leaks
Inadequate insulation allows heat from your living space to radiate into the attic, warming the roof deck. The Department of Energy recommends R-values of R-30 to R-60 for most attics, depending on your climate zone.
- Inspect Insulation: Look for areas of thin or compressed insulation, especially near exterior walls and around light fixtures, exhaust fans, and chimneys. If you can see the top of your ceiling joists, you likely need more insulation.
- Seal Air Leaks: Before adding insulation, meticulously seal all air leaks between the living space and the attic. Use caulk for small gaps and expanding foam for larger penetrations (e.g., around plumbing stacks, electrical wires, recessed lighting). This is arguably more important than insulation alone!
- Add Insulation: Roll out unfaced fiberglass batts or blow in loose-fill cellulose or fiberglass insulation to achieve the recommended R-value. Ensure insulation does not block soffit vents; install baffles if necessary to maintain airflow.
6. Examine and Repair Gutters and Downspouts – Ensure Free Flow
Clogged or damaged gutters and downspouts can exacerbate ice dam issues by trapping water.
- Clear Debris: Regularly clean gutters of leaves, twigs, and other debris. Ideally, do this in late fall before the first snow.
- Check for Pitch: Ensure gutters have a slight pitch (about 1/4 inch per 10 feet) towards the downspouts to promote drainage.
- Repair Damage: Fix any sagging, broken, or leaky sections of gutters and make sure downspouts are clear and routed away from the foundation.
7. Install Gutter Heating Cables (Last Resort) – Active Mitigation
Electrical heating cables can prevent ice from forming in gutters and along the roof edge. These are an energy-intensive solution but effective in problematic areas.
- Installation: Zig-zag the cables along the roof edge and inside the gutters and downspouts in the areas where ice dams typically form. Follow manufacturer instructions carefully.
- Energy Use: Be aware that these cables use electricity and can increase your utility bill. Use them only when necessary.
Common Causes
- Poor Attic Insulation: The most common culprit. Insufficient insulation allows warm air from the living space to rise into the attic, heating the roof deck.
- Inadequate Attic Ventilation: A lack of proper airflow through the attic means warm air gets trapped, leading to uneven roof temperatures. Soffit vents blocked by insulation are a frequent issue.
- Air Leaks: Gaps and cracks around light fixtures, exhaust fans, plumbing stacks, chimneys, and attic hatches allow significant amounts of warm, moist air to escape directly into the attic.
- Snow Accumulation: Heavy snow loads provide a thick insulating layer, trapping any escaping heat and accelerating snowmelt on the warmed roof surface.
- Sunny Days & Freezing Nights: A common weather pattern where daytime sun melts snow on the upper roof, which then refreezes at the colder eaves overnight.
- Clogged or Damaged Gutters: While not a primary cause, clogged gutters can worsen ice dam problems by preventing meltwater from draining freely, causing it to back up onto the roof.
Common Mistakes
- Using a Pickaxe or Hammer to Break Ice: This is extremely dangerous and almost guaranteed to damage your shingles, gutters, and potentially yourself. Never attempt to chip away at ice dams with blunt force.
- Applying Rock Salt (Sodium Chloride): While effective at melting ice on pavement, rock salt can corrode metal gutters, damage roof shingles, kill vegetation, and leave white stains. Always use calcium chloride specifically designed for roofs.
- Blasting with a Pressure Washer (Cold Water): Cold water pressure washing can worsen the problem by adding more water to the dam, creating more ice, and potentially forcing water under shingles. It can also damage the roof surface.
- Ignoring Attic Air Leaks: Many homeowners focus solely on insulation, but sealing air leaks between the conditioned living space and the attic is often more critical for preventing heat loss that contributes to ice dams.
- Blocking Soffit Vents with Insulation: When adding insulation, ensure you use baffles to maintain a clear air channel from the soffit vents into the attic space. Blocked vents negate the purpose of proper ventilation.
- Waiting Until the Problem is Severe: Addressing snow accumulation quickly after a snowfall, or tackling small ice dams with calcium chloride, is much easier and safer than waiting for a massive ice dam to form.
Cost & Time Breakdown
| Task | DIY cost | Pro cost | Time |
|---|---|---|---|
| Snow Removal (Roof Rake) | $30–$80 (rake) | $150–$400 | 30–90 minutes |
| Ice Melt Application | $15–$30 (calcium chloride) | Included in removal service | 15–30 minutes |
| Air Sealing (Caulk/Foam) | $20–$50 | $300–$800 | 2–6 hours |
| Add Attic Insulation (DIY batts) | $300–$1,000 | $1,000–$3,000 | 1–2 days |
| Attic Ventilation Improvements | $50–$300 (materials) | $500–$1,500 | 4–8 hours |
| Gutter Cleaning/Repair | $0–$50 (tools) | $100–$250 | 1–2 hours |
Tips & Prevention
- Regular Snow Removal: After every significant snowfall, use a roof rake to pull at least the bottom 3-6 feet of snow off your roof. This is the single most effective way to prevent ice dams from forming in the first place.
- Ensure Proper Attic Ventilation: Verify that your attic has continuous and unobstructed airflow from soffit vents to ridge or gable vents. Check for blocked vents from inside the attic.
- Seal Attic Air Leaks: Before adding insulation, conduct a thorough air sealing of your attic floor. Pay special attention to penetrations around chimneys, plumbing stacks, electrical wires, recessed lights, and the attic hatch. This minimizes warm air leakage into the attic.
- Adequate Attic Insulation: Ensure your attic meets the recommended R-value for your climate zone. This slows heat transfer from your living space to the attic, keeping the roof deck colder.
- Keep Gutters Clean: Leaves and debris can impede proper drainage, contributing to ice buildup. Clean your gutters thoroughly in late fall before winter sets in.
- Monitor Roof for Warning Signs: After heavy snowfalls or during thaws, periodically check your roof eaves for any signs of ice buildup. Early detection allows for easier and safer intervention.
- Consider a Roof De-icing System: If you live in an area prone to severe ice dams and other preventive measures are insufficient, consider professionally installed, self-regulating heating cables for gutters and roof edges. While more expensive to install and operate, they offer active protection.
When to Call a Professional
Call a professional ice dam removal service when the ice dams are extensive, very thick, or difficult to reach safely from the ground. If you lack the necessary equipment (like a long roof rake or low-pressure steam), or if you are uncomfortable working on a ladder in winter conditions, a professional is your safest bet. Additionally, if you suspect water has already penetrated your roof and caused interior damage (e.g., water stains on ceilings or walls, dripping inside), contact a professional immediately to assess the damage and mitigate further issues. For long-term prevention, a qualified home energy auditor or insulation/ventilation contractor can thoroughly inspect your attic and recommend specific improvements to insulation, air sealing, and ventilation to resolve persistent ice dam problems at their source.
Related Articles
Keep troubleshooting with these hand-picked guides from FixlyGuide:
- The #1 Mistake Homeowners Make with Ice Dams (and How to Fix It SAFELY) — Most homeowners approach ice dam removal incorrectly, creating more damage or safety risks. Learn the right, safe methods to protect your r…
- The $30 Trick to Melting Ice Dams (Before They Destroy Your Roof) — Discover how to safely remove ice dams from your roof instantly with common household items, preventing costly damage. Stay safe while tack…
- The $30 Secret to Banishing Ice Dams Without Damaging Your Roof — Discover how a simple, inexpensive trick can safely eliminate dangerous ice dams from your roof and prevent costly damage to your home.
- The 7 Critical Home Inspection Checks Most Homeowners Miss (and How to Do Them Yourself) — Discover the essential annual home inspection checks many homeowners overlook and learn how to perform them yourself to prevent costly repa…
- The 3 Critical Mistakes Homeowners Make Inspecting Their Roof (From the Ground) — Learn how to spot damaging roof problems safely from the ground, avoiding common pitfalls and knowing exactly what to look for.
- Is Your Gutter Sagging After Every Storm? The Hidden Flaw Most Homeowners Miss — Discover the overlooked reason your gutters sag after every storm and learn the lasting fix that most homeowners miss.
Recommended for DIYers & woodworkers
Sponsored
The Top 20 Tools for Workshops of Any Budget
No stationary machines or power tools required — plus 3 fundamental tools that can't be bought at any price.
Get the free guide
Ted's Woodworking — The #1 Woodworking Resource
Detailed instructions, dimensioned drawings, materials & cutting lists, and 3D schematics for every skill level.
See the plansSponsored: links above are affiliate links. FixlyGuide may earn a commission on qualifying purchases — at no extra cost to you.
Frequently asked questions
What causes ice dams on a roof?+
Ice dams form when heat from your home's interior escapes into the attic, warming the roof deck and melting snow. This meltwater then flows down to the colder roof eaves, where it refreezes and builds up, creating a barrier that traps more water.
Is it safe to chip away at ice dams?+
No, absolutely not. Using a hammer, axe, or any sharp object to chip away at ice dams is extremely dangerous for both you and your roof. It can cause severe damage to shingles, gutters, and lead to falls.
What is the best way to remove an existing ice dam?+
For active removal, use a roof rake to clear snow above the dam, then strategically place calcium chloride ice melt (in a nylon stocking) perpendicular to the dam to create drainage channels. For very large dams, professional steam removal is the safest option.
How can I prevent ice dams from forming?+
The best prevention involves ensuring adequate attic insulation to keep the roof deck cold, proper attic ventilation to remove any heat that does escape, and sealing all air leaks between your living space and the attic.
Can ice dams damage my home?+
Yes, ice dams can cause significant damage. Trapped water can back up under shingles, leading to water infiltration in the attic, damaged insulation, stained ceilings and walls, mold growth, and compromised structural integrity.


Discussion
Loading comments…