
Tools & materials you'll need
Affiliate links- AmazonNew air filter1
As an Amazon Associate FixlyGuide earns from qualifying purchases — at no extra cost to you. Prices and availability are accurate as of publication and subject to change.
How it works
Your air conditioning system does not create cold air; it removes heat from your home's indoor air and transfers it outside. This process relies on a sealed loop of refrigerant that undergoes continuous phase changes. The cycle begins at the compressor, usually located in the outdoor condenser unit. This compressor pressurizes the refrigerant, turning it from a cool gas into a very hot, high-pressure gas.
This hot gas flows into the condenser coils, also in the outdoor unit. A large fan pulls outside air across these coils, causing the heat from the refrigerant to dissipate into the atmosphere. As it cools, the refrigerant condenses into a high-pressure liquid. This liquid then travels through a thin copper line to the indoor unit (the evaporator coil, often located on top of your furnace).
Before entering the evaporator, the liquid passes through a metering device, such as an expansion valve, which causes a rapid drop in pressure and temperature. Now a very cold, low-pressure liquid, the refrigerant flows through the evaporator coils. Your system's blower motor pulls warm, humid air from your home across these coils. The refrigerant absorbs the heat from the air, causing the refrigerant to evaporate back into a gas. The now-cooled and dehumidified air is then blown back into your home through the ductwork. The cool, low-pressure refrigerant gas returns to the compressor, and the cycle repeats. An interruption at any stage—restricted airflow from a dirty filter, blocked heat release at the condenser, or low refrigerant—will compromise this entire process.
Step-by-Step Fix
Follow these sequential steps to diagnose and resolve the most common causes of an AC blowing warm air. Always prioritize safety by disconnecting power before touching electrical components or internal parts.
1. Confirm Thermostat Settings — Start with the simplest potential issue, which requires no tools. Go to your central thermostat and verify its configuration. Ensure the system mode is set to Cool, not Off, Heat, or Fan. Next, check the temperature setting. It must be set at least 3-5°F below the current ambient room temperature to signal the AC to turn on. If you have a smart or programmable thermostat, check for an active "hold" or a scheduled "away" period that might be overriding your command.
- Tools: None.
- Pro Tip: If the thermostat screen is blank, the batteries may be dead. Replace them. If it's hardwired and blank, this points to a power supply issue, which you will investigate in the next step.
2. Reset All Related Circuit Breakers — Your AC system has multiple power connections that can trip. Locate your home's main electrical panel. Inside, you will typically find two separate breakers dedicated to the HVAC system. One is for the indoor air handler/furnace (often 15-20 amps), and a larger, "double-pole" breaker (30-60 amps) is for the outdoor condenser unit. Check if either is in the tripped (middle) or fully Off position. To reset a breaker correctly, push it firmly to the Off position first, then flip it back to On.
- Tools: Flashlight.
- Safety: Next to the outdoor condenser unit, there is usually a separate power disconnect in a small metal box. For any work on the outdoor unit, you must turn off the breaker and pull this disconnect (it may be a pull-out handle or a switch) to ensure it is completely de-energized.
3. Replace the System Air Filter — A clogged air filter is the single most common cause of cooling problems. It chokes the system, preventing it from drawing in enough air to cool. This can cause the indoor evaporator coil to freeze into a block of ice, completely obstructing airflow and resulting in warm air from your vents. Locate your filter, which is typically in a slot on the side of the air handler/furnace or inside a large return air grille in a wall or ceiling. Note the dimensions printed on the filter's frame. Slide the old one out and insert a new one of the exact same size.
- Tools: New air filter.
- Pro Tip: Pay attention to the airflow arrow printed on the new filter's frame. It must point toward the furnace/air handler, following the direction of the air being pulled from your home. An improperly installed filter is less effective and can be noisy.
4. Check and Clear the Condensate Drain Line — Your AC removes humidity from the air, which collects as water (condensate) in a drain pan and flows out of your house through a PVC pipe. If this line becomes clogged with algae and sludge, water backs up and can trigger a safety float switch, which shuts down your AC to prevent water damage. Locate the PVC pipe coming from your indoor unit. It may have a small overflow switch wired into it near a "U" trap. If the switch has been triggered, the unit will not cool.
- Tools: Wet/dry vacuum, distilled white vinegar, stiff brush.
- Fix: Turn off the power at the breaker. Use a wet/dry vac to suction out the clog from the termination point of the pipe outside your house. This is often enough to clear it. For stubborn clogs, you may need to access a "T" fitting or cleanout port near the air handler to pour a 50/50 solution of water and vinegar down the line to dissolve the blockage.
5. Clear the Outdoor Condenser Area — The outdoor unit needs unrestricted airflow to release heat. Walk around your condenser and inspect the area. Remove any leaves, grass clippings, or debris piled against the sides. Trim back bushes, weeds, and tree branches to create a minimum of 24 inches of clear space on all sides and above the unit. Also, look down through the top fan grille and remove any leaves or twigs that have fallen inside onto the unit's base.
- Tools: Work gloves, gardening shears.
- Safety: Turn off all power to the outdoor unit (at the breaker and the exterior disconnect) before reaching near the fan blades or fins.
6. Thoroughly Clean the Condenser Coils — Dirt, pollen, and cottonwood fluff can embed deep within the condenser's metal fins, acting like an insulating blanket. After turning off all power, use a garden hose with a spray nozzle to gently rinse the coils from the outside. Then, carefully remove the top protective grille and fan assembly (without disconnecting the wires, just set it aside), and spray the coils from the inside out. This pushes the embedded debris out instead of driving it deeper. For heavy grime, use a commercially available foaming coil cleaner spray, letting it sit for 10-15 minutes before rinsing.
- Tools: Screwdriver/nut driver, garden hose with sprayer, commercial coil cleaner (optional).
- Caution: The aluminum fins are extremely fragile. Never use a pressure washer, as it will bend them flat and destroy the unit's efficiency.
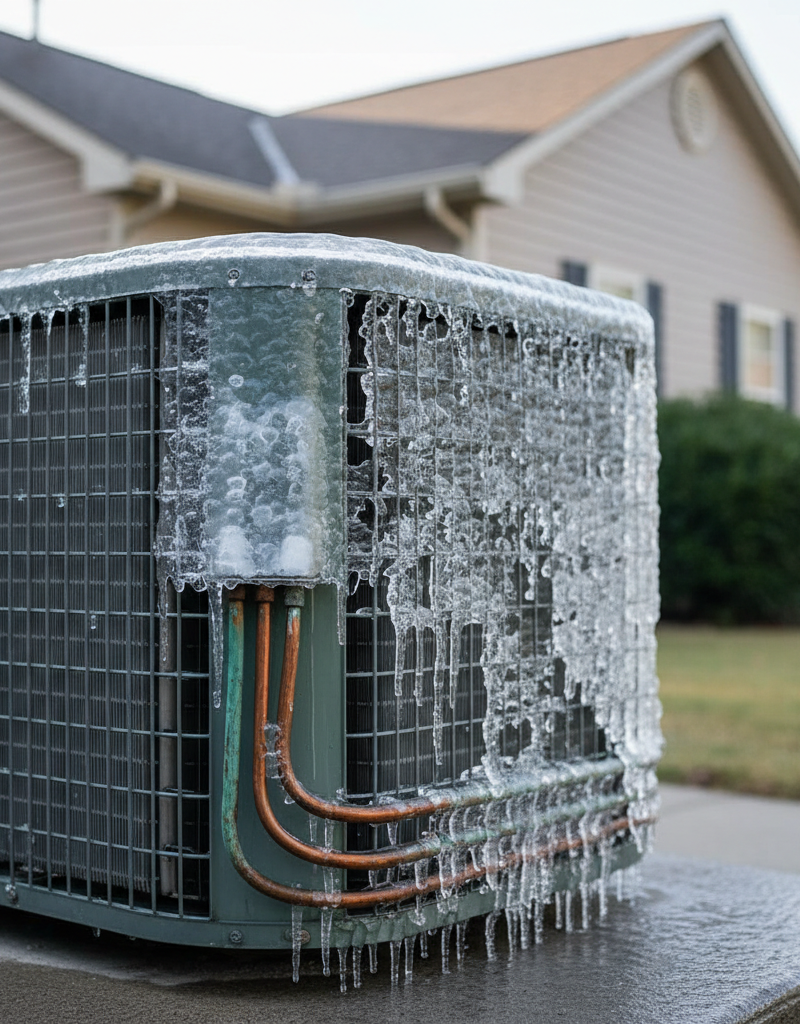
7. Allow Frozen Evaporator Coils to Thaw — If you discovered a severely clogged air filter, your indoor evaporator coil is likely frozen. Do not continue to run the AC in Cool mode. Go to your thermostat, turn the system mode to Off, but switch the fan setting to On. This will circulate room-temperature air across the ice, speeding up the thawing process. This can take anywhere from 1 to 24 hours, depending on the severity of the freeze. Place towels around the base of the indoor unit to absorb melting water.
- Tools: Towels.
- Diagnosis: Once thawed, install a new filter and restart the AC. If it cools properly, the problem was airflow. If it freezes again within a day or two despite a clean filter and clean coils, the issue is almost certainly a refrigerant leak.
8. Observe Outdoor Fan and Compressor Operation — With the system trying to run, go outside and observe the condenser unit. You should hear the hum of the compressor and see the top fan spinning rapidly. If the fan is not spinning but you hear a humming or buzzing sound from the unit, the fan motor may be seized or, more commonly, its run capacitor has failed.
- Tools: Your eyes and ears.
- If this doesn't work: If the fan is struggling to start (e.g., you can push-start it with a stick, which is dangerous and not recommended), this strongly indicates a bad capacitor. If there is no sound at all and you've verified power, the issue is more severe (e.g., contactor, control board).
9. Visually Inspect the Run Capacitor — This is a common failure point and a manageable DIY replacement for those comfortable with electrical safety. Power off the unit at the breaker and outdoor disconnect. Remove the service panel on the condenser. The capacitor is a large, cylindrical metal can. Look for physical signs of failure: a domed or bulging top, or oily fluid leaking from its terminals. If you see either, the capacitor has failed and must be replaced.
- Tools: Nut driver, insulated screwdriver, needlenose pliers.
- CRITICAL SAFETY: Capacitors store a high-voltage charge even when the power is off. Before touching it, you MUST discharge it by carefully placing the metal shaft of an insulated screwdriver across its metal terminals, bridging them to discharge any stored energy. A spark may occur.
10. Replace the Failed Capacitor — After discharging the old capacitor, take a picture of the wire connections. Use needlenose pliers to carefully disconnect the wires. Loosen the retaining strap and remove the capacitor. Note the specifications printed on the side (e.g., 45+5 MFD, 370 VAC). You must purchase a replacement with the exact same MFD (microfarad) and an equal or greater VAC (voltage) rating. Install the new capacitor, reconnect the wires exactly as they were, secure the service panel, and restore power.
- Tools: As above, plus new capacitor.
- Pro Tip: Take the old capacitor to an HVAC supply store to ensure you get a perfect match. A dual-run capacitor (like
45+5 MFD) has three terminals (C,HERM,FAN) and runs both the compressor and fan motor. A single capacitor has two terminals. Match your replacement precisely.
Common mistakes
- Using a Pressure Washer on Coils. The high-pressure water stream will flatten the delicate aluminum fins on your condenser or evaporator coils, obstructing airflow permanently. This severely reduces efficiency and can necessitate a costly coil replacement. Instead, use a garden hose with a spray nozzle or a dedicated, low-pressure coil cleaning wand.
- "Topping Off" Low Refrigerant. An AC is a sealed system. If refrigerant is low, there is a leak. Simply adding more (often called "recharging") without locating and repairing the leak is a temporary fix at best, environmentally irresponsible, and illegal for an unlicensed individual. The system will just leak again, and running on improper levels can damage the compressor.
- Forgetting to Discharge a Capacitor. A run capacitor can hold a dangerous electrical charge long after power is disconnected. Attempting to remove it without first safely discharging it by shorting the terminals with an insulated screwdriver can result in a severe electrical shock and burns.
- Ignoring a Repeatedly Tripping Breaker. If you reset a circuit breaker and it trips again immediately or within minutes, do not keep resetting it. This indicates a dead short or a serious electrical overload in the system (e.g., a grounded compressor). Forcing power to it can cause a fire or destroy expensive components. Call a technician.
- Installing the Air Filter Backwards. Air filters have an arrow on the frame indicating the correct direction of airflow. Installing it backward reduces its effectiveness, puts more strain on the blower motor, and in some cases, can cause the filter to collapse and be sucked into the ductwork.
- Mismatching Capacitor Specifications. When replacing a capacitor, you must match the MFD (microfarad) rating exactly. Using the wrong MFD rating will cause the motor to run inefficiently, overheat, and fail prematurely. The voltage rating (VAC) on the replacement must be equal to or higher than the original, but never lower.
Cost & time breakdown
Costs are estimates and can vary by location and equipment type. Professional costs often include a service call fee ($75 - $150) plus parts and labor.
| Task | DIY Cost | Pro Cost | Time |
|---|---|---|---|
| Air Filter Replacement | $5 - $40 (per filter) | $80 - $150 (as part of a maintenance call) | 5-10 minutes |
| Condensate Line Clearing | $0 - $20 (for a wet/dry vac) | $100 - $250 | 20-45 minutes |
| Condenser Coil Cleaning | $15 - $30 (for can of coil cleaner) | $150 - $400 | 45-60 minutes |
| Run Capacitor Replacement | $20 - $60 (for the part) | $175 - $450 | 30-60 minutes |
| Smart Thermostat Install | $100 - $250 (for the thermostat) | $250 - $600 | 45-75 minutes |
| Professional Leak Search & Repair | N/A (EPA license required) | $400 - $1,500+ (depending on leak location/severity) | 2-5+ hours |
When to call a pro
While many causes of warm air are fixable, certain symptoms indicate a problem beyond the scope of a typical DIY repair. It is time to call a licensed HVAC technician if you encounter any of the following:
- The circuit breaker trips repeatedly upon reset, signaling a dangerous electrical fault.
- You hear loud, mechanical noises like grinding, squealing, or metallic clanking from the outdoor unit, which could mean a failing compressor or fan motor bearings.
- You find evidence of a refrigerant leak, such as oily residue on coil fittings or hissing sounds. Handling refrigerant requires EPA certification and specialized tools.
- The system cools for a short time and then shuts off repeatedly (short-cycling) even after cleaning filters and coils.
- You have performed all the relevant troubleshooting steps in this guide—including filter replacement, coil cleaning, and checking for power—and the system still fails to cool.
- The outdoor condenser unit fan is running, but the copper line running from the unit feels warm or hot instead of cool and sweating, suggesting a compressor or refrigerant flow problem.
Prevention & maintenance
Proactive maintenance is the most effective way to prevent AC failures and ensure efficient operation. Integrate these habits into your home maintenance routine.
- Replace Air Filters Religiously. Inspect the filter monthly and replace it every 1-3 months. Homes with pets, smokers, or proximity to construction may require monthly changes. Use a quality filter with a MERV rating between 8 and 11 for a good balance of airflow and filtration.
- Schedule Annual Professional Tune-Ups. Once a year, preferably in the spring, have a qualified HVAC technician inspect your entire system. They will check refrigerant pressures, test electrical components, lubricate motors, and clean critical parts that are difficult for homeowners to access.
- Keep the Outdoor Unit Clean and Clear. At the start of each cooling season, and periodically throughout the summer, clean the condenser coils and ensure a 24-inch clearance zone is maintained around the unit for proper airflow.
- Maintain the Condensate Drain Line. Every two to three months during the cooling season, pour a cup of distilled white vinegar (or use specialized condensate pan tablets) down the cleanout port of your drain line. This prevents the growth of algae and sludge that cause clogs.
- Use a Programmable or Smart Thermostat Wisely. Avoid making large, rapid temperature adjustments. Set a consistent schedule that minimizes strain on the system. A "setback" of 7-10°F for 8 hours a day (e.g., when you're at work or asleep) can save significant energy without overworking the unit.
Related Articles
Keep troubleshooting with these hand-picked guides from FixlyGuide:
- AC Blowing Warm Air? Easy Fixes for Common AC Problems — Discover the most common reasons your AC is blowing warm air and learn simple, actionable steps to troubleshoot and fix the issue yourself,…
- The #1 Reason Your AC Blows Warm Air (And It's Not What You Think) — Discover the most common and often overlooked reason your AC might be blowing warm air, and how a simple capacitor fix can restore cool air.
- The Secret Culprit Behind Your AC Blowing Warm Air (It’s Not What You Think) — Discover the unexpected reason your air conditioner is blowing warm air and how a simple, often overlooked fix can restore your home’s cool…
- AC Not Cooling? 12 Things to Check Before Calling HVAC — Before you spend $150 on a service call, run through these 12 quick checks. Most no-cool AC problems are solved in under 15 minutes with no…
- The Secret Culprit Behind Your Dead AC (And How to Revive It in 10 Minutes) — Discover how a common, easily replaceable part might be preventing your air conditioner from turning on, and learn to fix it yourself in un…
- Washing Machine Won't Spin or Drain? Easy Fixes for Common Problems — If your washing machine isn’t spinning or draining, it’s usually due to a clogged pump filter, a kinked drain hose, or an overloaded machin…
Frequently asked questions
Why is my AC running but blowing warm air?+
Your AC might be running but blowing warm air due to a very dirty air filter restricting airflow, obstructed outdoor condenser coils preventing heat dissipation, or a tripped circuit breaker cutting power to essential components.
How often should I change my AC filter?+
It's recommended to change your AC air filter every 1 to 3 months, especially during peak cooling seasons, if you have pets, or if someone in your household has allergies.
What does it mean if my AC coil is frozen?+
A frozen AC coil means ice has built up on the evaporator coil, preventing it from absorbing heat effectively. This is usually caused by restricted airflow from a dirty filter or a low refrigerant level, leading to warm air from your vents.


Discussion
Loading comments…