
Tools & materials you'll need
Affiliate linksAs an Amazon Associate FixlyGuide earns from qualifying purchases — at no extra cost to you. Prices and availability are accurate as of publication and subject to change.
Quick Answer
If your compost pile isn't heating up, it's usually a sign of an imbalance in its foundational elements: carbon, nitrogen, water, and oxygen. The quick fix involves assessing and adjusting these ratios. You'll need to check the moisture content, ensure proper aeration, and likely add more 'greens' (nitrogen) or 'browns' (carbon) to kickstart the decomposition process. Achieving and maintaining the ideal conditions will encourage the microorganisms to thrive, leading to the heat production essential for effective composting.
The Problem
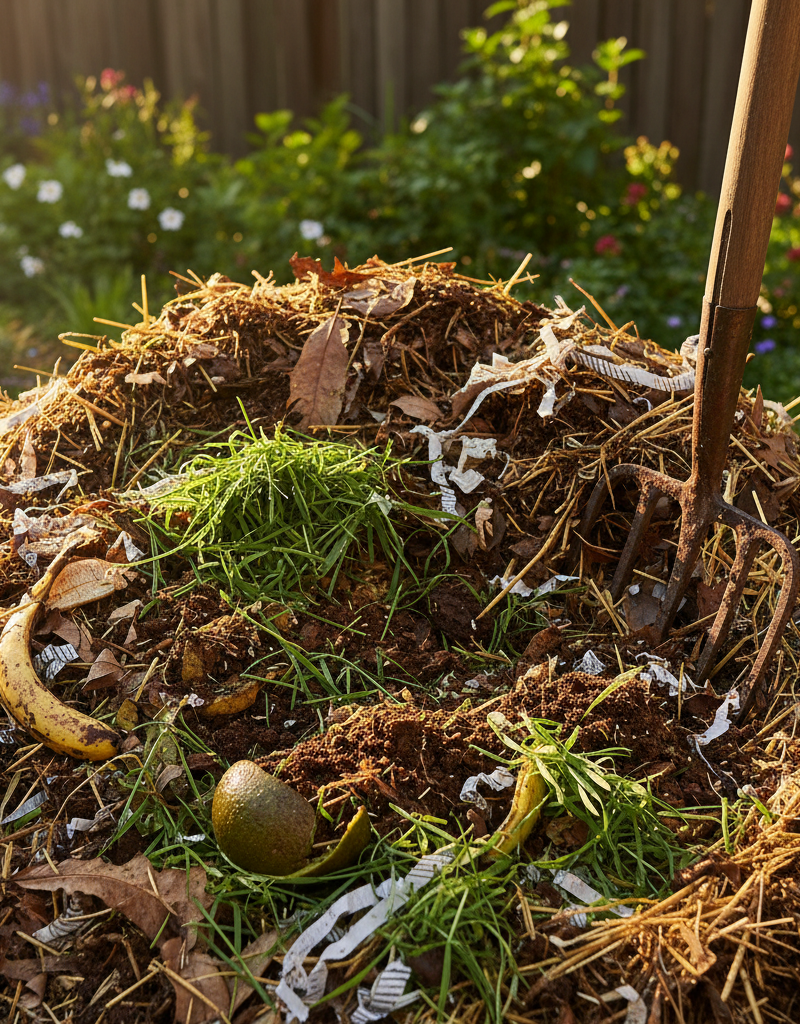
Starting a compost pile seems simple enough: gather organic waste, toss it in a heap, and let nature do its work. However, many enthusiastic backyard composters quickly encounter a frustrating issue: their pile just sits there, cold and inert, instead of transforming into rich, dark compost. A healthy, active compost pile should heat up significantly, often reaching temperatures between 120°F and 160°F (49°C to 71°C). This heat is a byproduct of microbial activity – the decomposition process itself. When your pile remains cold, it's a clear signal that the conditions aren't right for these beneficial microorganisms to do their job efficiently. This can lead to slow decomposition, unpleasant odors, and a finished product that never quite reaches its full potential. The goal isn't just to break down waste, but to create nutrient-dense humus, and a cold pile simply won't get you there effectively.
How It Works
Composting is essentially a controlled aerobic decomposition process, driven by a diverse community of microorganisms—bacteria, fungi, and actinomycetes. These microscopic workers break down organic matter in the presence of oxygen. For them to thrive and work efficiently, they need four key ingredients in the right balance: carbon (energy source, 'browns'), nitrogen (protein for growth, 'greens'), oxygen (for aerobic respiration), and moisture (to transport nutrients and support microbial life). When these elements are properly balanced, the microorganisms multiply rapidly. As they consume organic materials, they release energy, much of which is dissipated as heat. This heat is crucial; it accelerates the decomposition process, kills off many weed seeds and pathogens, and helps to create that earthy, sweet-smelling finished compost. A carbon-to-nitrogen ratio (C:N) of roughly 25-30:1 is considered ideal. Too much carbon (e.g., all dry leaves) and the process slows down due to a lack of nitrogen for microbial growth. Too much nitrogen (e.g., all grass clippings) and the pile can become anaerobic, producing ammonia and foul odors, as well as not heating up properly. Optimal moisture content is like a wrung-out sponge, and sufficient oxygen is maintained by turning the pile regularly, preventing compaction and anaerobic conditions.
Step-by-Step Fix
1. Assess Moisture Content – Too dry prevents microbial activity
Grab a handful of compost from the center of your pile and squeeze it. It should feel like a damp sponge – moist, but not dripping wet. If it's crumbly and dry, it needs water. If water drips out easily, it's too wet.
- If too dry: Add water gradually while turning the pile. A garden hose with a spray nozzle works well. Turn and mix thoroughly to distribute moisture evenly, especially in the core.
- If too wet: Incorporate dry, carbon-rich materials like shredded cardboard, dry leaves, or sawdust. Turn the pile frequently to increase air circulation and help it dry out.
2. Evaluate Carbon-to-Nitrogen Ratio – The most common culprit for a cold pile
This is often the most critical factor. 'Greens' are high in nitrogen (e.g., grass clippings, food scraps, coffee grounds), and 'Browns' are high in carbon (e.g., dry leaves, wood chips, shredded paper, straw). A good rule of thumb is to aim for roughly two to three parts 'browns' for every one part 'greens' by volume.
- If too many browns (pile is dry, slow to decompose): Add more 'greens.' Fresh grass clippings (in thin layers to prevent matting), fresh food scraps (avoid meat/dairy), or even a small amount of an organic nitrogen fertilizer (like blood meal) can jumpstart biological activity. Mix these into the core of the pile.
- If too many greens (pile smells putrid, slimy): Add more 'browns.' Shredded cardboard, newspaper, dry leaves, or wood chips will absorb excess moisture and provide the carbon needed to balance the ratio. Mix thoroughly.
3. Check for Aeration – Microbes need oxygen to thrive
Lack of oxygen is a common reason for a cold or smelly pile. Compressed material starves the beneficial aerobic bacteria and promotes anaerobic ones, which produce foul odors and little heat.
- Turn the pile: Use a pitchfork or compost aerator to turn the entire pile every few days or at least once a week. Aim to mix the outer, cooler material into the warmer center. This introduces oxygen and helps distribute moisture and nutrients.
- Consider a compost aerator: For less strenuous turning, a specialized compost aerator can be plunged into the pile and pulled up, creating air channels without full turning.
- Safety Note: Always wear gloves when handling compost. If your pile contains sharp objects or thorns, use caution.
4. Size Matters (Material Particle Size) – Smaller pieces break down faster
Larger pieces of organic matter break down very slowly because microorganisms have less surface area to work on. Small pieces, conversely, offer more surface area and pack down less.
- Shred materials: If you're adding large items like woody branches or big fruit rinds, shred or chop them into smaller pieces (1-2 inches is ideal) before adding them to the pile. A chipper/shredder can be invaluable, but a sturdy pair of pruners or even a lawnmower (for leaves) can work.
5. Evaluate Pile Size – Too small won't generate enough heat
For efficient heating, a compost pile needs a critical mass. Too small a pile loses heat too quickly to the environment.
- Ideal dimensions: Aim for a pile that is at least 3x3x3 feet (1 cubic yard). This size provides enough mass to insulate the core and allow heat to build up without becoming too unwieldy to turn.
- Add more material: If your pile is too small, continue adding appropriate layers of 'greens' and 'browns' until it reaches the minimum size.
6. Maintain Consistency – Regular additions and turning are key
Composting is an ongoing process. Sporadic additions and neglect will prevent your pile from reaching its full potential.
- Regular feeding: Add new materials in layers, alternating between 'greens' and 'browns.' Bury food scraps in the center to deter pests.
- Consistent turning: Keep turning your pile as recommended (at least weekly) to maintain aeration and mix materials.
Common Causes
- Incorrect Carbon-to-Nitrogen Ratio: This is by far the most frequent issue. Too many 'browns' (e.g., just dry leaves) means not enough nitrogen for microbial growth. Too many 'greens' (e.g., just grass clippings) can lead to a dense, wet, anaerobic pile that smells but doesn't heat.
- Insufficient Moisture: Microorganisms need water to survive and function. A dry pile will see minimal activity and therefore no heat generation. Think of a desert – not much life thriving there.
- Lack of Aeration: Compost microbes are aerobic, meaning they require oxygen. A compacted pile starves them of oxygen, leading to slow, inefficient decomposition and often foul odors. No oxygen, no heat.
- Pile Size Too Small: A small pile (less than 3x3x3 feet) doesn't have enough mass to retain the heat generated by microbial activity. The heat dissipates into the surrounding air too quickly, preventing the core from reaching critical temperatures.
- Incorrect Particle Size: Large chunks of material (e.g., whole branches, big fruit rinds) have less surface area for microbes to colonize, slowing down decomposition considerably and preventing heat buildup.
- Heavy Pesticide/Herbicide Use: While less common for backyard composters, materials treated heavily with certain persistent pesticides or herbicides can inhibit microbial activity within the pile, although most common residential products break down relatively quickly.
Common Mistakes
- Adding Large, Unshredded Items: Tossing in whole branches or large vegetable stalks significantly slows down decomposition. Always aim for smaller pieces.
- Ignoring the Smell: A healthy compost pile should smell earthy, like a forest floor. If it smells like rotten eggs, ammonia, or overtly putrid, something is wrong – usually too much nitrogen/moisture or not enough aeration. Don't ignore it; address it immediately.
- Not Turning Enough: Many beginners underestimate the importance of turning. Turning is not just about aeration; it also remixes materials, brings less decomposed sections to the hot core, and helps distribute moisture.
- Adding Meat, Dairy, or Oily Foods: These items can attract pests, create unpleasant odors, and decompose slowly, leading to a cold or smelly pile. Stick to plant-based food scraps.
- Expecting Instant Results: While a hot compost pile works quickly, it still takes time. Don't get discouraged if you don't have finished compost in a week. Weeks to months is more realistic for 'finished' compost.
- Letting it Get Bone Dry or Sopping Wet: Consistency in moisture is key. Check your pile regularly, especially during dry spells or after heavy rains.
Cost & Time Breakdown
| Task | DIY Cost | Pro Cost | Time |
|---|---|---|---|
| Initial Pile Setup (materials) | $0-$50 | N/A | 1-3 hours |
| Tools (pitchfork, aerator) | $30-$100 | N/A | One-time |
| Adding Browns (leaves, paper) | $0-$20/year | N/A | 10-20 min/week |
| Adding Greens (food scraps) | $0/year (waste) | N/A | 5-10 min/day |
| Turning/Aerating Pile | $0 | N/A | 15-30 min/week |
| Watering Pile | $0 (water bill) | N/A | 5-10 min/as needed |
Tips & Prevention
- Layering is Your Friend: When building or adding to your pile, think in layers. Alternate between 'browns' (e.g., dry leaves, wood chips) and 'greens' (e.g., grass clippings, food scraps). This helps ensure an even distribution of carbon and nitrogen.
- Chop it Up: The smaller your materials, the faster they will decompose. Use a shredder for larger items, or simply chop up kitchen scraps into 1-2 inch pieces.
- Keep it Damp, Not Wet: The ideal moisture level is like a wrung-out sponge. If your climate is dry, cover your pile with a tarp to retain moisture. If it's very rainy, a cover can prevent it from becoming waterlogged.
- Regular Turning: Aim to turn your compost pile every 3-7 days, especially during its active heating phase. This re-introduces oxygen and ensures even decomposition.
- Bury Food Scraps: Always bury fresh food scraps in the middle of the pile, covered by a layer of 'browns.' This helps deter pests and allows them to break down faster in the active core.
- Monitor Temperature: Invest in a compost thermometer. This simple tool can give you clear insights into your pile's activity and help you determine if your adjustments are working. Aim for 120-160°F (49-71°C).
When to Call a Professional
For basic backyard composting, a professional isn't typically needed. However, if you are struggling with persistent foul odors that attract pests despite your best efforts at balancing and turning, a landscaping professional or composting expert might offer tailored advice based on your specific climate and available materials. If you're considering large-scale composting systems for extensive yard waste or have concerns about significant pest infestations (e.g., rats, raccoons) that your current setup can't manage, a professional can provide guidance on improved bin designs or alternative waste management strategies. Otherwise, composting is designed to be a self-sustaining and DIY-friendly process with the right knowledge.
Related Articles
Keep troubleshooting with these hand-picked guides from FixlyGuide:
- The #1 Mistake Homeowners Make When a Sprinkler Head Won't Pop Up — A common problem with sprinkler systems is a head that won't pop up, often due to a simple clog or adjustment issue.
- The #1 Mistake Killing Your Compost Pile (and How to Fix It in 10 Minutes) — If your backyard compost pile isn't breaking down, the most common culprit is an imbalance of 'greens' and 'browns,' easily remedied with p…
- The 3 Compost Pile Mistakes Sabotaging Your Soil (And How to Fix Them) — Unlock nutrient-rich soil by avoiding common composting errors and learn the simple steps to a thriving backyard compost pile.
- The 3 Compost Pile Mistakes Even Experienced Gardeners Make — Avoid common pitfalls and build a thriving backyard compost pile with the right mix of greens, browns, and proper aeration for nutrient-ric…
- The Hidden Reason Your Sprinkler System Won't Start (And Why It's Not the Controller) — Before you blame the controller, learn this common, overlooked reason your sprinkler system isn't starting and how to fix it with basic too…
- The #1 Gutter Mistake That Causes Overflow (And How to Fix It in 20 Minutes) — Overflowing gutters during heavy rain are usually caused by a readily fixable clog, often due to a common cleaning mistake.
Frequently asked questions
How hot should a compost pile get?+
A healthy, active compost pile should typically reach temperatures between 120°F and 160°F (49°C to 71°C) in its core. This thermophilic (heat-loving) stage is crucial for fast decomposition and killing off pathogens and weed seeds.
What if my compost pile smells bad?+
If your compost pile smells like ammonia or rotten eggs, it's usually a sign of too much nitrogen, too much moisture, or insufficient oxygen (anaerobic conditions). To fix this, add dry, carbon-rich materials like shredded leaves or cardboard, and turn the pile thoroughly to introduce air.
How often should I turn my compost pile?+
For an actively heating pile, turning every 3-7 days is ideal. This provides necessary oxygen, redistributes fresh materials into the hot core, and helps maintain even moisture. If your pile is just slowly decomposing, turning once every 1-2 weeks might suffice.
Can a compost pile be too small to heat up?+
Yes, a compost pile can definitely be too small. A minimum size of approximately 3x3x3 feet (1 cubic yard) is generally recommended to create enough mass for the heat generated by microbial activity to be retained within the pile, rather than dissipating too quickly into the environment.


Discussion
Loading comments…