Tools & materials you'll need
Affiliate links- AmazonHardwood board (e.g., walnut, ash, oak)1' x 1.5' x 1''
- AmazonGalvanized or black iron pipe nipples (1/2 or 3/4 inch diameter)Various lengths
- AmazonPipe flanges (matching pipe diameter)3
- Amazon90-degree pipe elbows (matching pipe diameter)3
- AmazonWood screws (flat-head)
- AmazonWood glue (e.g., Titebond III)
- AmazonWood finish (e.g., polyurethane, Danish oil)
As an Amazon Associate FixlyGuide earns from qualifying purchases — at no extra cost to you. Prices and availability are accurate as of publication and subject to change.
Quick Answer
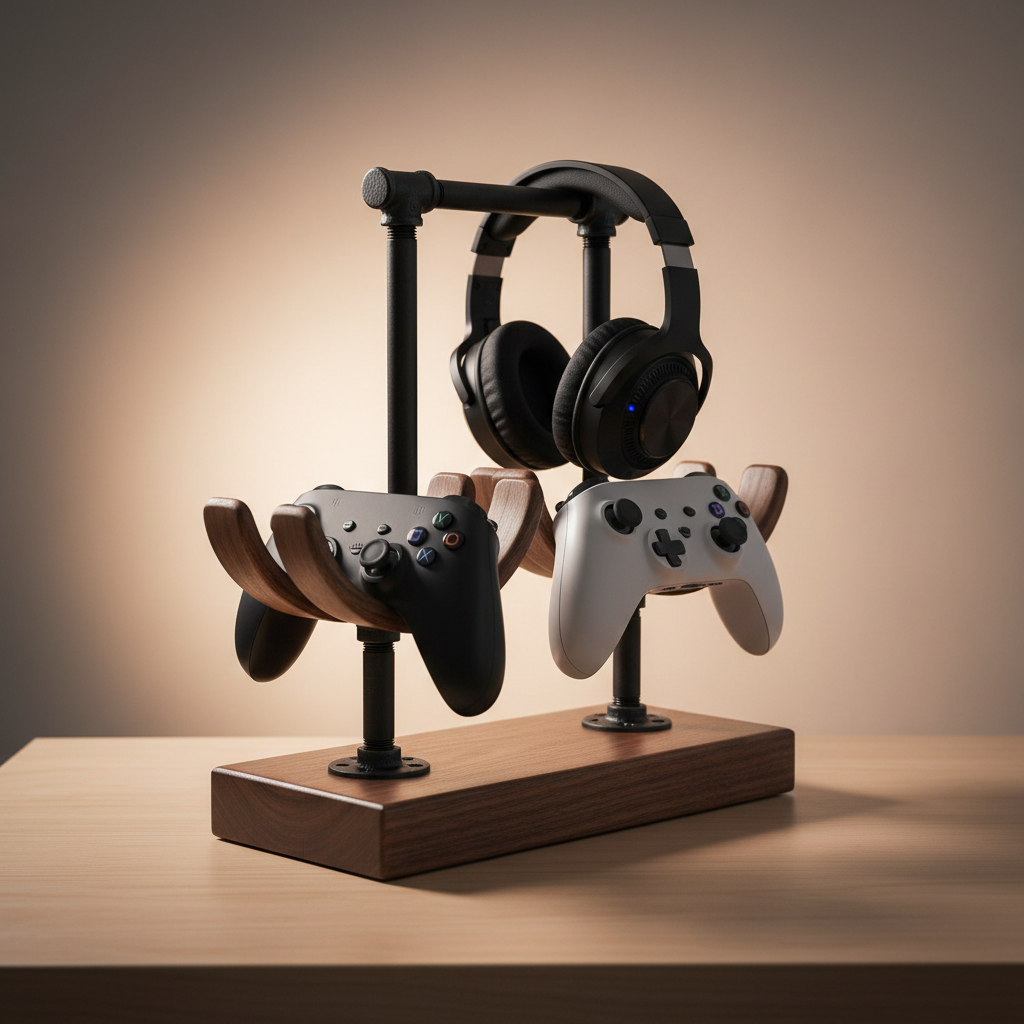
Fabricating a custom gaming controller stand from readily available wood pieces and standard pipe fittings provides an elegant and highly functional solution for decluttering your gaming space. This project not only organizes your controllers and headset but also adds a personalized touch to your setup, all while protecting your valuable gaming gear from accidental damage and keeping charging cables neatly managed.
The Problem
Every gamer faces the perennial challenge of controller clutter. Whether it’s a PlayStation, Xbox, Nintendo Switch, or PC gamepad, controllers have a frustrating habit of accumulating on surfaces, tangling their charging cables, and often succumbing to accidental knocks or falls. This creates an untidy gaming environment, makes it difficult to quickly locate a specific controller, and increases the risk of damage to expensive hardware. The same goes for gaming headsets, which often end up tossed aside, leading to stretched headbands or damaged earcups. Beyond aesthetics, proper storage is crucial for extending the lifespan of these valuable electronics, preventing dust buildup in sensitive ports, and maintaining an organized, stress-free gaming experience.
How It Works
At its core, a controller stand works by providing a designated, elevated, and stable resting place for your gaming accessories. Instead of allowing controllers to lie flat and take up horizontal surface area—or worse, dangle by their cables—a stand utilizes vertical space. This particular DIY design leverages the strength and aesthetic appeal of wood combined with the industrial flair of pipe fittings to create a robust structure. The wooden base provides stability, often with routed channels or felt pads to prevent sliding. Vertical wooden dowels or precisely cut wood sections, securely joined to the base, create arms or cradles for the controllers. These arms are strategically angled and spaced to accommodate the unique ergonomics of various controller types, ensuring a snug yet accessible fit. For headsets, a wider, often curved arm or hook extends from the main structure, supporting the headband without creasing the padding. The pipe fittings, typically galvanized or black iron, act as the connecting elements, providing structural rigidity and adjustability while contributing to a distinct, modern industrial aesthetic. These fittings, which include flanges, elbows, and short pipe nipples, thread together to form a strong, interlocking skeleton. When assembled correctly, the stand redistributes the weight of the controllers and headset evenly, preventing tipping and keeping all accessories safely elevated and organized. This not only clears up valuable desk or entertainment center real estate but also showcases your gear, turning clutter into a display.
Step-by-Step Fix
This project involves basic woodworking and assembly. Always prioritize safety, especially when using power tools.
-
Cut the Base and Supports — Begin by preparing your wooden components.
- Using a miter saw or table saw, cut a solid piece of hardwood (like walnut, ash, or oak) to your desired base dimensions, typically 6-8 inches deep and 10-14 inches wide, depending on how many controllers and a headset you plan to store. Sand all edges smooth with 120-grit, then 220-grit sandpaper. This will prevent splinters and provide a clean finish. Ensure the base is perfectly flat. For controller supports, cut two pieces of wood, roughly 1 inch thick, 1.5 inches wide, and 6 inches long. These will cradle your controllers. For the headset support, cut a wider, slightly curved piece of wood, about 1 inch thick, 2.5 inches wide, and 8-10 inches long. You can sketch a gentle curve on one long edge and cut it with a jigsaw or band saw, then sand it meticulously.
-
Drill Pilot Holes for Flanges — Mark and pre-drill for secure attachment.
- Determine the placement for your pipe flanges on the wooden base. For a two-controller, one-headset stand, you might place one flange near each end of the base and one in the center-rear for the headset post. Mark the screw holes for each flange. Using a drill press or a hand drill with a drill bit slightly smaller than your screw shank, drill pilot holes through the base at each marked point. This prevents wood splitting when you drive in the screws.
-
Attach Flanges to the Base — Secure the foundation of your pipe structure.
- Align each pipe flange with its pilot holes on the wooden base. Using flat-head wood screws that are long enough to penetrate the base securely without poking through the bottom (typically 3/4 to 1 inch screws), fasten the flanges firmly to the base. Use a screwdriver (power drill with clutch set low is fine) to avoid stripping the screws or over-tightening.
-
Assemble Pipe Fittings — Build the skeletal frame of your stand.
- Thread short pipe nipples (e.g., 2-4 inches long, 1/2-inch or 3/4-inch diameter) into the flanges. Then, thread 90-degree elbows onto the top of these nipples. From the elbows, thread longer pipe nipples (e.g., 6-10 inches long), which will serve as the main vertical supports. You can use a pipe wrench for a snug fit, but avoid over-tightening to prevent damaging the wood or stripping threads. Ensure all pipe sections are oriented correctly to guide the subsequent wooden supports.
-
Prepare Wood Supports for Pipe Attachment — Integrate the wood and pipe components.
- For the controller supports, carefully mark the center of one end of each 6-inch wood piece. Using a drill bit sized slightly larger than the outer diameter of your vertical pipe nipples (e.g., 7/8 inch for a 1/2-inch iron pipe), drill a hole about 1.5-2 inches deep into the end of each controller support. This hole will allow the wooden support to slide down over the pipe and rest securely. Repeat this for the headset support, ensuring the hole is centered on its bottom edge.
-
Attach Wood Supports to Pipe Frame — Slide and secure the wooden cradles.
- Carefully slide each drilled wooden controller support down onto its respective vertical pipe nipple until it rests firmly. For added security, you can apply a strong wood glue (like Titebond III) inside the drilled hole before sliding it on, clamping it until dry. Alternatively, small set screws could be used if you tap the pipe, but glue is simpler for DIY. Ensure the controller supports are angled slightly back to prevent controllers from sliding off. Slide the headset support onto its dedicated pipe section, ensuring the curved edge faces forward.
-
Finish the Wood — Protect and beautify your stand.
- Once all wood components are securely attached and glue (if used) is dry, apply your chosen finish. Options include clear polyurethane for durability, Danish oil for a natural look, or a stain followed by a topcoat. Apply thin, even coats as per product instructions, sanding lightly with 320-grit sandpaper between coats for a silky smooth finish. Allow ample drying time between coats and before placing controllers on the stand.
-
Add Felt Pads (Optional but Recommended) — Protect your surfaces.
- Apply self-adhesive felt pads to the bottom corners of your wooden base. This will prevent the stand from scratching your desk, entertainment center, or other furniture surfaces, and can also reduce any tendency for the stand to slide.
Common Causes
- Lack of Designated Storage: The most straightforward cause of controller clutter is simply not having a specific, accessible place for them to go when not in use. Without a "home," they end up wherever they
Related Articles
Keep troubleshooting with these hand-picked guides from FixlyGuide:
- The $15 Secret to a Clutter-Free Gaming Setup (Your Controllers Will Thank You) — Reclaim your gaming space with a simple, custom-built controller stand that's both functional and stylish using common materials.
- The 12 Checks That Prevent 80% of Costly Home Repairs — Don't wait for a disaster. Our comprehensive monthly home maintenance checklist reveals the surprising, simple tasks that catch small issue…
- The Secret Power Tool Hiding in Your Garage for a Speedier Clean — Unlock the hidden potential of your cordless drill to tackle stubborn household grime, soap scum, and dirt with specialized cleaning attach…
- The Single Cedar Board Secret to Attracting Bluebirds to Your Yard — Discover how to construct an ideal bluebird nesting box using just one cedar board, providing a safe and inviting habitat for these cherish…
- The Single Cedar Board Secret to Attracting Bluebirds to Your Yard — Discover how a single cedar board can transform your backyard into a haven for bluebirds, offering them a safe and welcoming nesting site.
- The 4-Step Drywall Patch Secret That Makes Large Holes Vanish — Discover how to flawlessly repair a large hole in drywall using a simple, effective method that makes the damage disappear without a trace.
Get the print-ready PDF of this guide
A clean, ad-free, printable version you can keep on your phone or pin to the workshop wall. Free with a FixlyGuide account.
- Print-optimized layout
- Tools, materials & every step included
- Saved to your account
This article was independently written by FixlyGuide based on the source topic.
Frequently asked questions
What kind of wood is best for a DIY controller stand?+
Hardwoods like walnut, ash, oak, or maple are excellent choices due to their durability and attractive grain. However, even common pine can work well if properly sanded and finished.
Can I use PVC pipes instead of metal pipe fittings?+
While technically possible, PVC pipes and fittings may not offer the same aesthetic appeal or structural rigidity as black iron or galvanized steel. Metal pipes provide a more upscale, industrial look and feel.
How do I make sure the stand is stable and doesn't tip over?+
Ensure your wooden base is sufficiently wide and deep for the height of your stand. Distribute the weight of the controllers and headset evenly. Using a heavier wood for the base and securely fastening the pipe flanges will also enhance stability.
What tools do I need if I don't have a miter saw or table saw?+
You can use a handsaw with a miter box for straight cuts, and a jigsaw or coping saw for any curved pieces. The key is to take your time and sand thoroughly to achieve clean edges.


Discussion
Loading comments…