Tools & materials you'll need
Affiliate linksAs an Amazon Associate FixlyGuide earns from qualifying purchases — at no extra cost to you. Prices and availability are accurate as of publication and subject to change.
Quick Answer
Many homeowners immediately suspect a broken heating element when their dryer isn't performing. However, the vast majority of 'dryer takes too long' complaints stem from a simple, yet critical, issue: restricted airflow due to a clogged dryer vent. Lint, debris, and even small articles of clothing can accumulate in the dryer vent hose and the external vent hood, preventing the hot, moist air from escaping. This forces your dryer to run longer, overheat, and eventually wear out components prematurely. Cleaning the entire vent system is a straightforward DIY task that can save you significant repair costs and energy bills.
The Problem
Your dryer is running, tumbling clothes, and even feels warm, but at the end of a standard cycle, your laundry is still damp, sometimes even soaking wet. You find yourself running cycle after cycle, wasting electricity and precious time. Not only is this frustrating, but it also poses a serious fire hazard. Lint is highly flammable, and when it builds up in a hot, enclosed space, the risk of a dryer fire escalates dramatically. Beyond fire safety, a perpetually damp load of laundry can lead to musty odors and even mildew growth on your clothes.
How It Works
A dryer's primary function is to remove moisture from clothes through a combination of heat and airflow. Inside the dryer, a heating element (electric dryer) or a gas burner (gas dryer) warms the air. A powerful blower fan then draws this hot air through the tumbling clothes, picking up moisture. This now-moisture-laden air is pushed out of the dryer drum, through a lint filter, and then into the dryer exhaust duct. This duct, typically a flexible or rigid metal hose, carries the humid air to an exterior vent hood, expelling it outside your home. For efficient drying, a continuous and unrestricted flow of air is crucial. The hot, dry air needs to be able to enter the drum and pick up moisture, and the moist, warm air needs to be able to exit freely. When the vent system becomes clogged with lint, this outflow is hampered. The dryer struggles to expel the humid air, causing humidity to build up inside the drum. This effectively creates a sauna, preventing the clothes from drying because the air around them is already saturated with moisture. The dryer's thermostat may also cycle off the heating element prematurely due to overheating, further extending drying times.
Step-by-Step Fix
Safety First! Before performing any maintenance on your dryer, always disconnect it from its power source. For electric dryers, unplug the power cord from the wall outlet. For gas dryers, turn off the gas supply valve (typically a yellow handle on a pipe behind the dryer) and then unplug the electrical cord.
- Pull Dryer Away — Carefully pull your dryer away from the wall, allowing enough space to work behind it. Be mindful of gas lines (if applicable) and electrical cords.
- If your dryer is heavy or difficult to move, enlist a helper to prevent injury or damage to gas/electrical connections.
- Disconnect Vent Hose — Locate the flexible or rigid duct attached to the back of your dryer and the wall. Use a screwdriver, nut driver, or pliers to loosen the clamps securing the hose at both ends. Gently twist and pull to remove the hose.
- Observe the type of hose: flexible foil hoses are prone to kinking and lint accumulation. Consider upgrading to a rigid or semi-rigid metal duct for better airflow and fire safety.
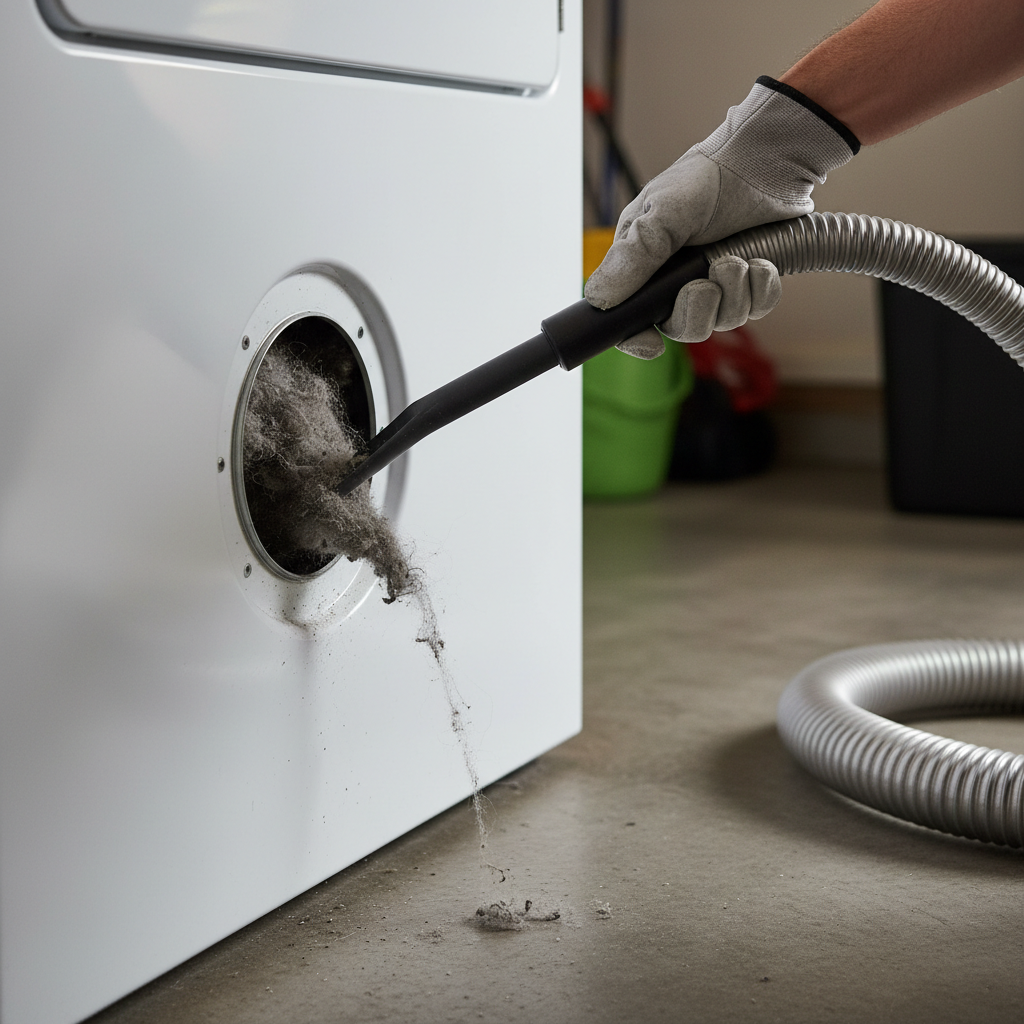
- Clean Dryer Port & Hose — With the hose removed, use a vacuum cleaner with a crevice tool attachment to thoroughly clean the exhaust port on the back of the dryer itself. Reach into the port as far as possible to remove any visible lint. Then, inspect the entire length of the disconnected vent hose. Use the vacuum to suck out lint, or use a dryer vent brush kit to push out stubborn blockages. Ensure the hose is completely clear and free of kinks.
- Be thorough! Even small amounts of lint can restrict airflow over time.
- Clean Wall Vent Port — Turn your attention to the vent opening in the wall. Use your vacuum and crevice tool to remove any lint from this opening. Don't be surprised if you find a significant amount built up here.
- Access Exterior Vent Hood — Go outside your house and locate the dryer vent hood. This is usually a louvered or caged opening on an exterior wall, often near the laundry room. Remove any screws or fasteners holding the vent cover in place. Some covers simply snap off.
- Wear gloves, as dryer vents can contain sharp edges or pest nests.
- Clean Exterior Vent Hood & Duct — Once the cover is off, thoroughly clean the vent hood itself, removing all lint and debris. Use a dryer vent brush kit (often containing flexible rods that connect to a drill) to clean as far into the exterior duct as possible. Push the brush through the duct, rotating it to dislodge lint, then use your vacuum to suck up the loosened debris. Repeat until no more lint emerges.
- Shine a flashlight into the duct to check for remaining blockages.
- Reconnect & Test — Once all sections are clean, reattach the dryer vent hose, ensuring a snug fit at both the dryer and wall ports. Secure with clamps. Push the dryer back into place, being careful not to kink the hose. Reconnect the power (and gas, if applicable). Run a small load of damp towels on a normal dry cycle and observe the drying time. You should notice a significant improvement.
- Listen for the sounds of strong airflow exiting the exterior vent, indicating a clear path.
- Regular Lint Trap Cleaning — Make it a habit to clean your dryer's internal lint screen before every load. This is your first line of defense against clogs.
Common Causes
- Infrequent Vent Cleaning: The most common culprit. Lint bypassed by the lint trap slowly accumulates in the ductwork over months or years.
- Improper Vent Material: Flexible foil or plastic vent hoses are notorious for trapping lint, kinking, and crushing, all of which impede airflow. Rigid or semi-rigid metal ducts are far superior.
- Long or Kinked Vent Runs: The longer the vent run, the more resistance to airflow, and the more likely lint will settle. Excess bends or kinks in the ductwork also create choke points.
- Blocked Exterior Vent Hood: Birds, rodents, or heavy snow/ice can build nests or blockages directly outside the vent, preventing air expulsion.
- Overloading the Dryer: Stuffing too many clothes into the dryer restricts tumbling and airflow, hindering drying even with a clean vent.
- Washing Machine Issues: If your washing machine isn't spinning clothes enough, they enter the dryer excessively wet, requiring much longer drying times.
Common Mistakes
- Only Cleaning the Lint Screen: Many homeowners diligently clean the screen but neglect the deeper vent system, leading to hidden clogs.
- Using the Wrong Vent Material: Flexible plastic or vinyl hoses are fire hazards and airflow inhibitors. Always use metal ducts.
- Ignoring Exterior Vent: Forgetting to check and clean the vent hood on the outside of your house (which can get clogged by lint, pests, or debris) is a common oversight.
- Pushing Dryer Too Close to Wall: This can crush or kink the flexible vent hose, instantly restricting airflow, even if the hose itself is clean.
- Overlooking Washer's Spin Cycle: If your washing machine isn't extracting enough water, your dryer has to work much harder. Check your washer's spin settings or diagnose any issues there first.
- Assuming a Heating Element Failure: Jumping to the conclusion of a costly heating element repair before checking and clearing the vent is a common and expensive mistake.
Cost & Time Breakdown
| Task | DIY cost | Pro cost | Time |
|---|---|---|---|
| Vent cleaning | $0–$50 | $100–$200 | 30 min–2 hours |
| Vent hose replacement | $20–$40 | Included in pro | 15–30 min |
| Exterior vent cap replacement | $15–$30 | Included in pro | 15–30 min |
| Professional vent inspection | N/A | $75–$150 | 30 min |
Tips & Prevention
- Clean Lint Screen Every Load: Make this a non-negotiable habit. It's the simplest and most effective preventative measure.
- Inspect Vent Hose Annually: At least once a year, disconnect and inspect the complete run of your dryer vent hose for kinks, damage, or significant lint buildup.
- Clean Exterior Vent Quarterly: Visually check and clear any visible lint or obstructions from the exterior vent hood every three months.
- Upgrade Venting: If you have an old flexible foil or plastic vent, consider upgrading to a rigid or semi-rigid metal duct. They offer better airflow and dramatically reduce fire risk.
- Avoid Overloading: Dry smaller, more manageable loads to ensure proper tumbling and air circulation.
- Check Washer Spin: Ensure your washing machine is effectively spinning water out of clothes before they go into the dryer.
When to Call a Professional
While clearing a clogged vent is a highly effective DIY fix, there are situations where professional help is warranted. If you've meticulously cleaned your entire dryer vent system and clothes still aren't drying, or if the dryer runs but produces no heat at all, it's time to call a qualified appliance technician. A lack of heat could indicate a faulty heating element, a broken thermal fuse, a dysfunctional thermostat, or a problem with the igniter in a gas dryer. Diagnosing and replacing these components often requires specialized tools and electrical or gas knowledge best left to a professional. Additionally, if your dryer vent run is exceptionally long, has multiple turns, or is routed through inaccessible areas (like ceilings or walls), a professional may have specialized equipment to clean it more effectively. Never attempt to diagnose or repair internal gas components yourself. The presence of a burning smell from the dryer (beyond normal 'new dryer' smells) or any strange electrical odors also signals an immediate need for professional inspection due to potential fire hazards.
Related Articles
Keep troubleshooting with these hand-picked guides from FixlyGuide:
- The #1 Mistake Homeowners Make When Their Dryer Stops Drying (And How to Fix It Free) — If your dryer is taking too long to dry clothes, the most common culprit is a clogged vent, which can be easily fixed with simple tools.
- The 3 Hidden Reasons Your Dryer Takes Forever – And the Easy Fixes — If your dryer is taking too long to dry clothes, the culprit is often reduced airflow, which can be easily resolved with a few simple check…
- The #1 Mistake Homeowners Make When Their Ice Maker Stops (And the Easy Fix) — Before you call for service, learn the most common and easily fixable reason your refrigerator's ice maker isn't producing ice.
- The Silent Fire Hazard Lurking In Your Laundry Room — Don't let a clogged dryer vent become a silent fire starter. Learn why this common oversight is so dangerous, the clear warning signs to lo…
- Your Refrigerator's Loud Hum? The Fix Most People Miss — A constant, loud refrigerator hum is more than annoying—it's a warning sign. Before you call a pro, discover the #1 most overlooked cause a…
- The #1 Mistake Homeowners Make When a Gas Burner Won't Light (And the Easy Fix) — Before you call a technician, discover the most common, overlooked reason your gas stove burner isn't lighting and how to fix it yourself i…
Get the print-ready PDF of this guide
A clean, ad-free, printable version you can keep on your phone or pin to the workshop wall. Free with a FixlyGuide account.
- Print-optimized layout
- Tools, materials & every step included
- Saved to your account
Frequently asked questions
How often should I clean my dryer vent?+
For most households, the dryer vent system (from the back of the dryer to the exterior vent hood) should be thoroughly cleaned at least once a year. If you have a large family, pets that shed heavily, or do many loads of laundry, you may need to clean it every 6-9 months. The lint trap, however, should be cleaned before every single load.
Can a clogged dryer vent cause a fire?+
Yes, absolutely. Lint is highly flammable, and when it accumulates in the dryer vent duct, it can ignite due to the dryer's heat, leading to a house fire. This is why regular vent cleaning is crucial for both efficiency and safety.
What's the best type of dryer vent hose?+
Rigid metal (galvanized or aluminum) or semi-rigid metal dryer ducts are superior to flexible foil or plastic hoses. Metal ducts provide better airflow, are less prone to kinking or crushing, and are more fire-resistant. Flexible plastic or vinyl hoses are considered fire hazards and should be replaced.


Discussion
Loading comments…