
Tools & materials you'll need
Affiliate linksAs an Amazon Associate FixlyGuide earns from qualifying purchases — at no extra cost to you. Prices and availability are accurate as of publication and subject to change.
Quick Answer
Many homeowners struggle with floating shelves that sag, pull away from the wall, or even fall, often due to an oversight during installation: failing to properly secure the mounting bracket into wall studs. While drywall alone can't support significant weight, wood studs provide a sturdy anchor point. The key is to accurately locate these studs and use the correct fasteners, or, when studs aren't an option, to employ high-strength drywall anchors designed for substantial loads. Skipping this critical step leads to instability and potential damage, but with the right technique, you can achieve a professional, reliable floating shelf installation.
The Problem
You've picked out the perfect floating shelves, envisioning a sleek, minimalist display for your books, photos, or decor. You follow the instructions, drill into the drywall, and everything seems fine – until a few weeks or months later. The shelf starts to sag, the bracket pulls away, or worse, the entire thing comes crashing down. This frustrating and common scenario isn't usually due to faulty shelves but rather an installation flaw: misidentifying or neglecting the structural support of wall studs, or using inadequate drywall anchors not rated for the shelf's intended load.
Drywall, while surprisingly resilient for some applications, is fundamentally a gypsum panel. It's designed to create a smooth wall surface, not to bear significant cantilevered weight. A small picture hook might be fine, but a floating shelf, especially with items on it, exerts considerable leverage. Without proper anchoring into a solid structure like a wood stud, the weight simply tears through the drywall, leading to instability, unsightly holes, and potential damage to your belongings.
How It Works
Understanding how floating shelves work and why proper anchoring is crucial starts with the physics of leverage and the composition of your walls. Most floating shelves consist of a hidden internal metal bracket and a shelf body that slides over it. The bracket is where all the weight-bearing magic (or disaster) happens. This bracket typically has multiple screw holes designed to be attached to the wall. When items are placed on the shelf, they exert a downward force. Because the shelf extends outward from the wall, this force creates a rotational moment, or leverage, that tries to pull the top of the bracket away from the wall and push the bottom into it.
Your walls are generally constructed with vertical wood (or sometimes metal) studs spaced either 16 or 24 inches on center. These studs are the structural backbone that supports the drywall. When you secure a floating shelf bracket directly into a stud with long, stout screws, the screw threads bite deep into the solid wood. This connection transfers the shelf's load directly to the house's framing, which is designed to handle such forces. The drywall simply covers the studs; it offers very little resistance to pulling forces on its own.
If you install the bracket into drywall without hitting a stud, the screws are only grabbing into the relatively soft gypsum. As weight is applied, the screw heads can easily pull through the drywall, or the drywall itself crumbles around the anchor. Specialty drywall anchors, like toggle bolts or heavy-duty self-drilling anchors, work by creating a much larger surface area or by expanding behind the drywall. This distributes the load over a wider section of the drywall or creates a strong mechanical lock. However, even the best drywall anchors have weight limits, and they are rarely as strong as a direct connection to a wood stud. For optimal stability and load-bearing capacity, always prioritize anchoring into studs.
Step-by-Step Fix
1. Plan Your Shelf Placement — Before drilling, finalize where your shelf will go, considering both aesthetics and structural support.
Place the shelf against the wall at your desired height. Use a pencil to lightly mark the top edge of the shelf. Consider what you'll be putting on the shelf; heavier items demand more secure anchoring. Remember that ideally, you'll want to hit at least two studs with your mounting bracket for maximum stability. If your chosen location doesn't allow for this, you'll need to rely on heavy-duty drywall anchors.
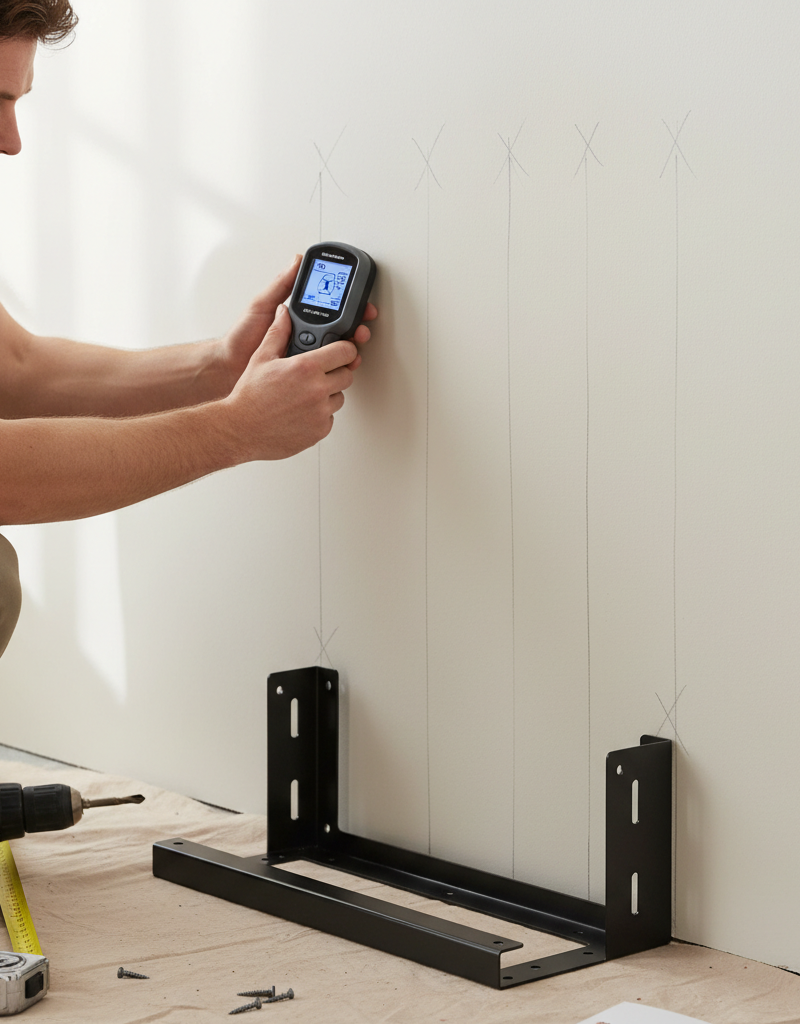
2. Locate Wall Studs Accurately — Use a stud finder to identify the precise center of each wood stud within your chosen shelf area.
- Tool: Electronic stud finder
- Technique: Calibrate your stud finder on an empty section of the wall. Move it horizontally across the wall in the area where your shelf will be mounted. When it indicates a stud, mark the edges with a vertical pencil line. Then, re-scan from the other direction to confirm. Mark the center of the stud – this is critical for a strong screw bite. Typical stud spacing is 16 or 24 inches on center. Try to find at least two studs that align with your shelf's mounting holes. If the shelf is long, you might hit three or more.
- If no studs are found: If your ideal shelf placement doesn't align with any studs, you must plan to use robust drywall anchors. Skip ahead to step 6 if this is the case.
3. Mark Mounting Holes on the Wall — Transfer the bracket's screw hole locations onto the wall, ensuring they align with your stud marks.
Hold the floating shelf's mounting bracket against the wall, aligning its top edge with your previously marked shelf height. Use a level to ensure the bracket is perfectly horizontal. With the bracket held firmly in place and level, use your pencil to mark the center of each screw hole directly onto the wall. If you've located studs, make sure your marks for those holes align precisely with the center of the studs you identified. Double-check level at this point – any tilt will be permanent.
4. Pre-drill Pilot Holes — Drill appropriate-sized pilot holes for your screws, especially when going into studs, to prevent splitting.
- When drilling into studs: Select a drill bit that is slightly smaller in diameter than the shank (non-threaded portion) of your mounting screws. This allows the screw threads to grip the wood firmly without splitting it. Drill straight through your marked points into the center of the studs to the depth of your screws. A piece of tape on the drill bit can act as a depth guide.
- When drilling for anchors (if not using studs): Refer to your specific drywall anchor's instructions for the correct drill bit size. Drilling too large a hole will compromise the anchor's grip, while too small a hole might make insertion difficult or damage the anchor.
5. Secure the Mounting Bracket to Studs — Attach the bracket to the wall, driving screws directly into the pre-drilled stud holes.
Position the bracket over the pilot holes. Insert the long, heavy-duty structural screws (often supplied with the shelf or purchased separately, typically 2.5-inch to 3-inch #8 or #10 wood screws) through the bracket and into the pilot holes in the studs. Use a power drill with the appropriate driver bit. Drive the screws in until the bracket is tight against the wall, but be careful not to overtighten, which can strip the wood or damage the bracket. Ensure the bracket remains perfectly level throughout this process. Secure every screw hole that aligns with a stud.
6. Install Heavy-Duty Drywall Anchors (if no studs are present or for extra support) — If studs aren't available for all holes, use toggle bolts or similar high-capacity anchors.
- Safety: Always wear eye protection when drilling.
- Types of Anchors:
- Toggle Bolts: These are among the strongest drywall anchors. They require a larger pilot hole. You push the metal wings through the hole, and they spring open behind the drywall, creating a strong grip when the bolt is tightened. Rated for 50-100+ lbs each.
- Molly Bolts (Sleeve Anchors): These expand as you tighten a screw, squeezing the metal sleeve against the back of the drywall. Good for 25-50 lbs each.
- Self-Drilling/Threaded Anchors: These screw directly into the drywall. Then a screw is driven into the anchor. Easier to install but generally lower weight capacity (15-30 lbs each) compared to toggles or mollys. Use these only for very light shelves or as supplemental support to stud-mounted points.
- Installation: Follow the manufacturer's specific instructions for your chosen anchor type. For toggle bolts, mark and drill the required larger hole, push the toggle wing through, then install the screw. For molly bolts, drill the correct pilot hole, tap the molly into place, and tighten the screw to expand it. Fill any remaining bracket holes with these heavy-duty drywall anchors if they didn't hit a stud.
7. Test Bracket Strength — Before adding the shelf, gently tug and push on the bracket to confirm it's securely fastened.
Once all screws and anchors are installed, give the bracket a good, firm wiggle. Push down, pull up, and gently tug it away from the wall. There should be no noticeable give, movement, or creaking. If anything feels loose, re-evaluate your anchors or screws. You may need to replace an anchor if it feels stripped or if the screw isn't biting properly into a stud.
8. Slide on the Shelf Body — Carefully slide the shelf over the installed mounting bracket until it's flush with the wall.
Most floating shelves are designed to slide over the arms of the internal bracket. Align the shelf's internal channels with the bracket's arms and push it gently but firmly until it is fully seated against the wall. Ensure it sits flush and level. Some shelves may have small set screws underneath to secure them to the bracket; tighten these if present.
Common Causes
- Ignoring Wall Studs: The most frequent culprit. Relying solely on drywall for support, even with basic anchors, is a recipe for disaster with floating shelves. Always aim for studs first.
- Using Insufficient Anchors: Choosing lightweight plastic wall anchors or small self-drilling anchors for heavy shelves or items. These are fine for pictures but inadequate for cantilevered loads.
- Incorrect Pilot Hole Size: Drilling pilot holes that are too large for screws (reducing grip) or too small (causing wood splitting or difficulty installing anchors).
- Failing to Use a Level: A crooked installation not only looks bad but can also unevenly distribute weight, leading to stress on fasteners.
- Overloading the Shelf: Even a perfectly installed shelf has a weight limit. Exceeding it, especially rapidly, can cause fasteners to fail or the shelf material to warp. Always check the manufacturer's specified weight capacity.
- Incomplete Fastening: Not using all available screw holes on the mounting bracket or only securing one side of a long bracket, leaving the other side vulnerable.
Common Mistakes
- Mistake: Skipping the stud finder entirely.
- Instead: Invest in a reliable electronic stud finder. It's an indispensable tool for any homeowner and prevents countless headaches.
- Mistake: Assuming all drywall anchors are created equal.
- Instead: Research and choose anchors specifically rated for heavy loads (toggle bolts, molly bolts). Match the anchor's capacity to the anticipated weight of the shelf plus its contents.
- Mistake: Not pre-drilling pilot holes into studs.
- Instead: Always drill pilot holes slightly smaller than the screw's shank when going into wood studs. This ensures a strong, non-split connection.
- Mistake: Eyeballing the level or relying on the ceiling/floor.
- Instead: Use a reliable spirit or laser level for every step of bracket placement and marking. A slight deviation multiplies over the length of a shelf.
- Mistake: Ignoring the manufacturer's weight rating.
- Instead: Always check the shelf's specified weight limit. When in doubt, err on the side of caution and place lighter items on the shelf.
- Mistake: Not checking for pipes or wires behind the wall.
- Instead: Use a stud finder with AC detection, or carefully consider the wall's context (e.g., above a sink, next to an outlet) to avoid drilling into plumbing or electrical lines. If unsure, drill very slowly and shallowly at first.
Cost & Time Breakdown
| Task | DIY cost | Pro cost | Time |
|---|---|---|---|
| Stud Finder (if needed) | $20–$50 | $0 (pro supplies) | 0 |
| Heavy-Duty Anchors (per 4) | $5–$15 | $0 (pro supplies) | 0 |
| Drill bits/screws | $5–$10 | $0 (pro supplies) | 0 |
| Total Materials | $30–$75 | $0 | 0 |
| Shelf Installation (hands-on) | $0 | $100–$250 | 30–60 minutes |
| Cleanup | $0 | $0 | 5–10 minutes |
| Total Project | $30–$75 | $100–$250 | 45–75 minutes |
Tips & Prevention
- Embrace the Stud Finder: Make it your best friend for any wall-mounting project. A good stud finder pays for itself many times over in saved frustration and repair costs.
- Over-Anchor, Don't Under-Anchor: If you're on the fence between two anchor strengths, always go with the stronger option. The cost difference is negligible compared to potential damage.
- Balance Your Load: Distribute weight evenly across the shelf, placing heavier items closer to the mounting points if possible. Avoid concentrating all the weight at one end.
- Periodic Checks: Every few months, gently jiggle your floating shelves to ensure they haven't loosened. Tighten any set screws if present. Look for any signs of sagging or pulling away from the wall.
- Consider Shelf Material: Laminated particle board shelves are often lighter than solid wood or thick glass, allowing for more forgiving installation if studs are hard to reach.
- Plan for the Future: If you foresee needing to place very heavy items on a shelf in a specific location, consider reinforcing the wall from behind during a renovation, or choosing a different type of shelving that incorporates visible brackets or floor support.
When to Call a Professional
While installing floating shelves is a common DIY task, there are specific situations where calling an experienced handyman or carpenter is highly recommended. If you're struggling to locate studs, or if the wall material isn't standard drywall (e.g., plaster and lath, concrete, or tile over masonry), a professional will have the specialized tools and expertise to ensure a secure installation without damaging your walls. Similarly, if your desired shelf location places it near existing electrical outlets, light switches, or plumbing fixtures, a professional can use advanced detection tools to avoid dangerous strikes. If the shelf is exceptionally large, unusually heavy, or intended to hold very valuable or fragile items, the peace of mind offered by professional installation often outweighs the DIY cost savings. Don't risk damaging your walls, shelf, or belongings if you feel out of your depth; a pro will guarantee a safe and stable result.
Related Articles
Keep troubleshooting with these hand-picked guides from FixlyGuide:
- The #1 Mistake Homeowners Make Installing Floating Shelves (and How to Fix It) — Discover the most common error DIYers make when mounting floating shelves into drywall and how to ensure your shelves are sturdy and secure.
- Your Floating Shelves Failed? 3 Hidden Drywall Mistakes. — Learn how to safely and securely install floating shelves into drywall using the right anchors and tools, avoiding common mistakes.
- Your Floating Shelves Sag? The 3 Drywall Mistakes You're Making — Learn how to install floating shelves into drywall securely and prevent common issues like wobbling or damage with the right tools and tech…
- The 7 Critical Wall Prep Mistakes That Ruin Your Paint Job (And How to Fix Them) — Discover the crucial wall preparation steps often overlooked by DIYers that lead to peeling, cracking, and uneven paint finishes, and learn…
- That 'Stud-Only' Belief? A Myth for Heavy Shelves — Tired of shelves ripping out of your drywall? The common advice to 'only use studs' is incomplete. Discover the modern anchoring techniques…
- The #1 Mistake Homeowners Make When Diagnosing Low Water Pressure (It's Not Your Pipes!) — Discover the most overlooked culprit behind low water pressure throughout your entire house and learn how to fix it with simple steps.
Recommended for DIYers & woodworkers
Sponsored
The Top 20 Tools for Workshops of Any Budget
No stationary machines or power tools required — plus 3 fundamental tools that can't be bought at any price.
Get the free guide
Ted's Woodworking — The #1 Woodworking Resource
Detailed instructions, dimensioned drawings, materials & cutting lists, and 3D schematics for every skill level.
See the plansSponsored: links above are affiliate links. FixlyGuide may earn a commission on qualifying purchases — at no extra cost to you.
Frequently asked questions
Can I install floating shelves without hitting a stud?+
Yes, but you must use heavy-duty drywall anchors specifically designed for sufficient weight capacity, such as toggle bolts or robust molly bolts. Standard plastic anchors are usually insufficient for the leverage and weight of a floating shelf and its contents.
What kind of anchors are best for floating shelves in drywall?+
For maximum strength when studs aren't available, toggle bolts are generally considered the strongest option for hollow walls like drywall. Molly bolts (sleeve anchors) are another good heavy-duty choice.
How much weight can a floating shelf hold on drywall?+
The weight capacity depends entirely on the installation method and the specific anchors used. If securely mounted into two or more studs with appropriate structural screws, a well-made shelf can hold 50-100+ pounds. If relying on heavy-duty drywall anchors, each anchor will have a specific rating (e.g., 50-75 lbs per toggle bolt), and the total capacity is the sum of the anchors' capacities, always limited by the shelf's own structural strength.
How do I find studs in my wall?+
The most effective way to find studs is with an electronic stud finder. Slide it horizontally across the wall. It will typically indicate the edges and center of wood studs. Once identified, mark the center with a pencil for accurate drilling.
My floating shelf is sagging. What should I do?+
A sagging shelf indicates inadequate support. You'll need to remove the shelf and bracket, assess the previous installation, and re-install it using stronger methods. This almost always involves locating and securing the bracket into wall studs, or upgrading to much stronger heavy-duty drywall anchors like toggle bolts.


Discussion
Loading comments…