
Tools & materials you'll need
Affiliate linksNo materials required.
As an Amazon Associate FixlyGuide earns from qualifying purchases — at no extra cost to you. Prices and availability are accurate as of publication and subject to change.
Quick Answer
Regularly inspecting your roof from the ground is a simple yet crucial home maintenance task that can save you thousands in repairs. By using binoculars and focusing on key areas like shingle integrity, flashing condition, and gutter cleanliness, you can identify early warning signs of damage or deterioration. This proactive approach helps you address minor issues before they lead to significant leaks, structural damage, or premature roof replacement.
The Problem
Many homeowners neglect their roof until a leak appears, often after a costly and extensive problem has already developed. The thought of climbing onto a steep, slippery roof is daunting and dangerous for most. However, ignoring the roof, the primary protector of your home, can lead to a cascade of expensive issues: water damage to ceilings, walls, and insulation; mold growth; compromised structural integrity; and a shortened roof lifespan. The good news is that a comprehensive roof inspection doesn't require you to set foot on the roof itself. With a few simple tools and a keen eye, you can identify the vast majority of common roof problems from the safety of your yard.
How It Works
Your roof is a complex system designed to shed water and protect your home from the elements. Understanding its basic components helps in identifying problems. The outermost layer is typically made of shingles (asphalt, wood, slate, tile, metal), which are designed to overlap, creating a waterproof barrier. Beneath the shingles, an underlayment provides an additional layer of protection, followed by roof decking (plywood or OSB) that forms the structural base. Flashing, typically made of metal, is critical in waterproofing vulnerable areas where the roof meets vertical surfaces like chimneys, skylights, and walls, or where roof planes intersect (valleys). Gutters and downspouts collect and divert rainwater away from the foundation.
When a roof ages or is subjected to harsh weather, these components begin to degrade. Shingles can crack, curl, blister, or lose their protective granules, reducing their ability to shed water. Flashing can rust, bend, or pull away, creating pathways for water intrusion. Clogged gutters can cause water to back up, leading to fascia and soffit rot, or even foundation issues. By systematically examining each of these visible elements from the ground, you can spot these early indicators of failure or damage. The goal is to look for deviations from a uniform, intact appearance – anything that suggests a material is compromised or displaced, which could allow water to penetrate the system.
Step-by-Step Fix
1. Gear Up Safely – Gather your tools for a thorough, safe ground-level inspection.
- Safety First: Choose a clear, dry day with good visibility. Avoid inspecting during rain, high winds, or icy conditions. Wear sturdy, non-slip shoes for walking around your property.
- Tools: You'll need a good pair of binoculars (7x to 10x magnification is ideal), a sturdy ladder (to safely inspect gutters and lower roof edges only, not to climb onto the roof), a notepad and pen, and a bright flashlight for peering into gutters or soffits.
2. Walk the Perimeter – Observe your roof from all angles for obvious issues.
- Full Circle: Start by walking a full circle around your house, looking up at the roof from various distances and angles. This initial pass helps you spot major irregularities like sagging sections, significant debris, or wildly displaced shingles.
- Identify Problem Areas: Note any sections that look different, such as sudden discoloration, areas with excessive moss growth, or sections that appear flatter or steeper than others. These could indicate underlying structural issues or localized damage.
3. Scrutinize Shingle Integrity – Use binoculars to examine shingles for red flags.
- Missing or Damaged Shingles: Look for shingles that are obviously missing, torn, cracked, or severely curled. High winds often cause shingles to lift or detach, especially on edges and ridges.
- Granule Loss: Pay close attention to dark patches or areas where the shingle surface appears smooth. This indicates significant granule loss, a sign that the asphalt shingles are aging and their UV protection is diminishing. Check gutter downspouts for excessive asphalt granules, which also signals advanced shingle wear.
- Curling and Cupping: Observe if shingles are curling upwards at the edges (cupping) or curling under at the edges. Both are signs of aging and moisture damage, making the roof vulnerable to wind and water penetration.
- Blistering: Look for small, raised bubbles or blisters on the shingle surface. These can rupture, exposing the shingle to faster deterioration.
- If you see widespread issues: Widespread granule loss, curling, or missing shingles across multiple sections often indicates the roof is nearing the end of its life and a professional assessment is needed.
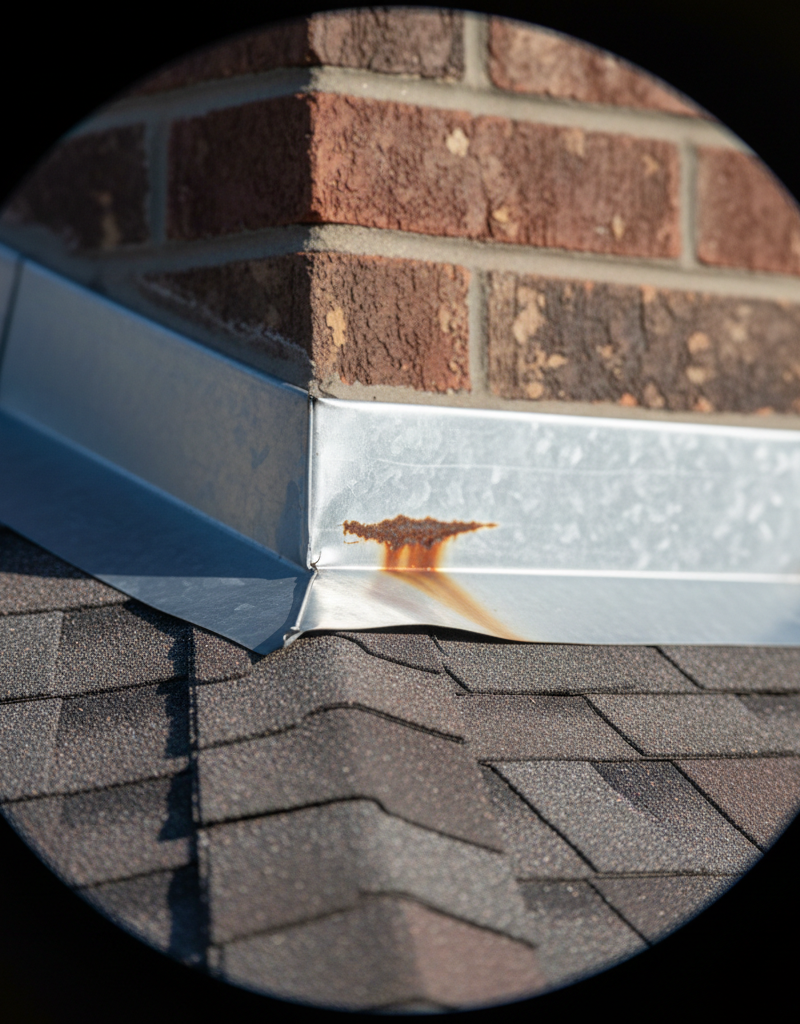
4. Inspect Flashing, Vents, and Penetrations – These are common leak points.
- Chimneys and Skylights: These are prime candidates for leaks due to degraded flashing. Use your binoculars to check metal flashing around chimneys, skylights, and dormers. Look for rust, sealant cracks, separation from the roof or wall, or bent/loose sections.
- Vent Pipes and Exhausts: Inspect the rubber boots or metal collars around plumbing vent pipes and exhaust fan vents. These seals can dry out, crack, and become brittle over time, allowing water to seep in.
- Valleys: Look carefully into roof valleys (where two roof planes meet) for any damaged, missing, or misaligned flashing. Valleys are major water channels, so their integrity is paramount.
- If you spot damaged flashing: Minor sealant cracks around a vent boot may be a DIY fix with appropriate roofing sealant, but significant damage or rust on main flashing (e.g., around a chimney) requires a pro.
5. Assess Gutters and Downspouts – Ensure proper water drainage.
- Clogs and Debris: From your ladder (safely, extending only high enough to see into the gutter, not onto the roof), check for leaves, twigs, shingle granules, or other debris clogging the gutters. Clogged gutters prevent water from draining properly and can lead to fascia rot and ice dams in winter.
- Sagging or Detached Gutters: Look for sections of gutter that are pulling away from the fascia board or appear to sag. This indicates loose hangers or excessive weight from clogs, leading to improper drainage.
- Downspout Flow: If it's recently rained, observe if water is flowing freely from the downspouts. If not, they might be clogged. Ensure downspout extensions direct water at least 5-10 feet away from the foundation.
- If gutters are consistently clogging: Consider installing gutter guards, but ensure they don't impede the flow of water.
6. Check for Moss, Algae, and Fungi Growth – Indicators of moisture issues.
- Moss Patches: Thick moss growth, especially on shaded or north-facing sections of the roof, can trap moisture against the shingles and degrade their surface. While not always immediately damaging, heavy moss can lift shingles and require treatment.
- Dark Streaks (Algae): Black or green streaks across the roof are usually gloeocapsa magma, a type of algae. While primarily cosmetic, it can indicate excessive moisture and, over long periods, contribute to shingle degradation.
- Fungus/Lichens: Patches of lichen often appear as crusty, colored growths. Like moss, they retain moisture and can accelerate shingle deterioration.
- If you have pervasive organic growth: Gentle cleaning methods (e.g., a 50/50 bleach and water solution in a garden sprayer, never pressure wash asphalt shingles) can address algae and light moss, but significant growth may signal poor drainage or ventilation.
7. Examine Soffits and Fascia – Signs of water intrusion further down.
- Rotting Wood: Look for peeling paint, soft spots, or obvious wood rot on the soffit (the underside of the eaves) and fascia (the board running along the edge of the roof). This is a strong indicator of water overflowing from clogged gutters or leaks from the roof edge.
- Pest Entry: Check for small holes or nests in the soffit, which could mean birds, rodents, or insects are gaining access to your attic, often facilitated by rotted wood.
- If you find rotting wood: This is a symptom, not the root cause. You
Related Articles
Keep troubleshooting with these hand-picked guides from FixlyGuide:
- The 3 Critical Mistakes Homeowners Make Inspecting Their Roof (From the Ground) — Learn how to spot damaging roof problems safely from the ground, avoiding common pitfalls and knowing exactly what to look for.
- The 7 Critical Roof Flaws You Can Spot From Your Yard (Before They Cost You Thousands) — Learn how to spot critical roof damage from the safety of your yard, identifying issues like missing shingles and blocked gutters before th…
- The 7 Critical Home Inspection Checks Most Homeowners Miss (and How to Do Them Yourself) — Discover the essential annual home inspection checks many homeowners overlook and learn how to perform them yourself to prevent costly repa…
- The 7 Sneaky Home Problems Spring Reveals (Before They Cost You Thousands) — Spring weather can expose hidden issues around your home that could lead to costly repairs if not addressed proactively.
- The #1 Mistake Homeowners Make with Ice Dams (and How to Fix It SAFELY) — Most homeowners approach ice dam removal incorrectly, creating more damage or safety risks. Learn the right, safe methods to protect your r…
- The 4 Hidden Reasons Your Chimney Leaks in Rain (And the Smart Fixes) — A leaky chimney during rain can hint at several underlying issues, from a faulty chimney cap to damaged flashing, all of which require prom…
Recommended for DIYers & woodworkers
Sponsored
The Top 20 Tools for Workshops of Any Budget
No stationary machines or power tools required — plus 3 fundamental tools that can't be bought at any price.
Get the free guide
Ted's Woodworking — The #1 Woodworking Resource
Detailed instructions, dimensioned drawings, materials & cutting lists, and 3D schematics for every skill level.
See the plansSponsored: links above are affiliate links. FixlyGuide may earn a commission on qualifying purchases — at no extra cost to you.
Frequently asked questions
How often should I inspect my roof from the ground?+
You should aim to inspect your roof from the ground at least twice a year – once in the spring after winter storms and once in the fall before winter sets in. Additionally, perform an inspection after any major weather event like a severe thunderstorm, hail, or strong winds.
Can binoculars really help me see roof damage from the ground?+
Absolutely. A good pair of binoculars (7x to 10x magnification) is essential for a detailed ground-level inspection. They allow you to clearly see individual shingles, flashing, and vent seals, making it possible to spot small cracks, granule loss, or minor displacements that would be invisible to the naked eye.
What are the most common roof problems I can spot from the ground?+
From the ground, you can easily spot missing or severely cracked shingles, excessive granule loss (dark patches on asphalt shingles), curled or cupped shingles, rusted or detached flashing around chimneys and vents, clogged or sagging gutters, and significant moss or algae growth. These are all critical indicators of roof health.
When should I stop my DIY inspection and call a professional?+
If you notice widespread damage like multiple missing shingles, significant sagging, severe granule loss across large areas, or obvious signs of leaks inside your home (water stains on ceilings), it's time to call a professional. Also, any concerns about structural integrity or extensive flashing damage warrant expert assessment. Never attempt repairs that involve dangerous heights or complex roofing techniques yourself.


Discussion
Loading comments…