
Tools & materials you'll need
Affiliate links- AmazonOld towels/rags
As an Amazon Associate FixlyGuide earns from qualifying purchases — at no extra cost to you. Prices and availability are accurate as of publication and subject to change.
Quick Answer
Is your kitchen sink draining at a snail's pace? The culprit is almost always a partial clog, typically a sticky, gunky mixture of grease, food debris, and soap scum that has built up over time within your drain pipes. While tempting to pour harsh chemicals down the drain, this is the #1 mistake homeowners make, as these products can corrode pipes and are often ineffective against tough clogs. A safer, more effective approach involves a combination of manual methods, starting with a good old-fashioned plunger, moving on to cleaning the P-trap, and finally, deploying a drain snake for deeper obstructions.
The Problem
Few things are as frustrating during kitchen cleanup as a sink that refuses to drain properly. Dishes pile up, water stands stagnant, and an unpleasant odor can begin to emanate from the drain. A slow-draining kitchen sink isn't just an annoyance; it's a clear signal that something is obstructing the flow of water somewhere in your drain line. This obstruction, if left unaddressed, will inevitably worsen until you have a complete, immovable clog – a much more difficult and messy problem to tackle. Understanding the nature of these clogs and the path water takes through your drain system is the first step toward a successful repair.
How It Works
Your kitchen sink's drain system is a marvel of simple engineering designed to efficiently carry wastewater away. When you pull the drain stopper, water flows down into the drain opening, typically past a strainer basket that catches larger food particles. From there, it enters the tailpiece, usually a short vertical pipe, and then into the P-trap. The P-trap is the U-shaped section of pipe directly beneath your sink. Its primary purpose isn't just to connect pipes; it holds a small amount of water to create a seal, preventing noxious sewer gases from entering your home. It’s also often the first place smaller clogs form due to its shape.
After the P-trap, the drain line connects to the branch drain, which carries not only your kitchen sink's wastewater but also that of other nearby fixtures (like a dishwasher or another sink basin if you have a double sink). This branch drain then connects to the main drain stack, a larger vertical pipe that runs through your house and eventually carries all wastewater to the septic system or municipal sewer line. Vents, usually on your roof, are crucial to this system, allowing air into the pipes, which prevents a vacuum from forming and ensures smooth water flow. Clogs typically occur in the P-trap, the branch drain, or, less commonly, in the main stack. The slow drainage indicates a partial blockage, restricting the pipe's diameter and thus the volume of water that can pass through.
Step-by-Step Fix
1. Clear the Area — Get ready to work
Before you begin, remove everything from under the sink cabinet, including cleaning supplies, waste bins, and any items stored on the bottom shelf. Place towels or old rags on the cabinet floor to catch any drips or spills. You'll need good lighting, so grab a flashlight if your under-sink area is dark.
- Safety: Always wear gloves and eye protection when working with drains, as you may encounter stagnant water, grime, and potentially harsh cleaning residue.
2. Plunge It Out — Your first line of attack
Fill the sink with enough hot water to cover the bottom of a sink plunger's rubber cup. Ensure the hot water isn't boiling, as very hot water can damage PVC pipes. Place the plunger over the drain opening, creating a tight seal. With firm, rapid up-and-down motions, plunge for about 20-30 seconds. Break the seal quickly on the last upstroke. Repeat this process 2-3 times. If you have a double sink, block the other drain opening tightly with a wet rag or stopper to ensure maximum suction.
- If this doesn't work: Move on to inspecting the P-trap.
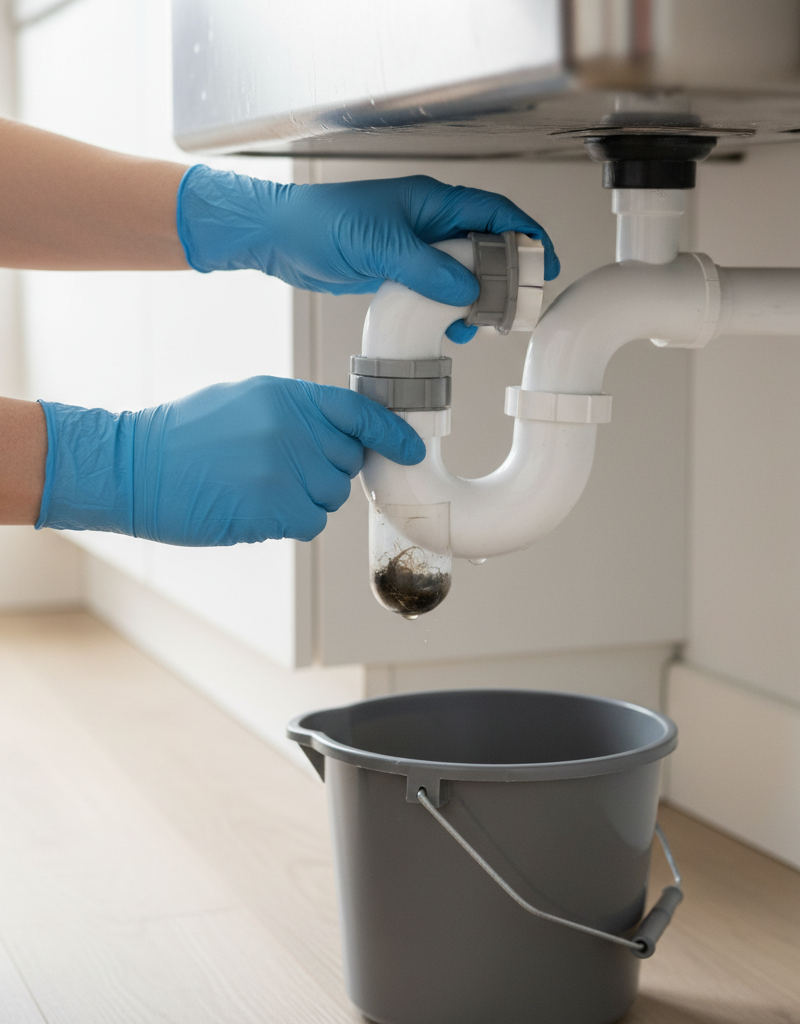
3. Tackle the P-Trap — The usual suspect
The P-trap is typically the easiest place to access a clog. Place a bucket or large bowl directly under the P-trap to catch water and debris. Using adjustable pliers or a basin wrench, carefully loosen the slip nuts on both ends of the P-trap. For older metal traps, these nuts can be stubborn; apply some penetrating oil if needed. Once loose, gently remove the P-trap. Carefully empty its contents into the bucket. Use a stiff brush, a bent wire coat hanger, or even a gloved finger to clean out any grime or buildup inside the P-trap and the connecting drain pipes as far as you can reach.
- If your P-trap is clear: The clog is deeper in the drain line.
4. Snake the Drain — Reaching deeper clogs
After cleaning the P-trap, reassemble it, ensuring all connections are hand-tight, then a quarter-turn more with pliers. Now, for clogs deeper in the line, you'll need a drain snake (also called an auger). Remove the P-trap again. Carefully insert the end of the drain snake into the open horizontal drain pipe extending towards the wall. Feed the snake into the pipe, turning the handle clockwise to help it navigate bends and break through obstructions. You'll feel resistance when you hit the clog. Continue turning and pushing until you feel the clog break up. Once you've cleared the obstruction, slowly pull the snake back out, cleaning any debris from the coil as it emerges. Reassemble the P-trap and run hot water to flush the drain.
- Pro Tip: If you have an accessible cleanout plug on the branch drain near the kitchen sink, you can remove that instead of the P-trap to insert the snake, providing a straighter path to deeper clogs. Just be prepared for potential water spillage.
5. Flush and Test — Confirm your success
Once you’ve finished clearing the clog, reassemble your P-trap and any other pipes you disconnected. Hand-tighten all slip nuts, then use your adjustable pliers to give each nut an additional quarter turn, being careful not to overtighten and crack plastic or strip threads. Turn on the hot water and let it run for several minutes at full pressure. Observe the drainage carefully. Does the water flow freely and quickly? Listen for any gurgling sounds, which might indicate a partial clog still remains. Check for leaks around the P-trap connections. If the sink still drains slowly, or if you encounter persistent leaks, you might need to repeat a step or consider a professional.
- Double-check: If leaks occur, gently tighten the slip nuts a little more, or disassemble and check that the old washers are properly seated or replaced if they are dried out or cracked.
Common Causes
- Grease Buildup: The number one culprit. When hot cooking grease is poured down the drain, it eventually cools and solidifies, clinging to pipe walls. Over time, this grease accumulates, acting like a magnet for other debris and slowly constricting the pipe's diameter.
- Food Particles: Even with a good strainer, small food scraps, coffee grounds, and starchy residues (like potato peels or pasta remnants) can slip into the drain. These combine with grease and soap to form a stubborn, sticky sludge.
- Soap Scum: Bar soap and even some liquid dish soaps contain fats and minerals that, when combined with hard water, create a waxy, insoluble residue. This soap scum adheres to pipe interiors, adding to the clog's bulk.
- Hair and Fibers: While less common in kitchen sinks than in bathroom drains, hair from pets or fibers from sponges and dishrags can occasionally make their way into the drain and contribute to a blockage.
- Mineral Buildup: In areas with hard water, dissolved minerals (calcium and magnesium) can precipitate out of the water and build up on the inside surfaces of pipes, reducing their internal diameter over time. This is often a slower process but can exacerbate other clogs.
- Poor Venting: Less often, a slow drain can be caused by an issue with your plumbing vent system. If the vent pipe is partially blocked (e.g., by a bird's nest or leaves on the roof), air cannot properly enter the drain system, leading to gurgling and slow drainage.
Common Mistakes
- Using Chemical Drain Cleaners Religiously: While they promise quick fixes, many chemical drain cleaners contain harsh caustics or acids that can corrode older metal pipes, warp PVC, and damage rubber seals over time. They often just eat a small path through a clog, leaving the bulk of it intact to reform. They also create a hazardous environment for plumbers if the clog requires professional intervention.
- Ignoring the P-Trap: Many homeowners immediately reach for a snake or commercial cleaner when a P-trap cleanout is often the simplest and most effective solution for kitchen sink clogs. It's designed to be accessible for this very reason.
- Overtightening PVC Connections: Plastic (PVC) pipes and fittings are common under sinks. Overtightening the slip nuts on these connections can easily crack the plastic, leading to leaks and requiring a full replacement of the damaged section.
- Not Protecting Cabinetry: Forgetting to place a bucket or towels under the P-trap before disassembly leads to messy spills that can damage porous cabinet bases and encourage mold growth.
- Using the Wrong Plunger: A toilet plunger (with a flange) is designed for toilets. A cup-style sink plunger with a flat bottom creates a better seal for sink drains.
- Assuming the Clog is Always Local: If you've thoroughly cleaned your P-trap and snaked the accessible drain line without success, don't assume the problem is still right under the sink. The clog could be deeper in the branch line or even in the main drain, in which case professional help is likely needed.
Cost & Time Breakdown
| Task | DIY Cost | Pro Cost | Time |
|---|---|---|---|
| Plunging | $0 | N/A | 10–15 minutes |
| P-Trap Cleanout | $0–$15 | N/A | 20–30 minutes |
| Sink Auger/Snaking | $0–$30 | N/A | 30–60 minutes |
| Chemical Drain Cleaner | $8–$15 | N/A | Varies |
| Professional Drain Service | N/A | $150–$350+ | 1–3 hours |
Tips & Prevention
- Scrape Plates Thoroughly: Always scrape food scraps into the trash or compost bin before rinsing dishes. Even small particles can accumulate.
- Avoid Pouring Grease Down the Drain: After cooking, allow grease to cool and solidify, then scrape it into the trash. For liquid fats (like cooking oil), pour them into an old can or jar, let them solidify, and then dispose of them in the trash.
- Regular Hot Water Flush: Once or twice a week, run very hot water down your drain for a few minutes. This can help melt and flush away minor grease and soap scum buildup before it becomes a major clog.
- Use Drain Screens: Equip your kitchen sink drains with fine mesh drain screens to catch food particles, hair, and other debris before they enter your pipes.
- Baking Soda and Vinegar Treatment: For a natural, gentler preventative measure, pour 1/2 cup of baking soda down the drain, followed by 1/2 cup of white vinegar. Let it sit for 20-30 minutes, then flush with hot water. This creates a fizzing action that can help break down minor grease and deodorize the drain. Do this monthly.
- Educate Household Members: Ensure everyone in your home understands what should and should not go down the kitchen drain.
When to Call a Professional
While many slow-draining kitchen sink issues are within the capabilities of a competent DIYer, there are clear instances when professional help is not just advisable but necessary. If you've meticulously followed all the steps – plunging, cleaning the P-trap, and snaking the drain beyond the P-trap – and the sink still drains slowly or not at all, the clog is likely deeper in your branch line or, more seriously, in the main house drain. This often requires specialized equipment like a heavy-duty electric auger or hydro-jetting, which DIY tools can't manage. Furthermore, if you notice slow drainage in multiple fixtures throughout your home (e.g., a slow draining bathroom sink or toilet, or a backed-up washing machine drain), it's a strong indicator of a main sewer line issue. These are complex problems that could lead to significant water damage and health hazards if not addressed swiftly by a licensed plumber. Finally, if you're dealing with old, fragile plumbing or suspect a collapsed pipe, attempting further DIY could cause more damage and significantly increase repair costs. A professional can quickly diagnose the problem with camera inspections and resolve it safely and effectively.
Related Articles
Keep troubleshooting with these hand-picked guides from FixlyGuide:
- The #1 Mistake Homeowners Make with a Slow Kitchen Drain (And the Simple Fix) — A slow kitchen sink drain is frustrating, but often an easy fix if you avoid common mistakes and know where to look first.
- The #1 Mistake Homeowners Make When Their AC Drain Clogs (And The $5 Fix) — Discover the most common error homeowners make when tackling a clogged AC drain line and learn a simple, inexpensive solution to prevent co…
- The 90-Second Trick to Unclogging Any Shower Drain (No Chemicals Needed) — Learn how to quickly and safely clear a clogged shower drain using simple tools and household items, avoiding harsh chemicals.
- The Nasty Truth About Your Smelly Bathroom Sink — And the 2-Ingredient Trick to Fix It — Uncover the hidden reasons behind that foul odor wafting from your bathroom sink drain and learn a simple, two-ingredient solution to banis…
- The Secret Culprit Behind Your Leaky Refrigerator (It’s Not Always a Hose) — Discover the hidden causes of your refrigerator leaking water and how to fix them with our comprehensive troubleshooting guide.
- The #1 Mistake Homeowners Make When Their Dryer Stops Drying (And How to Fix It Free) — If your dryer is taking too long to dry clothes, the most common culprit is a clogged vent, which can be easily fixed with simple tools.
Frequently asked questions
Why is my kitchen sink draining slowly?+
The most common reason for a slow-draining kitchen sink is a partial clog caused by the accumulation of grease, food particles, soap scum, and other debris over time. These materials gradually build up on the interior walls of your drainpipes, restricting water flow.
Can I use chemical drain cleaners for a slow kitchen sink?+
While chemical drain cleaners offer convenience, they are generally not recommended. They can damage pipes, especially older metal or PVC systems, and often only create a narrow path through a clog, allowing it to re-form quickly. Manual methods like plunging, P-trap cleaning, and snaking are safer and more effective.
How often should I clean my kitchen sink drain to prevent clogs?+
To prevent clogs, it's a good practice to take preventative measures weekly or monthly. This includes regularly flushing with hot water, using drain screens, and performing a baking soda and vinegar treatment about once a month.
What if my double kitchen sink is draining slowly on both sides?+
If both sides of a double kitchen sink are draining slowly, it indicates a clog deeper in the common branch drain beyond where the two sink drains merge, or potentially an issue with the main house drain. You'll likely need to snake the drain from the P-trap or a cleanout to reach this deeper obstruction after plunging both sides.
When should I call a professional plumber for a slow kitchen sink?+
You should call a professional plumber if you've attempted all DIY fixes (plunging, P-trap cleaning, snaking) without success, or if you notice multiple drains in your home are slow, indicating a main sewer line issue. Professionals have specialized tools like hydro-jetters and video inspection cameras to diagnose and clear complex clogs safely.


Discussion
Loading comments…