
Tools & materials you'll need
Affiliate linksAs an Amazon Associate FixlyGuide earns from qualifying purchases — at no extra cost to you. Prices and availability are accurate as of publication and subject to change.
Quick Answer
Many homeowners struggle with achieving a long-lasting, watertight caulk seal around their bathroom sink, often due to overlooking crucial preparation steps or using the wrong application technique. The secret to a durable, mold-resistant seal lies in meticulous old caulk removal, thorough surface cleaning and drying, and applying a steady, consistent bead of high-quality silicone caulk. Neglecting any of these steps inevitably leads to early failure, water damage, and frustrating re-dos.
The Problem
Water is a persistent enemy in the bathroom. Around your sink, a compromised caulk line creates an open invitation for water to seep into the gaps between the sink basin and the countertop or vanity. This isn't just an aesthetic issue; it's a direct pathway for moisture to penetrate underlying materials. Over time, this infiltration can lead to significant problems: mold and mildew growth (often hidden from view), rot in the vanity cabinet and subfloor, delamination of countertop materials (especially laminate), and even structural damage if left unaddressed. A poorly caulked sink also looks unsightly, detracting from the bathroom's overall appearance with cracked, discolored, or peeling caulk.
How It Works
Caulk serves as a flexible, waterproof barrier that bridges the small gaps and seams where different materials meet, allowing for slight movement while maintaining a seal. In a bathroom, this movement is common due to temperature fluctuations (hot showers, cold air conditioning) and the expansion and contraction of building materials. Silicone caulk, particularly 100% silicone, is ideal for bathrooms because of its superior flexibility, high water resistance, and excellent adhesion to non-porous surfaces like porcelain, ceramic, and cultured marble. It cures by reacting with moisture in the air, forming a durable, rubber-like seal. Unlike acrylic latex caulk, which can become brittle and crack with prolonged moisture exposure, silicone retains its elasticity, making it highly resistant to mold and mildew when formulated with biocides. The key for caulk to work effectively is a clean, dry surface for it to bond to, creating a continuous, impervious barrier that water cannot penetrate. Without proper surface prep, the caulk cannot adhere fully, creating weak points that water will exploit.
Step-by-Step Fix
Properly caulking a bathroom sink is a precise job that requires patience and attention to detail. Follow these steps for a long-lasting, professional-grade seal.
-
Safety First! — Always wear appropriate personal protective equipment, including safety glasses and chemical-resistant gloves, especially when working with caulk removers or cleaning agents. Ensure the bathroom is well-ventilated by opening a window or running the exhaust fan.
-
Remove All Old Caulk — This is the most critical step. Using a utility knife, caulk removal tool, or even a specialized oscillating tool with a scraper attachment, carefully cut and peel away all existing caulk. Get every last bit, even the tiny remnants. For stubborn caulk, apply a commercial caulk remover (follow product instructions carefully) and let it penetrate before scraping.
- Pro Tip: Be gentle around delicate surfaces like fiberglass or glossy finishes to avoid scratches.
-
Clean the Surface Thoroughly — After removing the old caulk, clean the seam vigorously. Use a stiff brush, rubbing alcohol, or a bleach-water solution (1 part bleach to 10 parts water) to remove any mold, mildew, soap scum, or residue. If mold is present, a dedicated mold cleaner or bleach solution is essential to kill spores and prevent regrowth. Rinse thoroughly with clean water.
-
Dry the Area Completely — This step is non-negotiable for proper adhesion. Use a clean cloth to wipe down the seam, then allow the area to air dry for several hours, ideally 24 hours. A hairdryer on a low, cool setting can help speed up the process. Ensure there is absolutely no moisture present before moving on.
-
Prepare the Caulk Tube — Cut the tip of the caulk tube at a 45-degree angle, about 1/8 to 1/4 inch from the end. The size of the opening should match the size of the gap you need to fill. Puncture the inner seal with a long nail or the wire on your caulk gun.
-
Load the Caulk Gun — Insert the caulk tube into a caulk gun. Apply even pressure to the trigger. Practice on a piece of scrap cardboard or paper to get a feel for the flow and pressure needed to create a consistent bead.
-
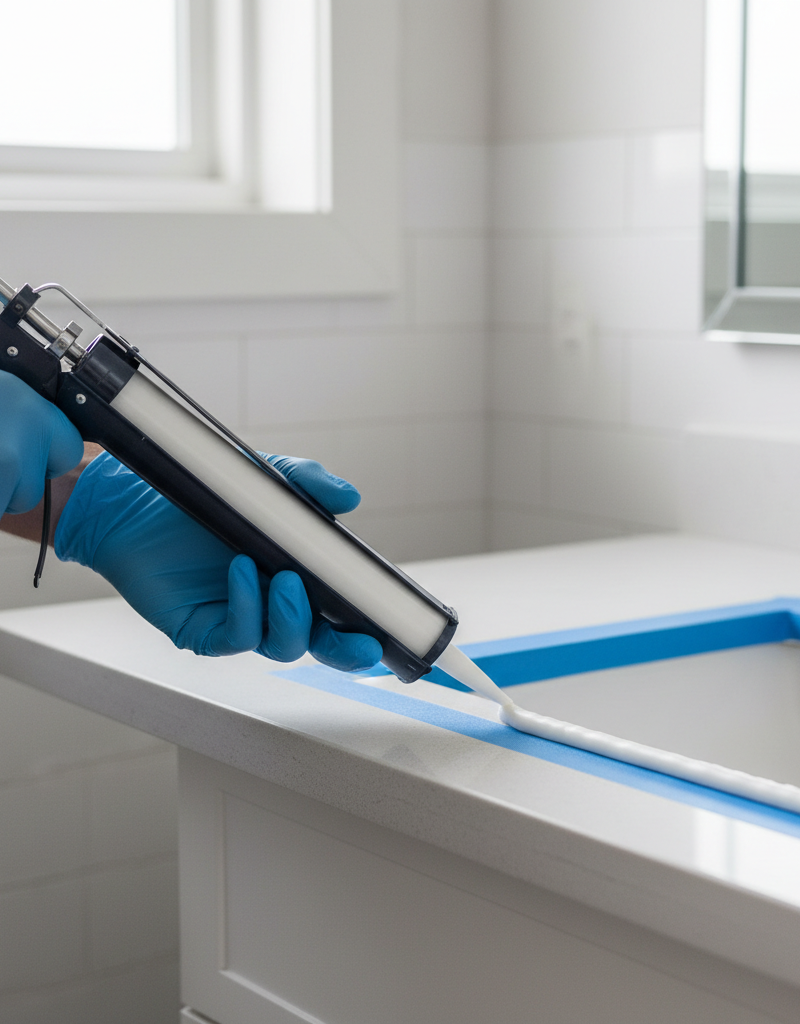
Apply a Continuous Caulk Bead — Starting at one end of the seam, apply a steady, even bead of caulk. Keep the caulk gun moving at a consistent speed, pulling it towards you. Aim for a smooth, continuous line without stopping. Don't worry about perfection at this stage; focus on getting enough caulk into the seam.
- If this doesn't work: If your bead is uneven or lumpy, stop, wipe it away quickly with a paper towel (before it skins over), and try again. Practice makes perfect.
-
Tool the Caulk Bead — Immediately after applying the caulk (within 5-10 minutes, depending on caulk type and humidity), tool the bead to create a smooth, concave finish. You can use a wet finger (wearing a glove for safety and hygiene), a specialized caulk tooling tool, or even the back of a plastic spoon. Apply light, consistent pressure, removing excess caulk as you go. Wipe your tooling tool or finger clean frequently with a damp paper towel.
-
Clean Up Excess and Let Cure — Carefully wipe away any excess caulk from the sink and countertop with a damp cloth before it dries. Once finished, allow the caulk to cure completely. This typically takes 24-48 hours, but always check the caulk manufacturer’s instructions for specific curing times. Avoid getting the area wet during the curing period.
Common Causes
- Poor Surface Preparation: This is, by far, the leading cause of caulk failure. If old caulk, soap scum, mold, or moisture remains on the surface, the new caulk cannot properly adhere, leading to peeling, cracking, and premature failure.
- Using the Wrong Type of Caulk: Silicone caulk is essential for bathrooms due to its flexibility and water resistance. Using acrylic latex caulk, which is cheaper and easier to clean up, will often lead to early failure in high-moisture environments as it becomes rigid and cracks.
- Improper Application Technique: Applying too thick a bead, too thin a bead, or an inconsistent bead will compromise the seal. A thick bead is prone to cracking, while a thin bead lacks durability. Stopping and starting frequently creates weak points.
- Lack of Tooling: Failing to tool the caulk bead into a smooth, concave shape removes air pockets, enhances adhesion, and provides a professional appearance. Untooled caulk has a rougher surface that can trap moisture and promote mildew growth.
- Premature Exposure to Water: Not allowing the caulk to fully cure before exposing it to water is a common mistake that prevents the caulk from forming its full, durable seal.
- Aging and Normal Wear: Even the best caulk will eventually degrade over time due to constant exposure to moisture, cleaning chemicals, and temperature fluctuations. Caulk typically lasts 5-10 years before needing replacement.
Common Mistakes
- Not removing ALL old caulk: Many DIYers simply caulk over existing caulk, which looks bad and prevents the new caulk from bonding properly to the surface underneath. Always start with a completely clean slate.
- Forgetting to dry the surface: Applying caulk to a damp surface guarantees poor adhesion. Moisture trapped beneath the new caulk can also lead to mold growth. Always ensure the area is bone dry.
- Using painter's caulk or interior caulk: These are not formulated for the constant moisture and humidity of a bathroom. Always choose 100% silicone sealant, preferably with mildew resistance, for bathroom applications.
- Applying too much or too little caulk: Too much caulk looks messy and is harder to tool; too little won't provide an adequate seal. Aim for a bead that fills the gap sufficiently but isn't overly wide.
- Skipping the tooling step: Tooling isn't just for aesthetics; it forces the caulk into the seam, creating better adhesion and a smoother, water-shedding surface. Don't skip it!
- Not reading the caulk's curing time: Impatiently using the sink or shower before the caulk has fully cured (often 24-48 hours) will weaken the seal and can ruin your work.
Cost & Time Breakdown
| Task | DIY Cost | Pro Cost | Time |
|---|---|---|---|
| Caulk & tools | $15–$30 | Included | 1–2 hours |
| Old caulk removal | $0 | Included | 30–60 min |
| Surface cleaning | $5–$10 | Included | 30 min |
| Caulk application & tooling | $0 | Included | 30–60 min |
| Total | $20–$40 | $150–$300 | 2–4 hours |
Tips & Prevention
- Choose the Right Caulk: Always opt for 100% silicone sealant formulated for baths and kitchens, ideally with mildew resistance. It adheres better, lasts longer, and resists mold more effectively than acrylic latex alternatives.
- Ventilate Your Bathroom: Proper ventilation after showers and baths helps reduce humidity, which is a major factor in mold growth and caulk deterioration. Always use your exhaust fan or open a window.
- Regular Cleaning: Regularly clean your caulk lines with a mild, non-abrasive bathroom cleaner. Avoid harsh chemical cleaners that can degrade silicone over time.
- Inspect Annually: Make it a habit to visually inspect your caulk around the sink and other wet areas annually. Look for signs of cracking, peeling, discoloration, or mold. Addressing minor issues early can prevent major water damage.
- Keep it Dry: After cleaning or heavy use, quickly wipe down caulk lines to prevent standing water from accumulating, especially in crevices.
When to Call a Professional
While recaulking a bathroom sink is a manageable DIY project for most homeowners, there are specific situations where calling a professional is wise. If you find extensive mold growth that appears to penetrate into the vanity or walls, it could indicate a larger water leak or significant internal damage that requires professional remediation. If you notice swelling, discoloration, or soft spots in your vanity cabinet, walls, or subfloor near the sink, this is a clear sign of persistent water damage that needs immediate investigation by a plumber or mold remediation specialist. Additionally, if the caulk consistently fails within a short period despite following all proper steps, there might be underlying structural movement or a persistent leak that needs to be diagnosed and addressed by an experienced professional to prevent ongoing problems.
Related Articles
Keep troubleshooting with these hand-picked guides from FixlyGuide:
- The Secret Culprit Behind Your Leaky Refrigerator (It’s Not Always the Water Line) — Discover the most common, often overlooked, reasons your refrigerator is leaking water and how to fix them with simple DIY steps.
- The Surprising Culprit Behind Your Refrigerator's Water Leak (It's Not Always the Ice Maker) — Discover the most common, often overlooked reason your refrigerator is leaking water and how to fix it with simple steps.
- The Secret Culprit Behind Your Leaking Refrigerator (It’s Not Always a Big Fix) — Discover the most common and often overlooked reasons why your refrigerator is leaking water on the floor, and how to fix them yourself.
- The #1 Mistake Homeowners Make When Their AC Drain Clogs (And The $5 Fix) — Discover the most common error homeowners make when tackling a clogged AC drain line and learn a simple, inexpensive solution to prevent co…
- The 30-Second Toilet Fix Plumbers Don't Want You to Know — Stop that phantom-flushing toilet with this quick guide to diagnosing and fixing the most common silent water leaks.
- The #1 Mistake Homeowners Make When a Gas Burner Won't Light (And the Easy Fix) — Before you call a technician, discover the most common, overlooked reason your gas stove burner isn't lighting and how to fix it yourself i…
Get the print-ready PDF of this guide
A clean, ad-free, printable version you can keep on your phone or pin to the workshop wall. Free with a FixlyGuide account.
- Print-optimized layout
- Tools, materials & every step included
- Saved to your account
Frequently asked questions
How often should I recaulk my bathroom sink?+
Ideally, you should inspect your bathroom sink caulk annually and plan to recaulk every 5-10 years, or sooner if you notice cracking, peeling, or mold growth.
What is the best caulk for a bathroom sink?+
For bathroom sinks, 100% silicone sealant, preferably with mildew resistance, is the best choice. It offers superior flexibility, water resistance, and longevity compared to acrylic latex caulks.
Can I caulk over old caulk?+
No, you should never caulk over old caulk. This will lead to poor adhesion, premature failure of the new caulk, and often traps moisture, promoting mold and mildew growth. Always remove all old caulk first.
How long does caulk need to dry before getting wet?+
Most silicone caulks require 24-48 hours to fully cure before being exposed to water. Always check the specific drying and curing times listed on your caulk product's packaging.
Why does my bathroom sink caulk keep getting moldy?+
Moldy caulk is often caused by persistent moisture, poor ventilation, or using the wrong type of caulk (e.g., acrylic latex instead of 100% silicone with mildew resistance). Ensuring thorough cleaning, complete drying before application, and proper bathroom ventilation can prevent mold.


Discussion
Loading comments…