
Tools & materials you'll need
Affiliate linksAs an Amazon Associate FixlyGuide earns from qualifying purchases — at no extra cost to you. Prices and availability are accurate as of publication and subject to change.
Quick Answer
That persistent running sound from your toilet, often called a "phantom flush," is usually costing you money and wasting water. The good news? For most homeowners, the fix is straightforward and takes less than 30 minutes. The primary culprits are typically a worn-out flapper valve that no longer seals properly or an incorrectly adjusted fill valve that keeps trying to fill an already full tank. This guide will walk you through diagnosing and repairing both issues, helping you reclaim your quiet bathroom and cut down on your water bill.
The Problem
Imagine a tiny river constantly flowing in your bathroom, unseen but heard. That's what's happening when your toilet runs continuously. It's not just annoying; according to the EPA, a running toilet can waste hundreds of gallons of water per day, adding significant costs to your monthly water bill. Beyond the financial impact, the constant sound can be disruptive in your home. The underlying issue is usually that the toilet tank isn't maintaining its water level because water is slowly, or sometimes rapidly, escaping into the toilet bowl. This drop in water level triggers the fill valve to cycle on repeatedly, creating that never-ending running sound.
How It Works
To understand how to fix a running toilet, it helps to know how a toilet's internal mechanisms work in harmony. When you flush, a chain lifts the flapper valve at the bottom of the toilet tank. This opens a large hole, allowing water to rush from the tank into the toilet bowl, creating the siphoning action that pulls waste down the drain. As the tank empties, the flapper falls back into place, sealing the hole. Simultaneously, the float mechanism (either a ball float or a cup float on the fill valve shaft) drops with the water level. This drop activates the fill valve, which begins to refill the tank with fresh water from the supply line. As the water level rises, the float rises with it. Once the water reaches a predetermined level, the float triggers the fill valve to shut off, stopping the water flow. A small refill tube also directs a stream of water into the overflow tube, which refills the toilet bowl's trap seal. The critical components are the flapper (which stops water from entering the bowl prematurely), the fill valve (which controls water entry into the tank and bowl), and the overflow tube (a safety measure for excess water). If any of these components malfunction or are misaligned, the delicate balance is disrupted, leading to a continuously running toilet.
Step-by-Step Fix
Safety First — Before you begin, turn off the water supply to the toilet by turning the shut-off valve located on the wall near the base of the toilet clockwise until it stops. Flush the toilet to empty most of the water from the tank.
-
Inspect the Flapper Valve — The flapper is the most common culprit. It's a rubber or plastic stopper at the bottom of the tank. Look for obvious signs of wear, cracking, or deterioration. Gently run your finger along the edges of the flapper to feel for roughness or unevenness. Sometimes, mineral deposits can build up, preventing a good seal. Also, check the chain connecting the flush handle to the flapper. If it's too slack, the flapper might not be lifting completely, and if it's too taut, it might not be sealing fully. There should be a small amount of slack in the chain (about 1/2 inch) when the flapper is closed.
- If the flapper is worn: Proceed to step 2 to replace it.
- If the chain is too short/tight: Adjust the chain to add a little slack.
- If the chain is too long: Adjust the chain to remove excess slack.
-
Replace the Flapper Valve — Replacing a flapper is a quick and inexpensive fix. Disconnect the old flapper's ears from the overflow tube posts and unhook the chain. Take the old flapper to a hardware store to ensure you get an exact match. Universal flappers are available but may not fit all toilet models perfectly. To install the new flapper, simply hook its ears onto the overflow tube posts and attach the chain to the flush lever, leaving about 1/2 inch of slack when the flapper is closed. Turn the water back on and check for leaks.
- Tools: None required, possibly small pliers for stubborn chain links.
- Materials: New flapper valve (specific to your toilet model or a universal fit).
-
Check the Fill Valve's Water Level — The fill valve regulates the water level in the tank. If the water level is too high, it will continuously spill into the overflow tube, causing the toilet to run. The water level should typically be about 1 inch below the top of the overflow tube. If you see water consistently trickling into the overflow tube, this is your issue.
- How to check: Visually inspect the water level. Is it higher than the overflow tube or just barely below it with a constant trickle?
-
Adjust the Fill Valve (Float) — Most modern fill valves have an adjustable float cup on the fill valve shaft. There will be a small adjustment screw or clip. For fill valves with an adjustment screw, turn it counter-clockwise to lower the water level. For older ballcock-style fill valves, you can gently bend the float arm downwards. For cup-style floats, there's usually a small clip that you can squeeze and slide down the shaft to lower the water level. After adjusting, turn the water supply back on and flush a few times to see if the running stops. Aim for the water level to be at the marked waterline on the inside of the tank, or about 1 inch below the top of the overflow tube.
- If you see water still overflowing: Adjust further downward.
-
Inspect the Refill Tube — The small refill tube connects the fill valve to the overflow tube. It's crucial for refilling the bowl after a flush. Ensure this tube is properly inserted into the overflow tube and isn't kinked or sending water elsewhere. Sometimes, if it's pushed too far down, it can siphon water out of the tank directly into the bowl, causing constant running. The end of the refill tube should be just above the water level in the overflow pipe, but still inside the pipe.
- If the tube is misplaced: Reposition it so it directs water properly into the overflow tube without becoming submerged.
-
Check for Leaks with Dye Test — If you've replaced the flapper and adjusted the fill valve but the toilet still runs, perform a dye test. Add a few drops of food coloring (or a toilet dye tablet) to the tank water. Wait 15-20 minutes without flushing. If colored water appears in the toilet bowl, you have a leak, most likely still a faulty flapper or a crack in the tank (though rare for silent leaks).
- If color appears: Re-verify the flapper seal or check for tank cracks (very rare for this type of leak).
- If no color appears but it still runs: Investigate the fill valve for internal wear or a defective shut-off mechanism that needs replacement.
-
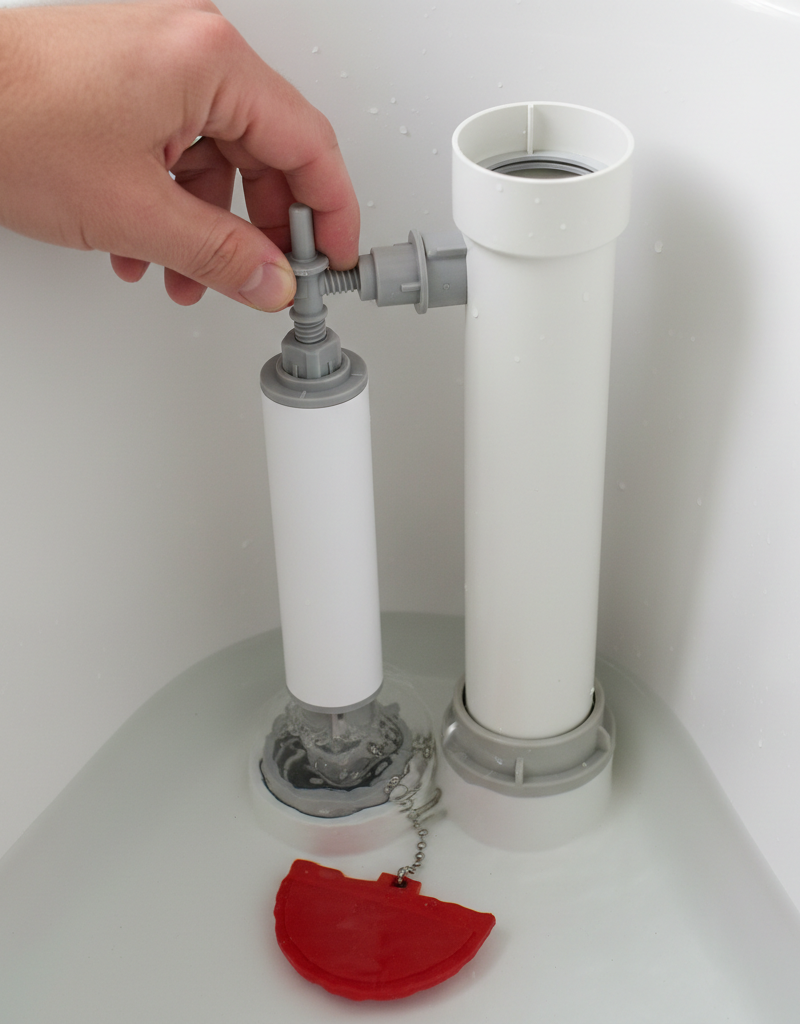
Replace the Fill Valve — If the flapper is fine, the water level is correct, and the toilet still runs, the fill valve is likely defective. This is a more involved repair but still DIY-friendly. Turn off the water supply and flush the toilet. Use a sponge to remove any remaining water from the tank. Disconnect the water supply line from the bottom of the fill valve. Loosen the large retaining nut on the underside of the tank that holds the fill valve in place. Remove the old fill valve. Install the new fill valve, ensuring the rubber washer is correctly seated, and tighten the retaining nut by hand, then a quarter turn with adjustable pliers (don't overtighten). Reconnect the water supply line. Turn the water back on and check for leaks. Adjust the new fill valve's float to the correct water level (1 inch below the overflow tube).
- Tools: Adjustable wrench, large channel-lock pliers, sponges, bucket.
- Materials: New fill valve assembly (universal fit or specific to your toilet).
- Safety: Always wear gloves and have rags/towels ready for spills.
Common Causes
- Worn Flapper Valve: Over time, the rubber or plastic flapper can harden, crack, or become encrusted with mineral deposits, preventing it from forming a watertight seal at the bottom of the tank. This allows water to slowly seep into the bowl, causing the fill valve to constantly cycle. This is by far the most frequent cause.
- Incorrectly Adjusted Fill Valve: If the fill valve's float is set too high, the water level in the tank will rise above the top of the overflow tube, causing water to continuously drain into the tube and then into the bowl. The fill valve will then try to refill the tank, leading to a constant running sound.
- Long/Short Flapper Chain: A chain that is too short or taut can prevent the flapper from closing completely. Conversely, a chain that's too long can get tangled under the flapper, again preventing a good seal.
- Defective Fill Valve: The internal mechanisms of the fill valve can wear out, causing it to fail to shut off completely, even when the water level is correct. This internal leak keeps water flowing into the tank continuously.
- Miscalibrated Fill Level Markings: Some older toilets might have a faint waterline or none at all. Relying solely on these can sometimes lead to setting the water level too high if not carefully observed against the overflow tube.
Common Mistakes
- Ignoring the problem: Many homeowners let a running toilet go for weeks or months, thinking it's a minor annoyance. This is a costly mistake, wasting hundreds if not thousands of gallons of water and significantly increasing utility bills.
- Overtightening connections: When replacing the fill valve or water supply line, overtightening plastic nuts can crack them, leading to larger leaks and more damage.
- Not checking the chain slack: A too-tight or too-loose flapper chain is a common, easy-to-fix issue that often gets overlooked in favor of more complex diagnostics.
- Buying the wrong replacement parts: There are various flapper and fill valve designs. Taking the old part to the store or knowing your toilet's make and model ensures you get the correct replacement, saving you a trip.
- Not turning off the water supply: Forgetting to turn off the water before disassembling the tank can lead to a messy flood.
- Assuming it's always the flapper: While common, sometimes the fill valve is the true culprit. Proper diagnosis (like the dye test) saves time and effort.
Cost & Time Breakdown
| Task | DIY cost | Pro cost | Time (DIY) |
|---|---|---|---|
| Flapper replacement | $5–$20 | $80–$150 | 10–20 minutes |
| Fill valve adjustment | $0 | $80–$150 | 5–10 minutes |
| Fill valve replacement | $15–$30 | $100–$250 | 30–60 minutes |
| Refill chain adjustment | $0 | $80–$150 | 5 minutes |
Tips & Prevention
- Regular Dye Tests: Perform a dye test every six months to catch silent leaks before they escalate. It's a quick, free check.
- Inspect Flapper Annually: Lift the tank lid and visually inspect your flapper for signs of wear and tear once a year. Look for discoloration, stiffness, or cracks.
- Clean Mineral Deposits: If you have hard water, mineral deposits can build up on the flapper or within the fill valve. Gently scrub the flapper with a soft brush and a mild cleaner (like white vinegar) if you notice buildup.
- Avoid Harsh Chemical Cleaners: Drop-in toilet bowl cleaners can corrode rubber flappers and other internal components over time, leading to premature failure. Stick to cleaners designed for the bowl itself.
- Adjust Water Level Correctly: Always ensure the water level is about 1 inch below the overflow tube, even after replacing components. This prevents unnecessary running.
- Use Quality Replacement Parts: When replacing a flapper or fill valve, opt for quality parts from reputable brands. They tend to last longer and perform better than generic, cheaper alternatives.
When to Call a Professional
While most running toilet issues are DIY-friendly, there are times when calling a licensed plumber is the wiser choice. If you've tried replacing the flapper and fill valve, performed dye tests, and the toilet still runs, there might be a more complex underlying problem, such as fluctuating water pressure, issues within the toilet's siphoning jet, or even a hairline crack in the porcelain that's not immediately visible. Additionally, if you encounter persistent leaks from the base of the toilet that don't stem from the tank components, or if you suspect issues with the main water supply line or the toilet's wax ring, a professional can properly diagnose and repair these more serious problems. Don't hesitate to call a pro if you're uncomfortable with any step, or if the problem persists after your best efforts; ongoing leaks can lead to significant water damage and higher utility bills.
Related Articles
Keep troubleshooting with these hand-picked guides from FixlyGuide:
- Why Is My Toilet Running? 7 Quick Fixes Before Calling a Plumber — A constantly running toilet wastes up to 200 gallons of water a day. Here are the 7 most common causes and how to fix each one yourself in…
- Your running toilet wastes 72,000 gallons. The fix? — A running toilet is usually caused by a faulty flapper valve, wasting water and creating annoying noise, but it's a fix you can often do yo…
- The $2 Trick to Stop a Running Toilet (Plumbers Don't Want You to Know) — Discover the simple, two-dollar fix that can stop your running toilet in minutes, saving water and preventing costly repairs.
- The $5 Single-Handle Faucet Fix Plumbers Don't Want You to Know — Stop that annoying drip! Most single-handle faucet leaks are caused by worn-out O-rings or seals, a repair homeowners can easily tackle in…
- The 30-Second Fix for a Humming Garbage Disposal (Plumbers Don't Want You to Know) — Before you call a plumber, try these simple steps to unjam a humming garbage disposal in under a minute and save yourself a service call.
- The #1 Mistake Homeowners Make When Diagnosing Low Water Pressure — Discover the most common oversight homeowners make when troubleshooting low water pressure throughout their house and how to fix it with si…
Get the print-ready PDF of this guide
A clean, ad-free, printable version you can keep on your phone or pin to the workshop wall. We'll also send occasional weekly tips matched to your home situation.
- Print-optimized layout
- Tools, materials & every step included
- Unsubscribe anytime
Frequently asked questions
Why does my toilet run constantly?+
A constant running toilet is usually caused by a faulty flapper valve that isn't sealing properly, allowing water to leak into the bowl, or an incorrectly adjusted fill valve that keeps the tank's water level too high, causing it to overflow into the central tube. Both issues trigger the fill valve to continuously refill the tank.
How do I know if my flapper is bad?+
You can check your flapper by inspecting it for visible signs of wear, cracks, or mineral buildup. Another test is the dye test: add food coloring to the tank water and wait 15-20 minutes without flushing. If colored water appears in the bowl, your flapper isn't sealing correctly.
Can I fix a running toilet myself?+
Yes, most running toilet issues are simple DIY fixes. Replacing a flapper valve or adjusting a fill valve's water level are common repairs that can be completed in under an hour with basic tools and inexpensive parts.
How much water does a running toilet waste?+
A continuously running toilet can waste hundreds of gallons of water per day, leading to significant increases in your monthly water bill. Even a small, slow leak can amount to thousands of gallons over a year.
When should I call a plumber for a running toilet?+
If you've replaced the flapper and fill valve, performed dye tests, and the toilet still runs, or if you notice leaks from the base of the toilet, consistently low flushing power, or you're uncomfortable attempting the repair yourself, it's best to call a licensed plumber.


Discussion
Loading comments…