
Tools & materials you'll need
Affiliate linksAs an Amazon Associate FixlyGuide earns from qualifying purchases — at no extra cost to you. Prices and availability are accurate as of publication and subject to change.
Quick Answer
A The most frequent, and often misdiagnosed, reason your refrigerator is leaking water onto the kitchen floor is a clogged defrost drain line. This seemingly minor issue can lead to significant puddles because the water generated during the defrost cycle has nowhere to go but out. The good news? This fix is usually a straightforward DIY task, involving some basic tools and about an hour of your time.
The Problem
Finding a puddle of water around your refrigerator can be alarming. Your first thought might be a serious plumbing issue or a broken ice maker, but often, the true culprit is much simpler and directly related to the refrigerator's defrost cycle. When the defrost drain line becomes obstructed, water that normally drains into the evaporator pan beneath the fridge overflows, finding its way onto your floor. This isn't just a cosmetic issue; standing water can damage your flooring, create slip hazards, and even encourage mold growth if not addressed promptly. Understanding how this system works is key to fixing it effectively.
How It Works
Modern refrigerators employ an automatic defrost system to prevent ice buildup on the evaporator coils, which are responsible for cooling the air inside the fridge and freezer compartments. Here's a simplified breakdown:
Periodically, usually several times a day, a heating element located near the evaporator coils activates. This element warms the coils just enough to melt any accumulated frost and ice without significantly raising the internal temperature of the refrigerator. The melted water then drips into a small drain hole, typically located at the bottom of the freezer compartment. This drain hole leads to a tube – the defrost drain line – which channels the water down to a shallow pan, known as the evaporator pan, situated beneath the refrigerator. The water in the evaporator pan then naturally evaporates back into the air, completing the cycle. This entire process is designed to be invisible and maintenance-free for the homeowner. However, over time, small food particles, crumbs, and even ice chips can be washed into the drain hole. These debris, sometimes combined with algae or mold growth due to the damp, cool environment, can accumulate and form a blockage in the drain line. When this blockage occurs, the melted defrost water has nowhere to go. Instead of flowing into the evaporator pan, it backs up, overflows the internal drain channel, and eventually seeps out from under the freezer door or trickles down the back wall of the refrigerator, ultimately pooling on your kitchen floor. The location of the leak can sometimes help diagnose where the blockage or overflow is occurring within the internal system. If the water appears to be coming from inside the freezer or flowing from beneath the freezer door, it's a strong indicator of a clogged defrost drain. If the water appears to be pooling from under the refrigerator near the back, it still points to the same issue, as the overflowing water will eventually find its way out.
Step-by-Step Fix
Safety First — Always unplug your refrigerator before attempting any repairs. This prevents electrical shock and accidental activation.
-
Empty the Freezer and Locate the Drain Hole — Clear all food and shelves. Remove all food items from your freezer and place them in a cooler. Remove any shelves, drawers, or ice maker components that obstruct your view of the back wall. The defrost drain hole is typically a small opening at the bottom of the freezer's back wall, sometimes hidden behind a panel.
- Tip: Refer to your refrigerator's owner's manual for the exact location of the defrost drain if you're having trouble.
-
Access the Evaporator Cover — Remove the rear freezer panel. In most top-freezer and some side-by-side models, the drain hole is directly accessible. However, many models require removing a rear panel inside the freezer to expose the evaporator coils and the drain opening. This panel is usually held by screws (Phillips or Torx).
- Tools: Screwdriver set corresponding to your refrigerator's fasteners.
-
Inspect for Ice and Debris — Look for visible blockages. Once the drain hole is visible, carefully inspect it for any ice buildup, food particles, or other debris. Use a flashlight if needed. There may be a solid plug of ice over the drain.
- If there's ice: Use a hairdryer on a low setting or a cup of warm water to carefully melt the ice. Avoid using sharp objects that could puncture the plastic liner or evaporator coils.
-
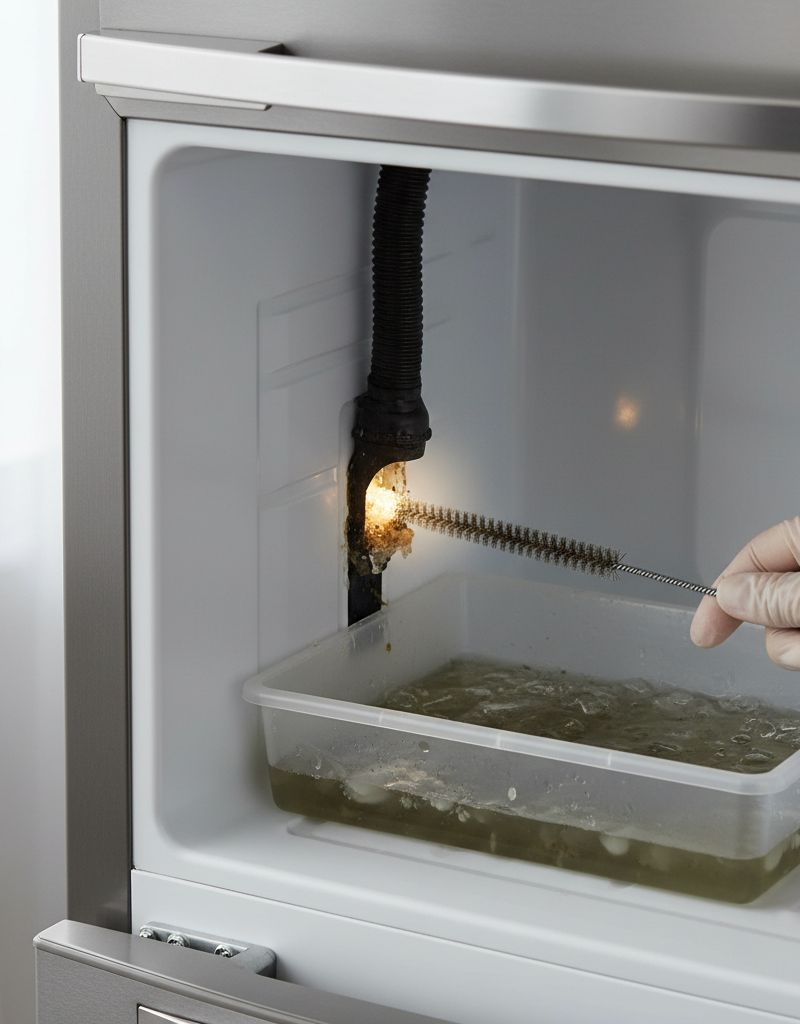
Clear the Drain Hole — Use a small, flexible tool. Once any ice is melted, use a long, flexible tool like a pipe cleaner, a small bottle brush, or a piece of weed eater line to gently push into the drain opening. Work it back and forth to dislodge any blockage. You might feel resistance if there's a significant clog.
- Alternative: Some online guides suggest pouring a mixture of hot water and baking soda or a dilute bleach solution down the drain to kill mold and flush debris. Use this sparingly and ensure it drains completely.
-
Access the Drain Pan (Optional but Recommended) — Locate the pan underneath. The other end of the defrost drain tube empties into a shallow pan (evaporator pan) located beneath the refrigerator, usually near the compressor. You'll often need to pull the refrigerator away from the wall and remove a rear access panel held by a few screws.
- Safety: Be mindful of sharp edges and hot components (like the compressor) when working in this area.
-
Clear the Drain Tube — Flush from both ends. If you can access the drain pan, you might see the end of the drain tube. Clean any sludge or debris from the pan. Then, use a small, stiff brush or a piece of flexible wire to clean the drain tube from this end, pushing upwards. A turkey baster filled with warm water can also be used to flush water up the tube from the pan to help dislodge blockages from the bottom up.
-
Test the Drain — Pour water into the freezer drain. Once you believe the drain is clear, pour about half a cup of warm water into the freezer's drain hole. The water should flow freely and quickly into the evaporator pan beneath the refrigerator. If it backs up, repeat steps 4-6.
-
Clean the Evaporator Pan — Remove standing water and debris. While you're under the fridge, clean out the evaporator pan. It often accumulates dust, debris, and sometimes even mold or algae. A sponge and some all-purpose cleaner work well. A clean pan ensures efficient evaporation and prevents odors.
-
Reassemble and Restore Power — Put everything back together. Once you're sure the drain is clear and everything is clean, reassemble any panels, shelves, and components you removed. Push the refrigerator back into place, taking care not to pinch any lines or cords. Plug the refrigerator back in. Monitor for any new leaks over the next 24-48 hours.
Common Causes
- Food Debris and Crumbs: Small particles from spilled food or packaging can easily fall into the drain hole, especially in the freezer compartment, and accumulate over time.
- Ice Buildup: Despite the defrost cycle, excessive ice buildup due to a faulty defrost heater or thermostat can overwhelm the drain, or ice can form directly in the drain line, blocking it.
- Algae or Mold Growth: The damp, cool environment of the drain line and evaporator pan is an ideal breeding ground for mold and algae, which can form a slimy blockage.
- Drain Tube Misalignment: Less common, but the drain tube itself can become dislodged from the drain hole or the evaporator pan, causing water to drip outside the intended path.
- Freezer Door Seal Issues: While not a direct drain clog, a poorly sealing freezer door can lead to excessive frost buildup, which produces more defrost water than the system can handle, potentially overwhelming a partially clogged drain.
Common Mistakes
- Ignoring the Leak: A small puddle can quickly become a big problem. Ignoring it can lead to costly floor damage, subfloor rot, and mold growth. Address leaks immediately.
- Using Sharp Objects to Clear Ice: Poking at ice in the drain hole with a screwdriver or knife can easily puncture the delicate plastic liner or even the evaporator coils, leading to much more expensive repairs. Always use warm water or a hairdryer.
- Forgetting to Unplug the Refrigerator: Working on any appliance with power connected is extremely dangerous. Always unplug the unit from the wall outlet before starting any work.
- Failing to Clean the Evaporator Pan: Even if the drain itself is cleared, a dirty evaporator pan full of sludge can cause odors and reduce the efficiency of water evaporation. Clean it thoroughly.
- Not Testing the Fix: After clearing the drain, always pour water down the freezer drain and verify it flows freely into the evaporator pan. This confirms the repair before you put everything back together.
- Assuming the Ice Maker is the Only Cause: While ice makers can leak, a clogged defrost drain is far more common for puddles under the fridge. Don't jump to conclusions without proper diagnosis.
Cost & Time Breakdown
| Task | DIY Cost | Pro Cost | Time |
|---|---|---|---|
| Initial Diagnosis | $0 | $75–$150 | 5–15 minutes |
| Clear Defrost Drain | $0–$10 | $150–$300+ | 30–60 minutes |
| Clean Evaporator Pan | $0 | Included | 10–20 minutes |
| Reassembly & Testing | $0 | Included | 15–30 minutes |
| Overall Estimated Total | $0–$10 | $250–$450+ | 1–2 hours |
Tips & Prevention
- Regular Cleaning: Periodically (e.g., every 6-12 months) remove food items from the freezer and quickly check the drain hole for any visible debris. A quick wipe can prevent future clogs.
- Avoid Overpacking the Freezer: Overpacking can sometimes restrict airflow and lead to increased frost buildup, putting more strain on the defrost system.
- Ensure Proper Door Seals: Check your refrigerator and freezer door gaskets regularly for cracks or gaps. A simple test is to close the door on a dollar bill – if you can pull it out easily, the seal is weak. Poor seals lead to more humidity and ice.
- Keep the Refrigerator Level: An unlevel refrigerator can cause water to pool unevenly in the evaporator pan or even prevent proper drainage. Use a level and adjust the leveling feet if necessary.
- Clear the Back of the Fridge: Dust and debris accumulating on condenser coils (often on the back or underneath) can make the refrigerator work harder, potentially impacting the defrost cycle. Clean these annually.
- Consider a Drain Kit: For recurrent issues caused by algae, some manufacturers offer special drain line kits with anti-algae tablets or improved drain tubes. Consult your refrigerator's brand for options.
When to Call a Professional
While a clogged defrost drain is a common DIY fix, there are several instances when calling a qualified appliance repair technician is recommended. If you've followed these steps and the leak persists, or if you suspect the issue is more complex, it's time to call in a pro. Persistent leaks could indicate a faulty defrost heater, a malfunctioning defrost thermostat, a broken evaporator fan, or a damaged evaporator pan. These components require specialized diagnostic tools and expertise to replace correctly. Furthermore, if the leak is accompanied by unusual noises from the refrigerator, significant temperature fluctuations (food spoiling quickly), or visible damage to internal components, a professional assessment is crucial. Repairing refrigeration sealed systems (involving refrigerant gas) or complex electrical faults should always be left to a licensed and experienced appliance technician, as improper handling can be dangerous and lead to further damage. Don't hesitate to call if you're uncomfortable at any point or if the repair seems beyond your skill level.
Related Articles
Keep troubleshooting with these hand-picked guides from FixlyGuide:
- The Secret Culprit Behind Your Leaky Refrigerator (It’s Not Always the Water Line) — Discover the most common, often overlooked, reasons your refrigerator is leaking water and how to fix them with simple DIY steps.
- The Secret Culprit Behind Your Leaking Refrigerator (It’s Not Always a Big Fix) — Discover the most common and often overlooked reasons why your refrigerator is leaking water on the floor, and how to fix them yourself.
- Refrigerator Leaking Water? Easy Fixes for Common Causes — A refrigerator leaking water on the floor is a common household problem often caused by a clogged defrost drain or a misaligned drain pan,…
- The Secret Culprit Behind Your Leaky Refrigerator (It’s Not Always a Hose) — Discover the hidden causes of your refrigerator leaking water and how to fix them with our comprehensive troubleshooting guide.
- The #1 Overlooked Reason Your Chimney Leaks (It Rots Your Roof!) — Discover the surprising, often-missed culprit behind your leaky chimney and how this common issue can silently damage your home.
- Showers Gone Cold? One Hidden Culprit Behind Your Missing Hot Water — Discover the most common, often overlooked reason your shower runs cold and how to fix it with simple steps.
Get the print-ready PDF of this guide
A clean, ad-free, printable version you can keep on your phone or pin to the workshop wall. We'll also send occasional weekly tips matched to your home situation.
- Print-optimized layout
- Tools, materials & every step included
- Unsubscribe anytime
Frequently asked questions
Why is my refrigerator leaking water inside?+
Water leaking inside the refrigerator, especially in the freezer or dripping from internal vents, often points to a clogged defrost drain line. The melted ice from the defrost cycle cannot drain properly and backs up into the compartment.
Can a clogged drain line damage my refrigerator?+
While a clogged drain line itself won't typically 'damage' the internal mechanics of the refrigerator, the constant presence of water can lead to rust, corrosion, and encourage mold and mildew growth within the appliance and on your floors, which can be a health hazard and cause structural damage to your home.
How do I prevent my refrigerator drain from clogging again?+
Regularly inspect the drain hole in the freezer for debris and clear it if necessary. Avoid overpacking the freezer, ensure door seals are tight, and periodically clean the evaporator pan and condenser coils. Some homeowners also use a small amount of warm water or a dilute bleach solution to flush the drain every few months as a preventative measure.


Discussion
Loading comments…