
Tools & materials you'll need
Affiliate links- AmazonHairdryerStandard home hairdryer, not a specialty heat tool
- AmazonHeat GunOptional, if hairdryer isn't effective; use on lowest setting only
- AmazonWork GlovesProtects hands from hot pipes or water
- AmazonFlashlight or HeadlampFor inspecting dark areas
- AmazonInfrared ThermometerOptional, for precise temperature checks
As an Amazon Associate FixlyGuide earns from qualifying purchases — at no extra cost to you. Prices and availability are accurate as of publication and subject to change.
How it works
The science behind a frozen pipe bursting is a lesson in hydraulic pressure. Water possesses a unique physical property: it expands by approximately 9% when it freezes into ice. Within the rigid, confined space of a pipe, this expansion creates a powerful force. However, the direct expansion of ice is not typically what ruptures the pipe. The real danger comes from the immense water pressure that builds up between the ice blockage and a closed faucet.
As a section of pipe freezes, it forms an ice plug. Water flowing from the supply line stops at this plug. As the temperature continues to drop, the ice plug grows, compressing the trapped, unfrozen water between it and the nearest closed fixture. This hydraulic pressure can skyrocket to over 2,500 pounds per square inch (PSI), far exceeding the pressure tolerance of standard residential plumbing. Copper pipes, for instance, are often rated for a maximum of 300-500 PSI. Under this extreme stress, the pipe wall will fail, usually at its weakest point—a fitting, a joint, or a thin spot—which may be located yards away from the actual ice blockage. Thawing a pipe safely involves gently melting the ice, starting from the faucet side, to create an escape path for this high-pressure water and prevent a catastrophic burst.
Step-by-Step Fix
Before beginning, ensure you have a fire extinguisher, several old towels, and a bucket nearby. Wear gloves for protection. Your primary goal is to apply gentle, indirect heat to avoid shocking the pipe material or causing a steam explosion.
-
Shut Off the Main Water Supply — Prevent a potential flood before you start. Locate your home's main water shutoff valve. This is typically found in a basement, crawl space, or utility closet where the water service line enters the house. Turn the valve clockwise until it is fully closed. This step ensures that if the pipe is already cracked or bursts during thawing, you won't have an uncontrolled flood.
-
Turn Off the Water Heater — Protect your appliance from damage. If the freeze affects your hot water lines, shut down your water heater. For a gas heater, turn the control knob to the "Pilot" or "Off" setting. For an electric heater, turn off the corresponding circuit breaker in your electrical panel. This prevents the heating elements from burning out if the tank drains.
-
Open the Affected Faucets — Create an escape route for pressure. Go to the faucet(s) fed by the frozen pipe and open both the hot and cold taps completely. This crucial step relieves trapped pressure from melting water and steam. It also serves as an indicator; a trickle of water will signal that the thawing process has begun.
-
Pinpoint the Frozen Section — Isolate the exact location of the ice plug. Trace the plumbing back from the non-working faucet into unheated areas like basements, crawl spaces, or cabinets against exterior walls. Look for visible signs like frost, condensation, or a slight bulge on the pipe's surface. The pipe will also feel significantly colder to the touch than surrounding sections.
- Pro Tip: If there are no visible clues, an infrared thermometer can non-destructively detect the coldest spot on the pipe, accurately pinpointing the blockage.
-
Choose a Safe Heating Tool — Select the right tool for gentle, controlled heat. Never use an open flame. Have your tools ready before proceeding.
- Best for accessible pipes: A standard hairdryer on a medium or high setting.
- For hands-free operation: An electric heating cable specifically designed for thawing pipes (UL-listed).
- For areas near flammable materials: Towels soaked in hot water and wrapped around the pipe.
- Use with extreme caution: A heat gun on its lowest setting, kept at a significant distance from the pipe.
-
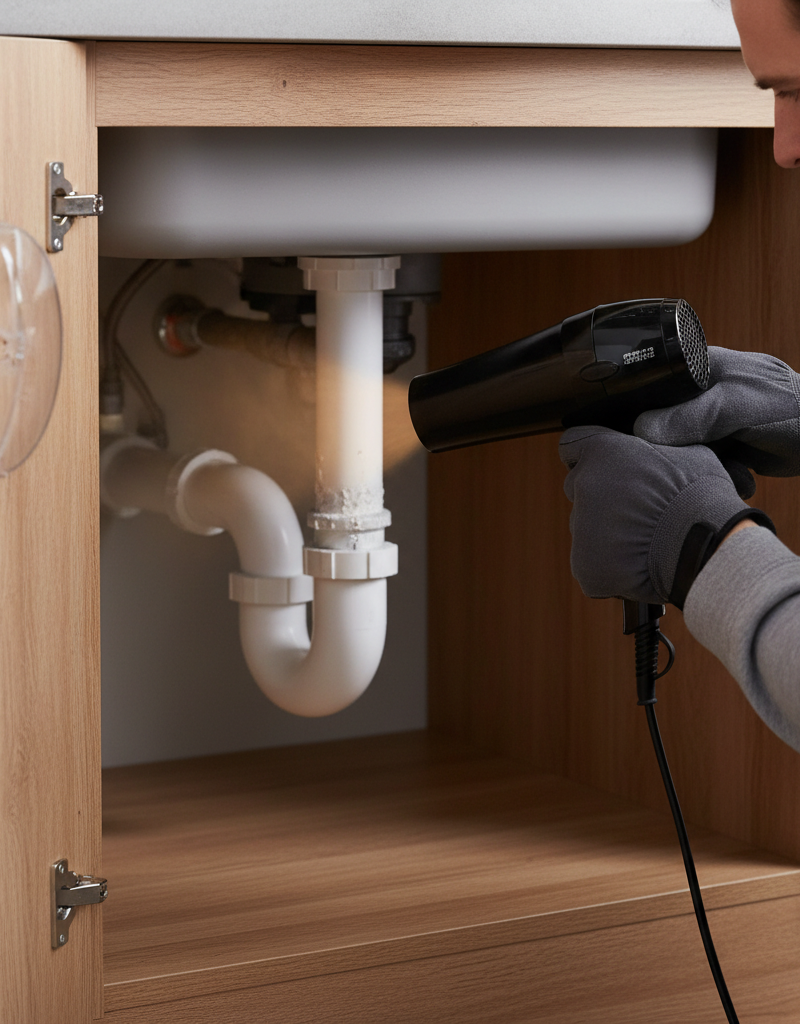
Apply Heat Starting From the Faucet Side — Work from the exit back to the blockage. This is the single most important technique for safe thawing. Begin applying heat to the pipe as close to the open faucet as possible. Slowly and deliberately work your way backward along the pipe toward the frozen section. This method melts the ice plug from the inside out, allowing water to flow out of the open faucet instead of building up pressure behind the blockage.
-
Use the Hairdryer or Heat Gun Method — Maintain constant motion to distribute heat. Hold the hairdryer or heat gun 6 to 10 inches away from the pipe surface. Keep the device moving back and forth over a one- to two-foot section at a time. Do not focus on a single spot, as this can overheat the pipe and surrounding materials, potentially causing a rupture or fire.
-
Use the Hot Towel Method — Employ this safe but slower technique. If the pipe is in a tight space or near flammable insulation, this is your safest option. Soak towels in hot (not boiling) water, wring them out, and wrap them securely around the pipe section. Replace the towels with freshly heated ones every 5 to 10 minutes until water flow is restored.
-
Monitor the Faucet for Restored Flow — Watch for the sign that the blockage is clearing. Keep an eye on the open faucet. You will first notice a drip or trickle, which will gradually increase to full, steady flow as the ice plug completely melts. This process can take anywhere from 15 minutes to over an hour.
-
Inspect for Leaks After Thawing — Confirm the pipe's integrity before restoring full pressure. Once water is flowing normally, close the faucet. Carefully dry the entire length of the thawed pipe with a clean cloth. Then, run a dry paper towel along the bottom of the pipe and around every joint and fitting. The paper will immediately show dark spots if there are any pinhole leaks or hairline cracks.
-
Slowly Reopen the Main Water Supply — Bring your system back online carefully. Return to your main shutoff valve. Turn it counter-clockwise very slowly, about a quarter turn at a time. Listen for any unusual sounds. Opening the valve too quickly can cause a "water hammer"—a hydraulic shockwave that can damage pipes, joints, and fixtures. Once the valve is fully open, perform one final leak inspection on the thawed pipe.
Common mistakes
- Using an Open Flame. Never use a propane torch, butane lighter, or any other open-flame device to thaw pipes. This practice is a leading cause of house fires. The intense, concentrated heat can also boil the water inside the pipe, creating a steam explosion that ruptures the metal and sends scalding water and shrapnel flying. Instead: Use a hairdryer or hot towels for safe, gentle heat.
- Applying Heat to the Middle of the Freeze. Heating the center of a blockage traps water between two solid ice plugs. As that water heats and expands, it creates immense pressure with no escape route, making a pipe burst almost inevitable. Instead: Always start applying heat at the faucet end of the pipe and work your way backward toward the blockage.
- Forgetting to Open the Faucet. Thawing a pipe with the faucet closed creates a sealed pressure vessel. As the ice melts and turns to water and steam, pressure builds rapidly, significantly increasing the risk of a burst. Instead: Always open the faucet connected to the frozen line before applying any heat.
- Ignoring a Small Leak After Thawing. A tiny drip or a wet spot is not a minor problem; it is a clear sign that the pipe has sustained a crack. This "pinhole" leak will not fix itself and will eventually worsen, leading to persistent moisture, mold growth, and structural rot. Instead: If you discover any leak, immediately shut off the main water supply and call a plumber to replace the damaged section of pipe.
- Thawing Too Quickly. The goal is to melt the ice, not cook the pipe. Blasting a pipe with high heat from a heat gun on its max setting or placing a powerful space heater directly against it can cause uneven expansion, stressing the metal or plastic and leading to failure. Instead: Be patient. Apply low, indirect heat and allow the process to happen gradually.
Cost & time breakdown
Costs are estimates and can vary based on your location, the complexity of the job, and the plumber's hourly rates. Emergency call-out fees will be higher.
| Task | DIY Cost | Pro Cost | Time |
|---|---|---|---|
| Locating & Thawing Exposed Pipe (e.g., in basement) | $0 - $30 (for hairdryer or heat tape) | $200 - $450 | 1 - 3 hours |
| Thawing a Pipe Behind a Wall (No Cutting) | Not Recommended | $300 - $700+ (using thermal cameras, specialized heaters) | 2 - 5 hours |
| Repairing Minor Crack in Exposed Copper Pipe | $30 - $75 (for fittings, pipe, torch, solder) | $250 - $600 | 2 - 4 hours |
| Thawing & Repairing Pipe in Wall (with Drywall Cut) | $100 - $250 (pipe parts, drywall, paint) | $600 - $2,000+ | 4 hours - 2 days |
| Proactive Pipe Insulation (Foam Sleeves) | $2 - $4 per linear foot | $200 - $500 (for targeted areas) | 2 - 4 hours |
| Emergency Water Damage Cleanup (Initial Phase) | $100+ (wet-vac rental, fans) | $1,500 - $4,000+ (professional remediation service) | Varies Widely |
When to call a pro
While thawing an exposed pipe is a manageable DIY task, certain situations require professional expertise to prevent further damage. Call a licensed plumber immediately if you encounter any of the following:
- The pipe has already burst. If you see water actively spraying or pooling, your first calls should be to a plumber for an emergency visit and then to your insurance company. Shut off the main water supply immediately.
- You cannot locate the frozen section. If there are no visible signs of a freeze and multiple fixtures are affected, the blockage is likely in an inaccessible area. Plumbers use thermal imaging cameras and other diagnostic tools to find hidden freezes without needless destruction.
- The frozen pipe is inside a wall, ceiling, or floor. Accessing these pipes requires cutting into finished surfaces. A professional can do this with minimal damage and has the tools and experience to perform the subsequent pipe and drywall repair correctly.
- You've tried thawing for an hour with no success. If gentle heating has not produced at least a trickle of water after 60-90 minutes, the ice blockage may be longer or more solid than you can handle with DIY methods.
- Multiple pipes are frozen. If pipes in several different areas of your home are frozen, it indicates a systemic insulation or heating problem that a professional should assess.
Prevention & maintenance
Preventing a freeze is far less stressful and costly than fixing one. Integrate these tasks into your yearly home maintenance routine.
- Insulate All Vulnerable Pipes. The most effective preventive measure is to wrap any water pipes that pass through unheated or poorly insulated spaces. Use foam pipe sleeves or fiberglass insulation on plumbing in crawl spaces, basements, attics, garages, and on exterior walls.
- Seal Air Leaks in Your Home's Envelope. Use caulk or expanding spray foam to seal cracks, gaps, and holes in your foundation and around the sill plate where cold outside air can blow in. Pay close attention to openings drilled for pipes, electrical wires, and vents.
- Maintain a Minimum Thermostat Setting. During cold weather, never set your thermostat lower than 55°F, even when you are away from home or asleep. The ambient heat is critical for protecting pipes hidden inside walls and floors. For sinks on exterior walls, open cabinet doors during extreme cold snaps to let warmer room air circulate around the pipes.
- Let Faucets Drip in Extreme Cold. When temperatures are forecast to drop into the single digits or below, allow faucets fed by historically vulnerable pipes to drip slowly. A continuous drip of both hot and cold water prevents static water from freezing solid in the line.
- Drain Exterior Water Lines. Before the first hard freeze of the season, disconnect garden hoses from outdoor spigots. If you have older spigots, find the interior shutoff valve for that line, close it, and then open the outside spigot to drain any trapped water.
- Upgrade to Frost-Proof Sillcocks. Consider replacing conventional outdoor spigots with modern frost-proof sillcocks. These fixtures are designed with a long stem that places the water shutoff valve deep inside the heated part of your home, preventing freezes at the exterior wall.
Related Articles
Keep troubleshooting with these hand-picked guides from FixlyGuide:
- Your Frozen Pipe Could Flood 10,000 Gallons. Here's Why. — Thawing a frozen pipe safely is crucial to prevent bursting and water damage. This guide shows you how to identify, locate, and thaw frozen…
- Is a frozen pipe about to burst? 3 ways to fix it fast — Safely thawing a frozen pi
Get the print-ready PDF of this guide
A clean, ad-free, printable version you can keep on your phone or pin to the workshop wall. Free with a FixlyGuide account.
- Print-optimized layout
- Tools, materials & every step included
- Saved to your account
Frequently asked questions
How do you tell if a pipe is frozen but not burst?+
The most common sign of a frozen pipe that hasn't burst is a complete loss of water pressure or a mere trickle from a faucet. You might also see frost on the outside of a pipe, or a slight bulge if the ice has expanded significantly. Be cautious, as a pipe can freeze without bursting immediately, but the risk of bursting remains until it's thawed.
Can I thaw a pipe with a heat gun?+
Yes, a heat gun can be used to thaw a frozen pipe, but it must be used with extreme caution. Set the heat gun to its lowest possible setting and keep it moving constantly, never focusing on one spot. Hold it at least 6-8 inches away from the pipe. Overheating can damage plastic pipes, melt solder joints on copper, or even cause the pipe to burst due to rapid internal pressure changes. A hairdryer is generally safer due to lower heat output.
How long does it take to thaw a frozen pipe?+
The time it takes to thaw a frozen pipe varies widely depending on the pipe's material, its diameter, the extent of the freeze, and the effectiveness of your heating method. A small, superficial freeze might clear in 20-30 minutes with a hairdryer, while a deeply frozen, larger pipe could take several hours of consistent, gentle heat. Patience is key; rushing the process can lead to pipe damage.
What happens if a frozen pipe bursts?+
If a frozen pipe bursts, it will typically release a significant amount of water once the ice blockage thaws. This can cause widespread water damage to walls, floors, ceilings, furniture, and electrical systems. Immediately shut off your main water supply if you suspect a burst pipe, then call a professional plumber and assess the damage. Prompt action can mitigate further costly repairs and prevent mold growth.
How do you prevent pipes from freezing in the future?+
To prevent pipes from freezing, insulate pipes in unheated areas like basements, crawl spaces, and attics. Seal air leaks around your home's foundation and exterior walls. During extreme cold, open cabinet doors under sinks on exterior walls to allow warm air to circulate, and consider letting a small trickle of water run from a faucet furthest from the main supply to keep water moving and relieve pressure in the pipes.


Discussion
Loading comments…