- Empty and Unplug the Refrigerator — Before doing anything else, move all food items from the freezer and refrigerator to a cooler or another fridge. Unplug the refrigerator from the wall outlet. This is crucial for your safety.
- Tip: Place towels immediately around the base of the fridge to soak up any existing water and prevent further floor damage.
- Tools: Phillips head screwdriver, nut driver (if applicable)
- Pro Tip: Take photos with your phone as you disassemble parts to help you remember how to put them back together.
- If this doesn't work: If water backs up immediately, the clog is likely deeper.
Plumbing · Leak
| Project category | Plumbing |
|---|---|
| Problem type | Leak |
| Trade required | Plumbing |
| Urgency | Emergency — act now |
| Safety risk | High safety risk |
| DIY suitability | DIY for experienced homeowners |
| Cost category | Low cost |
| Typical timeline | Shut water off now; repair usually same or next day |
| Contractor type | Licensed plumber |
Repair option
Isolate at the shutoff, replace the failed component, and dry the cavity fully.
Replacement option
Repipe the run or the branch when corrosion is widespread.
Common causes
- Failed supply line or shutoff valve
- Worn washers, cartridges, or P-trap connections
- Pinhole corrosion in older copper
Relevant tools:emergency checklistdiy or hire a pro
Published July 24, 2026Last updated August 17, 2026
Tools & materials you'll need
Affiliate linksAs an Amazon Associate FixlyGuide earns from qualifying purchases — at no extra cost to you. Prices and availability are accurate as of publication and subject to change.
Quick Answer
Is your refrigerator leaking water on the floor, creating a troublesome puddle? The overwhelming likelihood is a clogged defrost drain line. This common issue occurs when food particles, ice, or mold accumulate in the drain tube, obstructing the path for defrost water to flow into the drain pan beneath the unit. Instead of evaporating, this water builds up and spills out, often appearing at the front of the refrigerator. The good news is that this problem is typically easy to diagnose and fix with basic tools and a bit of hands-on effort.
The Problem
You've discovered a puddle of water around the base of your refrigerator, or perhaps even inside the crisper drawers. This isn't just an annoying mess; persistent leaks can damage your flooring, lead to mold growth, and potentially create a slipping hazard. While there are several reasons a refrigerator might leak, the most prevalent and often overlooked culprit is a blockage in the defrost drain line. This happens in both top-freezer and bottom-freezer models, as well as side-by-sides.
The leak usually starts subtly, perhaps just a few drops, but can quickly escalate to a significant puddle. You might notice ice build-up in the freezer compartment that seems excessive, or even water pooling under crisper drawers before it makes its way to the floor. Ignoring the issue won't make it go away; in fact, it can worsen, potentially leading to more extensive damage or even appliance malfunction.
How It Works
Most modern refrigerators use an automatic defrost system to prevent the build-up of ice on the evaporator coils in the freezer compartment. This system typically activates a heating element several times a day to melt any accumulated frost. The resulting meltwater then needs a clear path to drain away. This is where the defrost drain line comes in.
The defrost drain line is a narrow tube, often made of plastic or rubber, that runs from a collection pan located beneath the evaporator coils down to a drain pan situated at the bottom of the refrigerator, usually near the compressor. The water collects in this drain pan and is then evaporated by the heat generated from the compressor. This is why you rarely see or need to empty a drain pan on a modern refrigerator.
However, this delicate system can be interrupted. Food crumbs, ice shards, mold, or even bacteria can enter the drain opening in the freezer and begin to accumulate. Over time, these obstructions form a clog, effectively creating a dam. When the defrost cycle runs, the meltwater has no escape route. It overflows the collection pan, flows down the back wall of the freezer or refrigerator, and eventually seeps out onto your kitchen floor, signaling a problem that needs immediate attention.
Step-by-Step Fix
Safety First — Always unplug your refrigerator before attempting any repairs. Water and electricity are a dangerous combination. Use caution when moving the appliance to avoid pinching power cords or water lines.
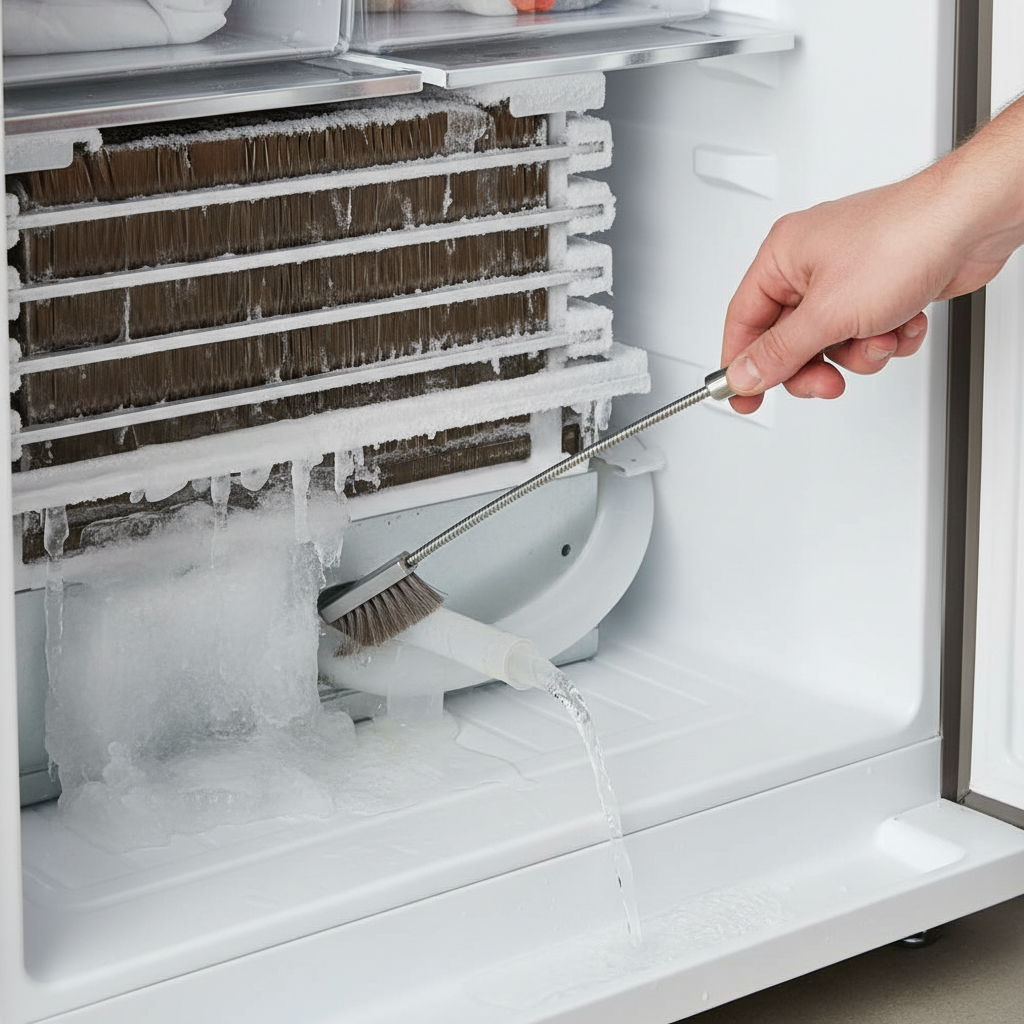
- Empty and Unplug the Refrigerator — Before doing anything else, move all food items from the freezer and refrigerator to a cooler or another fridge. Unplug the refrigerator from the wall outlet. This is crucial for your safety.
- Tip: Place towels immediately around the base of the fridge to soak up any existing water and prevent further floor damage.
- Locate the Defrost Drain Opening — In most top-freezer models, the drain opening is at the back bottom of the freezer compartment, often under an access panel. In bottom-freezer and side-by-side models, you'll need to remove shelves and sometimes the back panel of the freezer to expose the evaporator coils and the drain trough underneath.
- Tools: Phillips head screwdriver, nut driver (if applicable)
- Pro Tip: Take photos with your phone as you disassemble parts to help you remember how to put them back together.
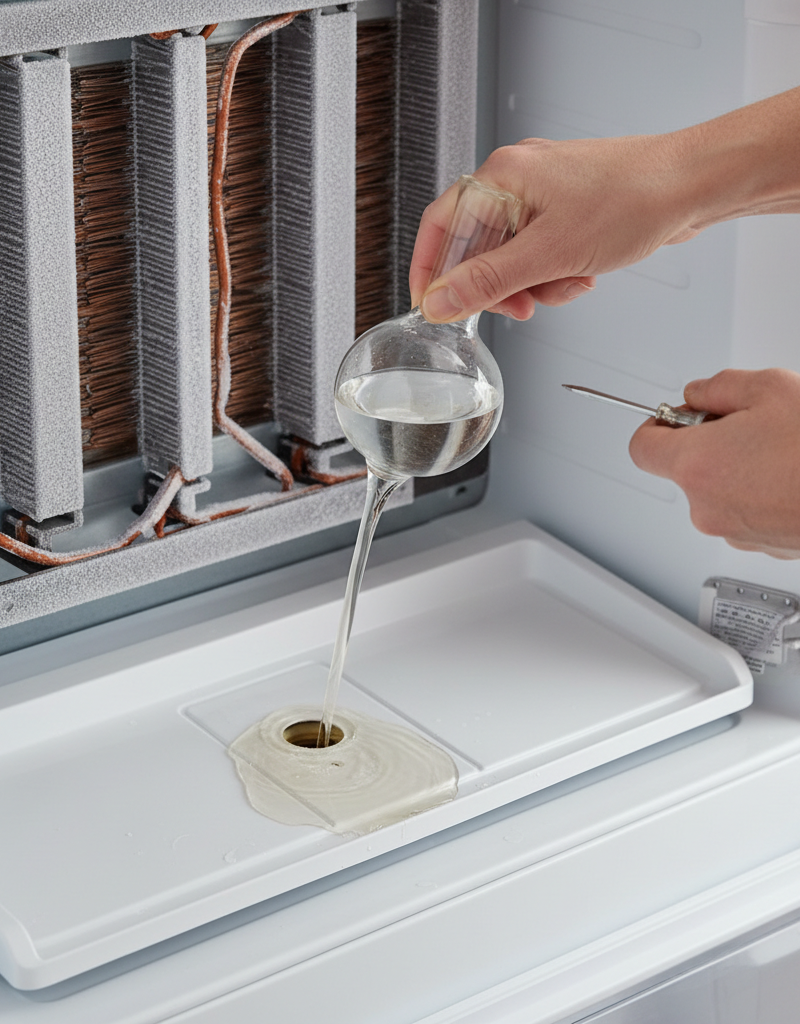
- Clear Visible Obstructions — Once the drain opening is visible, use a turkey baster or a syringe filled with warm water (not boiling) and a few drops of bleach (to kill mold) to flush the drain. You can also use a small, flexible brush (like a bottle brush or a refrigerator drain cleaning brush) to manually clear any gunk or ice near the opening.
- If this doesn't work: If water backs up immediately, the clog is likely deeper.
- Access the Drain Pan — Carefully pull the refrigerator away from the wall. Locate the drain pan, which is typically found underneath the unit, often recessed behind a kickplate or directly above the compressor. You might need to remove a rear access panel held by a few screws.
- Caution: The compressor can be hot. Avoid touching it directly.
- Clean the Drain Pan — Once you've located the drain pan, carefully slide it out. It will likely contain stagnant water, sludge, or even mold. Empty the pan, wash it thoroughly with warm, soapy water and a splash of bleach, and rinse completely. Look for the end of the drain tube entering the pan and ensure it's not blocked.
- Unclog the Drain Tube from Below — From the back of the refrigerator, locate the end of the defrost drain tube that empties into the drain pan. Use a small, stiff wire (like a straightened coat hanger with a small hook at the end) or a flexible drain auger (specifically designed for appliance drains) to gently push up into the drain tube to dislodge any remaining clog. You can also use the turkey baster with the bleach solution from this end, pushing it up into the tube.
- Safety: Wear gloves if using bleach or dealing with moldy residue.
- Flush and Test — Once you believe the clog is clear, pour warm water (about 1-2 cups) down the drain opening inside the freezer/refrigerator to test the flow. The water should flow freely down into the drain pan. Check the drain pan to confirm the water is collecting there as expected.
- Reassemble and Monitor — Once you're satisfied the drain is clear and water flows freely, reassemble all removed panels and parts. Push the refrigerator back into place, taking care not to crimp the water line (if applicable) or the power cord. Plug the refrigerator back in and monitor for several days to ensure the leak does not return.
Common Causes
- Food Debris & Crumbs: The most common culprit. Small food particles, especially in the freezer, can fall into the defrost drain opening and accumulate, leading to a blockage.
- Ice Build-up: If the defrost heater malfunctions or the drain line itself gets too cold, ice can form within the tube, completely blocking the flow of meltwater.
- Mold and Mildew: Over time, in a damp, cool environment, mold and mildew can grow inside the drain tube, narrowing its diameter and eventually causing a clog.
- Slime and Algae: Similar to mold, a biological slime can develop in the drain line, especially if the refrigerator is in a humid environment or infrequently cleaned.
- Drain Pan Overflow (less common): Sometimes the drain pan itself can overflow if the humidity is extremely high, or if the refrigerator's evaporator fan isn't working efficiently to aid in evaporation, though clogs are far more frequent.
Common Mistakes
- Ignoring the Safety Precautions: Forgetting to unplug the refrigerator is a serious electrical hazard, especially when dealing with water. Always disconnect power first.
- Using Boiling Water to Clear Ice: While warm water is good, boiling water can damage plastic drain lines and other internal components due to sudden thermal shock.
- Forcefully Pushing the Clog: Aggressively pushing a wire or tool into the drain line can puncture the tube or damage the evaporator coils, leading to a much more expensive repair.
- Not Cleaning the Drain Pan: Just clearing the tube isn't enough if the drain pan itself is full of sludge or mold. A dirty pan can contribute to odors and future clogs.
- Assuming a Serious Appliance Failure: Many homeowners quickly jump to conclusions about a broken compressor or sealed system issue. A clogged drain is much more common and simpler to fix.
- Overlooking the Rear Access Panel: Some models require removing a rear access panel to get to the drain pan and the lower end of the drain line. Failing to do so makes proper cleaning difficult.
Cost & Time Breakdown
| Task | DIY cost | Pro cost | Time |
|---|---|---|---|
| Diagnosing the leak | $0 | $75–$150 | 15–30 min |
| Clearing drain line (DIY) | $0–$15 | (Included in visit) | 30–60 min |
| Cleaning drain pan (DIY) | $0 | (Included in visit) | 15 min |
| Reassembly & testing | $0 | (Included in visit) | 15–30 min |
| Total Estimated Cost | $0–$15 | $75–$250+ | 1–2 hours |
Tips & Prevention
- Regular Cleaning: Periodically clean the interior of your freezer, paying attention to crumbs or spills near the drain opening.
- Check Drain Hole: For models with an easily accessible drain hole in the freezer, occasionally pour a small amount of warm water (with a tiny touch of bleach) into it to flush it out.
- Maintain Temperature: Ensure your refrigerator and freezer temperatures are set correctly. Extreme cold can sometimes contribute to ice formation in the drain line if temperatures fluctuate.
- Clean Drain Pan Annually: If accessible, pull out and clean your refrigerator's drain pan once a year to prevent sludge and mold buildup.
- Use Proper Storage: Avoid overpacking your freezer, which can impede air circulation and lead to frost buildup, indirectly increasing the chance of drain clogs.
- Inspect Door Gaskets: While not directly related to the drain, faulty door gaskets can lead to excess moisture and frost, creating more meltwater and potential clogs.
When to Call a Professional
While a clogged defrost drain is a common DIY fix, there are situations where calling a licensed appliance repair technician is the smartest choice. If you've followed the steps to clear the drain and the leak persists, it could indicate a more serious underlying issue, such as a faulty defrost heater, a malfunctioning defrost thermostat, or a blocked or cracked drain tube that's not accessible through standard cleaning methods. Furthermore, if you notice significant ice buildup that returns quickly after a manual defrost, it might point to a problem with the sealed refrigeration system or a more complex electrical component failure. If you're uncomfortable moving the refrigerator, disassembling internal panels, or if the leak appears to be coming from a water dispenser line or ice maker connection (which is a different type of leak entirely), a professional can diagnose and fix the problem safely and efficiently. Never attempt to repair sealed system components or electrical faults beyond simple connections; these require specialized tools and expertise to avoid further damage or personal injury. A pro can also ensure any warranty remains valid.
Related Articles
Keep troubleshooting with these hand-picked guides from FixlyGuide:
- The Secret Culprit Behind Your Leaky Refrigerator (It’s Not Always the Water Line) — Discover the most common, often overlooked, reasons your refrigerator is leaking water and how to fix them with simple DIY steps.
- The Surprising Culprit Behind Your Refrigerator's Water Leak (It's Not Always the Ice Maker) — Discover the most common, often overlooked reason your refrigerator is leaking water and how to fix it with simple steps.
- The 3 Hidden Reasons Your Refrigerator Leaks Water (And How to Fix Them in 30 Minutes) — Discover the surprising culprits behind a leaking refrigerator and learn simple, effective fixes you can do yourself in under an hour.
- The 3 Hidden Reasons Your Refrigerator Leaks Water (And How to Fix Them in 30 Minutes) — Discover the most common culprits behind a leaking refrigerator and learn how to diagnose and fix them quickly with this comprehensive guid…
- The Secret Culprit Behind Your Leaking Refrigerator (It’s Not Always a Big Repair) — Discover the most common, often overlooked reason your refrigerator is leaking water onto your kitchen floor and how to fix it yourself.
- The #1 Mistake Homeowners Make When Their Ice Maker Stops (And the Easy Fix) — Before you call for service, learn the most common and easily fixable reason your refrigerator's ice maker isn't producing ice.
Should you do this yourself?
Answer five quick questions before you start. Safety outranks savings every time.
Your experience with work like this
How high do you have to work?
Does the job involve any of these?
Will it need a permit?
Specialty tools
Free and instant. Educational guidance only — not a quote, inspection, or professional diagnosis.
Questions to ask before you sign
Ask every contractor the same questions and the cheapest bid stops looking cheapest. Check them off as you go — your progress is saved on this device.
Free, no signup. Bring this to every walkthrough so you compare bids on the same terms.
What should this project cost?
Enter your project details for a realistic cost range before you call anyone.
Common repairs run $150–$650; repipes and water-heater replacements reach $1,500–$4,500.
- Regional adjustment
- National average
- Labor share (typical)
- ~$754
- Quotes to collect
- 3 written estimates
Educational estimate based on national averages — not a binding quote. Always confirm with written local estimates.
Fixly Project Decision Box
- DIY difficulty
- Moderate
- Estimated time
- 30 minutes – half a day
- Cost level
- Moderate
Main tools / materials
- Adjustable wrench
- Plunger or drain auger
- Bucket and towels
- Thread tape
When to stop and call a pro
- Water you cannot shut off at the fixture or main
- Sewage backing up into more than one fixture
- Water near electrical panels or outlets
- Gas water heater work beyond relighting a pilot
Need professional help?
Get a Licensed PlumberHandle this before it gets worse
First steps that limit damage, then a way to reach a qualified pro.
- Emergency repair checklistThe first steps that limit damage before a pro arrives.Open
- Get local estimatesSend one request and compare written estimates from vetted pros.Open
- Estimate this projectGet a cost range for your scope and ZIP before you call anyone.Open
Free, no signup required. Estimates are educational guidance, not a quote or an inspection.
Get the print-ready PDF of this guide
A clean, ad-free, printable version you can keep on your phone or pin to the workshop wall. Free with a FixlyGuide account.
- Print-optimized layout
- Tools, materials & every step included
- Saved to your account
Frequently asked questions
Why is my refrigerator leaking water inside the fridge?+
Water leaking inside the refrigerator, especially into crisper drawers or on shelves, is a strong indicator of a clogged defrost drain line. The water from the defrost cycle is backing up and overflowing inside the compartment instead of draining into the pan below.
Can a clogged drain line damage my refrigerator?+
While it might not immediately damage major components, a persistent water leak from a clogged drain line can lead to mold and mildew growth, damage to internal insulation, rust on metal parts, and severe damage to your kitchen flooring, potentially even subfloor rot if left unchecked.
How often should I clean my refrigerator's defrost drain?+
There's no strict schedule, but if you've experienced a clog, it's wise to flush the drain line with a warm water and bleach solution every 6-12 months. Regularly cleaning crumbs and spills from the freezer compartment can also help prevent future blockages.
What if water is coming from the water dispenser or ice maker line?+
If the leak is specifically from the water dispenser or ice maker supply line, the issue is different from a clogged defrost drain. Check for loose connections, cracked lines, or a faulty water inlet valve. In these cases, you might need to tighten fittings, replace a damaged line, or call an appliance repair professional if the valve is failing.
Discussion
Loading comments…