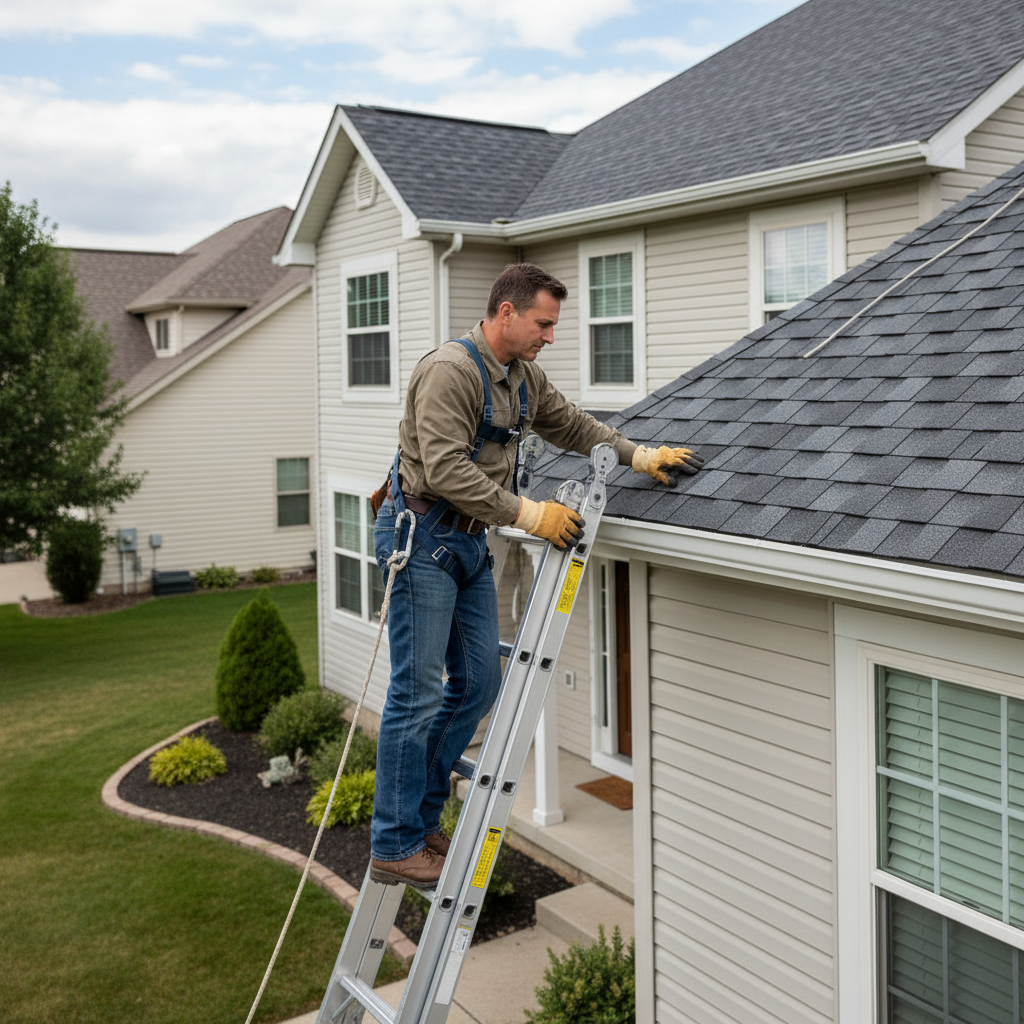
- Damaged or Missing Shingles: Wind, hail, and plain old wear and tear can crack, tear, or knock shingles loose, which exposes the underlayment. That’s a straight shot for water. I see this after just about every big storm.
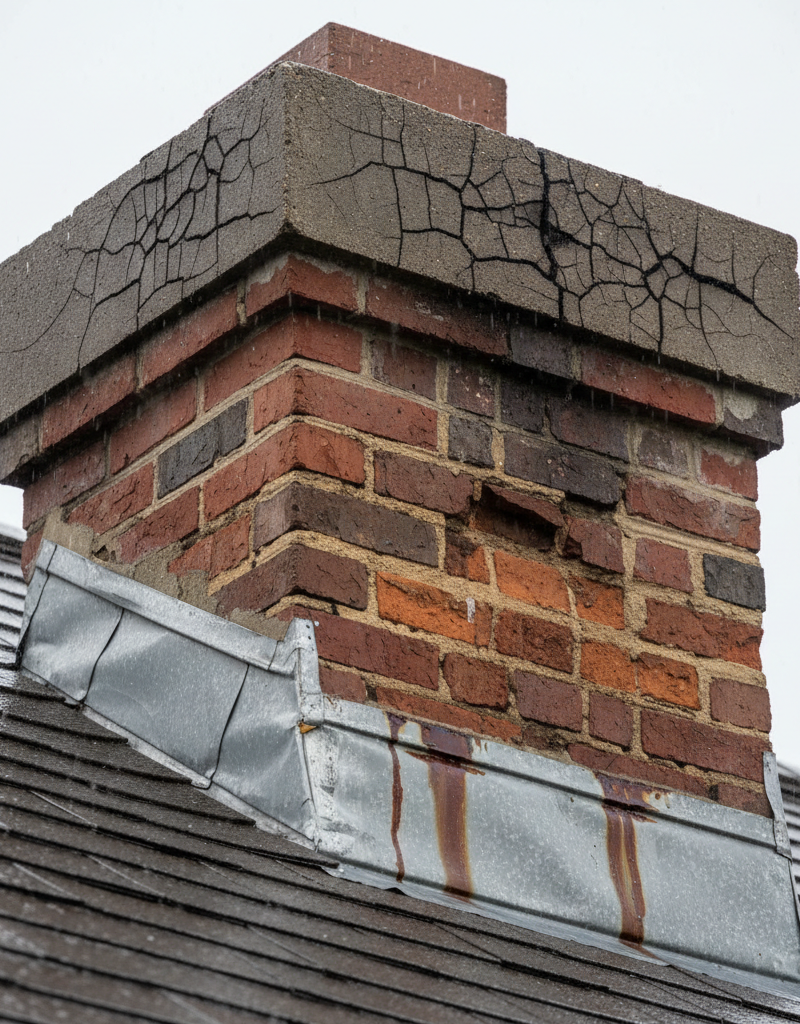
- Compromised Flashing: This is probably the number one culprit. Flashing around chimneys, skylights, and vents is often the first thing to fail when leaks start. It can rust, corrode, bend, or pull away from expansion and contraction.
- Clogged Gutters & Ice Dams: When gutters overflow, water can back up and sit against your fascia boards, then work its way under the eaves. In winter, ice dams do the same kind of damage, pushing melted snow under shingles.
- Worn-Out Vent Boots: The rubber or neoprene collars around plumbing vent pipes break down over time from UV radiation, crack, and let water seep in. I’ve replaced hundreds of those things; they just don’t outlast the roof sometimes.
- Cracked Sealants: Caulk or sealants around roof penetrations or flashing can dry out, crack, and pull away, leaving little highways for water.
Plumbing · Leak
| Project category | Plumbing |
|---|---|
| Problem type | Leak |
| Trade required | Plumbing |
| Urgency | Emergency — act now |
| Safety risk | High safety risk |
| DIY suitability | DIY for experienced homeowners |
| Cost category | Low cost |
| Typical timeline | Shut water off now; repair usually same or next day |
| Contractor type | Licensed plumber |
Repair option
Isolate at the shutoff, replace the failed component, and dry the cavity fully.
Replacement option
Repipe the run or the branch when corrosion is widespread.
Common causes
- Failed supply line or shutoff valve
- Worn washers, cartridges, or P-trap connections
- Pinhole corrosion in older copper
Relevant tools:emergency checklistdiy or hire a pro
Published July 29, 2026Last updated August 17, 2026
Tools & materials you'll need
Affiliate links- AmazonSturdy ladderExtension ladder if needed for roof access, A-frame for attic access
- AmazonBright flashlight or headlamp1
- AmazonGarden hose with adjustable nozzle
- AmazonBinocularsFor ground-level roof inspection
- AmazonMoisture meterOptional, but excellent for confirming dampness in walls/ceilings
As an Amazon Associate FixlyGuide earns from qualifying purchases — at no extra cost to you. Prices and availability are accurate as of publication and subject to change.
Quick Answer
Catching a roof leak before it turns into a major headache and a money pit is all about knowing where to look and what to look for. You’re trying to catch the early warning signs — stuff like water stains on the ceiling, a musty smell up in the attic, or even a crumbly piece of fascia outside. The goal is simple: find where the water’s getting in before it starts pouring through like a busted faucet. I’ve seen folks save thousands just by catching a little drip early. No joke.
The Problem
You’ve got a roof over your head, and if it’s built right, it should be doing its job. But sooner or later, water’s gonna find a way in. It’s not a matter of if — it’s when. And once it does, that tiny drip can turn into a real mess fast: rotted rafters, mold sneaking through drywall, even electrical problems if it tracks through the wrong spot. I remember a job out in Northlake where a homeowner thought his dryer vent was just a little leaky; turns out, a cricket on his roof flashing had rusted through, and for months, water was slowly wicking into his attic, rotting out a nearly 8-foot section of a ceiling joist. That thing was a nightmare. The real problem isn’t just the water getting in; it’s the damage it does while nobody’s looking.
How It Works
To really figure out how to find a leak, you’ve gotta know how the roof keeps water out in the first place. Think of it like a layered defense. The shingles are your first shield, shedding most of the rain down into the gutters. Under that, you usually’ve got underlayment — felt paper or a synthetic membrane — and that’s your backup if a shingle gets damaged. Then there’s flashing. Honestly, that’s one of the biggest players in leak prevention. Flashing is thin sheet metal — usually aluminum or galvanized steel — installed around anything sticking through the roof: chimneys, skylights, vent pipes, valleys where two roof planes meet, even where the roof runs into a wall, like dormer walls.
Those metal pieces are bent and layered so water gets pushed over the shingle below it. If the flashing’s installed wrong, or it corrodes, or it gets bent up, you’ve got an open door for water.
Rain wants to run downhill. That part’s easy. A bad shingle might let some water through to the underlayment, but usually the underlayment sends it farther down to a lower, intact shingle course. The real trouble starts when water gets under the underlayment or slips past the flashing. From there, it can run sideways along rafters, electrical conduits, or the top of ceiling joists for a long way before it finally shows up as a stain in the living room. That’s why the stain you see might be 10 or 15 feet away from the real source. Wind-driven rain can make it worse too, forcing water under shingles that’d normally be just fine. Once you understand that, you start thinking like a detective instead of just staring at a wet spot and hoping it tells you the truth.
Step-by-Step Fix
1. Gear Up Safely — Before you even think about climbing a ladder, get your stuff together and don’t rush it.
- Tools: Sturdy ladder (A-frame or extension, depending on your roof height), work gloves, flashlight (a headlamp’s even better), waterproof marker or chalk, moisture meter (optional, but super helpful).
- Safety: Always have someone spotting you when you’re on a ladder. Don’t get on a wet or icy roof. If you’re shaky on a ladder or you don’t like heights, stay on the ground and stick to the inside inspection. Your safety’s worth a lot more than saving a few bucks.
2. Start Inside: The Attic Hunt — This is usually where I start, and for good reason.
- Get into the attic or crawl space with a strong flashlight. Look for water stains on the underside of the roof decking (that’s the plywood or OSB the shingles sit on), on rafters, or on insulation. Don’t just stare at the ceiling stain and call it a day; water travels. Trace the stain up along rafters and joists.
- Smell Test: A musty, moldy smell is a dead giveaway, even if you can’t see active water. It means moisture’s been hanging around for a while.
- Check Vents: Look at attic vents, bathroom fan exhausts, and plumbing vent pipes for signs of water around the boots or collars. Those are common leak points.
3. Exterior Ground-Level Scan — Before you climb anything, take a good look from the ground with binoculars.
- Damaged Shingles: Look for missing, cracked, curled, buckled, or blistered shingles. Any weird-looking shingle surface can be a way in for water. Pay extra attention around chimneys, skylights, and valleys.
- Gutters & Downspouts: Are the gutters overflowing or packed with debris? Clogged gutters can back water up under the eaves and soffits, and then you’re dealing with rot and leaks inside the house. Make sure the downspouts are carrying water away from the foundation.
4. Get on the Roof (Carefully!) — If it’s safe and you’re comfortable, now’s the time to get a closer look.
- Flashing Inspection: This is the big one. Check all flashing around the chimney, dormers, skylights, and vent pipes. Look for bent, rusted, missing, or poorly sealed flashing. Caulk cracks and pulls away with age. Tiny gaps here turn into big problems in a hurry.
- Vent Pipe Boots: The rubber or plastic boot around plumbing vent pipes often cracks up from UV exposure. Those are prime leak spots.
- Valleys: Check for cracks in the valley flashing or missing granules if it’s a shingled valley. Valleys move a lot of water, so they’ve got to stay watertight.
5. The Garden Hose Test — If you’ve got a likely suspect or you still can’t pin it down, this is your best move.
- Team Up: Get a helper. One person stays in the attic with the flashlight, and the other gets on the roof with a garden hose.
- Systematic Approach: Start at the lowest part of the suspected leak area. Have the person on the roof run water slowly over a small section for several minutes (say, 5-10 minutes). The person in the attic listens and watches.
- Move Up: Work your way up the roof, one section at a time. Don’t soak the whole roof at once or you’ll have no clue where the water started. If you’re testing a chimney, wet just one side first, then move to the next. That slow, methodical approach usually finds the exact entry point. A little food coloring in the water can help too, but I usually don’t bother unless the leak’s being stubborn.
6. Mark It & Plan the Repair — Once you’ve found it, don’t lose track of it.
- Mark: Use that waterproof marker or chalk to mark the exact spot where the water’s getting in, inside and outside if you can see it.
- Document: Take photos. They’re handy if you end up calling a contractor, and they’re good to have for your own records. Now you know what you’re dealing with.
Common Causes
- Damaged or Missing Shingles: Wind, hail, and plain old wear and tear can crack, tear, or knock shingles loose, which exposes the underlayment. That’s a straight shot for water. I see this after just about every big storm.
- Compromised Flashing: This is probably the number one culprit. Flashing around chimneys, skylights, and vents is often the first thing to fail when leaks start. It can rust, corrode, bend, or pull away from expansion and contraction.
- Clogged Gutters & Ice Dams: When gutters overflow, water can back up and sit against your fascia boards, then work its way under the eaves. In winter, ice dams do the same kind of damage, pushing melted snow under shingles.
- Worn-Out Vent Boots: The rubber or neoprene collars around plumbing vent pipes break down over time from UV radiation, crack, and let water seep in. I’ve replaced hundreds of those things; they just don’t outlast the roof sometimes.
- Cracked Sealants: Caulk or sealants around roof penetrations or flashing can dry out, crack, and pull away, leaving little highways for water.
- Improper Installation: Sometimes the roof was never installed right in the first place, and that creates problems that don’t show up for years. Poorly nailed shingles or badly lapped flashing are trouble waiting to happen.
Common Mistakes
- Ignoring Small Stains: A small yellow stain on your ceiling or a bit of peeling paint isn’t nothing. It’s usually the roof telling you there’s a problem starting. Ignore it long enough and that thing gets expensive.
Related Articles
Keep troubleshooting with these hand-picked guides from FixlyGuide:
- The Silent Destroyer: 7 Hidden Signs Your Roof Has a Leak (Before You Need a New Ceiling) — Catching roof leaks early can save your home from extensive damage and costly repairs. Learn the subtle indicators that reveal hidden water…
- The One Hidden Sign of a Roof Leak Most Homeowners Miss (And the $10 Fix) — Catching a roof leak early can save thousands in repairs. Learn the elusive signs and a simple, effective fix before minor issues become ma…
- The #1 Mistake Homeowners Make with a Slow Kitchen Drain (and the Real Fix) — Before you reach for harsh chemicals, learn the right way to fix a slow kitchen sink drain and prevent future clogs.
- The 4 Hidden Reasons Your Chimney Leaks in Rain (And the Smart Fixes) — A leaky chimney during rain can hint at several underlying issues, from a faulty chimney cap to damaged flashing, all of which require prom…
- The #1 Mistake Homeowners Make When Caulking a Bathroom Sink (And How to Fix It) — Discover the most common caulk mistake homeowners make around bathroom sinks and follow simple steps to achieve a lasting, watertight seal.
- The 3 Missing Shingles: Why Ignoring Them Costs You $10,000 — Ignoring even a few missing roof shingles after a storm can lead to thousands in water damage and rot – here’s how to safely fix them yours…
Should you do this yourself?
Answer five quick questions before you start. Safety outranks savings every time.
Your experience with work like this
How high do you have to work?
Does the job involve any of these?
Will it need a permit?
Specialty tools
Free and instant. Educational guidance only — not a quote, inspection, or professional diagnosis.
Estimate your own project cost
National averages are a starting point. Enter your details for a range that fits your house.
Roof replacement cost
- Per square (installed)$604 – $866
Add $500–$2,500 if decking is rotten and needs replacement. Storm damage may be covered by insurance.
Educational estimate only — always confirm with written local bids.
What should this project cost?
Enter your project details for a realistic cost range before you call anyone.
Common repairs run $150–$650; repipes and water-heater replacements reach $1,500–$4,500.
- Regional adjustment
- National average
- Labor share (typical)
- ~$754
- Quotes to collect
- 3 written estimates
Educational estimate based on national averages — not a binding quote. Always confirm with written local estimates.
Fixly Project Decision Box
- DIY difficulty
- Professional Recommended
- Estimated time
- Inspection 1–2 hours · repairs 1–3 days
- Cost level
- High
Main tools / materials
- Binoculars for a ground-level look
- Flashlight for attic checks
- Moisture meter
- Roofing cement (temporary patch only)
When to stop and call a pro
- Active leak near lights, fans, or any wiring
- Sagging, bulging, or water-filled ceiling
- Steep, wet, or two-story roof — do not climb it
- Storm or hail damage you plan to claim on insurance
Need professional help?
Free roof assessment first — no phone calls until you ask for them.
Get Local Roofing HelpDecide what your roof needs
Two minutes of questions turns "something is wrong up there" into a clear next step.
- Repair or replace your roof?Answer 10 questions about age, leaks, and damage to get a clear next step.Open
- Compare contractor quotesScore up to four bids on price, warranty, licensing, and timeline.Open
- Get local estimatesSend one request and compare written estimates from vetted pros.Open
Free, no signup required. Estimates are educational guidance, not a quote or an inspection.
Frequently asked questions
How quickly can a small roof leak become a big problem?+
A small leak can become a major problem surprisingly fast. What starts as a drip might lead to saturated insulation, damaged drywall, and structural rot within weeks or a few months, especially in humid conditions favoring mold growth.
Can a roof leak occur without visible ceiling stains?+
Absolutely. Water can travel along rafters or inside wall cavities for considerable distances before it saturates enough material to create a visible stain on your ceiling. Look for musty odors, peeling paint near the ceiling, or bulging plaster.
How often should I inspect my roof for leaks?+
I recommend a thorough visual inspection at least once a year, preferably in the spring after winter storms, and again in the fall before heavy rains and snow. Also, do a quick check after any major storm with strong winds or hail.
What's the best way to find a leak if I can't see it?+
If you suspect a leak but can't see it, the garden hose test is your best bet. With a helper in the attic, systematically wet small sections of your roof, starting low and working your way up. This pinpoints the exact entry point.
Are all roof leaks expensive to fix?+
Not necessarily. A missing shingle or a cracked vent pipe boot might be a pretty quick and cheap fix, often under $100 for materials if you DIY. The expense comes when the leak has gone unnoticed and caused extensive secondary damage.
Can I use caulk to fix a roof leak?+
While caulk can be a temporary band-aid for very small gaps or cracks, it's rarely a permanent solution for roof leaks, especially around flashing. It dries, cracks, and pulls away. Flashing repairs or proper shingle replacement are usually needed for a lasting fix.
What are common signs of a roof leak in the attic?+
In the attic, look for water stains or discoloration on the roof decking, rafters, and insulation. You might also see active drips, feel dampness, or smell a distinct musty odor indicating mold or mildew.
Will my homeowner's insurance cover roof leak damage?+
Typically, homeowner's insurance covers sudden and accidental damage, like a leak caused by a storm or falling tree. However, it usually won't cover damage from neglect or gradual leaks that developed over time due to lack of maintenance. Check your policy carefully.
What's the average lifespan of common roofing materials?+
Asphalt shingles typically last 20-30 years, architectural shingles 25-40 years, metal roofs 40-70 years, and tile or slate roofs can last 50-100+ years. Regular maintenance can help achieve the higher end of these estimates.

Discussion
Loading comments…