Tools & materials you'll need
Affiliate linksAs an Amazon Associate FixlyGuide earns from qualifying purchases — at no extra cost to you. Prices and availability are accurate as of publication and subject to change.
Quick Answer
A slow kitchen sink drain is a common nuisance, primarily caused by accumulated grease, food debris, and soap scum within the drain system. The most effective solution is not an expensive chemical cleaner, but rather a methodical, hands-on approach targeting specific clog locations. This involves using tools like a plunger or a drain snake, or directly disassembling and cleaning the P-trap beneath the sink.
The Problem
You pour water down your kitchen sink, and instead of disappearing instantly, it swirls lazily, eventually draining after what feels like an eternity. Sometimes, you might even notice standing water for a few minutes. This isn't just an annoyance; it's a warning sign. A slow drain indicates a partial obstruction in your plumbing system. Left unaddressed, this partial clog will inevitably become a complete blockage, leading to an unusable sink and potentially overflowing water if you forget and leave the tap running. The problem often stems from the daily grind of kitchen life: rinsing dishes, washing hands, and even running the garbage disposal. Over time, fats, oils, and grease (FOG), along with small food particles, coffee grounds, and soap residue, cling to the interior walls of your drainpipes, narrowing the channel and impeding water flow.
How It Works
Your kitchen sink drain system is a relatively simple network designed to move wastewater away from your home. It starts with the sink strainer in the basin, which ideally catches larger food particles before they enter the drain. Below the sink, water flows down through the tailpiece and then enters the P-trap. The P-trap is the curved section of pipe – shaped like the letter "P" on its side – that always retains a small amount of water. This water acts as a barrier, preventing noxious sewer gases from entering your home. From the P-trap, the drainpipe connects to a branch drain line, which then merges with the main stack (the larger vertical pipe) that carries all wastewater out of your house to the sewer or septic system. All drain lines rely on gravity and proper ventilation (provided by vent pipes connecting to your roof) to facilitate smooth, rapid water flow.
Clogs typically form in specific areas because of their design or higher exposure to debris. The P-trap is a prime location due to its curve and water retention, which allows grease and particles to settle and accumulate. Further down, at the branch drain line, especially at points where pipes change direction or connect to other fixtures, turbulence can cause solids to drop out of suspension and build up. When grease and food particles go down the drain, they are often cooled by the water, solidifying and sticking to the pipe walls. Soap scum, which is mineral residue from hard water reacting with soap, adds to this sticky matrix, catching more debris and slowly constricting the pipe's diameter until drainage becomes noticeably slow.
Step-by-Step Fix
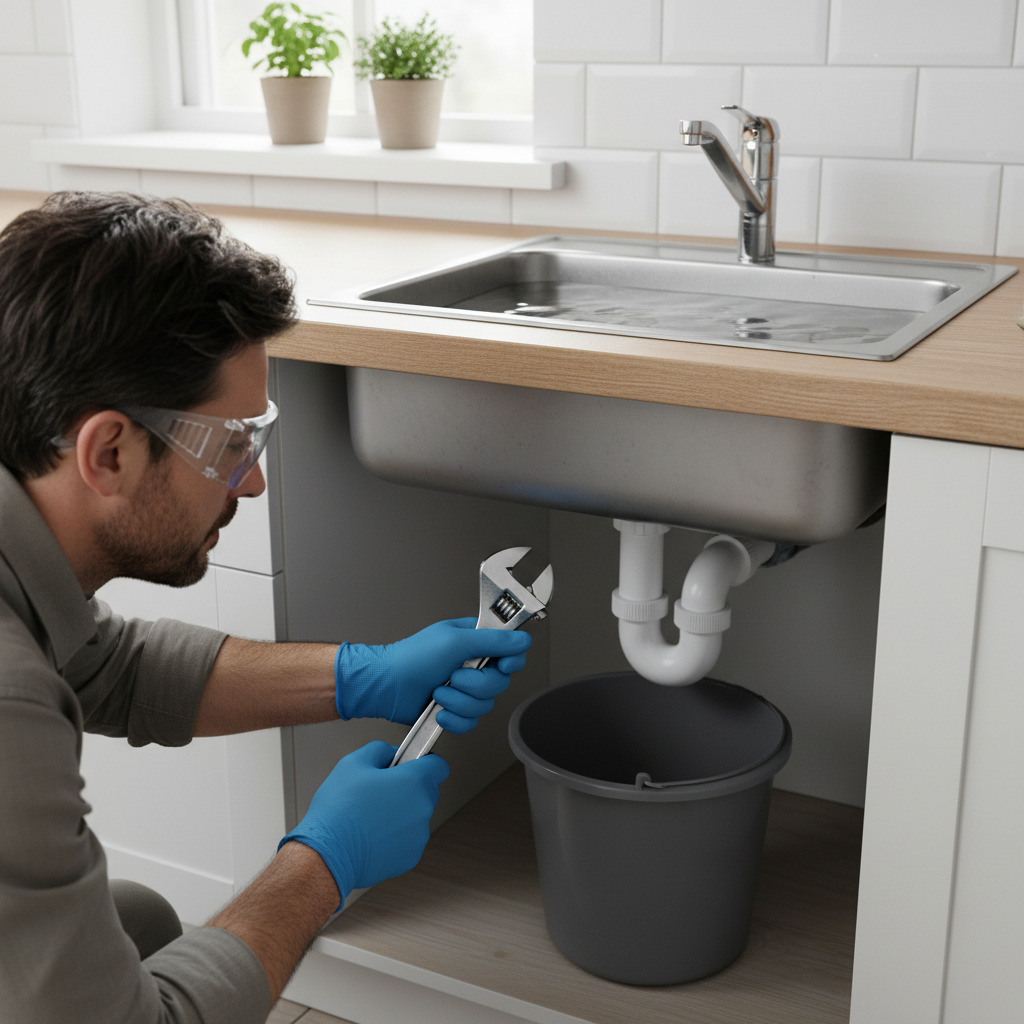
Safety First — Always wear gloves and eye protection when working with drains, especially if you suspect previous chemical use. Have a bucket ready for any spilled water.
1. Plunge with Purpose — Clear the sink of any dishes or debris. Fill the sink with 2-3 inches of hot water, just enough to cover the plunger cup. Position the plunger firmly over the drain, ensuring a good seal. Pump vigorously for 15-20 seconds, maintaining the seal, then quickly pull the plunger up to break the vacuum. Repeat this process 3-4 times. If using a double-bowl sink, block the other drain opening with a wet rag or stopper to create an effective vacuum.
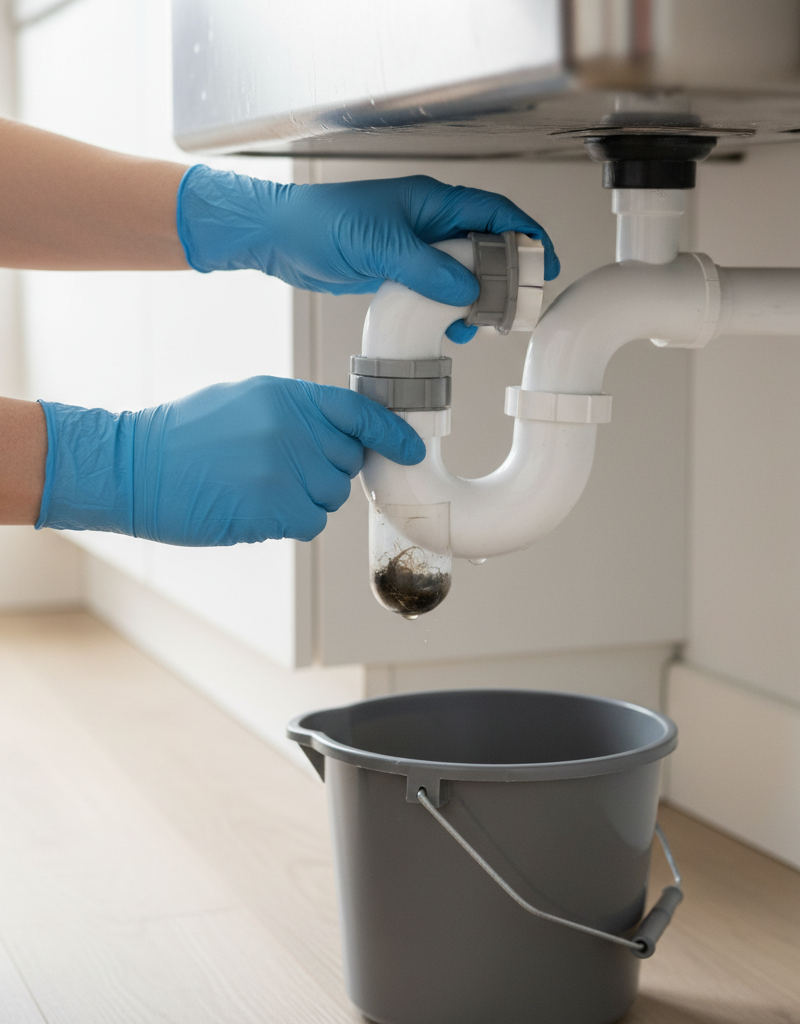
2. Tackle the P-Trap — Place a bucket directly under the P-trap (the U-shaped pipe under the sink) to catch water and debris. Using adjustable pliers or a basin wrench, carefully loosen the slip nuts on both ends of the P-trap. You might need to twist and gently pull to separate the sections. Once removed, inspect the P-trap for any visible clogs. Use a wire brush, old toothbrush, or even a gloved finger to clear out accumulated gunk. Rinse the P-trap thoroughly in a utility sink or outside with a garden hose. Reassemble, ensuring washers are correctly seated and slip nuts are hand-tightened, then a quarter-turn more with pliers. Don't overtighten, as this can crack plastic pipes.
3. Snake the Drain — If the P-trap was clean or the problem persists, the clog is likely further down the drainpipe. Feed a small drain snake (or auger) into the drain opening, past where the P-trap connects to the wall. Push the snake slowly until you feel resistance. Once you hit the clog, crank the handle to feed the snake through, breaking up or hooking the obstruction. Pull the snake back slowly, extracting any gunk. Repeat several times, flushing with hot water periodically to check progress. For stubborn clogs, try rotating the snake as you push it further in.
4. Hot Water Flush (Optional) — After clearing a clog with plunging or snaking, always flush the drain with a generous amount of very hot (but not boiling) water for several minutes. This helps to melt and wash away any remaining grease, soap scum, and loosened debris in the pipes.
5. Check the Air Gap (Dishwasher Only) — If you have a dishwasher connected to your kitchen drain AND the problem only occurs when the dishwasher drains, check the air gap (the small cylindrical fixture usually located next to the faucet on the countertop). Remove the cap and cover, then inspect for blockages inside the air gap or its connecting hoses. Clear any debris with a small brush or screwdriver. This is a less common cause of a slow general sink drain but worth checking if the issue correlates with dishwasher use.
Common Causes
- Grease and Oil Buildup: The primary culprit. Fats, oils, and grease (FOG) congeal when they cool, sticking to pipe walls and catching other debris over time. Even small amounts rinsed down the drain accumulate quickly.
- Food Particles: Small bits of food, such as rice, pasta, coffee grounds, eggshells, and vegetable peelings (even from garbage disposals), can escape the strainer and contribute to blockages, especially when mixed with grease.
- Soap Scum: A residue formed when minerals in hard water react with soap. This creates a sticky film that coats pipe interiors, providing a surface for other debris to adhere to.
- Hair and Lint: While less common in kitchen sinks compared to bathrooms, pet hair from washing pet bowls or hair from washing human hair down the sink can contribute to clogs.
- Mineral Buildup: In areas with very hard water, calcium and magnesium deposits can slowly accumulate on pipe walls, reducing their diameter over many years.
- Improper Venting: Though not a direct cause of a physical clog, poor or blocked plumbing vents can lead to slow drains by preventing air from entering the drain system, creating a vacuum that impedes water flow. This often manifests as gurgling sounds.
Common Mistakes
- Relying on Chemical Drain Cleaners: These are often ineffective against grease clogs, can corrode certain pipe materials (especially older, metal pipes), and pose significant safety risks. They also don't "clean" pipes, but rather eat away at organic matter, leaving behind a sticky residue that can attract more debris. They can also harden certain types of clogs, making a plumber's job much harder.
- Ignoring the P-Trap: Many DIYers go straight for snaking or chemicals without checking the P-trap first. This U-shaped pipe is where most kitchen sink clogs reside and is often the easiest to clear manually.
- Pouring Grease Down the Drain: Even seemingly harmless cooking oils or small amounts of bacon grease will solidify in your pipes. Always dispose of grease in the trash once it has cooled.
- Overloading the Garbage Disposal: Disposals are for light food waste. Jamming large quantities or items like fibrous vegetables, potato peels, or fruit pits can overwhelm them, leading to clogs both in the disposal unit and further down the drain.
- Overtightening P-Trap Connections: When reassembling the P-trap, overtightening slip nuts can crack plastic pipes or strip threads, leading to leaks.
- Using a Drain Snake Without Care: Forcing a snake can scratch or damage pipes, especially older, more fragile ones. Be gentle and let the snake do the work.
Cost & Time Breakdown
| Task | DIY cost | Pro cost | Time |
|---|---|---|---|
| Plunging | $0–$15 | N/A | 5–10 minutes |
| Clearing P-trap | $0–$10 | $100–$250 | 20–40 minutes |
| Snaking drain line (kitchen) | $0–$30 | $150–$400 | 30–60 minutes |
| Comprehensive drain cleaning | N/A | $150–$500+ | 1–3 hours |
Tips & Prevention
- Hot Water Flush Regularly: After washing dishes, let hot water run for 30 seconds to a minute to help keep grease flowing down the drain rather than solidifying in the pipes.
- Dispose of Grease Properly: Never pour cooking fats, oils, or grease down the drain. Scrape them into a container (like an old milk carton or coffee can) and dispose of them in the trash once cooled and solidified.
- Use Strainers: Always use a sink strainer in your kitchen drain to catch food particles before they enter the drainpipe. Clean it out regularly.
- Run the Disposal with Cold Water: When using a garbage disposal, always run cold water before, during, and for at least 30 seconds after you
Related Articles
Keep troubleshooting with these hand-picked guides from FixlyGuide:
- The 5-Minute Trick to Restore Your Kitchen Sink Sprayer's Lost Pressure — Restore your kitchen sink sprayer's low pressure with a quick, simple trick that often takes less than five minutes and requires no special…
- The $5 Secret to Silencing That Annoying Dripping Faucet (Single-Handle Fix) — Stop a dripping single-handle faucet with a simple and inexpensive DIY fix by replacing a worn-out o-ring or washer.
- The #1 Mistake Homeowners Make When Their AC Drain Clogs (And The $5 Fix) — Discover the most common error homeowners make when tackling a clogged AC drain line and learn a simple, inexpensive solution to prevent co…
- The Nasty Truth About Your Smelly Bathroom Sink — And the 2-Ingredient Trick to Fix It — Uncover the hidden reasons behind that foul odor wafting from your bathroom sink drain and learn a simple, two-ingredient solution to banis…
- The 5-Minute Trick to Stop a Dripping Single-Handle Faucet (No Plumber Needed) — A persistent drip from your single-handle faucet is usually caused by a worn-out cartridge, a repair you can typically complete yourself in…
- The 3 Hidden Reasons Your Gutters Fail in Heavy Rain (It’s Not Just Leaves) — Overflowing gutters during heavy rain often stem from a few common, yet overlooked, issues beyond simple leaf clogs, leading to potential s…
Frequently asked questions
Why is my kitchen sink draining so slowly?+
The most common reason for a slow kitchen sink drain is a buildup of accumulated grease, food particles (like coffee grounds or rice), and soap scum within the P-trap or further down the drainpipe. These substances coat the pipe interior, progressively narrowing the passage for water.
Are chemical drain cleaners safe to use in a kitchen sink?+
Generally, no. Chemical drain cleaners can be caustic and are often ineffective against stubborn grease clogs. They can damage certain pipe materials, especially older ones, and pose significant safety risks to you and your plumbing. Manual methods like plunging or snaking are safer and more effective for kitchen drains.
How often should I clean my kitchen drain?+
It's a good practice to perform preventative maintenance once every month or two. This can involve flushing with hot water and baking soda/vinegar, or simply ensuring you're diligent about not pouring grease down the drain and using a strainer. If you notice it slowing down, address it immediately rather than waiting for a full clog.
Can a garbage disposal cause a slow drain?+
Yes, an improperly used or overloaded garbage disposal can contribute to slow drains. If too many fibrous foods, starchy items, or large quantities of food waste are put down the disposal, they can create a dense clog either within the disposal unit itself or further down the drainpipe.
When should I call a plumber for a slow kitchen drain?+
You should call a plumber if you've tried all DIY methods (plunging, P-trap cleaning, snaking) and the drain is still slow or completely blocked. Also, call a professional if you suspect the issue is deeper in your main drain line, if multiple drains in your home are slow, or if you notice water backing up into other fixtures.


Discussion
Loading comments…