Tools & materials you'll need
Affiliate linksAs an Amazon Associate FixlyGuide earns from qualifying purchases — at no extra cost to you. Prices and availability are accurate as of publication and subject to change.
Quick Answer
When rain starts dripping from your chimney, most homeowners immediately think “big, expensive repair.” And sure, sometimes it is. But more often than not, I’ve found it’s one of three usual suspects: the flashing at the base, a cracked chimney crown, or a damaged chimney cap. Those are problems you can often track down and sometimes even fix yourself, which can save you a pile of cash. The trick is knowing what you’re looking for and where to look. We’re talking about keeping water out of your house, so let’s get after it.
The Problem
You know that sinking feeling: it’s raining outside, and then you start seeing water stains creeping across your ceiling near the fireplace, or worse, actual drips down your fireplace wall. A leaky chimney isn’t just annoying; it can turn into structural damage, rot in your rafters, ruined drywall, mold growth, and even fire hazards if water gets into your flue liner. I’ve seen homes in Brookhaven where a tiny flashing leak got ignored for years, and by the time they called me, the whole chase framing was rotten through. That’s a five-figure repair, easy. Don’t sit on this—once you spot trouble, get moving.
Water always finds the easiest path. With a chimney, that means it’ll exploit any little crack, gap, or missing piece of protection. Rain hitting the top of the chimney, running down masonry, or sheeting off the roof can get funneled straight into your attic or living space if those layers aren’t doing their job. Figuring out how all these parts work together is the first step to figuring out why they’re failing.
How It Works
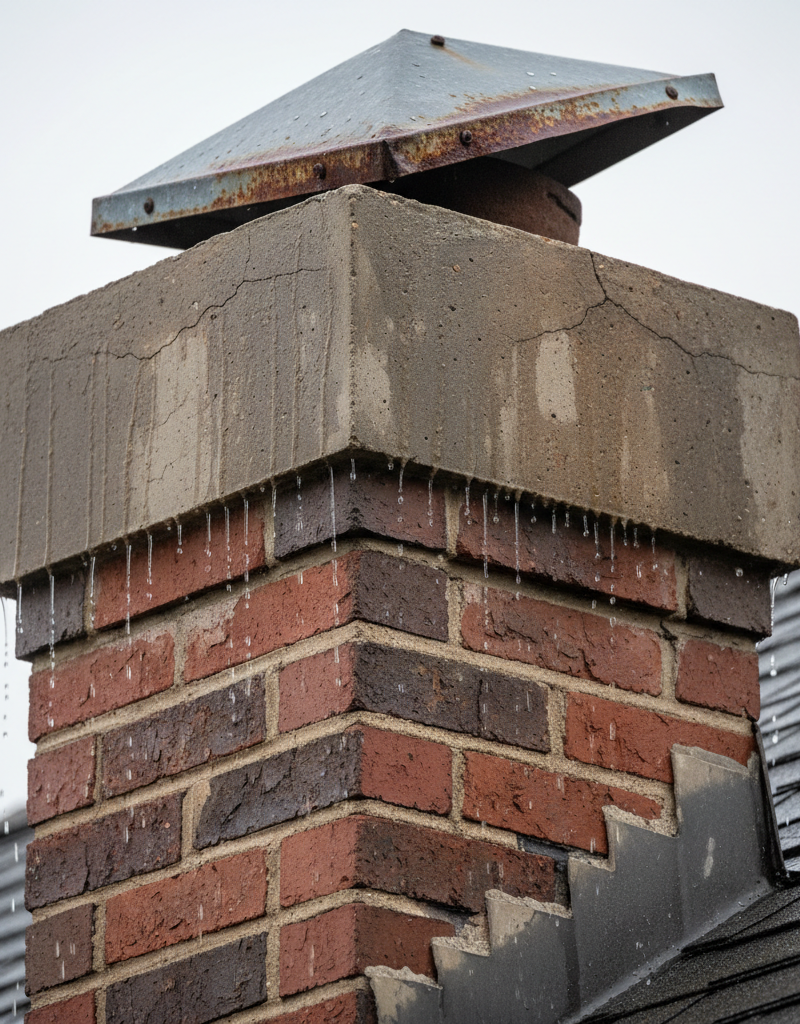
Think of your chimney like a little fortress built to keep the weather out while still letting smoke and gases out safely. Up top, you’ve got the chimney cap, usually metal, and it keeps rain, snow, animals, and debris from dropping straight into your flue. Below that is the chimney crown, a concrete or stone slab that slopes enough to shed water away from the flue opening and off the sides of the chimney masonry. A good crown sticks out past the masonry by at least 2 inches, which makes a drip edge and forces water to fall cleanly instead of running down the brick and soaking into the mortar joints.
The main body of the chimney is usually brick and mortar. Bricks themselves are a little porous, but the real weak spot is the mortar joints. Over time, those can crack, erode, or just wear down from weather, freeze-thaw cycles, and acidic combustion byproducts. Once that happens, water starts wicking right into the masonry.
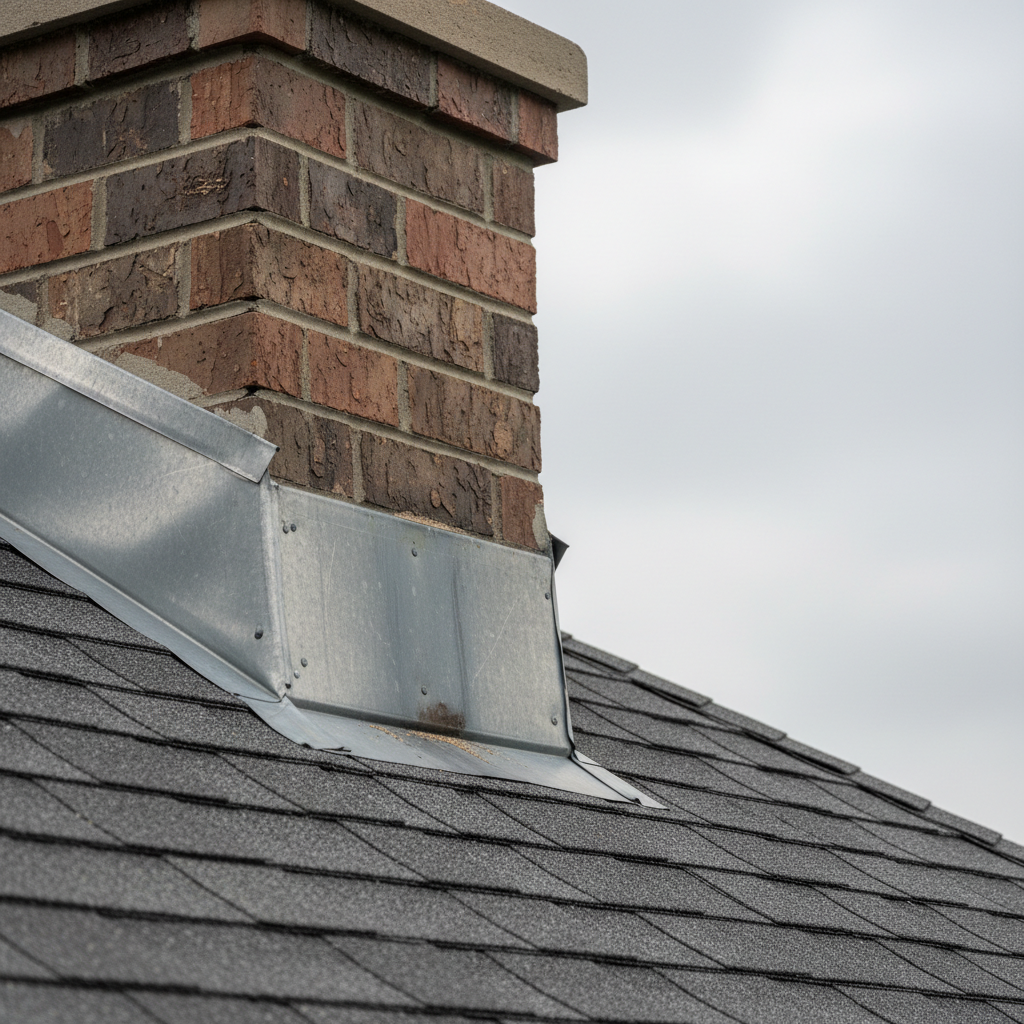
Then you get to the critical spot where the chimney passes through the roof—the flashing. That’s the series of metal strips, usually aluminum or copper, that bridges the chimney face to the roof decking. It goes in overlapping layers, like shingles, but it’s sealed with roofing cement so the whole thing stays watertight. There’s base flashing, step flashing, and counter flashing. Each piece matters. The base flashing sits on the roof and runs up the chimney. Step flashing is tied into the shingles and bent at 90-degree angles. Counter flashing gets mortared into the chimney chase and bends down over the step flashing. It’s a layered system, and it’s gotta be right. If even one piece is loose, corroded, or installed wrong—which I see all the time—you’ve got water coming in sooner or later.
Step-by-Step Fix
1. Safety First – Assess the risks before you climb.
Before you even think about getting on the roof, check the weather. Don’t go up if it’s wet, windy, or icy. Use a sturdy extension ladder on level ground. If you can, have someone spot you. Wear shoes with real grip. If the roof’s steep, think hard about calling a pro—it’s not worth a busted leg just to save a few bucks.
2. Interior Inspection – Locate the leak source from inside.
Before you hit the roof, try to narrow down where the leak’s coming from inside the house. Look for water stains on the ceiling, walls, or inside the firebox. Use a flashlight. That’ll give you a better idea of where to focus once you’re outside. Is it right above the firebox? Off to one side? That helps you figure out whether you’re chasing a cap, crown, or flashing problem.
3. Assess the Chimney Cap – Check for damage and tight fit.
Once you’re safely on the roof, take a good look at the chimney cap. Is it rusted, bent, or gone completely? Any gaps where it meets the flue? Critters can knock them loose, and high winds can warp them. If it’s a mesh cap, make sure the mesh isn’t torn or corroded. A missing or damaged cap is a real easy way for rain to dump straight down your flue.
4. Examine the Chimney Crown – Look for cracks, deterioration, and proper overhang.
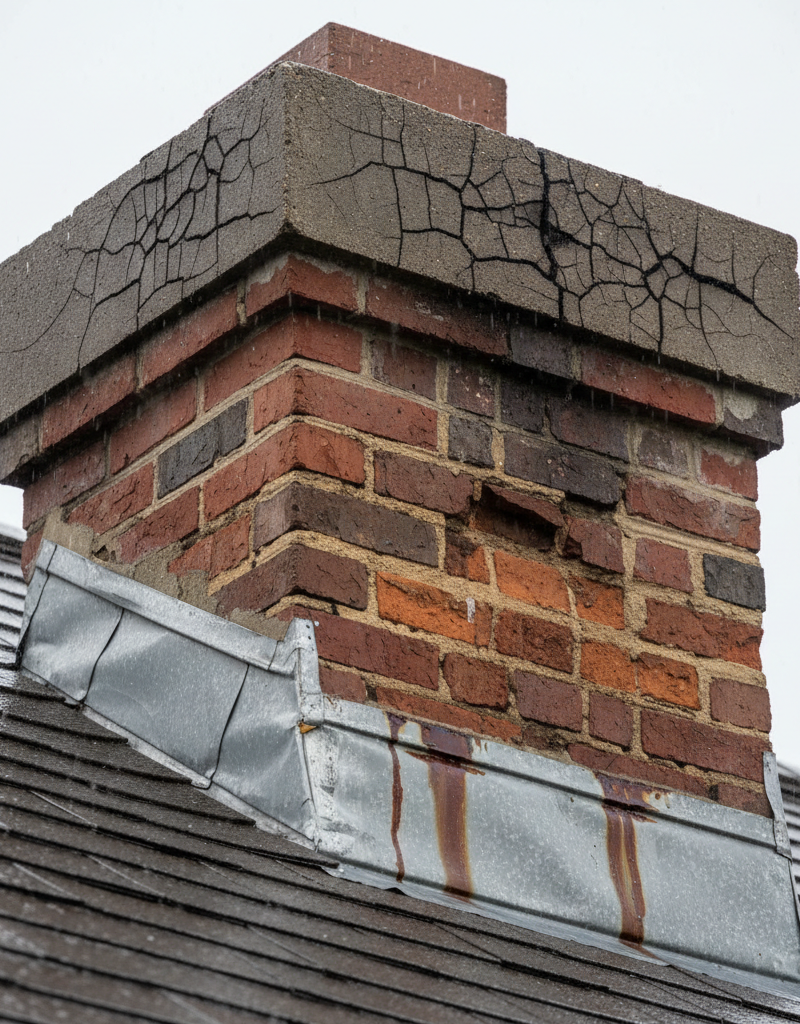
This is a big one. Inspect the concrete or stone slab at the top of your chimney. Look for hairline cracks, bigger fractures, or pieces that have spalled off. Pay close attention to where the crown meets the flue liner—that’s a real common place for cracks to show up. Also check whether the crown has a proper overhang (drip edge) of at least 2 inches. If water’s running down the brick sides, the crown’s not doing its job.
*   **Crown Repair (Minor Cracks):** Clean the surface thoroughly. Use a wire brush to get rid of loose debris. Apply a high-quality elastomeric chimney crown repair sealant, like "CrownCoat" or an equivalent. Trowel it smooth over the cracks and make sure it’s fully covered. Follow the product’s drying time, usually 24-48 hours. Don’t skimp on prep; that’s what makes it stick.
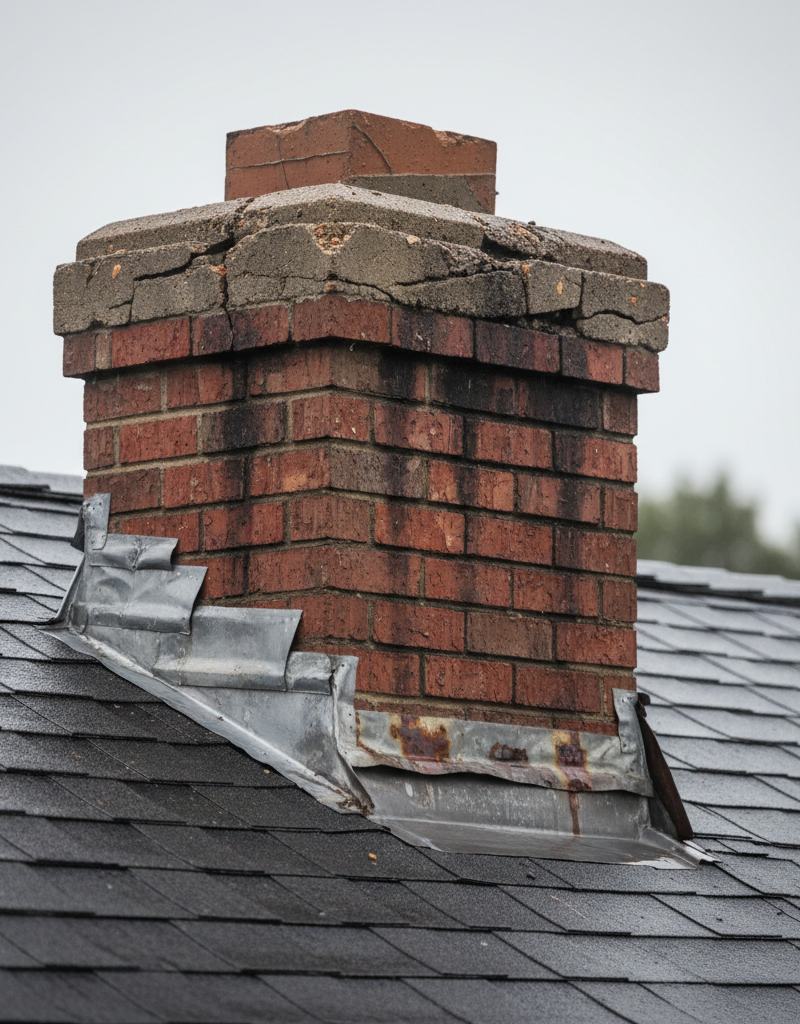
*   **Crown Repair (Major Damage):** For big cracks or missing chunks, a simple sealant won’t cut it. You might need to chip out the damaged crown and pour a new one, or have a mason put on a new concrete overlay. That’s usually where I tell folks to bring in a pro.
5. Inspect the Flashing – The most common leak source.
This is where I find 70% of chimney leaks. Carefully look over all the metal flashing around the base of the chimney. Check for:
*   **Loose or missing step flashing:** Are any individual pieces pulling away from the shingles or brick? Any gaps? Is it bent?
*   **Corroded metal:** Old galvanized flashing can rust right through.
*   **Cracked or dried-out roofing cement:** The sealant around the counter flashing and where base flashing meets the roof can break down and leave openings.
*   **Improper installation:** Sometimes flashing’s just installed wrong from day one, especially after a DIY roof job. The counter flashing should be mortared into the chimney, not just bent over.
6. Re-seal Flashing (Temporary Fix) – For small gaps and deteriorating sealant.
For small gaps or dried-out caulk around the counter flashing, a tube of high-quality exterior-grade sealant made for roofs (like an asphaltic roofing cement or polyurethane sealant) can buy you some time. Clean the area really well first. Then apply a generous bead into the gap. That said, this is usually a temporary fix; a proper flashing repair or replacement is often what you need long-term. Just last month, I patched some flashing for a client in Roswell with some Henry's 208 Wet Patch. It stopped the leak for now, but I told them a full re-flash would probably be needed in the next year or two if they wanted it done right.
7. Check Mortar Joints & Bricks – Look for crumbling or missing mortar.
Inspect the brickwork on the whole chimney for spalling (flaking/peeling bricks), efflorescence (white mineral deposits), or crumbling mortar joints. Use a screwdriver and gently poke at the mortar. If it crumbles easy, it’s breaking down. Repointing (grinding out old mortar and replacing it with new) is skilled work, but you can patch small areas with a masonry repair caulk or tuckpointing mortar for minor fixes. This is often a secondary issue, and it can make problems from the cap, crown, or flashing even worse.
8. Perform a Water Test (Optional/Advanced) – Simulate rain to pinpoint the leak.
If you can’t find the source just by looking, try a controlled water test. Have somebody inside with a flashlight. From the roof, slowly hose down sections of the chimney, starting from the lowest point (flashing) and working upward. Pause a few minutes after each section. When your helper spots water inside, you’ve found the general area. It takes patience, but it can be dead useful.
Common Causes
- Deteriorated Flashing: This is the big kahuna. Over time, the metal can corrode, or the sealant around it can dry out and crack, opening the door for water. Wind can also lift or bend the flashing.
- Cracked Chimney Crown: The concrete slab on top of your chimney gets hammered by sun, rain, snow, and freeze-thaw cycles. Cracks let water seep into the masonry or even down the flue.
- Missing or Damaged Chimney Cap: Without a cap, rain goes straight into your flue. A rusted or ill-fitting cap won’t deflect water like it should.
- Damaged Mortar Joints: If the mortar between your bricks is crumbling or cracked, it stops shedding water and starts acting like a sponge, soaking up water that then moves into the chimney structure.
- Spalling Bricks: Bricks that stay saturated can start flaking or peeling, especially in freezing weather. That weakens the chimney and lets even more water in.
- Condensation: Sometimes what looks like a leak is really condensation forming inside the flue because of inefficient heating equipment or poor insulation. That often collects and drips from the cleanout door or down the firebox. That’s a different fix, usually a flue liner or better insulation.
Common Mistakes
- Ignoring the problem: A small stain turns into a big repair bill fast. Water damage piles up before you know it.
- Assuming it's the roof, not the chimney: Homeowners blame the roof first. Sure, they’re connected, but a roof leak near a chimney is often a flashing problem.
- Applying too much sealant: Gobs of roofing tar slapped over everything isn’t a fix. It’s a short-term patch that can make a proper repair harder later. Keep it clean and precise.
- Not checking the crown and cap: These get missed all the time, even by some “pros.” Start at the top and work down.
- DIYing a steep roof: Seriously, if the pitch is aggressive or you’re not comfortable, hire somebody. Safety first, every time.
- Not addressing the root cause: Just stopping the drip isn’t enough. You’ve got to figure out why it’s leaking, or you’ll be right back out there.
Cost & Time Breakdown
| Task | DIY Cost ($) | Pro Cost ($) | Time (DIY) |
|---|---|---|---|
| Simple flashing re-sealing | $10–$30 | N/A | 30–60 minutes |
| Chimney cap replacement | $50–$200 | $150–$400 | 1–2 hours |
| Minor crown crack repair | $20–$50 | $100–$300 | 1–3 hours |
| Extensive flashing repair | N/A | $300–$800+ | N/A |
| Chimney inspection (pro) | N/A | $100–$250 | N/A |
| Complete crown replacement | N/A | $500–$1,500+ | N/A |
Tips & Prevention
- Annual Visual Inspections: Once a year, preferably in the fall before the rainy season, grab some binoculars and check your chimney from the ground. Look for any obvious damage to the cap, crown, or flashing. If you’re comfortable on a ladder, a closer look every couple of years is even better.
- Clean Gutters Regularly: Clogged gutters near the chimney can make water back up and spill over, which increases the amount of water hitting the chimney and finding weak spots.
- Ensure Proper Crown Overhang: When you have chimney work done, make sure the new crown extends at least 2 inches beyond the masonry to create that drip edge. That keeps water off the brickwork.
- Maintain Mortar Joints: Keep an eye on deteriorating mortar. If you catch it early, a small tuckpointing job can save you from a bigger mess. Don’t let it crumble away.
- Consider a Chimney Cap: If you don’t have one, get one. They’re cheap compared to the damage they prevent by keeping out rain, snow, and animals. Just make sure it’s sized right and secured well.
- Water Repellent Application: After major masonry work or on an older but healthy chimney, think about applying a breathable, silane- or siloxane-based water repellent. It can cut down on water absorption without trapping moisture inside. Skip acrylic sealers—they can trap moisture.
When to Call a Professional
Look, I’m all for DIY, but some jobs are too dangerous or too tricky for the average homeowner. If you see serious structural damage to your chimney, like large cracks in the masonry, bricks falling out, or a chimney that’s visibly leaning, stop right there and call a certified chimney sweep or a qualified mason. Any major flashing repair, especially one that means pulling shingles and replacing metal, is usually past a quick DIY fix and should go to a pro. If your roof is too steep to move around safely, or you’re just not comfortable up there, hire someone. And if you’re unsure, a professional inspection can find the exact cause of the leak and usually gives you a much tougher, longer-lasting solution than a string of patch jobs. They’ve got the right tools, the know-how, and the insurance for a reason.
Related Articles
Keep troubleshooting with these hand-picked guides from FixlyGuide:
- Why Your Chimney Leaks in the Rain (It's Not Always the Roof) — Discover the hidden causes of a leaky chimney during rain, from flashing failures to damaged crowns, and how to fix them for good.
- The 4 Hidden Reasons Your Chimney Leaks in Rain (And the Smart Fixes) — A leaky chimney during rain can hint at several underlying issues, from a faulty chimney cap to damaged flashing, all of which require prom…
- The Secret Culprit Behind Your Leaky Chimney (It’s Not Always the Obvious Flashing) — Discover the often-overlooked causes of chimney leaks during rain and how to tackle them with effective DIY solutions and prevention tips.
- The Secret Culprit Behind Your Leaky Chimney (It's Not Always the Obvious Fix) — Discover the often-overlooked causes of a leaky chimney during rain, beyond just a faulty cap, and learn practical steps to fix it.
- The One Hidden Sign of a Roof Leak Most Homeowners Miss (And the $10 Fix) — Catching a roof leak early can save thousands in repairs. Learn the elusive signs and a simple, effective fix before minor issues become ma…
- The #1 Reason Your Gutters Overflow (It's Not Clogging) — Discover the surprising true cause of overflowing gutters during heavy rain and how a simple fix can prevent costly water damage to your ho…
Frequently asked questions
Why does my chimney leak only when it rains hard?+
Hard rain means more water hitting your chimney and roof at higher velocity. Small cracks or compromised flashing that might handle a light drizzle can be overwhelmed by a downpour, allowing water to penetrate more easily and visibly.
Can a chimney leak cause a fire?+
Yes, indirectly. Water entering the flue can damage the flue liner or masonry, making the chimney less safe for use. If water gets into electrical components or compromises the stability of the chimney structure itself, it presents a serious hazard.
How much does it cost to fix a leaky chimney?+
The cost varies widely depending on the cause. A simple re-sealing of flashing might be $10–$30 DIY, while a full flashing replacement could cost $300–$800+ for a professional. A complete chimney crown replacement can run anywhere from $500 to over $1,500.
What is chimney flashing and why is it important?+
Chimney flashing is the system of metal sheets that creates a watertight seal where the chimney passes through the roof. It's crucial because it prevents rainwater from running down the chimney sides or straight into your attic and living space.
Can I seal chimney cracks with regular caulk?+
No, absolutely not. Regular caulk isn't designed for the extreme temperature fluctuations or the specific composition of masonry. You need specialized elastomeric chimney crown repair sealants for crowns or proper tuckpointing mortar for brick joints.
How often should I have my chimney inspected?+
The National Fire Protection Association (NFPA) recommends having your chimney inspected at least once a year. This helps identify potential issues like leaks, creosote buildup, or structural damage before they become major problems.
What are signs of a chimney crown problem?+
Look for visible cracks on the concrete slab at the top of your chimney, especially where it meets the flue liner. Also, if the crown doesn't have a good overhang (drip edge) and water is running down the sides of your chimney, it's a sign of poor design or deterioration.
Can overgrown vines cause chimney leaks?+
Yes, definitely. Vines can hold moisture against the brickwork, slowly deteriorating mortar joints. Their roots can also penetrate small cracks and widen them over time, leading to significant water entry points.
Is it normal for a chimney to be damp inside after rain?+
A healthy chimney should remain dry inside. If you notice dampness, it's a strong indicator of a leak, whether it's from the cap, crown, flashing, or porous masonry. Address it quickly to prevent extensive damage.
What's the difference between a chimney cap and a crown?+
The chimney cap is typically a metal cover that sits *over* the flue opening to prevent rain, debris, and animals from entering. The chimney crown is the concrete or stone slab *on top* of the chimney masonry that sheds water away from the entire structure.
Discussion
Loading comments…