Tools & materials you'll need
Affiliate linksAs an Amazon Associate FixlyGuide earns from qualifying purchases — at no extra cost to you. Prices and availability are accurate as of publication and subject to change.
Quick Answer
A chimney leaking during rain is most often caused by compromised flashing, a cracked chimney crown, or damaged mortar joints. Less common but significant culprits include a missing chimney cap or problems with the brickwork and masonry itself. Diagnosing the exact source often requires a careful, methodical inspection from the rooftop down to the attic, checking each component systematically for signs of wear or damage. Addressing these issues promptly is crucial to prevent further water damage to your home’s interior, structural compromises, and potential mold growth.
The Problem
Few things are as disheartening to a homeowner as discovering water stains on the ceiling or walls near the fireplace after a rainstorm. A leaky chimney isn't just an aesthetic issue; it's a structural threat. Water infiltration can rot framing, damage drywall, promote mold and mildew growth, and even compromise the structural integrity of the chimney itself. Over time, recurring leaks can lead to significant and expensive repairs, far beyond the cost of addressing the initial problem. The challenge lies in pinpointing the exact source, as water can travel a considerable distance before becoming visible, often masking the true point of entry. It's a common misconception that a chimney leak automatically means a damaged roof. While roof flashing is a frequent culprit, several other components of your chimney system are designed to repel water, and any one of them can fail.
How It Works
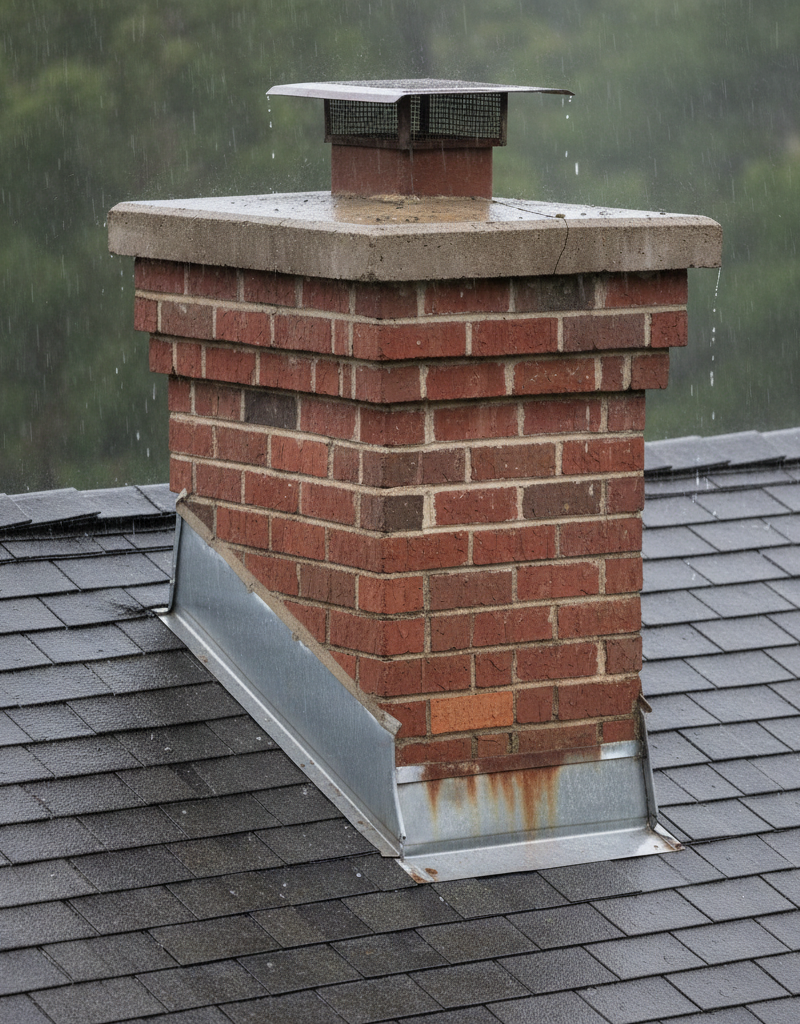
To understand why a chimney leaks, it helps to understand how a chimney is supposed to keep water out. Your chimney isn't just a simple brick stack; it's a complex system of protective layers. At the very top, the chimney cap sits like an umbrella, preventing rain and snow from falling directly into the flue. Below the cap, the chimney crown is a concrete slab or pre-cast stone that caps the top of the masonry, sloping slightly to direct water away from the flue opening and over the sides of the chimney. This crown protects the mortar joints and brickwork directly below it from direct rainfall. The main vertical structure is the masonry and mortar joints. Bricks themselves are porous, and mortar, while less so, can also absorb water, especially if it's old and crumbly. To prevent water absorption into the masonry, modern chimneys are often treated with a water repellent sealant. Where the chimney passes through the roof, flashing is critical. This consists of metal sheets (typically aluminum, copper, or galvanized steel) bent and installed in two layers: the 'step flashing,' which weaves in with the roof shingles, and the 'counter flashing,' which is mortared into the chimney's masonry joints and then bent down over the step flashing. This two-layer design allows for slight movement between the roof and the chimney while maintaining a watertight seal. If any of these components—cap, crown, flashing, mortar, or bricks—fail, water has an open invitation into your home. The stack effect (warm air rising) within the chimney can also draw moisture inward, exacerbating a small entry point into a significant problem.
Step-by-Step Fix
Always prioritize safety when working on a roof. Use a stable ladder, wear appropriate footwear, and avoid working in wet or windy conditions. If you're uncomfortable on a ladder or roof, call a professional.
1. Initial Inspection from the Ground — Start with visual checks
Before climbing onto the roof, use binoculars to inspect your chimney from the ground. Look for obvious signs of damage: a missing or crooked chimney cap, large cracks in the chimney crown, crumbling mortar, or visible gaps in the flashing where it meets the roof.
2. Check the Chimney Cap — The first line of defense
Climb onto the roof safely. Inspect the chimney cap for rust, damage, or dislodgement. If it's missing or badly rusted, it's not effectively shedding water. A new cap is relatively inexpensive and easy to install.
- If missing/damaged: Replace with a stainless steel or copper cap for longevity. Ensure it's properly secured.
3. Examine the Chimney Crown — Look for cracks and deterioration
The chimney crown is susceptible to freezing and thawing cycles. Look for hairline cracks, spalling (flaking surface), or larger structural cracks. Even small cracks can funnel water directly into the chimney structure.
- If hairline cracks: Clean the crown thoroughly and apply a elastomeric crown sealant product specifically designed for chimney crowns. This can seal small cracks and prevent future water penetration for several years. Ensure the surface is dry and free of debris before application.
- If major cracks/deterioration: For large cracks or crumbling crowns, a simple sealant won't suffice. You'll likely need to chip away the old crown and pour a new one, or have a pre-cast crown installed. This is a more involved repair and often where a professional is recommended.
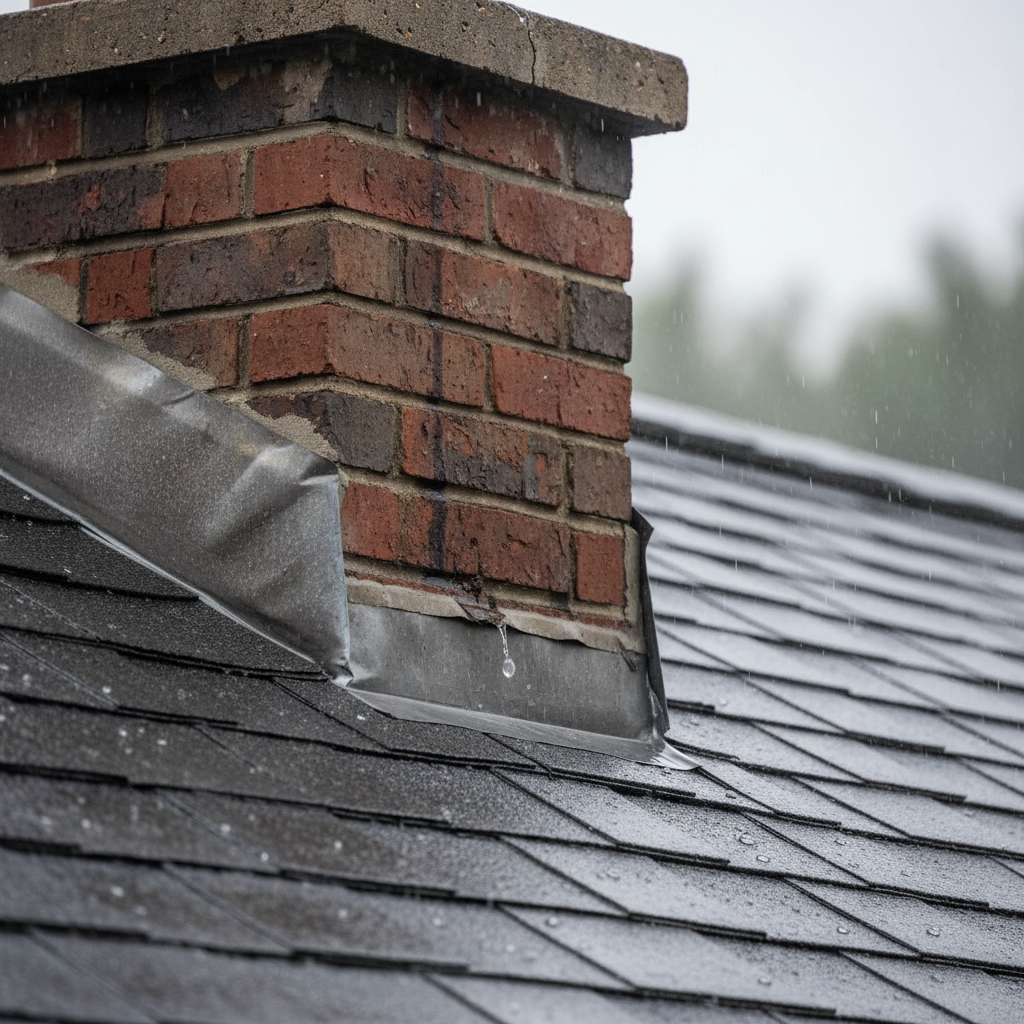
4. Inspect Flashing for Gaps and Damage — Common cause of leaks
Flashing is notorious for leaks. Carefully check the counter flashing where it tucks into the mortar joints of the chimney and bends down over the step flashing. Look for:
- Separations: Gaps between the flashing and the chimney or roof shingles.
- Rust/Corrosion: Weak spots in the metal.
- Loose Nails/Caulk: Old caulk drying out and cracking, or nails popping up.
- Incorrect Installation: Flashing that isn't woven properly with shingles or doesn't have a proper overlap.
- If minor gaps/old caulk: Clean out old caulk. Apply a high-quality polyurethane caulk, specifically designed for exterior use and masonry, to seal minor gaps. Ensure complete adhesion.
- If rust/damaged sections: Small, rusted holes can sometimes be patched with flashing cement and a new piece of metal, but often, damaged sections of flashing require replacement. This can be complex as it involves lifting shingles and potentially chiseling out mortar.
- If complete failure: Significant flashing damage or incorrect installation almost always requires a professional roofer or chimney repair specialist to properly replace the entire flashing system.
5. Assess Mortar Joints and Brickwork — Porous pathways for water
Over time, mortar degrades, becoming crumbly and porous. Bricks themselves can become saturated, especially if they are older or low-fired. Look for:
- Crumbled/Missing Mortar: Use a screwdriver or trowel to gently probe mortar joints. If they're crumbly or shallow, they need repointing.
- Spalling Bricks: Bricks with flaking or crumbling surfaces, indicating water saturation and freeze-thaw damage.
- Masonry Stains: Dark, wet-looking areas on the brick after rain suggests excessive absorption.
- If minor mortar damage (repointing): Carefully rake out the old, failing mortar to a depth of about 1 inch (2.5 cm) using a hammer and chisel or a mortar rake. Mix new mortar (Type N is common for general use) according to manufacturer instructions. Dampen the area, then apply the new mortar with a pointing trowel, pressing it firmly into the joint. Finish by tooling the joint for a proper seal and appearance. Work in small sections.
- If spalling bricks: Spalled bricks must be replaced, as they've lost their protective outer layer. This is a more advanced masonry repair.
- If general porosity: After all repairs are made and the chimney is dry, consider applying a breathable, silane/siloxane based water repellent specifically designed for masonry. This penetrates the surface and creates a hydrophobic barrier without sealing in moisture, allowing the brick to breathe.
6. Check the Attic/Interior for Entry Points — Trace the water's path
After addressing exterior issues, inspect the attic space or the area around the chimney inside your home after a rainstorm. Look for residual dampness, stains, or active drips. This can help confirm if the exterior repairs were successful or if another entry point exists. The exact point of entry might be above where the water stains appear due to gravity and capillary action.
Common Causes
- Damaged or Missing Chimney Cap: The most exposed part of the chimney, directly vulnerable to rain and snow. A damaged cap allows water to pour straight into the flue.
- Cracked Chimney Crown: The concrete slab on top of the chimney acts as a roof for the masonry. Cracks in the crown allow water to seep into the chimney structure below, saturating bricks and mortar.
- Compromised Flashing: The metal seal where the chimney meets the roof is a frequent failure point. It can rust, separate, or be improperly installed, creating gaps for water entry.
- Deteriorated Mortar Joints: Over time, exposure to weather causes mortar to erode and crack. Old, sandy, or shallow mortar joints allow water to wick into the brickwork.
- Porous Bricks: While bricks are generally durable, some older or lower-quality bricks can absorb significant amounts of water, especially if their protective outer 'skin' has spalled off due to freeze-thaw cycles.
- Condensation: While not strictly a rain-related leak, excessive moisture from appliance exhaust (especially high-efficiency furnaces or water heaters venting through a too-large or unlined flue) can condense inside the chimney, mimicking a leak.
Common Mistakes
- Ignoring Small Cracks: Many homeowners overlook hairline cracks in the chimney crown or mortar, thinking they're minor. These small cracks are often the initial entry points for water, which then expands during freeze-thaw cycles, leading to larger, more destructive damage.
- Using Standard Caulk on Flashing: Applying regular silicone or latex caulk to flashing gaps is a temporary fix at best. These caulks are not designed for the movement and expansion/contraction of roofing materials and chimney masonry and will fail quickly. Always use a high-quality, flexible, polyurethane or specialized flashing sealant.
- Neglecting the Chimney Cap: Assuming the cap is just for aesthetics or keeping out animals. A functional chimney cap is a vital rain diverter. Not having one, or having a damaged one, is an open invitation for water.
- Improper Repointing: When repairing mortar, not raking out the old mortar deep enough, not dampening the bricks before applying new mortar, or using the wrong type of mortar mix can lead to a weak bond and continued water infiltration.
- Painting Bricks Without Proper Prep: While some products can seal bricks, simply painting over porous or compromised brickwork can trap moisture, leading to spalling and accelerated deterioration. Proper cleaning, repair, and often, a breathable silane/siloxane sealer are better solutions.
- DIY Flashing Replacement: Flashing is complex and requires specialized tools and expertise to properly weave into the roof shingles and seal into the masonry. Incorrectly installed flashing will almost certainly leak, potentially worse than before. This is a job best left to experienced roofers or chimney professionals.
Cost & Time Breakdown
| Task | DIY Cost | Pro Cost | Time |
|---|---|---|---|
| Chimney Cap Replacement | $50–$200 | $150–$500 | 30 mins – 1 hr |
| Crown Repair (Sealant) | $30–$80 | $150–$300 | 1–2 hours |
| Crown Replacement (New) | $100–$300 (materials) | $600–$2,000 | 1-2 days |
| Flashing Repair (Minor Caulk) | $15–$30 | $100–$250 | 30 mins |
| Flashing Replacement | $50–$300 (materials) | $500–$1,500 | 4–8 hours |
| Mortar Repointing (Small) | $20–$50 (materials) | $200–$500 (per area) | 2–4 hours |
| Masonry Water Repellent | $50–$150 | $300–$700 | 2–4 hours |
Tips & Prevention
- Annual Chimney Inspection: Have a certified chimney sweep or technician inspect your chimney annually, even if you don't use it frequently. They can spot small issues before they become major leaks.
- Check Your Chimney Cap: Periodically inspect your chimney cap from the ground (or safely from the roof) for rust, damage, or buildup. Replace it if it's damaged.
- Maintain Chimney Crown: Apply a quality chimney crown sealant every 5-10 years to prevent small cracks from forming due to weathering and freeze-thaw cycles. Ensure the crown has a proper drip edge to shed water effectively.
- Watch for Mortar Deterioration: If you notice crumbling or sandy mortar joints, address them promptly through repointing. Don't let gaps widen.
- Consider a Masonry Water Repellent: For older or highly exposed chimneys, applying a breathable silane/siloxane based water repellent can significantly reduce water absorption into the bricks and mortar without trapping moisture.
- Keep Gutters Clean: Ensure gutters near the chimney are always clean and free-flowing. Overflowing gutters can saturate the chimney masonry and surrounding roof area, exacerbating minor leaks.
When to Call a Professional
A chimney leak can quickly escalate from a minor annoyance to a significant structural problem. If you identify extensive damage to your chimney crown, such as large structural cracks or crumbling sections, it's time to call a professional mason or chimney repair specialist. Similarly, if your flashing is severely rusted, detached, or if you suspect it was installed incorrectly, a licensed roofer or chimney expert has the specific knowledge and tools to replace it correctly, ensuring a long-lasting, watertight seal. Any leaks involving the chimney's internal flue liner, significant spalling of bricks (where the face of the brick is crumbling off), or if you're uncomfortable working on a ladder or roof, warrant immediate professional attention. Attempting complex masonry or flashing repairs without the proper expertise can lead to further damage, more expensive future repairs, or even personal injury. Professionals can also conduct a comprehensive inspection to identify hidden problems that a DIY approach might miss, providing a holistic solution to your chimney's water intrusion issues.
Related Articles
Keep troubleshooting with these hand-picked guides from FixlyGuide:
- The 4 Hidden Reasons Your Chimney Leaks in Rain (And the Smart Fixes) — A leaky chimney during rain can hint at several underlying issues, from a faulty chimney cap to damaged flashing, all of which require prom…
- The Secret Culprit Behind Your Leaky Chimney (It’s Not Always the Obvious Flashing) — Discover the often-overlooked causes of chimney leaks during rain and how to tackle them with effective DIY solutions and prevention tips.
- The Secret Culprit Behind Your Leaky Chimney (It's Not Always the Obvious Fix) — Discover the often-overlooked causes of a leaky chimney during rain, beyond just a faulty cap, and learn practical steps to fix it.
- The One Hidden Sign of a Roof Leak Most Homeowners Miss (And the $10 Fix) — Catching a roof leak early can save thousands in repairs. Learn the elusive signs and a simple, effective fix before minor issues become ma…
- The 3 Hidden Reasons Your Washing Machine Leaks from the Bottom (and the $5 Fix) — A washing machine leaking water from the bottom is often caused by a loose hose connection or a clogged drain pump filter, both easy DIY fi…
- The 7 Critical Home Inspection Mistakes Almost Every Homeowner Makes — Don't wait for a costly surprise; learn the common mistakes homeowners make with annual inspections and how to build a smart, proactive mai…
Frequently asked questions
How do I know if my chimney cap is leaking?+
You'll likely see water stains directly inside the firebox or flue, especially after heavy, vertical rain. Water will have a clear path straight down the chimney. An inspection will show rust, damage, or a complete absence of the cap.
Can flashing be repaired or does it need to be replaced?+
Minor flashing issues, like small separations or old caulk, can often be repaired with a high-quality sealant. However, if the flashing is severely rusted, torn, or improperly installed from the beginning, full replacement by a professional is usually the only long-term solution.
What's the difference between a chimney crown and a chimney cap?+
The chimney cap sits *on top* of the flue opening, like a hat, to keep out rain and animals. The chimney crown is the *concrete slab* that covers the entire top of the chimney masonry, protecting the brick and mortar below from weather and directing water off the sides.
Is it normal for a chimney to get wet in the rain?+
The exterior masonry of a chimney will get wet in the rain, but it should not absorb so much water that it leaks into your home. The various components (cap, crown, flashing, mortar, and sealant) are designed to shed water and prevent interior entry. Excessive saturation or visible leaks are always a sign of a problem.
How much does it cost to fix a leaky chimney?+
The cost to fix a leaky chimney varies widely depending on the source of the leak and the extent of the damage. Minor repairs like sealing a crown or re-caulking flashing might cost $100-$300, while a full flashing replacement or a new chimney crown could range from $500 to $2,000 or more with professional labor.


Discussion
Loading comments…