
Tools & materials you'll need
Affiliate linksAs an Amazon Associate FixlyGuide earns from qualifying purchases — at no extra cost to you. Prices and availability are accurate as of publication and subject to change.
Quick Answer
A chimney leaking during rain is a clear sign that water is finding an entry point into your home where it shouldn't. The most frequent culprits are a damaged chimney cap, deteriorated flashing around the base of the chimney, cracked or spalling mortar joints, or a compromised chimney crown. Addressing these issues promptly is crucial to prevent extensive water damage to your chimney structure, ceiling, and attic.
The Problem
You notice mysterious water stains on your ceiling near the fireplace, or worse, see drips directly from the firebox after a heavy rain. A leaky chimney isn't just an unsightly nuisance; it's a structural threat. Water intrusion can lead to mold and mildew growth, rot wooden framing, damage drywall, and even compromise the structural integrity of your chimney itself through freeze-thaw cycles. Ignoring a chimney leak can result in thousands of dollars in repairs down the line, far exceeding the cost of a timely diagnosis and fix.
The challenge for many homeowners is pinpointing the exact source of the leak. Rainwater can travel surprisingly far within a chimney structure before revealing itself inside your home, making direct correlation difficult. What looks like a leak from the top might actually be originating from damaged flashing several feet below, or vice-versa. Understanding the different components of your chimney and how they contribute to its watertight defense is the first step in effective troubleshooting.
How It Works
Your chimney isn't just a vertical shaft; it's a complex system designed to safely vent smoke and combustion byproducts while also keeping your home dry. Several key components work in concert to achieve this:
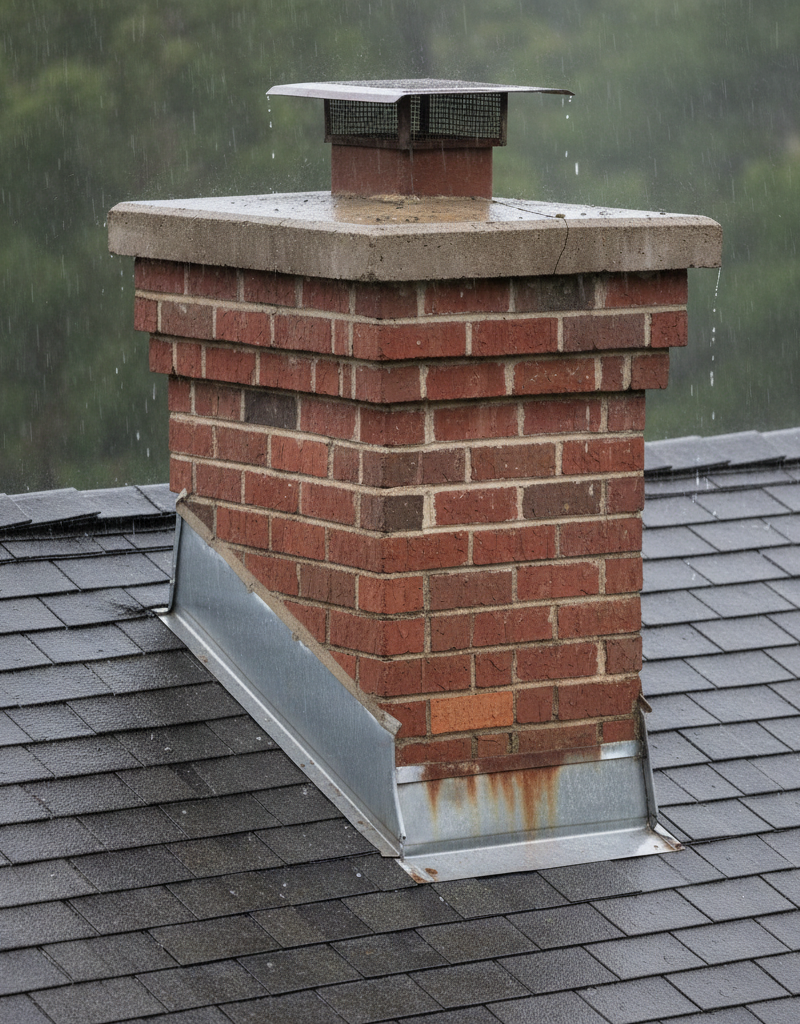
Chimney Cap: Perched at the very top, the chimney cap is your first line of defense against rain, snow, animals, and debris. It typically features a mesh screen to prevent critter entry and a solid top to shed water away from the flue opening. Without a proper cap, rain can pour directly down the flue, leading to leaks.
Chimney Crown: This concrete or metal slab sits just beneath the chimney cap, extending slightly beyond the chimney's masonry to create a drip edge. Its primary function is to direct water away from the chimney's vertical surfaces, preventing it from saturating the masonry and working its way into the home. Cracks in the crown are a very common entry point for water.
Mortar Joints: The mortar between your bricks acts as both an adhesive and a sealant. Over time, exposed to the elements, these joints can erode, crack, or spall (flaking away), creating pathways for water to seep into the brickwork. This process, known as spalling, can eventually lead to widespread masonry deterioration.
Flashing: This critical component is a waterproof seal where the chimney meets the roof. Typically made of sheet metal (aluminum, copper, or steel), flashing is installed in layers. Step flashing is interwoven with roof shingles along the sides of the chimney, while counter flashing is cut into the chimney's mortar joints and bent down over the step flashing, forming a watertight overlap. A continuous apron flashing is often used across the lower side of the chimney. Any breach in this flashing system – lifted edges, rusted sections, or failed caulk seals – allows water to run directly into your attic or down wall cavities.
Soffit and Fascia: While not direct chimney components, the soffit and fascia boards near your chimney can also show signs of water damage if the leak is severe and runs down exterior walls. Rotting wood in these areas can indicate prolonged water exposure from a chimney leak.
When rain hits your roof, it's designed to flow downwards, shed by shingles and guided by flashing. If any part of this defense system on or around the chimney fails, water bypasses these protections and enters your home. Understanding this intricate interplay helps you logically diagnose and address the leak.
Step-by-Step Fix
Before you begin: Safety is paramount when working on a roof. Only attempt these steps if you are comfortable on a ladder and roof, and the weather is dry and calm. Always use a sturdy, properly secured ladder and non-slip footwear. Consider having a spotter. If you have a steep roof or are uncomfortable with heights, call a professional.
1. Conduct a Ground-Level Visual Inspection – Initial assessment from afar
- Walk around your house and visually inspect the chimney from the ground using binoculars. Look for obvious signs of damage such as missing chimney caps, large cracks in the crown, missing or crumbling mortar, or bent/lifted flashing. This can often narrow down the possibilities before you even get on the roof.
- Pay attention to any discoloration on the brickwork that might indicate prolonged water flow down a specific side.
2. Prepare for Roof Access and Safety – Secure your workspace
- Tools: Sturdy extension ladder, work gloves, non-slip shoes, safety harness (recommended), bucket for tools, camera/smartphone.
- Ensure your ladder is placed on firm, level ground and extends at least three feet above the roofline. Secure the top of the ladder to the roof or fascia board if possible. Always maintain three points of contact when ascending or descending.
- Have your phone readily available for emergencies or to take detailed photos of any damage you find.
3. Inspect the Chimney Cap and Crown – Top-down check for entry points
- Once safely on the roof, carefully approach the chimney. Examine the chimney cap for rust, holes, or detachment. If it's missing entirely, this is a very likely culprit.
- Inspect the chimney crown. Look for any hairline cracks, larger fissures, or crumbling sections. Pay close attention to where the flue liner exits the crown – this is a common stress point for cracking.
- If this doesn't work: If the cap and crown appear intact, move on to the mortar joints and flashing.
4. Examine Mortar Joints and Bricks – Checking for masonry degradation
- Carefully use a stiff wire brush to clean any moss or debris from the mortar joints to get a clear view. Look for signs of 'spalling' (where brick faces peel or flake off) or 'efflorescence' (white, powdery deposits indicating moisture wicking through the masonry).
- Use a screwdriver or a small trowel to gently probe the mortar joints. If the mortar is soft, sandy, and crumbles easily, it's deteriorated and needs repointing.
- Inspect the bricks themselves for cracks, particularly horizontal ones, which can indicate structural movement or prolonged water saturation.
- Repair: For small, isolated cracks in the crown, a high-quality, flexible exterior caulk or crown repair sealant specifically designed for chimneys can provide a temporary fix. For widespread mortar deterioration, 'repointing' (grinding out old mortar and replacing it with new) is necessary, often a job for a professional.
5. Scrutinize the Chimney Flashing – The critical roof-to-chimney seal
- Closely inspect all sections of the flashing where the chimney meets the roof shingles. Look for any gaps, lifted edges, rust, punctures, or areas where old caulk has dried, cracked, or pulled away.
- Pay particular attention to the counter flashing (the top layer that's cut into the mortar joints). Ensure it overlaps the step flashing properly and hasn't pulled out of the mortar joint.
- Check the sealant around the flashing. If it's old, cracked, or missing, water will easily penetrate.
- Repair: For minor issues like small gaps or lifted edges, you can try to carefully pry up the shingle slightly and apply a generous bead of high-quality, exterior-grade roofing cement or silicone caulk underneath. Press the flashing back down firmly. For rusted or severely damaged sections, flashing replacement is essential, usually a task for a roofing professional.
6. Perform a Water Test (Optional/Advanced) – Simulating rainfall to pinpoint entry
- Safety Note: This step should only be performed with a spotter and extreme caution. Ensure the area below is clear of electronics or valuables. Have a bucket ready to catch water if it starts pouring in.
- With a helper inside the house near the suspected leak area, take a garden hose onto the roof (ensure you have a secure footing). Systematically spray different parts of the chimney, starting from the very top. Spray the cap for 5-10 minutes, then the crown, then the mortar joints section by section, and finally the flashing. Allow time for water to travel and for your helper to call out when they see water appear indoors. This methodical approach can accurately pinpoint the entry point.
- Pro Tip: Isolate sections. Cover the flashing with plastic sheeting and tape, then spray the upper chimney. If it leaks, the problem is above the flashing. If it doesn't, then the flashing is likely the culprit.
7. Evaluate the Interior for Further Damage – Assessing the full extent of the leak
- Back inside, check the attic and ceiling area around the chimney for any additional water stains, mold growth, or soft spots in the drywall. Take photos for insurance purposes if necessary.
- If you find significant mold or structural damage to wooden beams, it's best to consult a professional mold remediation specialist or structural engineer.
Common Causes
- Damaged Chimney Cap: The cap is rusted through, bent, or missing entirely, allowing rain to fall directly into the flue.
- Cracked Chimney Crown: The concrete or metal crown has developed cracks due to weathering, thermal expansion/contraction, or improper installation, letting water seep into the masonry structure below.
- Deteriorated Mortar Joints: The mortar between bricks has eroded, cracked, or become porous over time, creating通道 for water to penetrate the chimney.
- Faulty or Damaged Flashing: The metal flashing that seals the chimney to the roof has lifted, rusted, developed holes, or the sealant around it has failed, allowing water to run under the shingles and into the attic or wall cavity.
- Spalling Bricks: Bricks themselves have begun to deteriorate, flaking apart due to repeated freeze-thaw cycles after absorbing too much moisture. This creates weak points for water entry.
- Condensation (less common but possible): In some cases, if the chimney is not properly insulated or the flue gases are cooled too rapidly, condensation can form inside the flue liner, mimicking a leak. This typically occurs in colder weather and is usually associated with gas or oil furnaces.
Common Mistakes
- Ignoring the Problem: Thinking a small drip isn't a big deal. Even minor leaks can lead to significant, costly damage over time, including wood rot, mold, and structural compromises.
- Relying on Caulk/Sealant as a Permanent Fix: While caulk can offer a temporary solution for minor cracks, it's rarely a permanent solution for widespread flashing failures or a severely cracked crown. It will eventually degrade and fail again.
- Incorrect Ladder Usage: Improperly setting up or climbing a ladder is incredibly dangerous. Always follow safety guidelines, ensure stability, and consider having a spotter.
- Not Inspecting All Components: Focusing solely on the flashing when the real problem is a cracked crown or a missing chimney cap. A thorough top-to-bottom inspection is crucial.
- DIYing Major Masonry or Flashing Replacement: While minor patches are possible, extensive repointing, crown replacement, or flashing reinstallation requires specialized skills and tools. Attempting these without experience can lead to further damage.
- Not Considering Interior Damage: Fixing the exterior leak but ignoring the water-damaged drywall, insulation, or potential mold growth inside your attic or walls, which can cause ongoing health and structural issues.
Cost & Time Breakdown
| Task | DIY Cost | Pro Cost | Time |
|---|---|---|---|
| Visual Inspection | $0 | $150–$300 | 30–60 minutes |
| Minor Crown Crack Repair | $20–$50 | $200–$500 | 1–2 hours |
| Chimney Cap Replacement | $50–$250 | $200–$600 | 1–2 hours |
| Minor Flashing Resealing | $15–$30 | $250–$600 | 1–3 hours |
| Repointing (per square foot) | $2 (materials) | $15–$30+ | Varies |
| Full Flashing Replacement | Not Rec'd | $500–$1500+ | 4–8 hours |
Tips & Prevention
- Annual Chimney Inspection: Have your chimney professionally inspected by a CSIA-certified chimney sweep annually, especially before the heating season. They can spot small issues before they become major leaks.
- Clean Chimney Cap Regularly: Clear debris like leaves, twigs, and bird nests from your chimney cap to ensure proper water shedding and vent airflow.
- Maintain Exterior Paint/Sealants: If your chimney is painted or has exposed wood trim, ensure these are well-maintained and sealed to prevent water absorption and rot.
- Keep Gutters Clean: Clogged gutters near the chimney can cause water to overflow and pool around the chimney base, exacerbating flashing issues.
- Proper Drainage: Ensure landscape grading around your home directs water away from the foundation and chimney base.
- Consider a Rain Cap/Spark Arrestor: If you don't have one, installing a good quality cap prevents rain entry and also keeps sparks from escaping and critters from entering.
When to Call a Professional
You should absolutely call a licensed chimney professional or a reputable roofing contractor if you are uncomfortable working on your roof, if your roof is very steep, or if you suspect complex issues beyond simple patching. This includes widespread mortar deterioration requiring repointing, significant cracks in the chimney crown, rust-through or damaged flashing that needs complete replacement, or any signs of structural damage to the chimney masonry. Additionally, if your water test reveals a leak that you cannot locate or fix with basic methods, or if you find extensive mold or water damage in your attic or walls, a professional diagnosis and repair are warranted to prevent further costly damage and ensure your home's safety and integrity.
Related Articles
Keep troubleshooting with these hand-picked guides from FixlyGuide:
- The 4 Hidden Reasons Your Chimney Leaks in Rain (And the Smart Fixes) — A leaky chimney during rain can hint at several underlying issues, from a faulty chimney cap to damaged flashing, all of which require prom…
- The Secret Culprit Behind Your Leaky Chimney (It’s Not Always the Obvious Flashing) — Discover the often-overlooked causes of chimney leaks during rain and how to tackle them with effective DIY solutions and prevention tips.
- The Secret Reason Your Chimney Leaks During Rain (It's Not Always the Obvious Culprit) — A leaking chimney during rain can be a frustrating mystery, but often the root cause isn't what you think, leading to costly misdiagnosis.
- The #1 Overlooked Reason Your Chimney Leaks (It Rots Your Roof!) — Discover the surprising, often-missed culprit behind your leaky chimney and how this common issue can silently damage your home.
- The $5 Secret to Fixing a Clogged AC Drain Line (and Avoiding a Costly Flood) — A clogged AC drain line can lead to water damage and mold, but a simple, inexpensive DIY fix can prevent costly repairs.
- The Urgent Truth About Missing Roof Shingles (And Your 3-Step Fix) — High winds can rip shingles off your roof, exposing your home to immediate water damage – here’s how to assess, temporary patch, and plan p…
Frequently asked questions
Why does my chimney leak only when it rains heavily?+
Heavy rain exposes weaknesses in your chimney's waterproofing faster than light rain. Small cracks in the crown, minor flashing gaps, or slightly deteriorated mortar might only become apparent when there's a significant volume of water to overwhelm these minor defenses.
How urgently do I need to fix a leaking chimney?+
Immediately. Even a small leak can lead to significant, expensive damage over time, including wood rot, mold growth, ceiling damage, and compromise the structural integrity of your chimney and roof. The faster you act, the less damage and cost you'll incur.
Can a chimney leak cause mold?+
Yes, absolutely. Any prolonged water intrusion into your home creates an ideal environment for mold and mildew to grow, especially in dark, damp areas like attics or within wall cavities around the chimney. Mold can cause respiratory issues and further degrade building materials.
Is chimney leak repair a DIY job or for a pro?+
Minor repairs like sealing small crown cracks or re-caulking flashing can be DIY for a comfortable homeowner on a low-slope roof. However, extensive damage like pervasive mortar deterioration, full flashing replacement, or significant structural cracks are best left to licensed chimney professionals or roofing contractors due to safety risks and complexity.


Discussion
Loading comments…