Tools & materials you'll need
Affiliate linksAs an Amazon Associate FixlyGuide earns from qualifying purchases — at no extra cost to you. Prices and availability are accurate as of publication and subject to change.
Quick Answer
To safely thaw a frozen pipe, first locate the frozen section, then apply gentle, indirect heat using a hairdryer, heat lamp, or warm towels, ensuring you open a nearby faucet to allow water to flow as the ice melts. Never use an open flame or high-heat devices, as this can crack the pipe or ignite surrounding materials. Early intervention and proper technique can prevent a burst pipe, which can lead to extensive water damage and expensive repairs.
The Problem
You wake up on a cold winter morning, turn on the faucet, and nothing comes out—or perhaps just a trickle. The dreaded frozen pipe. While many homeowners immediately think of the inconvenience, the real problem is far more severe than a temporary lack of water. Water expands by about 9% when it freezes, creating immense pressure within your pipes. This pressure doesn't just build at the freezing point; it builds between the ice blockage and the closed faucet, effectively turning your pipe into a pressure cooker. If left unaddressed, this pressure will cause the pipe to burst, often in concealed areas like walls, ceilings, or crawl spaces. The resulting water damage can be catastrophic, leading to ruined drywall, flooring, insulation, and even structural issues, not to mention a massive repair bill.
Beyond the burst pipe, there's another hidden danger: the potential for scalding. If a hot water pipe freezes and then bursts, very hot water can flood an area, posing a burn risk. Electrical hazards are also a concern if water from a burst pipe comes into contact with wiring or electrical outlets.
The urgency of safe thawing cannot be overstated. A quick, well-executed thawing process can save you thousands in repairs and countless hours of headaches. Conversely, an impatient or incorrect approach, like using a blowtorch, can turn a manageable problem into a dangerous disaster.
How It Works
Understanding how pipes freeze helps in knowing how to thaw them. Water in pipes freezes when the ambient temperature drops below 32°F (0°C). However, the water inside your pipes can take longer to freeze, especially if it's moving. Stagnant water, or pipes in unheated areas like basements, crawl spaces, exterior walls, or attics, are most susceptible. When water freezes, it expands. This expansion applies outward pressure on the pipe walls. However, the most critical stress occurs not at the point of freezing, but in the segment of pipe between the ice blockage and the nearest closed faucet. As more water freezes upstream, it pushes against the existing ice blockage, creating an increasing amount of hydraulic pressure in that trapped section. Imagine a solid plug of ice forming, with more ice forming behind it, essentially trying to compress an incompressible fluid (water) in a fixed space. This immense pressure, sometimes exceeding 2,000 pounds per square inch (PSI), is what ultimately causes pipes to split or burst. The pipe itself doesn't typically burst at the freeze; it bursts downstream from the blockage, where the pressure builds up.
When you apply heat, you're aiming to melt the ice plug from the outside in. As the ice turns back into liquid water, it contracts, relieving the pressure. It's crucial to open a faucet served by the frozen pipe as you thaw it. This provides an escape route for the melting water and helps to relieve the pressure build-up. The flow of water will also help conduct heat further into the pipe, accelerating the thawing process. Without an open faucet, the melting ice still has nowhere to go, and pressure could build again, even if you’re melting the blockage.
Step-by-Step Fix
Before you begin, turn off the main water supply to your home if you suspect multiple frozen pipes or if you're unsure which pipe is frozen. This minimizes flood damage if a pipe bursts during or after thawing. Open all faucets connected to the affected pipe to relieve pressure as the ice melts.
-
Locate the Freeze—Find the exact spot of the blockage. Carefully trace the affected pipe from the faucet back towards the main water supply. Pay extra attention to unheated areas like basements, crawl spaces, exterior walls, and attics. Look for signs like frost on the outside of the pipe, a bulge in the pipe, or a section that feels significantly colder than surrounding pipes. Sometimes, you'll hear a faint gurgling or dripping sound at the ice blockage. If the pipe is hidden within a wall, you might need to use an infrared thermometer or listen for the coldest spot.
-
Prepare the Area—Clear combustible materials and protect surfaces. Move any flammable materials, such as old rags, newspapers, or insulation, away from the pipe. Lay down towels or a shallow bucket to catch any drips or minor leaks that might occur as the pipe thaws. If the pipe is in a sensitive area, like near drywall, consider using a protective barrier like aluminum foil to reflect heat where it's needed and prevent scorching.
-
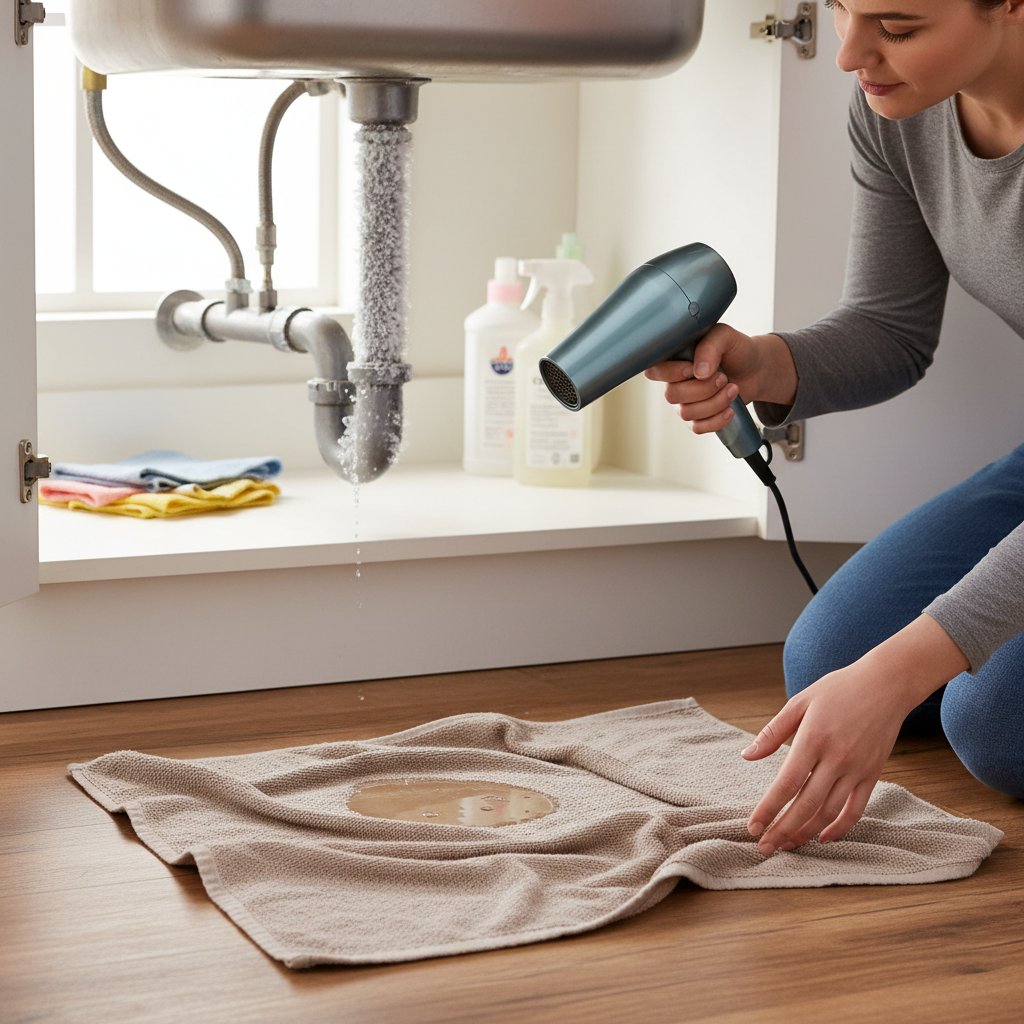
Apply Gentle, Indirect Heat with a Hairdryer—Gradually warm the frozen section. Plug in a hairdryer (ensure it's not plugged into an overloaded circuit). Set it to a medium or low heat setting. Direct the warm air stream onto the frozen section of the pipe, moving it back and forth continuously. Do not hold it stationary in one spot, as this can lead to uneven heating and stress the pipe. Keep the faucet open. This process can take anywhere from 15 minutes to an hour or more, depending on the severity of the freeze.
- Safety Note: Never leave a hairdryer unattended. Do not use an extension cord unless it is rated for outdoor use and heavy-duty appliances, and inspect it for damage.
- If this doesn't work: Move to a heat lamp or portable space heater (with caution).
-
Try a Heat Lamp or Portable Space Heater—For larger or stubborn freezes. Position a heat lamp (with a 250-watt infra-red bulb) or a small, fan-forced portable space heater at a safe distance from the frozen pipe—typically 1 to 2 feet away. Never place it so close that it risks melting plastic pipes, scorching wood, or igniting nearby materials. Keep the heat source moving slightly if possible, or rotate your position to ensure even heating. Monitor the area constantly, watching for any signs of overheating or melting. Again, keep the faucet open.
- Safety Note: Always maintain a safe distance and never leave heat lamps or space heaters unattended, especially near combustible materials. Ensure proper ventilation.
-
Use Warm Towels—An alternative for accessible sections or to supplement other methods. Soak several towels in hot (but not scalding) water. Wrap them around the frozen section of the pipe. You can hold them in place with string or duct tape. Replace the towels as they cool down to maintain continuous warmth. This method is slower but very safe and effective for pipes that are easily accessible. Combine with a hairdryer for faster results.
-
Increase Room Temperature—For pipes in unheated spaces. If the frozen pipe is in an unheated room, basement, or crawl space, try to raise the ambient temperature of that area. Use a portable space heater (again, with extreme caution and never unattended) or even an incandescent light bulb (if safely secured and not in contact with anything) to add warmth to the space. Open cabinet doors in kitchens and bathrooms to allow warmer air to circulate around pipes.
-
Monitor for Water Flow—The key sign of success. Keep the affected faucet open. As the ice melts, you should first hear drips, then a trickle, and eventually a steady stream of water. Once water begins to flow freely, allow it to run for several minutes to ensure all ice has cleared. The flowing water will help melt any remaining ice and prevent immediate re-freezing.
-
Check for Leaks—Post-thawing inspection is critical. Once the pipe is thawed and water is flowing normally, carefully inspect the entire length of the pipe for any signs of leaks. Look for drips, wet spots, or condensation. A pipe that has been under severe pressure may have hairline cracks or weakened joints that only become apparent once pressure is restored. If you find any leaks, immediately turn off the main water supply and call a plumber.
-
Prevent Future Freezes—Don't let it happen again. After the immediate crisis is over, take steps to prevent recurrence. Insulate exposed pipes, especially in unheated areas. Seal cracks and openings in your home's foundation and exterior walls. Disconnect outdoor hoses and drain exterior spigots before winter. Consider letting a faucet drip slightly during prolonged cold snaps to keep water moving through vulnerable pipes.
Common Causes
- Lack of Insulation: Pipes running through unheated spaces (crawl spaces, attics, garages, exterior walls, basements) without proper insulation are highly susceptible to freezing when temperatures drop. Even interior pipes located in exterior walls can freeze if the wall insulation is inadequate or missing.
- Sudden Temperature Drops: A rapid drop in outdoor temperature, especially during the night, can quickly freeze exposed pipes before the internal temperature of a home can compensate.
- Poorly Sealed Openings: Cracks in foundation walls, gaps around dryer vents, or unsealed openings where pipes enter and exit the house allow cold air to infiltrate, directly exposing pipes to freezing temperatures.
- Thermostat Set Too Low: If you set your thermostat too low (e.g., below 55°F or 13°C) or turn off your heat entirely when away from home during winter, the ambient temperature inside walls and unheated areas can drop enough for pipes to freeze.
- Exterior Hose Bibs/Spigots: Leaving garden hoses connected to outdoor spigots can trap water in the pipe leading to the spigot, which then freezes and can cause the pipe to burst inside the wall.
- Periods of Inactivity: Pipes in rarely used parts of the house, like guest bathrooms or utility sinks, where water doesn't regularly flow, are more likely to freeze because the water is stagnant.
Common Mistakes
- Using an Open Flame: Never, under any circumstances, use a blowtorch, propane torch, or any other open flame to thaw a frozen pipe. This is incredibly dangerous. It can quickly overheat and damage the pipe (especially plastic pipes, which can melt), ignite nearby combustible materials (wood, insulation), and create a severe fire hazard. The sudden, intense heat can also cause water trapped inside to flash to steam, leading to a violent pipe burst.
- Applying High, Concentrated Heat: Similar to open flames, using high-heat devices like powerful heat guns directly on a single spot can rapidly expand the pipe in that area, while other parts remain frozen. This uneven thermal expansion can cause the pipe to crack or burst due to stress.
- Ignoring the Faucet: Forgetting to open a faucet (or multiple faucets) on the affected line while thawing is a critical mistake. Without an open faucet, the melting ice has nowhere to go, and the pressure continues to build between the melted section and the next ice plug, potentially leading to a burst.
- Thawing Too Quickly: While urgency is important, attempting to thaw a pipe too quickly with extreme heat can cause more harm than good, as explained above. Gentle, gradual heat is always the safest approach.
- Forgetting to Check for Leaks: Many homeowners rejoice when water starts flowing again and forget to thoroughly inspect the pipe for leaks after thawing. A pipe might not burst during the freeze but may develop hairline cracks that only leak once the water pressure returns. Missing a leak can lead to significant hidden water damage.
- Not Addressing the Root Cause: Simply thawing the pipe without taking steps to prevent future freezes (like adding insulation or sealing gaps) means you're likely to face the same frustrating—and potentially costly—problem again during the next cold snap.
Cost & Time Breakdown
| Task | DIY cost | Pro cost | Time |
|---|---|---|---|
| Thawing a single pipe | $0–$20 | $150–$400 | 20 min – 2 hrs |
| Minor leak repair | $5–$50 | $200–$600 | 1–3 hrs |
| Replacing burst section | $20–$100 | $400–$1,500+ | 2–6 hrs |
| Water damage repair (minor) | $100–$500 | $500–$2,000+ | Days |
| Adding pipe insulation (DIY) | $30–$100 (materials) | N/A | 1–3 hrs |
Tips & Prevention
- Insulate Exposed Pipes: Wrap pipes in unheated areas (basements, crawl spaces, attics, garages) with foam pipe insulation sleeves, fiberglass insulation, or heat tape. This is your first line of defense.
- Seal Air Leaks: Use caulk or expanding foam to seal cracks and openings in your home's foundation and exterior walls, especially where utility lines or pipes enter the house. Cold drafts are a major culprit for frozen pipes.
- Disconnect Hoses and Drain Spigots: Before winter, disconnect all garden hoses from outdoor spigots. If your spigots aren't frost-proof, close the interior shut-off valve for the spigot and then open the outdoor faucet to drain any remaining water.
- Keep Thermostat Consistent: During cold snaps, maintain your home's temperature at a consistent level, ideally no lower than 55°F (13°C), even if you're away. This helps keep ambient temperatures above freezing inside walls and cabinets.
- Open Cabinet Doors: During extreme cold, open kitchen and bathroom cabinet doors to allow warmer air from your home to circulate around the pipes under sinks and against exterior walls.
- Let Faucets Drip: As a temporary measure during severe cold, allow a faucet on an exterior wall to drip slowly. The movement of water, even a trickle, can prevent freezing. Catch the drips in a bucket to conserve water.
- Know Your Main Shut-Off: Familiarize yourself with the location of your main water shut-off valve. In an emergency (like a burst pipe), knowing how to quickly turn off the water can save your home from extensive damage.
When to Call a Professional
You should call a licensed plumber immediately if you suspect a frozen pipe has already burst or if you are unable to locate the frozen section of the pipe within a wall or other inaccessible area. If you attempt to thaw a pipe and notice any signs of a leak—even a small drip—turn off your main water supply and call a professional. Never try to repair a burst pipe yourself, especially if it's under pressure or hidden. Furthermore, if you've tried safe thawing methods for an hour or more and still have no water flow, or if multiple pipes are frozen, it's time to bring in an expert. Plumbers have specialized equipment like thermal cameras to pinpoint frozen sections and professional tools to thaw pipes safely and efficiently, minimizing the risk of further damage.
Related Articles
Keep troubleshooting with these hand-picked guides from FixlyGuide:
- The 3 Hidden Dangers of Frozen Pipes (And How to Thaw Them Safely) — Frozen pipes can burst, causing extensive water damage. Learn to safely thaw them and prevent costly repairs.
- The 3 Hidden Reasons Your Pipes Freeze (And How to Thaw Them Fast) — Discover the real culprits behind frozen pipes and learn a step-by-step method to safely thaw them, preventing costly damage.
- The 90-Minute Hidden Danger of a Frozen Pipe (And the DIY Fix) — Thawing a frozen pipe quickly and safely is crucial to prevent bursting and extensive water damage to your home.
- The 3 Hidden Reasons Your Pipes Freeze (and How to Thaw Them Fast) — Discover the real culprits behind frozen pipes and learn safe, effective methods to thaw them quickly, preventing costly damage to your hom…
- The $5 Secret to Fixing a Clogged AC Drain Line (and Avoiding a Costly Flood) — A clogged AC drain line can lead to water damage and mold, but a simple, inexpensive DIY fix can prevent costly repairs.
- The 10-Second Flaw Home Inspectors Spot (That Hides Water Damage) — Discover the often-overlooked sign professionals catch in seconds that points to hidden water damage, protecting your home from costly repa…
Get the print-ready PDF of this guide
A clean, ad-free, printable version you can keep on your phone or pin to the workshop wall. Free with a FixlyGuide account.
- Print-optimized layout
- Tools, materials & every step included
- Saved to your account
Frequently asked questions
How long does it take to thaw a frozen pipe?+
Thawing time varies greatly depending on the severity of the freeze, the pipe material, and the thawing method used. It can take anywhere from 20 minutes for a small, superficial freeze to several hours for a deeply frozen section. Patience and continuous, gentle heat are key.
Can I use a heat gun to thaw a frozen pipe?+
While a heat gun can be used, it must be done with extreme caution. Set it to a low-to-medium setting and keep it moving constantly, never concentrating heat on one spot. A hairdryer is generally safer because its heat output is less intense and less likely to damage the pipe or surrounding materials. Never use an industrial-grade heat gun designed for paint stripping, as it can be too powerful and cause pipes to burst or materials to ignite.
What are the first signs of a frozen pipe?+
The most obvious sign is a significant reduction or complete cessation of water flow from a faucet. Other signs include visible frost on an exposed pipe, a bulging section of pipe, or a strange smell coming from a drain (indicating a frozen drain line). Sometimes, you might hear gurgling or hammering sounds within the walls as water tries to move past an ice blockage.
Should I turn off my main water supply if I have a frozen pipe?+
Yes, it's highly recommended, especially if you suspect the pipe might burst or if you cannot locate the frozen section immediately. Turning off the main water supply will prevent catastrophic flooding if the pipe bursts while you are thawing it, or once the water pressure returns.
How can I prevent pipes from freezing in the future?+
To prevent future freezes, insulate exposed pipes in unheated areas, seal air leaks in your foundation and exterior walls, disconnect outdoor hoses before winter, and maintain your home's thermostat at a consistent temperature (at least 55°F) during cold weather. Opening cabinet doors under sinks can also help circulate warmer air around vulnerable pipes.


Discussion
Loading comments…