
Tools & materials you'll need
Affiliate links- AmazonGarden hose or spray paintFor marking the layout
- AmazonTrenching spadeNarrow shovel for digging trenches
- AmazonHand tamper or spade endFor compacting soil and base material
- AmazonUtility knife or snipsFor cutting flexible edging
- AmazonRubber mallet or small sledgehammerFor driving stakes and tapping pavers
- AmazonLevel (4-foot or string level)For checking flatness
As an Amazon Associate FixlyGuide earns from qualifying purchases — at no extra cost to you. Prices and availability are accurate as of publication and subject to change.
Quick Answer
Many homeowners struggle with landscape edging that shifts, gaps, or rises out of the ground shortly after installation. The core issue often lies in inadequate trenching and insufficient anchoring. By taking the time to prepare a level, well-compacted trench and utilizing the correct number and type of anchors for your specific edging material, you can prevent these common problems and achieve a durable, professional-looking border for your flower beds.
The Problem
Picture this: you've spent an entire weekend meticulously planting vibrant flowers and lush shrubs, carefully setting up your new landscape edging to define your beautiful beds. For a few weeks, it looks fantastic. Then, after a heavy rain or a few rounds of mowing, you notice it: the plastic edging has popped up in spots, the pavers have shifted, or unsightly gaps have appeared, letting grass invade your pristine garden. This common frustration stems primarily from an eagerness to finish the job quickly, often skipping critical preparation steps like proper trenching and secure anchoring. Without a stable foundation and sufficient hold, even the highest quality edging will succumb to ground movement, frost heave, foot traffic, and the persistent pressure of growing grass roots.
How It Works
Landscape edging serves as a crucial barrier, preventing turfgrass from encroaching into flower beds and keeping mulch or decorative stones neatly contained. To function effectively, this barrier needs stability. The ground beneath and around it exerts constant pressure. Soil expands and contracts with moisture and temperature changes, a phenomenon known as frost heave can lift poorly anchored objects, and the relentless growth of grass rhizomes pushes against any obstruction. Proper installation works by counteracting these forces.
When you dig a trench, you're creating a stable, level base that the edging can sit within, distributing its weight and resistance evenly. The depth and width of this trench are critical – too shallow, and the edging doesn't have enough embedment to resist lateral forces; too narrow, and you can't properly backfill and compact the soil. The material of the edging itself plays a role: flexible plastic or rubber edging relies more heavily on stakes for stability, while heavier concrete pavers or natural stone blocks derive stability from their weight, interlocking design, and a well-prepared aggregate base. Anchoring pins or stakes, typically made of plastic or metal, drive into the ground through or alongside the edging, creating a mechanical bond that resists upward and lateral movement. Compacting the soil around the installed edging crucial: it eliminates air pockets, increases the density of the soil, and locks the edging firmly in place, making it much harder for external pressures to cause shifting or lifting. Without these fundamental steps, the edging simply rests on the surface or in a loose channel, vulnerable to the natural dynamics of your landscape.
Step-by-Step Fix
1. Plan Your Design and Mark the Path — Before you dig, visualize the final curve or line.
Walk the perimeter of your flower bed and decide on the exact shape. Use a garden hose, rope, or spray paint to mark the proposed line for your edging. This allows you to stand back and adjust the curves or straight lines until you're satisfied with the aesthetic. Accuracy here saves significant effort later. Consider the mower deck clearance if your goal is to create a mowing strip. Ensure the line is smooth and intentional.
- Tip: For perfect curves, use two stakes and a string to draw a large arc, or gently lay out a garden hose and adjust it until the curve is pleasing to the eye.
2. Dig the Trench Correctly — A level, consistent trench is the foundation for stable edging.
Using a spade or trenching tool, dig a trench along your marked line. The depth and width will vary based on your edging material. For most flexible plastic or rubber edging, aim for a trench that allows at least two-thirds of the edging's height to be below ground, typically 4-6 inches deep and 3-4 inches wide. For pavers or blocks, dig deep enough to accommodate a 1-2 inch base of compacted gravel plus the height of your paver, ensuring the top is flush or slightly above ground level. Use a hand tamper or the end of your shovel to firm up the bottom of the trench. Remove all loose soil, debris, and stubborn roots. This is the most crucial step most DIYers rush.
- Tool Tip: A trenching spade (a narrow shovel) or a square-head spade works best for creating clean, straight-sided trenches.
- If this doesn't work: If the trench is uneven, your edging will be uneven. Take the time to level the bottom carefully. Use a small level on a straight board to check consistency.
3. Add a Stable Base (for pavers/blocks) — Provide a solid foundation for rigid edging.
If you're installing concrete pavers, bricks, or natural stone blocks, spread 1-2 inches of paver base (crushed gravel or decomposed granite) into the bottom of your trench. Rake it to an even thickness and then compact it thoroughly using a hand tamper. This creates a stable, well-draining sub-base that prevents settling and shifting, which is vital for heavier materials.
- Material Note: Do not skip this step for rigid materials. Without a compacted base, pavers will invariably shift and sink over time.
4. Lay the Edging Material — Carefully place the edging, checking for alignment as you go.
Begin laying your chosen edging material into the prepared trench. For flexible plastic or rubber, unroll it gradually. For bricks, pavers, or stone, place each piece snugly against the last. For curved sections with rigid materials, you may need to use smaller, wedge-shaped pieces or make small cuts if the material allows for it. Ensure the top edge of your edging is at the desired height – typically flush with the surrounding lawn or an inch or two above your mulch layer in the bed. Use a rubber mallet to gently tap pavers into place and ensure they are level with their neighbors and along the overall line.
- Alignment Tip: Use a string line pulled taut between two stakes to guide your installation, ensuring a consistently straight run or a smooth, predictable curve.
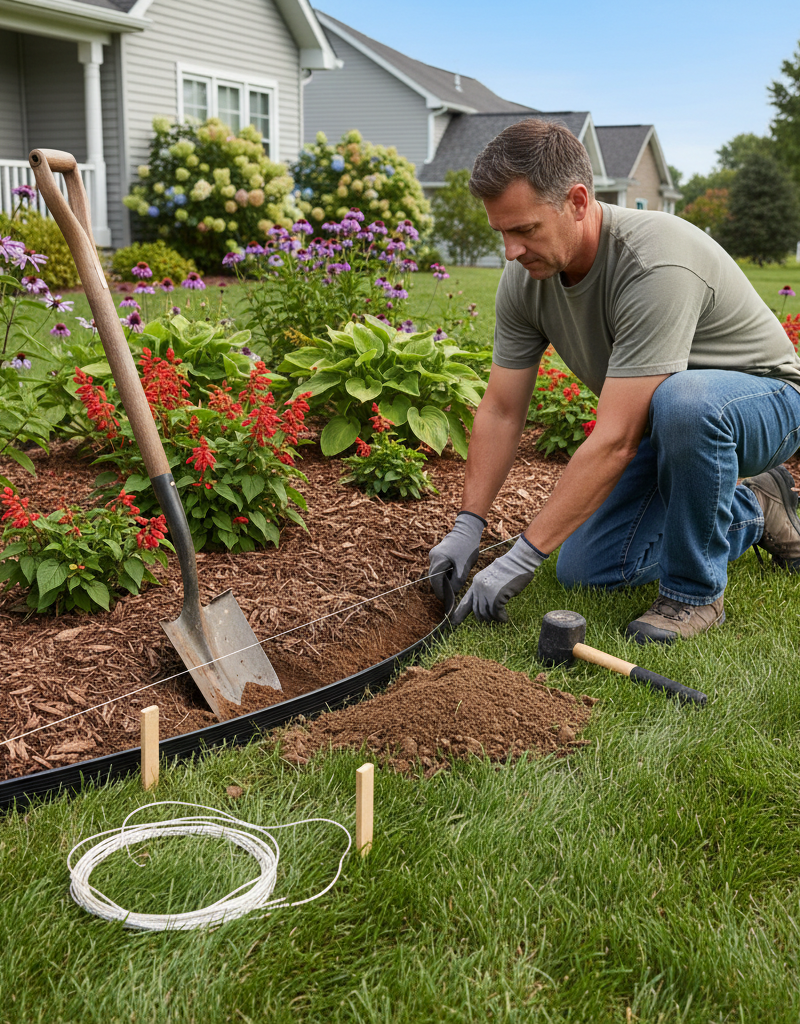
5. Secure with Anchoring Stakes — The key to preventing future movement.
This is where most homeowners fail. For flexible plastic or rubber edging, insert anchoring stakes (usually plastic or metal, 8-10 inches long) through the designated holes or alongside the back edge of the edging. Space stakes every 18-24 inches on straight runs and every 12-18 inches on curves. Curves exert more outward pressure, requiring closer staking to maintain their shape. Drive the stakes fully into the ground with a small sledgehammer or rubber mallet, ensuring the top of the stake is flush with or slightly below the top of the edging. For rigid materials like bricks or pavers, you may use specialized plastic or metal landscape edging restraint strips (often called
Related Articles
Keep troubleshooting with these hand-picked guides from FixlyGuide:
- The 3 Hidden Mistakes That Make Landscape Edging Fail (And How to Fix Them) — Discover common mistakes homeowners make when installing landscape edging and learn the correct methods to achieve a durable, professional-…
- The #1 Mistake Homeowners Make with Landscape Edging (and How to Fix It) — Discover the most common error in landscape edging installation that leads to weeds and an uneven look, and learn the easy fix for a clean,…
- The 3 Glaring Mistakes Most Homeowners Make with Landscape Edging (and How to Fix Them) — Avoid common pitfalls when installing landscape edging to keep your flower beds neat and prevent grass invasion with these simple fixes.
- The #1 Mistake Homeowners Make with Landscape Edging (and How to Fix It) — Discover the common pitfalls in landscape edging installation and how to avoid them for a clean, long-lasting garden border.
- The #1 Mistake Homeowners Make When Fighting Lawn Grubs (And How to Fix It) — Discover the crucial mistake homeowners often make when treating lawn grubs and learn the most effective, timing-sensitive strategies to el…
- The Secret to Lush Raised Beds? It's Not Just About How You Water — Smart irrigation for raised garden beds isn't just about automation; it's about delivering the right amount of water precisely when your pl…
Frequently asked questions
How deep should landscape edging be?+
The trench for landscape edging should typically be 4-6 inches deep, allowing at least two-thirds of the edging material's height to be below ground. For pavers or blocks, the depth needs to accommodate a 1-2 inch compacted gravel base plus the height of the paver, ensuring the top is flush with or slightly above the surrounding grade.
How far apart should landscape edging stakes be placed?+
For flexible plastic or rubber edging, stakes should be placed every 18-24 inches on straight runs. For curved sections, where more outward pressure is exerted, stakes should be closer, typically every 12-18 inches, to maintain the curve's integrity and prevent shifting.
Why does my landscape edging keep popping up?+
Landscape edging often pops up due to insufficient trenching and inadequate anchoring. If the trench isn't deep or compacted enough, or if too few stakes are used, ground movement, frost heave, or grass roots can displace the edging. Proper preparation and ample anchoring are key to preventing this.
Can I install landscape edging without digging a trench?+
While some lightweight, temporary edging might be placed without a trench, it is generally not recommended for long-term, stable results. A trench provides the necessary embedment and stability for the edging to resist lateral forces, frost heave, and root encroachment, ensuring a professional and durable finish.
What's the best material for landscape edging?+
The "best" material depends on your aesthetic preference, budget, and desired durability. Flexible plastic/rubber is cost-effective and easy to install for curves. Concrete pavers/bricks offer a more formal, durable look but require more intensive preparation. Metal edging (steel/aluminum) provides a sleek, modern line and excellent durability. Natural stone offers a rustic, organic feel but can be labor-intensive to install.


Discussion
Loading comments…