Tools & materials you'll need
Affiliate linksAs an Amazon Associate FixlyGuide earns from qualifying purchases — at no extra cost to you. Prices and availability are accurate as of publication and subject to change.
Quick Answer
Applying mulch incorrectly, specifically piling it too high or directly against the base of plants and trees, creates ideal conditions for pests and diseases. The key is to maintain a 2–4 inch layer of mulch, ensuring it's spread evenly and kept several inches away from trunks and stems to allow for proper air circulation and discourage unwanted visitors.
The Problem
Mulch is a garden's best friend...when applied correctly. Unfortunately, many homeowners, with the best intentions, make a critical mistake that turns this beneficial layer into an unwitting attractant for a host of garden pests. This common error involves applying mulch too thickly or, even worse, piling it directly against the stems of plants and the trunks of trees, often creating what's colloquially known as a 'mulch volcano.'
While a thick layer of mulch might seem like more protection, it actually becomes a damp, dark, and insulated refuge for rodents like voles and mice, slugs, snails, carpenter ants, and even some fungal pathogens. The constant moisture held against bark and stems can also lead to rot, crown rot in perennials, and soft spots that make plants more vulnerable to insect boring. Furthermore, an overly thick layer can smother beneficial soil microbes, prevent water and nutrients from reaching roots, and even impede gas exchange, ultimately stressing your plants and making them less resilient.
How It Works
Mulch functions primarily as a protective layer over the soil. Its benefits are numerous: it conserves soil moisture by reducing evaporation, suppresses weed growth by blocking sunlight, moderates soil temperature by insulating roots from extreme heat and cold, and as organic mulches break down, they slowly enrich the soil with nutrients. The effectiveness of mulch hinges on creating an optimal environment benefiting plants without inadvertently harming them.
When mulch is applied correctly, a 2–4 inch layer allows sufficient air and water exchange while still providing insulation and weed suppression. This depth is thin enough to dry out periodically on the surface, making it less appealing for moisture-loving pests. Crucially, leaving a 'buffer zone' of 2–6 inches around plant stems and tree trunks prevents the mulch from holding constant moisture against the bark. This air gap allows the bark to dry out naturally, reducing the risk of rot and creating an inhospitable barrier for pests that burrow or crawl along the surface.
Pests like voles and slugs thrive in consistently moist, dark environments where they can hide from predators and access tender plant tissues. A thick, wet layer of mulch right against a plant stem offers them exactly that—a superhighway to your plant and a cozy, protected home. Conversely, a thinner, well-aerated layer with a clear space around the plant base disrupts this ideal habitat, forcing pests to cross exposed soil, which is less appealing and makes them more visible to predators.
Organic mulches, such as wood chips, shredded bark, or pine needles, decompose over time. This decomposition is a biological process carried out by bacteria, fungi, and insects, which gradually break down the organic matter into hummus, improving soil structure and fertility. However, excessive anaerobic decomposition (when too much mulch prevents oxygen from reaching lower layers) can lead to sour mulch, characterized by a rotten egg smell, which can be toxic to plants. Proper depth and aeration prevent this.
Step-by-Step Fix
1. Assess and Remove Excess Mulch — Carefully inspect your garden beds, especially around the base of trees and shrubs. If you see mulch piled high, touching stems or trunks, or forming a 'mulch volcano,' it's time to act.
*   **Tools needed:** Garden rake or gloved hands
*   **Safety first:** Wear garden gloves to protect your hands from splinters or hidden debris.
*   **Action:** Gently pull back any mulch that is too close to the plant base or is thicker than 4 inches. If the mulch is severely compacted or shows signs of fungal growth (white mycelial mats) or a sour smell, it's best to remove and discard that portion and replace it with fresh material.
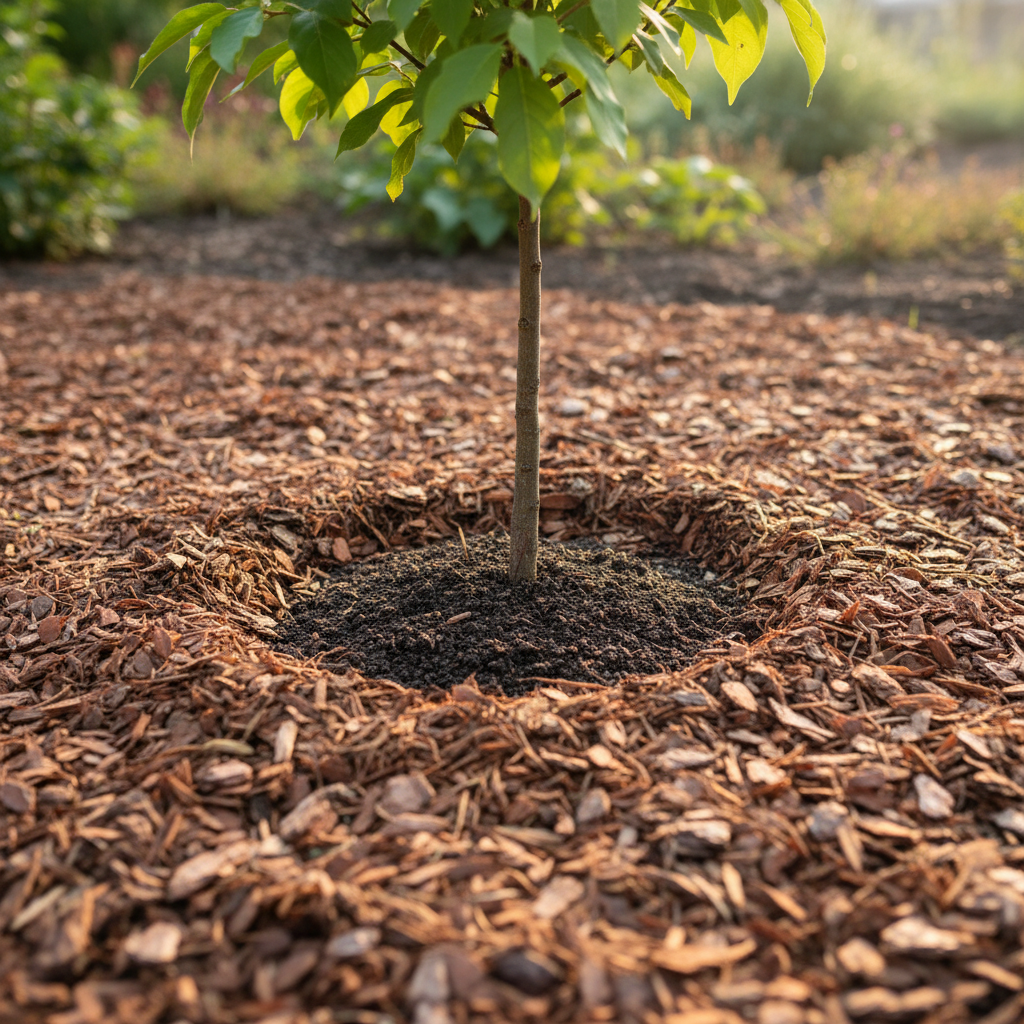
2. Create the "Donut" or "Moat" — This is the most crucial step for pest prevention and plant health. The goal is to create a gap between the mulch and the plant's base.
*   **Distance:** For smaller plants and perennials, aim for a 2–3 inch clearance. For shrubs and established trees, leave a 4–6 inch clear ring around the trunk.
*   **Shape:** Imagine a donut or a small moat around your plant, where the 'hole' is the clear space around the stem/trunk, and the 'dough' is the mulched area.
*   **Purpose:** This gap allows air circulation, prevents moisture buildup against the stem/trunk, and makes it harder for pests to access the plant without crossing exposed soil.
3. Evenly Spread to Optimal Depth — After creating the buffer zone, ensure the remaining mulch is spread uniformly at the correct depth across the rest of the garden bed.
*   **Depth:** Maintain a consistent layer of 2–4 inches for most landscape situations. For fine mulches like shredded bark, you can lean towards the 2-3 inch range. For coarser mulches like larger wood chips, 3-4 inches is often appropriate.
*   **Tools:** Use a garden rake or your hands to gently spread the mulch. Pay attention to low spots or areas where mulch has settled.
*   **Coverage:** Ensure the mulch extends to the drip line of trees and shrubs, or covers the entire bed where perennials and annuals are planted, but always respect the buffer zone around individual plants.
*   **If this doesn't work:** If you continue to see significant pest activity despite correcting your mulching technique, other pest management strategies may be needed, such as traps for voles or specific organic pesticides for slugs, always applied according to package directions.
Common Causes
- Over-enthusiasm: Homeowners often believe 'more is better,' leading to excessive mulch application. They may even re-mulch without removing or thinning old layers.
- Aesthetic Preference: A thick, uniform layer of mulch can look tidy, leading people to prioritize appearance over proper horticultural practice.
- Misunderstanding of Purpose: Lack of knowledge about how mulch interacts with plants and soil and how pests utilize excessive mulch as habitat.
- Commercial Landscaping Practices: Sometimes, landscape crews apply mulch too thickly or create mulch volcanoes quickly for aesthetic purposes, without considering long-term plant health.
- Weed Suppression Focus: While mulch does suppress weeds, an over-application often stems from a misconception that extreme thickness is required, rather than an adequate 2-4 inch layer.
Common Mistakes
- The "Mulch Volcano": Piling mulch directly against the base of trees and shrubs. This is the cardinal sin of mulching, promoting rot, disease, and pest harborage.
- Too Thick a Layer: Applying mulch more than 4 inches deep. This can suffocate roots, encourage anaerobic decomposition, and prevent water from reaching the soil.
- Ignoring Old Mulch: Adding new mulch on top of old, compacted, or decomposed mulch without assessing or raking out the previous layer. This compounds the thickness issue.
- Using the Wrong Mulch: Applying non-organic mulches (like rubber or plastic sheeting) where organic material would be more beneficial, or using uncomposted wood chips that can temporarily deplete soil nitrogen.
- Mulching Wet Soil: Applying mulch when the soil is completely saturated. While it helps retain moisture, it can also trap excessive moisture, leading to root issues. It's best to apply to damp, but not soaking wet, soil.
- Mulching Over Weeds: Not thoroughly weeding an area before applying mulch. Mulch will suppress new weeds, but it won't kill established ones, which will simply grow through it.
Cost & Time Breakdown
| Task | DIY cost | Pro cost | Time |
|---|---|---|---|
| Remove excess mulch | $0 (tools on hand) | $50-$150 (small area) | 15-30 mins |
| Purchase & spread new mulch | $20-$100 (10-20 bags) | $150-$400+ (for materials & labor) | 1-2 hours |
| Correcting existing mulch | $0 | $50-$100 | 10-20 mins |
| Learning proper technique | $0 | N/A | Priceless |
Tips & Prevention
- Observe Annually: Walk through your garden beds each spring and fall. Look for 'mulch volcanoes' or areas where mulch has become too deep due to decomposition or reapplication. Rake it back as needed.
- Refresh, Don't Rebuild: Instead of adding a thick new layer every year, rake out the existing mulch to loosen it and then top dress with a thin 1-2 inch layer of fresh material to maintain the proper depth.
- Choose Wisely: Select organic mulches like shredded bark, wood chips, or pine needles for their slow decomposition and soil benefits. Avoid dyes if you're concerned about chemicals leaching into your soil, though most modern dyes are considered safe.
- Inspect for Pests: While adjusting mulch, keep an eye out for signs of pests like slug trails, vole tunnels, or ant nests. Addressing these early can prevent larger infestations.
- Water Before Mulching: If the soil is dry, give your beds a good watering before applying mulch. This ensures moisture is locked in effectively.
When to Call a Professional
While correcting mulching technique is a straightforward DIY task, there are instances where calling a professional can be beneficial. If you have extensive garden beds or a large property with many trees and shrubs, and the task of adjusting mulch feels overwhelming and time-consuming, hiring a professional landscaping company can save you significant effort. You should also consider a pro if you've been battling persistent pest infestations despite correcting your mulching, as they can accurately diagnose the specific pest and recommend a targeted, safe treatment plan. Additionally, if your plants are showing signs of severe stress, disease, or decline, and you suspect it might be related to long-term improper mulching or other underlying soil issues, a certified arborist or horticulturist can provide expert diagnosis and propose a comprehensive solution for improved plant health that goes beyond just mulch adjustment. They can also advise on appropriate mulch types for your specific soil and plant needs, ensuring long-term success and vitality for your landscape. Professionals have the large-scale equipment and experienced crews to handle substantial mulching projects efficiently and correctly, ensuring your landscape receives the best care from the start.
Related Articles
Keep troubleshooting with these hand-picked guides from FixlyGuide:
- The 3 Mulching Mistakes That Are Secretly Killing Your Plants — Discover the three common mulching errors that inadvertently harm your garden plants and learn how to apply mulch correctly for thriving, h…
- The #1 Mistake Homeowners Make with Landscape Edging (and How to Fix It) — Discover the most common error in landscape edging installation that leads to weeds and an uneven look, and learn the easy fix for a clean,…
- The #1 Mistake Killing Your Thin Lawn (and How to Fix It in a Weekend) — Overseeding a thin lawn is crucial for a lush yard, but a common mistake can ruin your efforts before they even begin. Learn how to diagnos…
- The #1 Mistake Killing Your Thin Lawn (And How to Fix It in a Weekend) — Overseeding your lawn can transform it from thin and patchy to lush, but many homeowners make a crucial mistake that hinders success. Learn…
- The 3 Hidden Reasons Your Tree Leaves Turn Brown (and the Easy Fixes) — Discover the often-overlooked environmental stressors and specific diseases that cause tree leaves to brown, and learn simple, actionable s…
- The Secret to Lush Raised Beds? It's Not Just About How You Water — Smart irrigation for raised garden beds isn't just about automation; it's about delivering the right amount of water precisely when your pl…
Frequently asked questions
How deep should mulch be around plants?+
Mulch should generally be 2–4 inches deep. For smaller plants and annuals, aim for the shallower end (2-3 inches), while larger shrubs and trees can benefit from 3-4 inches. The most important thing is to avoid excessive depth and maintain a clear space around the plant's base.
What is a 'mulch volcano' and why is it bad?+
A 'mulch volcano' is when mulch is piled high, directly against the trunk of a tree or the stem of a plant. This is bad because it traps moisture against the bark, leading to rot, fungal growth, and creates a perfect hiding and breeding ground for pests like voles, slugs, and insects. It can also suffocate surface roots.
How far should mulch be from a tree trunk?+
Mulch should be kept 4–6 inches away from a tree trunk. This creates a critical 'buffer zone' that allows the bark to dry out, prevents rot, and deters pests from burrowing or crawling directly onto the tree, ensuring good air circulation at the base.
What kind of pests are attracted to too much mulch?+
Too much mulch, especially when piled against plant bases, attracts a variety of pests. These commonly include voles and mice (who use it for shelter and nesting), slugs and snails (who thrive in the damp environment), carpenter ants, earwigs, and various fungal gnats or other moisture-loving insects.
Can I just rake back old mulch, or do I need to remove it?+
For slightly too-deep or compacted mulch, raking it back and redistributing it to the correct depth (2-4 inches with a clear base) is often sufficient. However, if the mulch shows signs of severe decomposition, a sour smell, or significant fungal growth (white mycelial mats), it's best to remove and replace those affected portions to prevent plant health issues.


Discussion
Loading comments…