
Tools & materials you'll need
Affiliate linksAs an Amazon Associate FixlyGuide earns from qualifying purchases — at no extra cost to you. Prices and availability are accurate as of publication and subject to change.
Quick Answer
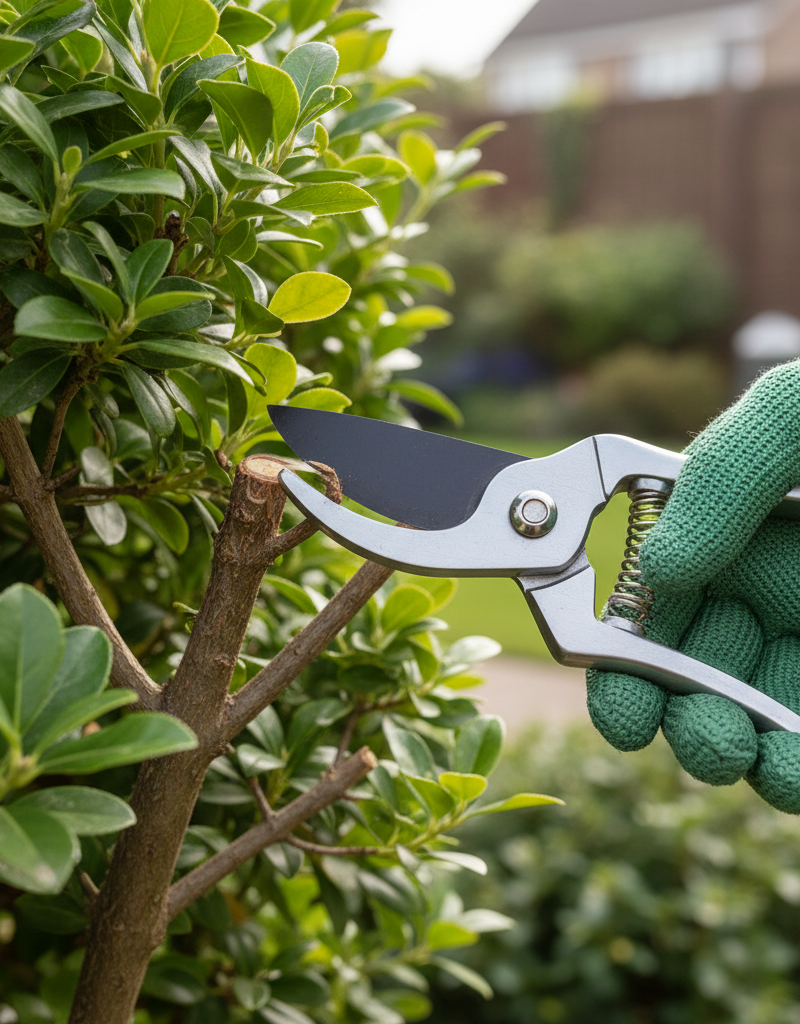
Many homeowners inadvertently harm their precious shrubs and plants by using tools that are not up to the task: dull or dirty pruning shears. This common oversight leads to rough, uneven cuts that invite pests and diseases, hindering plant health and growth. The swift and effective solution is to regularly clean, sharpen, and properly maintain your pruning shears, ensuring every cut is precise and clean, fostering robust plant recovery and vitality.
The Problem
It happens almost imperceptibly. A homeowner grabs their trusty pruning shears, perhaps from the back of the shed or a forgotten corner of the garage. They snip away at overgrown branches, aiming to tidy up a rose bush or shape a wayward shrub. Yet, instead of a clean, decisive cut, the branch resists, requiring extra force. The result? A ragged, crushed stem, not a neat incision. This isn't just an aesthetic problem; it's a critical wound for your plant. These torn, frayed edges are open invitations for pathogens, fungi, and insect infestations. Plants struggle to heal these rough cuts, diverting energy from growth and flowering into a prolonged recovery. Over time, repeated poor cuts stress the plant, leading to weakened branches, stunted growth, and in severe cases, the complete demise of the shrub. The seemingly innocuous act of pruning with improper tools can quietly undermine the health of your entire landscape.
How It Works
To understand why proper shear maintenance is so vital, consider the mechanics of a healthy plant cut. When a sharp, clean pruning shear closes around a stem, it acts like a surgeon's scalpel, severing the plant's vascular tissues — the xylem and phloem – with minimal damage. This creates a small, defined wound that the plant can quickly seal off, much like your body forming a scab. The plant's natural defense mechanisms are triggered, sending growth hormones and protective compounds to the site, allowing a rapid and efficient healing process.
Conversely, a dull or dirty shear doesn't cut; it crushes and tears. Imagine trying to cut a rope with a butter knife – you'd fray the fibers and make a mess. A dull blade forces the plant's cells to rupture unevenly, leaving a significantly larger and more vulnerable wound site. This exposé of intercellular material is a beacon for opportunistic bacteria and fungi, which can enter the plant's system and spread disease. Moreover, compressed and torn tissue struggles to transport water and nutrients, further impeding healing. Dirty blades compound this issue by directly transferring pathogens from an infected plant to a healthy one, acting as vectors for disease. Residues like sap and soil, if not cleaned, also contribute to friction, making cuts even less precise and accelerating blade dullness. Understanding this cellular-level impact clarifies why a clean, sharp edge isn't just about ease of use—it's about plant health and survival.
Step-by-Step Fix
Maintaining your pruning shears ensures clean cuts and healthy plants. Follow these steps for optimal tool care.
-
Gather Your Supplies – Before you begin, have everything ready.
- Collect your pruning shears, a wire brush or stiff bristle brush, rubbing alcohol (or household disinfectant wipes), a sharpening stone (fine grit, 400-600 is ideal), light machine oil (like 3-in-1 oil), and an old rag or cloth. Safety glasses and gloves are also recommended to protect your hands and eyes from debris and sharp edges.
-
Clean Off Debris – Remove visible plant matter immediately after use.
- Use the wire brush or stiff bristle brush to scrub away any sap, dirt, small twigs, or leaves clinging to the blades and pivot points. Pay close attention to the cutting edge and hinges. For stubborn sap, a little warm soapy water can help, but ensure you dry the shears thoroughly afterward to prevent rust.
-
Disinfect the Blades – Crucial for preventing disease transmission.
- Soak an old rag or cotton ball with rubbing alcohol. Wipe down both sides of the blades thoroughly. This sterilizes the cutting surfaces, killing any bacteria, fungi, or viruses that could transfer from one plant to another. You can also use household disinfectant wipes for convenience. Allow the alcohol to evaporate completely.
-
Inspect for Damage – Check for wear and tear before sharpening.
- Hold the shears up to the light and carefully examine the blades. Look for nicks, burrs, or bending. Minor nicks can often be sharpened out, but significant damage might require professional repair or replacement of the blade. Check the pivot bolt for looseness; tighten if necessary with a wrench or screwdriver.
-
Sharpen the Blades (Bypass Shears) – Restore the cutting edge for clean cuts.
- For bypass pruners (which have two blades that slide past each other like scissors), only sharpen the beveled edge of the upper blade. Hold the sharpening stone at the same angle as the existing bevel (usually between 10-20 degrees). Push the stone along the beveled edge, moving from the pivot to the tip, applying moderate pressure. Repeat 10-15 times on each side of the blade. Flip the blade over and run the stone flat against the back side just a few times to remove any burrs that may have formed.
-
Sharpen the Blades (Anvil Shears) – Different mechanism, different sharpening approach.
- Anvil pruners (where a single blade cuts against a flat
Related Articles
Keep troubleshooting with these hand-picked guides from FixlyGuide:
- The Hidden Reason Your AC Isn't Cooling (And 7 Fixes Homeowners Miss) — If your central AC isn't cooling your home, the culprit often lies in an overlooked issue that's simple to fix, preventing costly professio…
- 7 Inspection Red Flags That Secretly Signal a $20,000 Bill — Don't let your dream home become a money pit. Many buyers and even some inspectors overlook subtle home inspection red flags that lead to f…
- The 3 Crucial Mistakes That Ruin Wall Stripes (And How to Fix Them) — Achieving crisp, professional-looking painted stripes on a wall is a rewarding DIY project, but it's easy to make common mistakes that lead…
- 7 Hidden Equity Drains Costing You Thousands Annually — Your home is an asset, but silent problems like minor leaks, poor insulation, and deferred maintenance can drain its value. Discover the se…
- The 4 Hidden Reasons Your Lawn Stays Yellow (And How to Fix It FAST) — Uncover the surprising culprits behind a yellow lawn and learn the quick, effective fixes to restore vibrant green growth.
- The #1 Pruning Mistake That Chokes Your Shrubs (And How to Fix It Right Now) — Discover the most common pruning error homeowners make and how to correct it for healthier, more vigorous shrub growth.
Get the print-ready PDF of this guide
A clean, ad-free, printable version you can keep on your phone or pin to the workshop wall. Free with a FixlyGuide account.
- Print-optimized layout
- Tools, materials & every step included
- Saved to your account
This article was independently written by FixlyGuide based on the source topic.
Frequently asked questions
How often should I sharpen my pruning shears?+
For active gardeners, sharpening shears after every 4-6 hours of use, or at least once a month during peak gardening season, is a good rule of thumb. If you notice cuts becoming ragged or requiring more effort, it's definitely time to sharpen.
What's the difference between bypass and anvil pruners?+
Bypass pruners have two blades that slide past each other, much like scissors, making clean cuts on live green wood. Anvil pruners have a single blade that slices through material against a flat surface (the 'anvil'), which is better for dead or woody branches as it can crush live tissue.
Can I use household oil to lubricate my shears?+
While some household oils might work in a pinch, it's best to use a light machine oil specifically designed for tools. These oils typically offer better lubrication and rust protection without attracting excessive dirt and grime. Avoid heavy grease or cooking oils.
Why do my shear blades get sticky after pruning?+
Sticky blades are usually caused by sap and resin from plants. This residue builds up, increasing friction and making cuts harder. Regular cleaning after each use, especially with rubbing alcohol, will prevent this buildup and keep your shears operating smoothly.


Discussion
Loading comments…