Tools & materials you'll need
Affiliate linksAs an Amazon Associate FixlyGuide earns from qualifying purchases — at no extra cost to you. Prices and availability are accurate as of publication and subject to change.
Quick Answer
Ice dams are formed by a cycle of melting and refreezing snow on your roof, primarily due to inconsistent roof temperatures. The melted snow runs down the roof until it hits a colder surface, typically the eaves, where it refreezes into a barrier. This barrier then traps more melting water, forcing it under shingles and into your home, leading to significant water damage. The safest and most effective methods for homeowners to address existing ice dams include using a long-handled roof rake from the ground to carefully pull snow off the lower edges of the roof and using chemical de-icers like calcium chloride in pantyhose 'socks' to melt channels through the dam, allowing water to drain.
The Problem
That shimmering, icy lip along your eaves might look picturesque, but it's a silent threat to your home. Ice dams aren't just an aesthetic issue; they're a symptom of heat loss from your home, leading to a cascade of expensive problems. When warm air leaks from your living space into the attic, it heats sections of the roof deck. Snow on these warmer sections melts, even if the outdoor temperature is below freezing. This meltwater then trickles down the roof slope until it reaches the colder eaves, which are typically unheated and extend beyond the insulated wall line. Here, the water refreezes, forming a growing ridge of ice—an ice dam. This dam prevents subsequent meltwater from draining off the roof. Instead, the water pools behind the dam, seeps under your shingles, saturates roof sheathing, insulation, and eventually makes its way into your walls and ceilings. This can cause stained ceilings, peeling paint, warped floors, mold growth, and even compromise the structural integrity of your home. The financial cost of repairing ice dam damage can range from hundreds to thousands of dollars, making proactive understanding and safe removal crucial.
How It Works
Understanding how ice dams form is key to preventing and managing them. The process hinges on a temperature differential across your roof surface. Inside your heated home, warmth naturally rises and attempts to escape into the attic. If your attic isn’t adequately insulated or sealed, this heat infiltrates the attic space, warming the roof deck from underneath. Simultaneously, the exposed parts of your roof, particularly the eaves that overhang your exterior walls, remain at or near the ambient outdoor temperature, which is often below freezing in winter.
When snow falls on your roof, the section above the heated portion of your house becomes slightly warmer, typically just above 32°F (0°C). This causes the bottom layer of snow to melt. This meltwater then flows downwards, underneath the remaining snowpack, until it reaches the colder eaves. As this water hits the unheated, sub-freezing eaves, it rapidly loses its heat and refreezes, forming a small ridge of ice. This initial ridge acts as a barrier. Subsequent meltwater, unable to drain over the edge, begins to pool behind this ice barrier. As more water accumulates and refreezes, the ice dam grows thicker and wider.
This trapped water is the real danger. It can sit for extended periods, exerting hydrostatic pressure that forces it up and under shingles. Shingles, while designed to shed water downwards, are not watertight when water flows upwards. Once under the shingles, the water can penetrate the roof's underlayment, soak into the roof sheathing, drip into the attic insulation, and ultimately stain and damage interior ceilings, walls, and insulation. Furthermore, the sheer weight of a large ice dam can stress gutters and fascia boards, potentially pulling them away from the house.
Step-by-Step Fix
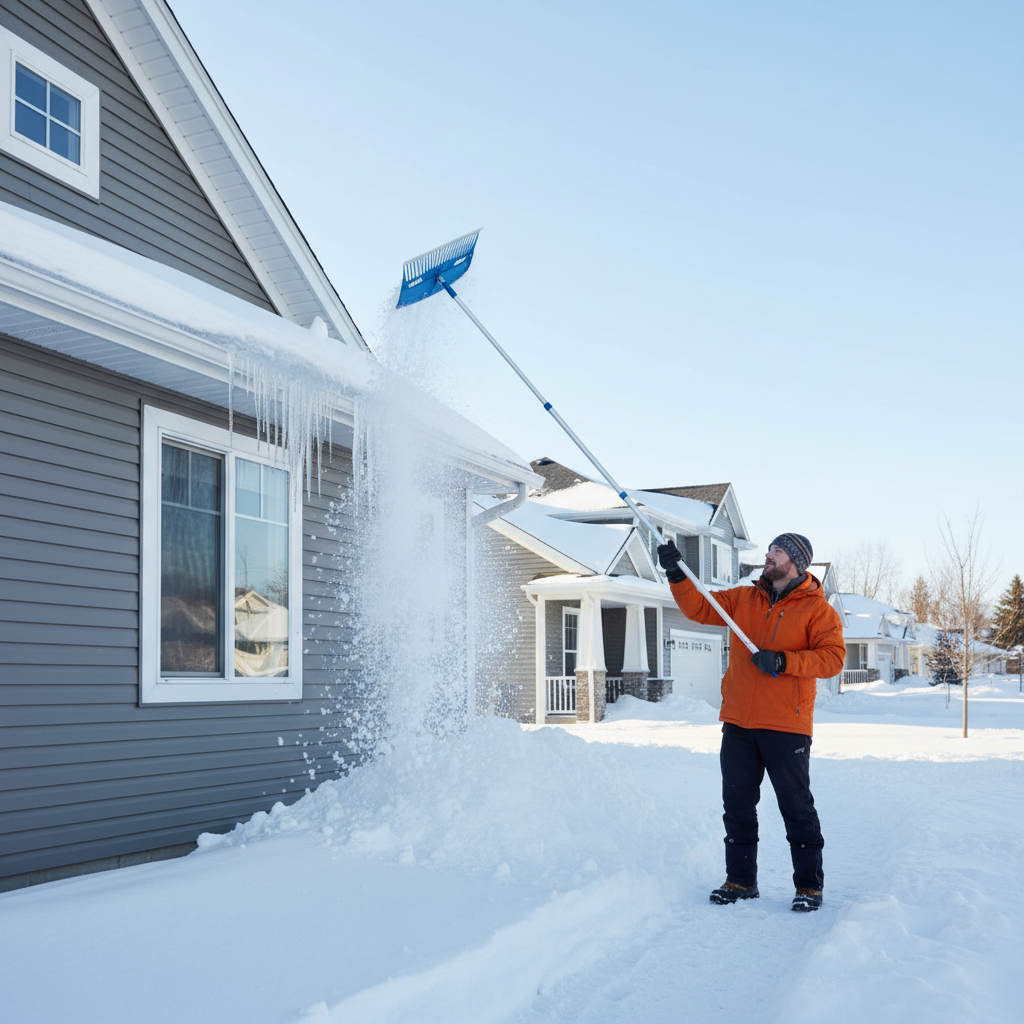
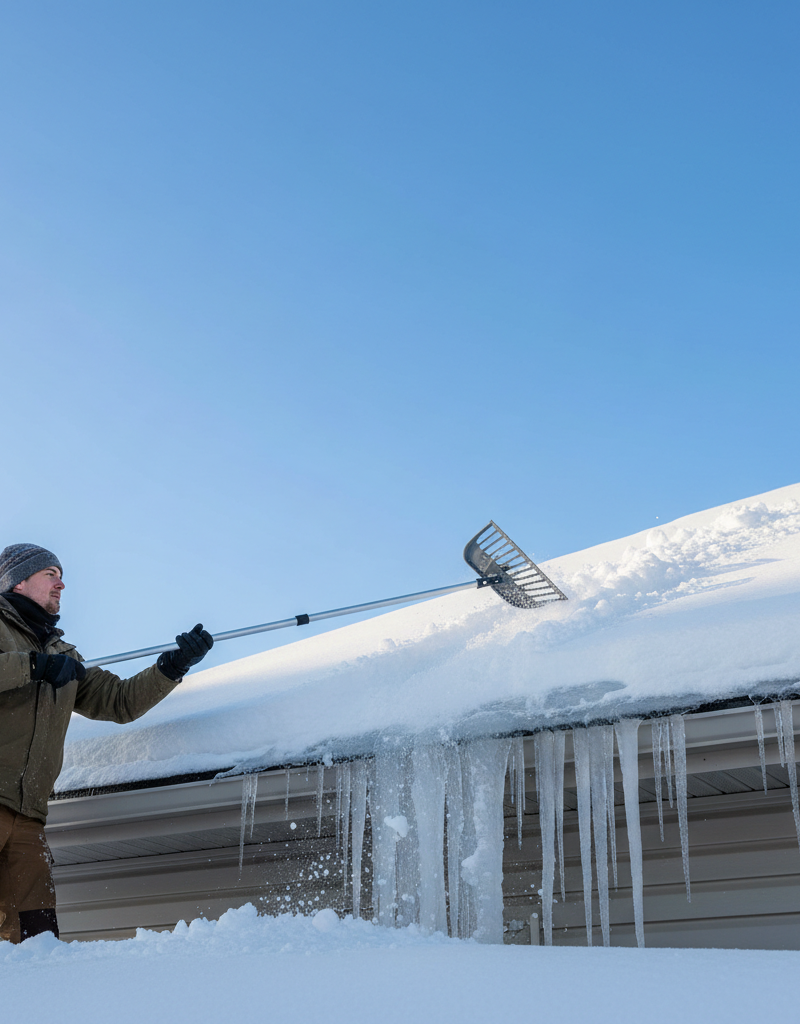
1. Prioritize Safety — Always work from the ground if possible, especially when snow and ice are involved. Ladders on icy surfaces are extremely dangerous. Wear non-slip footwear if you must walk on snow near the house, but never climb onto an icy roof yourself.
2. Clear the Snow — Use a roof rake with a long telescopic handle to pull snow off the lower 3-4 feet of your roof from the ground. This is the most crucial step as it removes the source material for the ice dam and prevents further growth.
- Tip: Extend the rake carefully. Aim to clear just enough snow to expose the eaves without damaging shingles.
- If this doesn't work: If the snow is too heavy or frozen, proceed to chemical melting.
3. Chemical Melt with Calcium Chloride — Fill old pantyhose or tube socks with calcium chloride ice melt. Knot them securely at the ends to create 'socks' of de-icer.
- Caution: Never use rock salt (sodium chloride) or other harsh de-icers, as they can damage your roof, gutters, and landscaping. Calcium chloride is safer for most roofing materials.
- Tools: Old pantyhose/tube socks, calcium chloride ice melt, rubber gloves.
4. Position the De-icer Socks — Carefully place the filled pantyhose socks across the ice dam, perpendicular to the eaves. Aim to create channels that allow the trapped water behind the dam to flow through and off the roof.
- Technique: Lay them directly on the ice dam. The calcium chloride will slowly melt channels, allowing water to drain.
- Safety: Do not climb on the roof. Use a long-handled tool or work from a secure ladder if absolutely necessary to reach the correct spot, ensuring the ladder is on stable, non-icy ground.
5. Allow Time for Melting — The calcium chloride will work slowly, creating melt channels. This process can take several hours to a full day, depending on the thickness of the ice dam and the outdoor temperature.
- Don't Rush: Resist the urge to chip at the ice while the chemicals are working, as this can easily damage shingles.
6. Monitor Drainage — Once channels are formed, observe if the trapped water is flowing off the roof. You may need to reposition or add more de-icer socks if drainage is incomplete.
- Ongoing Prevention: Continue clearing fresh snow with a roof rake after subsequent snowfalls to prevent new dams from forming.
7. Address Interior Leaks (If Applicable) — If water has already penetrated your home, place buckets to catch drips. Contact a professional immediately if the leak is significant or involves electrical fixtures.
Common Causes
- Poor Attic Insulation: Insufficient insulation in the attic allows heat from the living space below to transfer to the roof deck, warming it above freezing.
- Inadequate Attic Ventilation: A lack of proper soffit and ridge vents traps warm air in the attic, leading to uneven roof temperatures. Ventilation helps keep the entire roof deck cold.
- Attic Air Leaks: Gaps, cracks, or unsealed penetrations (e.g., around light fixtures, plumbing stacks, attic hatches) allow warm, moist air to directly escape from conditioned living spaces into the attic, heating specific roof sections.
- Clogged Gutters: Gutters filled with leaves and debris can block proper drainage, causing water to back up and freeze at the eaves, contributing to ice dam formation.
- South-Facing Roof Sections: While not a
Related Articles
Keep troubleshooting with these hand-picked guides from FixlyGuide:
- The $30 Trick to Melting Ice Dams (Before They Destroy Your Roof) — Discover how to safely remove ice dams from your roof instantly with common household items, preventing costly damage. Stay safe while tack…
- The #1 Mistake Homeowners Make with Ice Dams (and How to Fix It SAFELY) — Most homeowners approach ice dam removal incorrectly, creating more damage or safety risks. Learn the right, safe methods to protect your r…
- The $20 Trick That Melts Ice Dams (and Saves Your Roof) — Discover a surprisingly simple, budget-friendly method to safely remove ice dams and prevent costly roof damage to your home.
- The $30 Secret to Banishing Ice Dams Without Damaging Your Roof — Discover how a simple, inexpensive trick can safely eliminate dangerous ice dams from your roof and prevent costly damage to your home.
- The 7 Critical Spring Home Tasks Most Homeowners Forget (And Why You Shouldn't) — Don’t just prune bushes; tackle these often-overlooked spring maintenance items to protect your home’s value and prevent costly repairs.
- The #1 Mistake Homeowners Make After Finding Missing Shingles (And How to Fix It Right) — Discover the crucial steps to take after a storm rips shingles from your roof, ensuring a proper, lasting repair and preventing costly futu…
Recommended for DIYers & woodworkers
Sponsored
The Top 20 Tools for Workshops of Any Budget
No stationary machines or power tools required — plus 3 fundamental tools that can't be bought at any price.
Get the free guide
Ted's Woodworking — The #1 Woodworking Resource
Detailed instructions, dimensioned drawings, materials & cutting lists, and 3D schematics for every skill level.
See the plansSponsored: links above are affiliate links. FixlyGuide may earn a commission on qualifying purchases — at no extra cost to you.
Frequently asked questions
What causes ice dams to form on a roof?+
Ice dams are caused by uneven roof temperatures. Heat escaping from your home warms portions of the roof, melting snow. This meltwater then flows down to colder eaves, where it refreezes, creating a dam that traps more water.
Is it safe to chip away at ice dams?+
No, chipping away at ice dams is generally unsafe and can severely damage your roof, gutters, and even lead to personal injury from falls or flying ice. It's best to use gentler methods like a roof rake or de-icing agents.
What is the best way to melt ice dams on a roof?+
The safest and most effective methods for melting ice dams are using calcium chloride ice melt in pantyhose 'socks' to create channels through the dam, or carefully removing snow with a roof rake from the ground.
Can ice dams damage my roof?+
Yes, ice dams can cause significant damage. The trapped water can seep under shingles, leading to water damage in the attic, ceilings, and walls, as well as rot, mold, and damaged gutters and fascia.


Discussion
Loading comments…