Tools & materials you'll need
Affiliate linksAs an Amazon Associate FixlyGuide earns from qualifying purchases — at no extra cost to you. Prices and availability are accurate as of publication and subject to change.
Quick Answer
A smoke detector chirping every 30-60 seconds is an insistent plea for attention, and in 95% of cases, it signals a low battery that needs immediate replacement. For most models, this means swapping out an old 9V or AA battery for a fresh one. If a new battery doesn't silence the chirp, the issue likely lies with a dusty sensor head requiring a quick vacuum and wipe-down, or, for hardwired units, a temporary power interruption that triggered a low-power warning which persists even after power is restored.
The Problem
That rhythmic, often maddening chirp, precisely every 30 to 60 seconds, is a universal signal from smoke and carbon monoxide detectors. It's designed to be annoying, to ensure you don't ignore it. While the gut reaction is usually a low battery – and that's often correct – many homeowners find themselves frustrated when a battery change doesn't solve the problem. The persistent chirping, especially in the dead of night, can lead to people disabling or even removing their life-saving alarms, which is a dangerous mistake. The underlying problem can range from a weak backup battery in a hardwired unit to residual charge issues, or even environmental factors affecting the sensor itself. Understanding the true cause is key to resolving the annoyance and ensuring your home remains protected.
How It Works
Smoke detectors operate using one of two primary technologies: ionization or photoelectric, or sometimes a combination. Ionization smoke detectors contain a small amount of radioactive material (Americium-241) that ionizes the air in a chamber between two electrically charged plates. This creates a small, constant electric current. When smoke enters the chamber, it disrupts this current, triggering the alarm. Photoelectric smoke detectors, on the other hand, utilize a light source and a photosensitive sensor. When smoke enters the chamber, it scatters the light, directing it towards the sensor and activating the alarm.
Both types, whether battery-powered or hardwired, require consistent power to function. Battery-powered units rely solely on their internal batteries (typically 9V or AA). Hardwired units draw their primary power from your home's electrical system, usually a dedicated circuit, but also contain a backup battery. This backup battery ensures the detector continues to function during power outages. When the primary battery in a battery-only unit, or the backup battery in a hardwired unit, starts to deplete, the detector's internal circuitry senses this drop in voltage. To alert you, a small buzzer is activated, producing that characteristic chirp. This chirp is specifically designed to be distinct from the full alarm siren, indicating a maintenance need rather than an immediate fire threat. The timing of the chirp (every 30-60 seconds) is often a manufacturer-specific interval programmed into the device's microcontroller to ensure it's noticeable but doesn't drain the last vestiges of battery life too quickly.
Step-by-Step Fix
Safety First! Before working on any smoke detector, especially hardwired units, ensure you understand the power source. If uncomfortable, contact a qualified electrician.
-
Identify the Chirping Culprit – Locate the exact detector. Walk around your home, listening carefully. Sometimes, the sound can echo, making it seem like a different detector is chirping. If you have multiple detectors, test each unit's silence button briefly to confirm which one is making the noise. Mark it with a piece of painter's tape if necessary.
- If you have interconnected detectors: One low battery can sometimes trigger a ghost chirp on other units. Always address the source unit first.
-
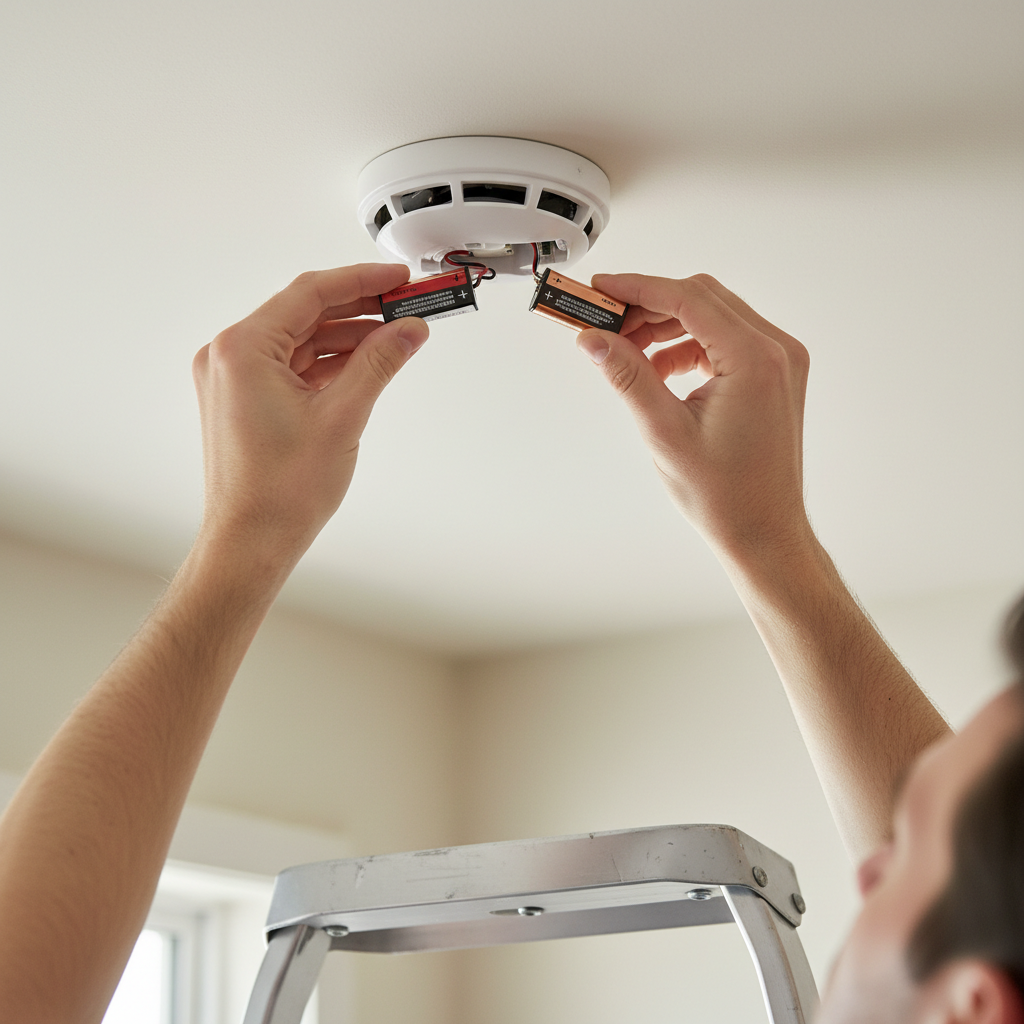
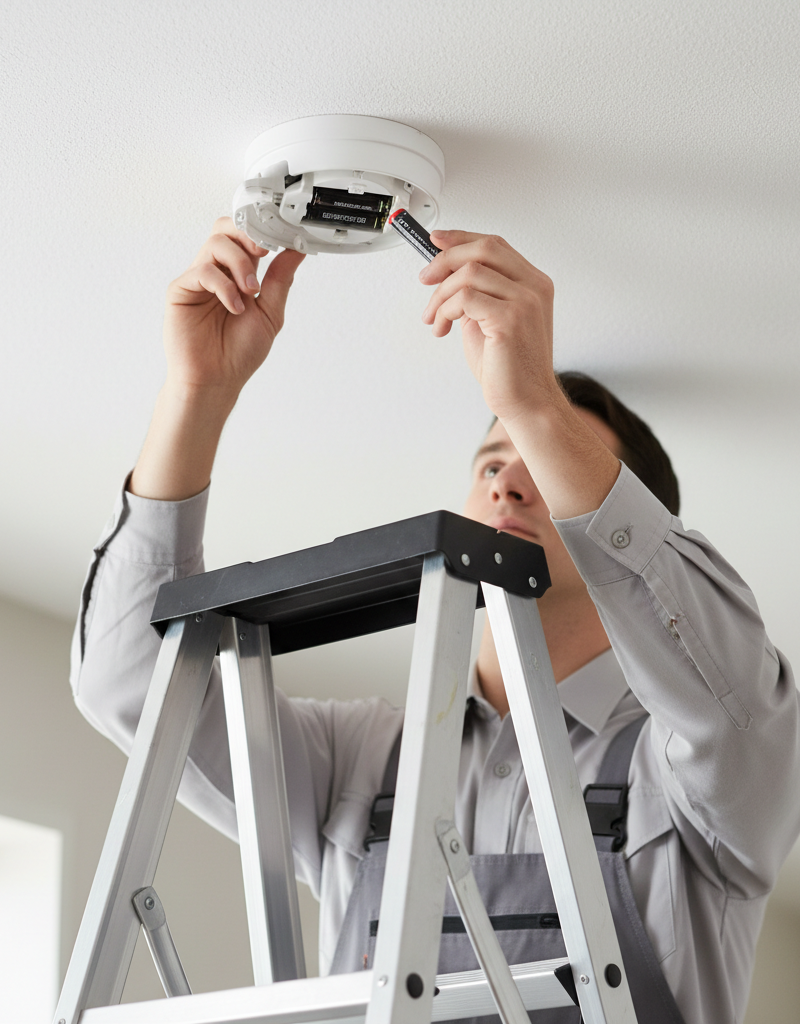
Replace the Battery – The most common fix. For battery-only units, simply twist or unlatch the detector from its mounting plate. Open the battery compartment. Note the correct polarity (+/-) and insert a fresh, high-quality alkaline 9V or AA battery. For hardwired units with a backup battery, remove the unit from the mounting plate, disconnect the wiring harness (usually a quick-connect plug), and replace the internal 9V or AA battery. Ensure the battery compartment closes securely.
- Tool: Small flathead screwdriver (for some battery doors)
- Safety: Never use a rechargeable battery in a smoke detector, as they often have lower voltage and shorter life cycles, potentially leading to immediate or rapid low-battery warnings.
-
Perform a Hard Reset (for Wired Units) – Clear residual charge. For hardwired smoke detectors, simply changing the battery usually isn't enough to clear the low-battery circuit. After replacing the backup battery, you'll need to reset the unit. First, power off the circuit breaker that controls the smoke detectors (find it in your main electrical panel). Next, with the power off at the breaker, hold down the test button on each smoke detector for 15-20 seconds. This drains any residual charge in the capacitors. After 20 seconds, release the test button, restore power at the circuit breaker, and then press the test button again briefly to confirm normal operation.
- Safety: Always turn off power at the breaker before disconnecting any wires.
- If this doesn't work: Ensure you've identified the correct breaker. Sometimes, multiple breakers feed different parts of an interconnected system.
-
Clean the Sensor Head – Dust can fool the sensor. Dust, insects, or spiderwebs can accumulate inside the smoke detector's sensing chamber, interfering with its normal operation and sometimes mimicking smoke, triggering false alarms, or generating error chirps. Use a can of compressed air (from a safe distance, not directly into the vents) to clear dust from the exterior vents. Even better, use the soft brush attachment of a vacuum cleaner to gently vacuum around the vents. Do not open the sealed chamber or attempt to clean internal components with liquids.
- Tool: Can of compressed air, vacuum with brush attachment
- If the problem persists: Consider if the detector is located in a particularly dusty area, kitchen, or bathroom where steam could be influencing it.
-
Check for Power Interruption (Hardwired Units) – A temporary electrical glitch. If your hardwired smoke detector started chirping after a brief power flicker, brownout, or outage (even if the main house power is back on), the unit might be interpreting this as a low-power state. Even with a fresh backup battery, the detector may need a full hard reset (as described in Step 3) to clear this warning. The circuitry may be indicating that its primary electrical power was interrupted, and some models use a similar chirp for this.
- If an outage recently occurred: This is a strong indicator that a hard reset is needed.
-
Check the Date and Replace if Expired – Smoke detectors don't last forever. All smoke detectors have a limited lifespan, typically 7-10 years from the date of manufacture. This date is usually printed on the back or side of the unit. After this period, the internal components, including the sensing chamber, can degrade, leading to unreliable operation or nuisance chirps. An expired unit may chirp even with new batteries and a clean sensor. If your detector is older than 7 years, it's time to replace it.
- Tool: Marker or label maker (to note installation date on new unit)
- Cost: A new basic smoke/CO alarm costs $20-$60.
-
Address Extreme Temperatures or Humidity – Environmental factors matter. Smoke detectors are designed to operate within specific temperature and humidity ranges. Extreme cold (below 40°F), heat (above 100°F), or high humidity (above 90%) can cause them to malfunction and chirp. If a detector is in an uninsulated attic, garage, or bathroom with persistent steam, consider moving it to a more suitable location or replacing it with a model designed for environmental extremes.
- If the location is unavoidable: Look for specialized alarms rated for garages or utility rooms.
Common Causes
- Low Battery: By far the most common reason. Both battery-only and hardwired units with backup batteries will chirp when their power source is low.
- Dusty Sensor: Accumulation of dust, dirt, or insects within the sensing chamber can interfere with operation and trigger error signals or chirps.
- Residual Charge: For hardwired units, a simple battery replacement may not clear the low-battery warning without a full power-off reset at the circuit breaker.
- Temporary Power Interruption: Hardwired units might chirp after a power flicker or outage, indicating that their main power was lost, even if it has since been restored.
- End-of-Life (EOL) Warning: Smoke detectors have a finite lifespan, usually 7-10 years. An old unit will begin to chirp as an EOL alert, signaling it's time for replacement.
- Extreme Environmental Conditions: High heat, excessive cold, or high humidity can cause detectors to malfunction and chirp, particularly if they are not rated for such conditions.
Common Mistakes
- Ignoring the Chirp: The most dangerous mistake is to ignore the chirp or, worse, to disable the detector. That chirp is signaling a critical need for attention.
- Not Replacing ALL Batteries: In homes with multiple detectors, particularly older interconnected systems, sometimes only one unit's low battery can cause other units to chirp intermittently. Always replace the battery specifically in the chirping unit.
- Forgetting the Hard Reset for Hardwired Units: Many homeowners replace the backup battery in hardwired detectors but skip the vital step of turning off the circuit breaker and holding down the test button. This leaves residual charge and keeps the chirp going.
- Using Rechargeable Batteries: Rechargeable batteries typically have a lower voltage (e.g., 1.2V per cell instead of 1.5V) and can deplete faster than alkaline, leading to premature chirping.
- Cleaning with Liquids or Harsh Chemicals: Never use water, household cleaners, or harsh chemicals to clean a smoke detector. This can damage sensitive internal components and render the unit inoperable.
- Not Checking the Manufacture Date: Overlooking the detector's expiration date is common. An expired unit, even with a new battery, will continue to chirp as its end-of-life warning.
- Mounting in Problematic Locations: Installing detectors too close to kitchens, bathrooms (steam), or uninsulated garages/attics can lead to nuisance chirps due to environmental factors.
Cost & Time Breakdown
| Task | DIY Cost | Pro Cost | Time |
|---|---|---|---|
| Battery Replacement | $5–$15 | $50–$100 (trip fee) | 5–10 min |
| Hard Reset (Wired Units) | $0 | $50–$100 (trip fee) | 10–15 min |
| Sensor Cleaning | $0–$10 | $50–$100 (trip fee) | 5–10 min |
| Install New Smoke Detector | $20–$60 per unit | $150–$300 per unit | 15–30 min |
| Troubleshooting Interconnected System | $0 | $150–$250 | 30–60 min |
Tips & Prevention
- Test Monthly: Press the test button on each smoke detector at least once a month to ensure it's functioning correctly. A quick chirp should confirm it's working.
- Replace Batteries Annually: Regardless of whether the detector is chirping, replace all smoke alarm batteries at least once a year. A good rule of thumb is to do it when you change your clocks for Daylight Saving Time.
- Check Expiration Dates: Note the manufacture date on the back of each unit upon installation. Replace units every 7-10 years, even if they seem to be working.
- Regular Cleaning: Incorporate smoke detector cleaning into your annual maintenance routine. A gentle vacuuming around the vents can prevent dust buildup.
- Strategic Placement: Avoid placing smoke detectors too close to kitchens (at least 10 feet away from cooking appliances), bathrooms (steam), or heating vents, which can cause false alarms or chirps due to environmental factors.
- Interconnected Systems: If you have hardwired, interconnected alarms, when one goes off, they all go off. This is a critical safety feature. Ensure all units are compatible when replacing them.
When to Call a Professional
While most chirping issues are easily resolved with a battery change or cleaning, some situations warrant a professional electrician. If you've replaced the battery, performed a hard reset, cleaned the unit, and confirmed it's not expired, yet the chirping persists, there might be a wiring issue within a hardwired unit or a fault in your home's electrical system affecting its power supply. Never attempt to diagnose or repair complex electrical wiring yourself, especially if it involves disconnecting wires at the ceiling box, as this poses a serious electrocution risk. Additionally, if your detectors are old and you plan to upgrade to an interconnected system or if you suspect a carbon monoxide alarm is malfunctioning (and you don't have a separate CO detector to confirm), it's best to consult a licensed electrician who can safely inspect the wiring, troubleshoot systemic issues, and ensure proper installation of new units according to local codes.
Related Articles
Keep troubleshooting with these hand-picked guides from FixlyGuide:
- The 30-Second Chirp: Why Most Homeowners Misdiagnose Their Smoke Detector (And The Real Fix) — A smoke detector chirping every 30 seconds almost always means a dying battery, but it can also signal an expired unit or a buildup of dust.
- The 3 Hidden Reasons Your Gas Burner Won't Light (Beyond a Clogged Pilot) — Before you call a technician, learn the common culprits behind a gas stove burner that refuses to light, from simple clogs to ignition comp…
- The 3 Hidden Reasons Your Gas Burner Won't Light (Beyond a Clog) — Before you call a technician, discover the most common culprits behind a gas stove burner that refuses to ignite and learn how to fix them…
- The 3 Hidden Reasons Your Ceiling Fan Wobbles (And the Easy Fixes) — A wobbling ceiling fan isn't just annoying; it can be a sign of underlying issues that are simple to fix with the right approach.
- The 3 Hidden Reasons Your Circuit Breaker Keeps Tripping (And How to Stop It) — Uncover the surprising culprits behind repeatedly tripping circuit breakers and learn practical, actionable steps to diagnose and resolve t…
- That Ceiling Stain Isn't a Leak: 5 Hidden Causes — A mysterious ceiling stain can be alarming, especially when there's no active leak. The real culprits are often hidden issues like attic co…
Get the print-ready PDF of this guide
A clean, ad-free, printable version you can keep on your phone or pin to the workshop wall. Free with a FixlyGuide account.
- Print-optimized layout
- Tools, materials & every step included
- Saved to your account
Frequently asked questions
Why does my smoke detector chirp after I change the battery?+
If your smoke detector continues to chirp after a battery change, especially a hardwired unit, it likely needs a hard reset to clear residual charge. Turn off the circuit breaker for the detector, hold the test button for 15-20 seconds to drain power, then restore power at the breaker and test the unit. A dusty sensor or an expired unit are other common culprits.
How do I make my hardwired smoke detector stop chirping after a power outage?+
For a hardwired smoke detector chirping after a power outage, first replace its backup battery. Then, turn off the circuit breaker controlling the detector, hold down its test button for 15-20 seconds to discharge any stored electricity. Restore power at the breaker, and finally, press the test button briefly to confirm it's working properly. This 'hard reset' clears the low-power warning.
How often should I replace smoke detectors?+
Smoke detectors should be replaced every 7-10 years from their manufacture date. This date is typically printed on the back or side of the unit. After this period, internal components can degrade, making the detector less reliable and potentially leading to nuisance chirps or failure to detect smoke.
Can dust cause a smoke detector to chirp?+
Yes, dust, dirt, or even small insects accumulating in the smoke detector's sensing chamber can interfere with its operation, leading to false alarms or intermittent chirps. Gently vacuuming around the vents with a soft brush attachment or using compressed air can often resolve this issue.


Discussion
Loading comments…