
Tools & materials you'll need
Affiliate links- AmazonWork gloves
As an Amazon Associate FixlyGuide earns from qualifying purchases — at no extra cost to you. Prices and availability are accurate as of publication and subject to change.
Quick Answer
Flushing your water heater annually is a vital maintenance task often overlooked, leading to decreased efficiency, premature failure, and costly repairs. The most common mistake homeowners make is not fully draining the tank or failing to flush until the water runs completely clear. Proper flushing involves shutting off power and water, connecting a garden hose to the drain valve, and allowing the tank to empty. Once drained, briefly open the cold water supply to agitate and flush out stubborn sediment, repeating until the water flowing from the hose is clean. This simple process can add years to your water heater's life and ensure a consistent hot water supply.
The Problem
Imagine your water heater as a giant kettle. Over time, as hard water is heated, minerals like calcium and magnesium separate and settle at the bottom of the tank, forming a layer of sediment. This sediment is the insidious culprit behind a host of water heater woes. Initially, you might notice popping or rumbling noises coming from the tank as superheated water gets trapped beneath the sediment layer and then bursts through. Beyond the noise, sediment acts as an insulator, forcing your water heater to work harder and longer to heat the water. This dramatically reduces efficiency, drives up energy bills, and accelerates wear and tear on the heating elements or burner assembly. In electric water heaters, elements can burn out prematurely when encased in sediment; in gas units, the burner struggles to transfer heat effectively. Neglecting a flush can lead to a tank full of abrasive scale, literally eating away at the tank lining, causing leaks, and ultimately leading to a complete and expensive water heater replacement, often years before it should be necessary. Many homeowners don't realize the silent damage occurring until it's too late.
How It Works
Understanding how your water heater operates helps clarify why flushing is so critical. A typical tank-style water heater consists of a large, insulated tank, a cold water inlet at the top that extends with a dip tube to the bottom, and a hot water outlet pipe also at the top. At the bottom, a heating element (electric) or a burner assembly (gas) warms the water. When you open a hot water faucet, cold water enters the tank through the dip tube, pushing the hot water out from the top. Sediment, being denser than water, naturally settles at the bottom of the tank, directly on top of or around the heat source. This area, known as the 'anode rod,' is also where sacrificial corrosion takes place, designed to protect the tank liner, but even the anode rod contributes to some amount of material build-up over time as it slowly degrades. The drain valve, typically a spigot near the bottom of the tank, is specifically designed to allow homeowners to flush out this accumulated sediment. By opening this valve and introducing fresh water (or allowing residual water pressure to push out the dirty water), you create a mini-current within the tank that dislodges and expels the heavy mineral deposits, restoring the heater's ability to efficiently transfer heat and extending the lifespan of its internal components.
Step-by-Step Fix
Before you begin, gather your tools and materials. This job typically takes 30-60 minutes of active work, though draining can take longer depending on tank size and sediment levels. Safety first: always wear work gloves to protect your hands, and be mindful of hot water.
-
Safety First: Turn Off the Power – Locate and disable the energy source.
- Electric Water Heaters: Go to your electrical service panel (breaker box) and flip the breaker labeled for your water heater to the OFF position. It's often a double-pole breaker. DO NOT skip this step; working with water and electricity is extremely dangerous. Tag the breaker to prevent accidental re-energizing.
- Gas Water Heaters: Turn the gas control knob on the water heater's gas valve to the “OFF” or “PILOT” position. If your water heater uses a traditional pilot light, you'll extinguish it. For electronic ignition models, turning to OFF is sufficient. You do not need to turn off the main gas supply to your home.
-
Shut Off the Cold Water Supply – Prevent new water from entering the tank.
- Locate the cold water inlet pipe at the top of your water heater, usually on the right if you're facing the unit. Follow this pipe down to where it enters the tank or to the nearest valve. This is typically a ball valve or gate valve with a handle. Turn the handle clockwise until it's completely closed. This stops new cold water from refilling the tank as you drain it.
-
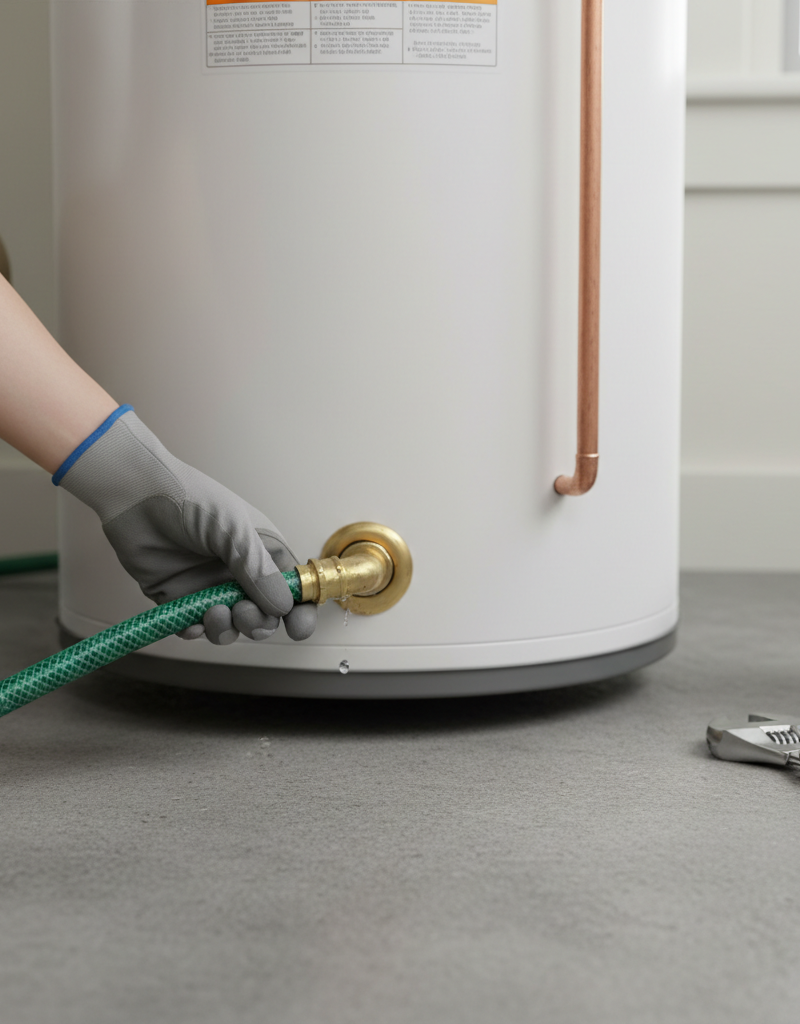
Attach a Garden Hose – Prepare for controlled drainage.
- Locate the drain valve near the bottom of your water heater. It often looks like a small spigot. Attach a standard garden hose securely to the drain valve. Ensure the connection is tight to prevent leaks. Run the other end of the hose to a suitable drainage area, such as a floor drain, a large utility sink, or outdoors away from foundations and plants. Elevating the hose slightly above the drain valve if possible can aid flow.
-
Open a Hot Water Faucet – Relieve tank vacuum.
- Go to a nearby sink or tub and open a hot water faucet to full blast. This allows air to enter the water heater tank as it drains, preventing a vacuum from forming and ensuring smooth, complete drainage. Leave this faucet open throughout the draining process. You may hear air hissing as drainage begins.
-
Begin Draining the Tank – Allow sediment-laden water to flow out.
- Slowly open the drain valve on the water heater. Be prepared for the water to be very hot initially. You can use a towel or rag to protect your hands if needed, though the drain valve itself should be cool to the touch. The water coming out will likely be discolored, murky, or contain visible sediment depending on how long it's been since the last flush. Continue draining until the flow from the hose significantly diminishes and the water runs cool.
- If flow is slow: The drain valve might be clogged with sediment. Close the drain valve, briefly open the cold water supply valve for 10-15 seconds to create some pressure and agitate the sediment, then close the cold water valve and try draining again. Repeat this
Related Articles
Keep troubleshooting with these hand-picked guides from FixlyGuide:
- The 4-Step Water Heater Flush That Adds Years to Its Life (and Cures 3 Common Problems) — Flushing your water heater annually is a quick DIY task that prevents sediment buildup, extends the unit's lifespan, and improves efficienc…
- The #1 Mistake Homeowners Make Flushing a Water Heater (And How to Do It Right) — Discover the crucial mistake most homeowners make when flushing their water heater and follow our step-by-step guide to properly maintain y…
- Your shower's cold shock: 1 broken part is the secret culprit. — Tired of your shower going from hot to cold in minutes? Sediment buildup, a failed dip tube, or a bad thermostat in your water heater is li…
- That Annoying Water Heater Popping Sound? It's Trying to Tell You This One Thing — A popping water heater usually signals a common issue: sediment buildup. Learn why it happens and how to fix it with a simple flush.
- The #1 Mistake Homeowners Make When Their AC Drain Clogs (And The $5 Fix) — Discover the most common error homeowners make when tackling a clogged AC drain line and learn a simple, inexpensive solution to prevent co…
- The 7 Critical Spots Homeowners Miss in Their Annual Inspection — Discover the seven often-overlooked areas in your home's annual inspection that can prevent costly repairs and maintain your property's val…
Get the print-ready PDF of this guide
A clean, ad-free, printable version you can keep on your phone or pin to the workshop wall. Free with a FixlyGuide account.
- Print-optimized layout
- Tools, materials & every step included
- Saved to your account
Frequently asked questions
How often should I flush my water heater?+
Most manufacturers and plumbing experts recommend flushing your water heater annually. However, if you live in an area with particularly hard water, you may benefit from flushing it every six months to prevent excessive sediment buildup.
What happens if I don't flush my water heater?+
Neglecting to flush your water heater can lead to several problems: reduced heating efficiency, higher energy bills, strange popping or rumbling noises, premature failure of heating elements or burner assemblies, and ultimately, a shortened lifespan for the entire unit.
What are the signs my water heater needs flushing?+
Key signs include popping or rumbling noises coming from the tank, reduced hot water output or inconsistent temperatures, cloudy or discolored hot water, and visible sediment in the water coming from your hot water tap.
Can I flush my tankless water heater?+
Yes, tankless water heaters also require flushing to remove mineral buildup, but the process is different and usually involves circulating a descaling solution through the unit with a small pump. Consult your specific tankless water heater's manual for detailed instructions or call a professional.


Discussion
Loading comments…