
Tools & materials you'll need
Affiliate links- AmazonNew HVAC air filter1 · Matching your current filter's size and MERV rating
As an Amazon Associate FixlyGuide earns from qualifying purchases — at no extra cost to you. Prices and availability are accurate as of publication and subject to change.
How it works
Your HVAC system operates on a continuous air circulation loop, acting as the lungs of your home. This process begins when the blower motor, located in your furnace or air handler, creates negative pressure that pulls air from your living spaces into the return air ductwork. Before this air reaches the delicate and expensive internal components of the system, it is forced to pass through an air filter.
The filter's sole purpose is to capture airborne particulates. Its pleated or fibrous media traps dust, pollen, pet dander, lint, mold spores, and other microscopic debris. This filtration is the first and most critical line of defense for your equipment.
Once cleansed, the air continues its journey to be conditioned. In cooling mode, it flows over the evaporator coil, where refrigerant absorbs heat. In heating mode, it passes over the heat exchanger, where it is warmed by the furnace's burners. Clean air allows for maximum thermal transfer on these surfaces. A filter clogged with debris drastically reduces airflow, an effect measured as an increase in "static pressure." This forces the blower motor to work significantly harder, increasing energy consumption. It also starves the coils and heat exchanger of the air volume they need, potentially causing an air conditioner to freeze into a block of ice or a furnace to overheat and shut down on a safety limit. The conditioned air is then pushed by the blower through the supply ducts back into your home.
Step-by-Step Fix
1. Locate and De-Energize the System — Shut off all power.
— Go to your home's main electrical panel and find the breaker labeled for your "Furnace," "Air Handler," or "HVAC." Flip it to the full "Off" position. As a second safety measure, locate the local power disconnect switch, which is typically in a small metal box mounted on or near the indoor unit itself, and turn it off.
2. Set the Thermostat to "Off" — Prevent accidental startup.
— Navigate to your home's thermostat and set the system mode to "Off." This ensures the unit won't try to initiate a heating or cooling cycle while you are servicing it, even if power were somehow restored.
3. Identify the Filter Location — Find the filter housing.
— The filter is always located in the return air path before the blower motor. Check these common locations: * In the furnace/air handler: Look for a thin metal door or slot, usually on the bottom or side of the unit where the large return duct enters. * In an external rack: The filter may be in its own metal housing, called a filter rack or cabinet, located in the return ductwork right next to the main unit. This is common for thicker media filters. * In a return air grille: Some homes have a large, hinged, and latched grille in a wall or ceiling. The filter sits directly behind this grille.
4. Open the Access Panel or Grille — Reveal the old filter.
— If the filter is in the unit or an external rack, slide off the metal access door. Some may have a thumbscrew or simple latch holding them in place. For return air grilles, unclip the latches (usually a pair of sliding tabs) and swing the grille open on its hinge.
5. Note Filter Size and Airflow Direction — Record the specifications before removal.
— The filter's dimensions are printed on its cardboard frame (e.g., "16x25x1"). There will also be an arrow printed on the frame indicating the correct direction of airflow. Take a clear photo of the filter in place with your phone for reference at the hardware store and during installation.
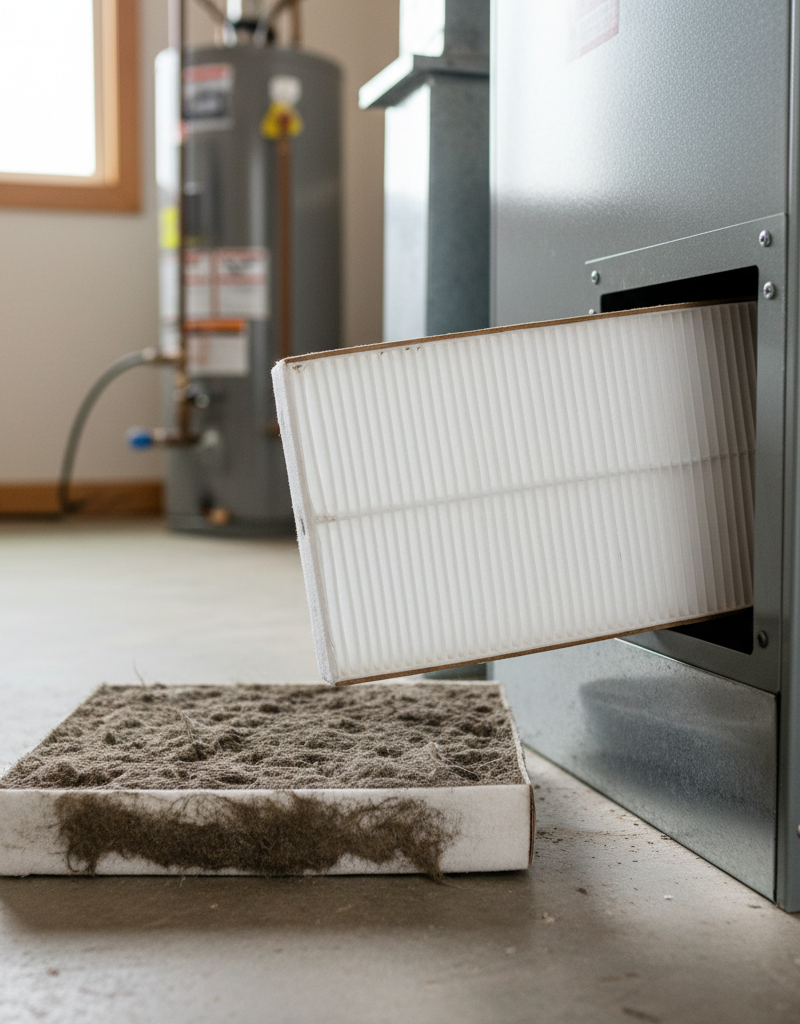
6. Remove the Old Filter Carefully — Contain the dust.
— Have a large trash bag ready. Slowly and gently slide the old filter out of its slot. Tilting it slightly so the dirtiest side faces up will help prevent accumulated dust and debris from falling into your HVAC system or onto your floor. Immediately place the dirty filter into the trash bag and seal it.
7. Inspect the Housing and Old Filter — Look for warning signs.
— With the old filter removed, use a flashlight to quickly look inside the filter slot and surrounding duct. A light dusting is normal, but heavy accumulation of debris indicates the previous filter was a poor fit or changes were too infrequent. Inspect the old filter: if it is bent, collapsed, or feels damp, this points to more serious issues that need investigation (see "When to Call a Pro").
8. Prepare the New Filter for Installation — Check for the airflow arrow.
— Unpack your new, correctly sized filter from its plastic wrapping. Locate the airflow direction arrow printed on the new frame. Comparing it to the photo you took earlier will confirm the orientation.
9. Insert the New Filter Correctly — Ensure proper orientation and fit.
— The airflow arrow on the new filter must always point toward the furnace or air handler equipment and away from the return duct opening. This ensures the filter's internal reinforcement properly supports the media against the force of the fan. Slide the filter firmly into the slot until it seats fully, ensuring there are no gaps around the frame where air could bypass it.
10. Secure the Access Panel or Grille — Seal the system.
— Replace the metal access door, ensuring it slides into its tracks and sits flush. If you have a return grille, swing it shut and ensure both latches click securely into place. A loose panel can create whistling noises and allow unfiltered air into the system.
11. Restore Power to the System — Re-energize in sequence.
— First, turn the local disconnect switch near the unit back to the "On" position. Next, go to your main electrical panel and flip the HVAC breaker firmly back to "On." Some breakers require you to push them to the full "Off" position before you can flip them back to "On."
12. Test System Operation — Confirm a successful change.
— Return to your thermostat, set it to "Heat" or "Cool," and adjust the temperature to start a cycle. Wait for the blower to engage and confirm that air is flowing from your supply vents. Listen for a minute to ensure there are no new rattles, vibrations, or scraping sounds.
Common mistakes
- Installing the Filter Backward. The airflow arrow on the filter's frame is a structural instruction, not a suggestion. Filter media is supported by a metal or cardboard mesh on the downstream side to prevent it from being sucked into the blower motor. Installing it backward puts pressure on the unsupported side, causing the filter to bow, collapse, and potentially get drawn into the fan, causing catastrophic damage.
- Using an Incorrectly Sized Filter. A filter that's even a half-inch too small will allow air to bypass the media entirely, sucking dust and debris directly into your system's sensitive components. This negates the purpose of the filter. Conversely, trying to jam in a filter that's too large can crush the frame, create tears in the media, and damage the filter housing, also leading to bypass. Measure your existing filter or the slot itself and buy the exact nominal size printed on the frame.
- Choosing a Filter with a MERV Rating That's Too High. It's tempting to buy the filter with the highest MERV (Minimum Efficiency Reporting Value) rating for the "cleanest air." However, a higher MERV rating means a denser filter media, which creates greater airflow resistance (static pressure). Most residential HVAC systems are designed to operate within a specific static pressure range. Installing a MERV 13+ filter in a system designed for MERV 8 can strain the blower motor, reduce air circulation to ineffective levels, and cause the furnace to overheat or the AC coil to freeze. Stick to the MERV 8-11 range unless your HVAC manual or a technician explicitly approves a higher rating.
- Believing Washable Filters are a "Set and Forget" Solution. While economical, washable filters require disciplined maintenance. They must be thoroughly cleaned with water and a mild detergent, but more importantly, they must be completely 100% dry before reinsertion. A damp filter is a breeding ground for mold and mildew, which you will then blow throughout your home. They also tend to be less efficient at capturing smaller particles than disposable pleated filters.
- Forgetting to Change It Until Problems Arise. The "out of sight, out of mind" mentality is the most common and costly mistake. By the time you notice reduced airflow, strange noises, or a system that won't cool, the damage from strain and overheating may have already reduced the lifespan of your components. Proactive replacement is always cheaper than reactive repair.
- Failing to Clean Around the Filter Area. When you pull out a dirty filter, a cloud of loose dust can be dislodged. If you don't take a moment to vacuum the filter housing, grille, and surrounding floor area, much of that debris will be immediately sucked into the system as soon as you install the new filter and turn it on.
Cost & time breakdown
| Task | DIY Cost | Pro Cost | Time |
|---|---|---|---|
| Standard 1-inch Fiberglass Filter Change | $2 - $5 per filter | $75 - $150 (as part of a service call) | 5-10 minutes |
| Standard 1-inch Pleated Filter Change | $8 - $20 per filter | $80 - $160 (as part of a service call) | 5-10 minutes |
| High-Efficiency 4-5” Media Filter Change | $30 - $60 per filter | $100 - $200 (as part of a service call) | 10-15 minutes |
| Washable/Electrostatic Filter Cleaning | $0 (after purchase) | Not applicable | 20-30 mins + 1-2 hours drying time |
| Full HVAC Maintenance Tune-Up | Not applicable | $100 - $300 | 1-2 hours |
| Emergency Repair from Clogged Filter | Component Cost + Labor | $250 - $1,500+ | 2-4 hours |
When to call a pro
Changing an air filter is a fundamental DIY task. However, you should immediately stop and call a qualified HVAC technician if you encounter any of the following signs, as they indicate a problem beyond a simple filter swap.
-
Your old filter is damp, wet, or has visible mold. This is a red flag for a serious issue. It could be a clogged condensate drain line causing water to back up, or a problem with the evaporator coil itself. Ignoring this can lead to significant water damage, dangerous mold growth within your HVAC system, and poor indoor air quality.
-
The old filter is bent, buckled, or collapsed. A deformed filter indicates that airflow was so severely restricted that the blower's suction literally crushed it. A technician needs to inspect the blower motor for strain damage and check the heat exchanger or evaporator coil for issues caused by sustained air starvation, such as cracks from overheating or refrigerant leaks from freezing.
-
The system will not power on after the change. If you have confirmed the breakers are on and the access panels are secure, the issue may be a tripped internal safety switch, a blown fuse on the control board, or a separate electrical problem. A technician can safely diagnose and repair these electrical components.
-
You find excessive debris behind the filter slot. If you look past the filter housing and see the blower fan wheel caked in dust or the evaporator coil fins matted with grime, the system requires a professional deep cleaning. This level of contamination cannot be fixed with a filter change and will continue to cripple your system's efficiency and air quality.
Prevention & maintenance
Consistent filter maintenance prevents the vast majority of surprise HVAC failures and keeps your system running efficiently. Follow this professional schedule.
- Establish a Custom Replacement Schedule. The "90-day rule" is only a baseline. Adjust your frequency based on your home's specific conditions:
- Baseline (1-2 adults, no pets, no allergies): Change 1-inch filters every 90 days. Change 4-5 inch media filters every 6-9 months.
- Home with Pets or Allergies: Change 1-inch filters every 60 days. Change 4-5 inch media filters every 4-6 months.
- Home with Multiple Pets, Smokers, or Severe Respiratory Issues: Change 1-inch filters every 30-45 days. Change 4-5 inch media filters every 3-4 months.
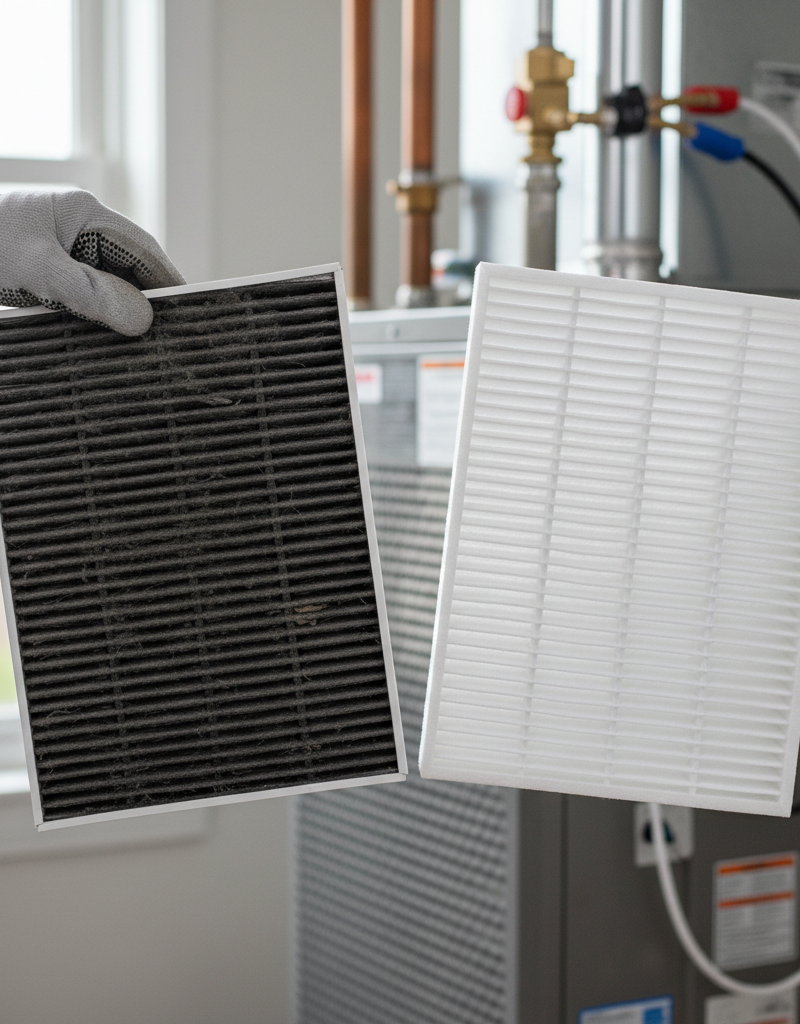
- Perform a Monthly Visual Check. Regardless of your schedule, perform a quick visual inspection once a month. Pull the filter out and hold it up to a bright light. If you cannot easily see the light passing through the media, it is clogged and should be replaced, even if it's "not time yet."
- Use Digital Reminders. Set a recurring reminder on your phone's calendar or use a dedicated home maintenance app. Many smart thermostats also track filter runtime and will provide a notification when it’s time for a change. When you install a new filter, use a permanent marker to write the date directly on the frame.
- Buy Filters Ahead of Time. Once you confirm the exact size and preferred MERV rating for your system, buy a multi-pack. Having fresh filters physically on hand removes any excuse for procrastination. Store them flat in a clean, dry area near your HVAC unit.
- Maintain Cleanliness Around the Unit. The less dust available, the longer your filter will last. Regularly vacuum floors, baseboards, and surfaces around your furnace/air handler and in rooms with large return air grilles. Make sure return vents are not blocked by furniture or rugs.
Related Articles
Keep troubleshooting with these hand-picked guides from FixlyGuide:
- AC Blowing Warm Air? Easy Fixes for Common AC Problems — Discover the most common reasons your AC is blowing warm air and learn simple, actionable steps to tr
Frequently asked questions
How often should I change my HVAC filter with pets?+
If you have one or more pets that shed, you should aim to change your HVAC filter every 30-60 days. Pet dander and hair can quickly clog filters, significantly reducing air quality and system efficiency.
What happens if I don't change my HVAC filter?+
Neglecting to change your HVAC filter can lead to several problems: increased energy bills, reduced heating/cooling efficiency, poor indoor air quality, premature wear and tear on your HVAC unit, and even component failures like a frozen AC coil or an overheated furnace.
Can a dirty HVAC filter cause my AC to freeze up?+
Yes, a dirty HVAC filter is one of the most common causes of an AC unit freezing up. The restricted airflow prevents warm indoor air from reaching the evaporator coil, causing the coil to get too cold and freeze over. This can lead to system damage and leaks.
What MERV rating is best for home air filters?+
For most residential homes, a MERV rating between 8 and 11 is ideal. This range provides a good balance of air filtration for common pollutants (dust, pollen, pet dander) without excessively restricting airflow and putting strain on your HVAC system. Higher MERV ratings (13+) are excellent for serious allergy sufferers but may require more frequent changes and can be too restrictive for older systems.

Discussion
Loading comments…