
Tools & materials you'll need
Affiliate linksAs an Amazon Associate FixlyGuide earns from qualifying purchases — at no extra cost to you. Prices and availability are accurate as of publication and subject to change.
How it works
Your home's water pressure is a function of supply, flow, and resistance. For homes on a municipal system, water is pushed from a water tower or pumping station through large underground mains. A smaller service line branches off to your house, entering through a foundation wall or floor slab. For well systems, a submersible or jet pump creates the pressure.
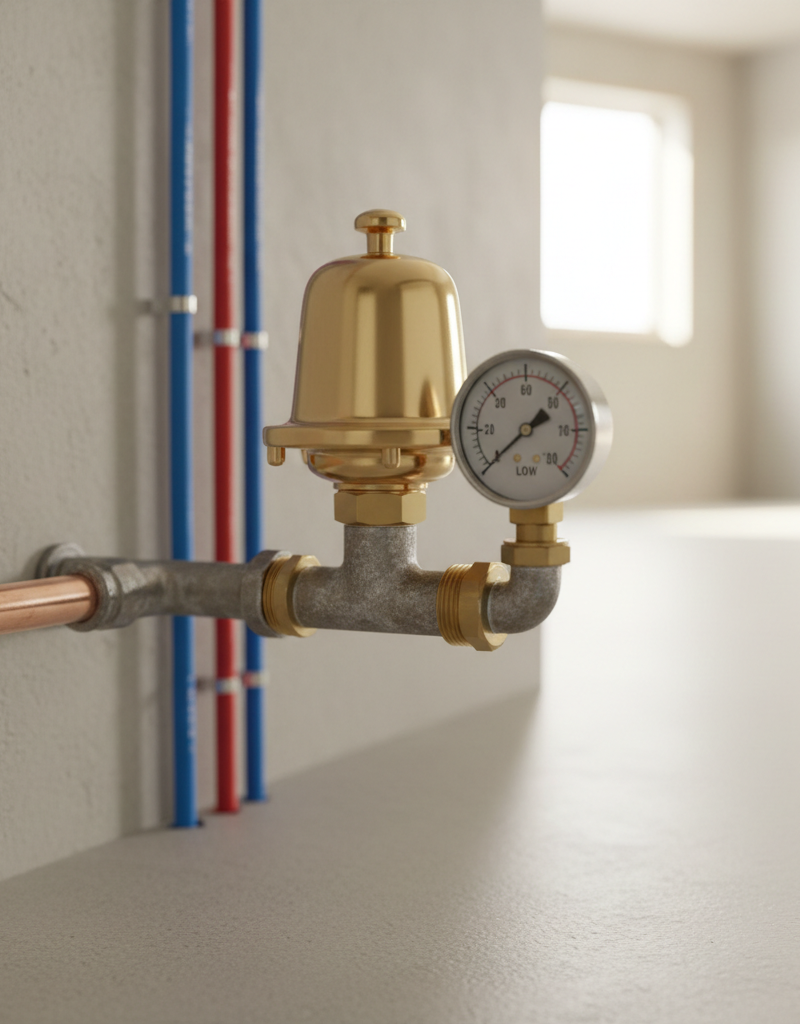
This incoming water first meets the main water shut-off valve, the primary control point for your entire home. Immediately following this is the water meter, which measures your consumption. Many homes then have a Pressure Reducing Valve (PRV), a bell-shaped brass device that steps down high municipal pressure (which can exceed 100 PSI) to a safe home level (typically 50-60 PSI). After the PRV, water often flows into a whole-house filtration system, which uses a replaceable cartridge to trap sediment, chlorine, or other contaminants.
From this central point, the main line branches into smaller hot and cold pipes that run to every fixture. The pressure you experience at a faucet is dynamic pressure—the force of the water as it's flowing. This is different from static pressure, which is the pressure in the pipes when all fixtures are off. The critical mistake homeowners make is assuming low dynamic pressure means a problem with the pipes themselves. In reality, a single restriction early in the system, like a partially closed valve or a sediment-packed filter, acts as a bottleneck. It chokes the volume of water (flow rate, measured in Gallons Per Minute) available to the entire house, causing low dynamic pressure everywhere simultaneously, even if the static pressure reading is normal.
Step-by-Step Fix
1. Confirm the Issue is System-Wide — Test multiple fixtures on different floors. Before investigating the main line, verify the problem isn't localized. Turn the cold and hot water on fully at a kitchen sink, an upstairs bathroom shower, and a basement utility sink or outdoor spigot. If all fixtures exhibit a weak, diminished flow, you have confirmed a whole-house issue and can proceed. If only one fixture or one room is affected, the problem is likely a clogged aerator, a blocked showerhead, or a faulty cartridge in that specific fixture.
- Tip: Test both hot and cold water separately. If only the hot water has low pressure everywhere, the issue is likely sediment buildup at the inlet of your water heater, not your main line.
2. Locate Your Main Water Shut-Off Valve — Find the primary control point for your home's water. This valve is located where the main water service line enters your house. Check in basements, crawl spaces, or utility closets near the front foundation wall. In homes without basements, it may be near the water heater or under the kitchen sink. You are looking for a valve on a large pipe (typically ¾-inch or 1-inch diameter) positioned before the water meter.
- Valve Types: It will likely be a gate valve (a round, wheel-like handle) or a ball valve (a straight lever handle).
3. Inspect and Fully Open the Main Shut-Off Valve — Ensure the valve is not partially closed. This is the single most common cause of sudden, house-wide low pressure. For a ball valve, the lever handle must be fully parallel to the pipe to be 100% open. If it is angled even slightly, it is restricting flow. For a gate valve, turn the round handle counter-clockwise as far as it will go until it comes to a gentle stop. Do not force it. Sometimes these valves are unintentionally partially closed after a plumbing repair or by an accidental bump.
- Caution: Older gate valves can be fragile. If the handle is extremely difficult to turn or just spins without resistance, the internal stem may be broken. Do not apply excessive force with a wrench.
4. Check Fixtures for Improvement — Confirm if opening the valve solved the problem. Return to one of the faucets you tested earlier and turn it on. If pressure is restored to normal, you have found and fixed the problem. If pressure remains low, the main valve was not the issue. Proceed to the next step.
5. Locate Your Whole-House Water Filter — Identify the filtration system canister. If you have one, the whole-house filter is usually installed shortly after the main shut-off valve and water meter. It typically consists of one or more large, vertical plastic or steel canisters (often blue, white, or clear) through which all the home's water passes.
6. Engage the Filter's Bypass Valve — Route water around the filter to test for a clog. Most filter housings have a built-in bypass mechanism. Look for a large red or blue knob or a set of three separate valves on the pipes connected to the filter head. Turn the knob to the "Bypass" position or, for a three-valve system, close the inlet and outlet valves and open the center bypass valve. This sends water directly into your home's plumbing, circumventing the filter cartridge entirely.
- If you don't have a bypass: You will need to turn off the main water supply and remove the filter cartridge (Step 8 & 9) to diagnose the issue.
7. Test Pressure with the Filter in Bypass — Determine if the filter cartridge is the bottleneck. With the filter in bypass mode, go to a faucet and test the pressure again. If your water pressure is now strong and normal, you have definitively identified a severely clogged filter cartridge as the culprit. If the pressure is still low, the problem lies elsewhere (such as the PRV or the service line itself). Put the filter back into service and proceed to Step 11.
8. Depressurize the Filter Housing — Safely prepare the canister for opening. If the clogged filter is the problem, you must replace the cartridge. First, put the valve back into the "Filter" position, then shut off the main water valve completely. Go to a nearby faucet (like a kitchen sink) and turn on the cold water to drain the pipes and release all pressure from the system. You will see water flow slow to a trickle and stop. Press the red pressure-relief button on top of the filter housing until all pressure is released (air and a small amount of water may spray out).
- Tools & Materials: You will need a plastic filter housing wrench (often included with the filter), a replacement filter cartridge, a bucket, and some old towels.
9. Replace the Filter Cartridge — Swap the old, clogged cartridge for a new one. Place a bucket under the filter housing to catch residual water. Fit the housing wrench onto the bottom of the canister and turn it counter-clockwise to loosen. Unscrew it the rest of the way by hand. Carefully lower the housing, which will be full of water. Pour out the water and remove the old, dirty filter cartridge. Clean the inside of the housing with a soft brush and soap, paying special attention to the O-ring and its groove. Seat the new cartridge over the standpipe in the housing, ensure the O-ring is properly seated and lubricated with food-grade silicone grease, and screw the housing back on.
- Tightening: Hand-tighten until snug, then use the wrench for an additional quarter- to half-turn. Do not overtighten, as this can crack the plastic housing or damage the O-ring.
10. Slowly Re-pressurize the System — Restore water flow without causing damage. Ensure all faucets in the house are closed. Open the main water shut-off valve only about a quarter of the way. You will hear water flowing and the filter housing filling. Listen for rushing air at the faucets. Once the sounds stop, slowly open the main valve the rest of the way. Press the pressure-relief button on the filter housing again to bleed out any trapped air. Check carefully for any leaks around the filter housing seal.
11. Inspect the Pressure Reducing Valve (PRV) — Check the device that regulates your home's pressure. If the main valve is open and the filter is not the cause, the PRV is the next most likely culprit. Find the bell-shaped brass valve located after the water meter. Most have an adjustment screw on top, protected by a threaded cap. A failed PRV can get stuck, causing permanently low pressure. Testing requires a water pressure gauge that screws onto a hose bib.
- If this doesn't work: PRV adjustment can be sensitive, and replacement requires soldering or compression fittings. If you are not confident, this is the point to call a professional.
12. Final System Test — Confirm the repair was successful. Go to the fixtures you originally tested and check the water pressure. It should now be restored to a consistently strong flow throughout the house.
Common mistakes
- Forcing a Seized Gate Valve. Applying a wrench or excessive force to an old, round-handled gate valve can easily snap the internal stem, leaving the valve stuck open or closed, or causing a major leak. Instead: Use gentle, firm pressure. If it doesn't move, or feels gritty and tight, it's best to call a plumber to replace it with a more reliable quarter-turn ball valve.
- Opening the Filter Housing Under Pressure. Forgetting to shut off the water and release the system pressure before trying to unscrew a filter canister will result in a high-pressure blast of water that can cause injury and significant water damage. Instead: Always follow the sequence: shut off the main water, open a downstream faucet to bleed pressure, then push the relief button on the housing before attempting to loosen it.
- Overtightening the Filter Canister. The plastic threads and O-ring on a filter housing create the seal. Using the wrench to excessively tighten the canister can crack the housing or pinch the O-ring, leading to a slow, persistent leak or a sudden failure later. Instead: Hand-tighten until it makes firm contact, then use the wrench for only a final quarter- to half-turn to snug it up.
- Misdiagnosing a Hot Water-Only Issue. If only your hot water has low pressure everywhere, the problem is not the main line, shut-off valve, or whole-house filter. It is almost certainly sediment buildup in the cold water inlet or hot water outlet of your water heater. Instead: Investigate the water heater connections and consider flushing the tank before troubleshooting the main supply line.
- Ignoring a Faulty Pressure Reducing Valve (PRV). Many homeowners don't know what a PRV is or that it can fail and cause low pressure. They may replace filters and check valves to no avail. Instead: Learn to identify your PRV. If your pressure is low and fixes for the valve and filter don't work, testing and adjusting/replacing the PRV should be the next step, whether DIY or by a pro.
Cost & time breakdown
| Task | DIY Cost | Pro Cost | Time |
|---|---|---|---|
| Inspect & Fully Open Main Shut-Off Valve | $0 | $100 - $200 (service call fee) | 10 minutes |
| Replace Whole-House Filter Cartridge | $25 - $75 (cartridge & wrench) | $150 - $300 | 30 - 60 minutes |
| Test Pressure with a Gauge | $15 - $30 (pressure gauge) | Included in diagnostic fee | 15 minutes |
| Adjust Pressure Reducing Valve (PRV) | $15 - $30 (for gauge) | $125 - $250 | 20 minutes |
| Replace Failed Pressure Reducing Valve (PRV) | $100 - $250 (valve & tools) | $400 - $700 | 2-4 hours (Advanced DIY) |
| Professional Plumbing System Diagnosis | N/A | $150 - $350 (initial fee) | 1 - 2 hours |
When to call a pro
While checking the main valve and filter are straightforward DIY tasks, some situations warrant a professional plumber. Call a pro if the main shut-off valve is leaking, the handle spins freely without stopping, or it is seized and cannot be moved with reasonable force. Any attempt to force it could cause a rupture. If you've confirmed the main valve is open and the filter is clean (or in bypass), but pressure remains low, the issue is likely a failed Pressure Reducing Valve (PRV) or a problem with the underground service line itself. PRV replacement requires cutting and soldering or connecting pipes under pressure, a job best left to experts. Furthermore, if you hear the sound of running water or hissing in your walls or floor when all fixtures are off, you may have a hidden pipe leak that requires immediate professional leak detection and repair to prevent catastrophic water damage.
Prevention & maintenance
- Exercise Your Valves Annually. Once a year, slowly turn your main water shut-off valve, water heater valve, and any other key supply valves all the way off and then all the way back on. This simple action prevents mineral buildup and keeps them from seizing, ensuring they work when you need them in an emergency.
- Follow a Strict Filter Schedule. Determine the manufacturer's recommended replacement interval for your whole-house filter cartridge (e.g., 3 months, 6 months, or based on gallon usage). Set a recurring calendar reminder and stick to it. Delaying replacement is the primary cause of pressure loss from filters.
- Perform an Annual Pressure Test. Purchase an inexpensive water pressure test gauge that screws onto an outdoor hose bib. Test the static pressure annually. A healthy range is 45-65 PSI. If the pressure is creeping above 80 PSI, your PRV is failing and needs replacement to protect your appliances. If it's consistently below 40 PSI, it confirms a pressure problem worth diagnosing.
- Periodically Clean Fixture Aerators. Every few months, unscrew the aerators from your kitchen and bathroom faucets and the showerhead from the shower arm. Soak them in a 50/50 solution of white vinegar and water to dissolve mineral deposits, then rinse and reinstall. This maintains strong flow at individual fixtures.
- Keep a Spare Filter and Wrench on Hand. Don't wait until your water pressure drops to a trickle to buy a new filter. Purchase a spare cartridge and a housing wrench and keep them near the filter system so you can perform the replacement immediately when needed.
Related Articles
Keep troubleshooting with these hand-picked guides from FixlyGuide:
- The #1 Mistake Homeowners Make When Diagnosing Low Water Pressure — Discover the most common oversight homeowners make when troubleshooting low water pressure throughout their house and how to fix it with si…
- Your shower sucks? 3 hidden culprits explained. — Low water pressure throughout your house often points to a few common culprits, from a partially closed main shut-off valve to issues with…
- One Shower, No Hot Water? The Hidden Mixing Valve Trick Plumbers Use — Discover why only one shower in your home might lack hot water and the simple internal fix for a common mixing valve issue, saving you a pl…
- Washing Machine Not Draining? Fix It in 5 Simple Steps — A washing machine that won’t drain leaves you with a tub full of soggy clothes. Often, this common problem has a simple DIY fix.
- [The 3 Hidden Reasons Your LED Bulbs Die Early (And the Simple Fixes)](/article/why-led-bulbs-burn-ou
Recommended for DIYers & woodworkers
Sponsored
The Top 20 Tools for Workshops of Any Budget
No stationary machines or power tools required — plus 3 fundamental tools that can't be bought at any price.
Get the free guide
Ted's Woodworking — The #1 Woodworking Resource
Detailed instructions, dimensioned drawings, materials & cutting lists, and 3D schematics for every skill level.
See the plansSponsored: links above are affiliate links. FixlyGuide may earn a commission on qualifying purchases — at no extra cost to you.
Frequently asked questions
Why is my water pressure suddenly low everywhere?+
Sudden low water pressure everywhere often points to a recent change or blockage in your main water supply. Common culprits include a partially closed main shut-off valve, a severely clogged whole-house water filter, or an issue with your municipal supply (check with neighbors).
Can a bad water heater cause low water pressure?+
A water heater typically only affects hot water pressure. If you have low pressure on both hot and cold lines throughout the house, the water heater is unlikely to be the primary cause. However, a failing dip tube or excessive sediment buildup in an old water heater can restrict hot water flow, mimicking low pressure.
How do I know if my water pressure regulator is bad?+
Signs of a failing water pressure regulator include fluctuating water pressure (sudden high or low surges), consistently low pressure throughout the house, or a banging noise in your pipes (water hammer). You can test it with a water pressure gauge attached to an outdoor spigot.
Should I replace my main shut-off valve if pressure is low?+
Only if inspection reveals it's faulty, leaking, or impossible to turn. More often, a main shut-off valve just needs to be turned fully open. If it's old and stiff, or doesn't fully open, replacement by a professional plumber is the safest option, as it controls your entire home's water supply.


Discussion
Loading comments…