
Tools & materials you'll need
Affiliate linksAs an Amazon Associate FixlyGuide earns from qualifying purchases — at no extra cost to you. Prices and availability are accurate as of publication and subject to change.
How it works
Your home’s electrical system distributes power from the main service panel in discrete paths called circuits. Each circuit, protected by a dedicated circuit breaker, feeds electricity to a specific group of outlets, lights, or appliances. When a breaker is on, it allows 120-volt alternating current (AC) to flow from the panel along a 'hot' wire (typically black) to each device on the circuit.
Outlets are typically wired in a "daisy-chain" sequence. Power flows to the first outlet in the series, and from that outlet's terminals, a second set of wires carries power to the next outlet down the line. A loose connection at any point in this chain can interrupt the flow of electricity to all subsequent, or "downstream," outlets. Inside a standard outlet, the hot wire connects to a brass-colored screw, a 'neutral' wire (white) connects to a silver-colored screw to complete the circuit, and a ground wire (bare copper or green) connects to a green screw for safety.
A Ground Fault Circuit Interrupter (GFCI) outlet adds another layer of protection. It contains a small internal transformer that constantly monitors the current flowing on the hot and neutral wires. If it detects a minute imbalance—as little as 5 milliamps, indicating current is leaking to ground (a ground fault)—it trips in milliseconds, cutting power to itself and any downstream outlets it protects. This is why a single tripped GFCI in a kitchen can disable a standard outlet in an adjacent hallway.
Step-by-Step Fix
This guide moves from the simplest, most common solutions to more involved diagnostics. Follow the safety precautions at each stage.
1. Perform Basic Checks and Isolate the Problem — Rule out simple oversights before assuming a wiring fault.
Start by testing a known working appliance, like a lamp or phone charger, in the non-functional outlet to confirm it is truly dead. Then, plug the original device you were trying to use into a known working outlet to ensure the device itself isn't faulty. Finally, check for any wall switches in the immediate vicinity. In many homes, a wall switch controls half or all of an outlet, a common feature in rooms without a ceiling light fixture. Flip all nearby switches to see if power is restored.
2. Locate and Reset All GFCI Outlets — This is the most frequent cause for a single dead outlet when the breaker is on.
Systematically search your home for all GFCI outlets, which are identifiable by their "TEST" and "RESET" buttons. Check these locations first:
- Required locations: Kitchens (countertops), bathrooms, garages, unfinished basements, crawl spaces, and exterior walls.
- Potential locations: Laundry rooms, utility rooms, or the first outlet on a circuit leaving the panel. Press the "RESET" button firmly on every GFCI outlet you find. A properly functioning GFCI will often produce an audible click. If the reset button pops back out immediately, unplug any devices connected to it and any other dead outlets on the circuit, then try again. If it still won't reset, the GFCI itself may be faulty or there is a ground fault downstream.
3. Cycle the Correct Circuit Breaker — A breaker can be internally tripped without appearing to be off.
Go to your main electrical panel. Even though you believe the breaker is on, its internal trip mechanism can be in a limbo state. Locate the breaker that controls the dead outlet. Switch it firmly and deliberately to the full "OFF" position, then switch it back to the "ON" position. This ensures it is properly reset. If you are unsure which breaker it is, you may need to cycle them one by one, testing the outlet each time. Labeling your panel is a critical task for future issues.
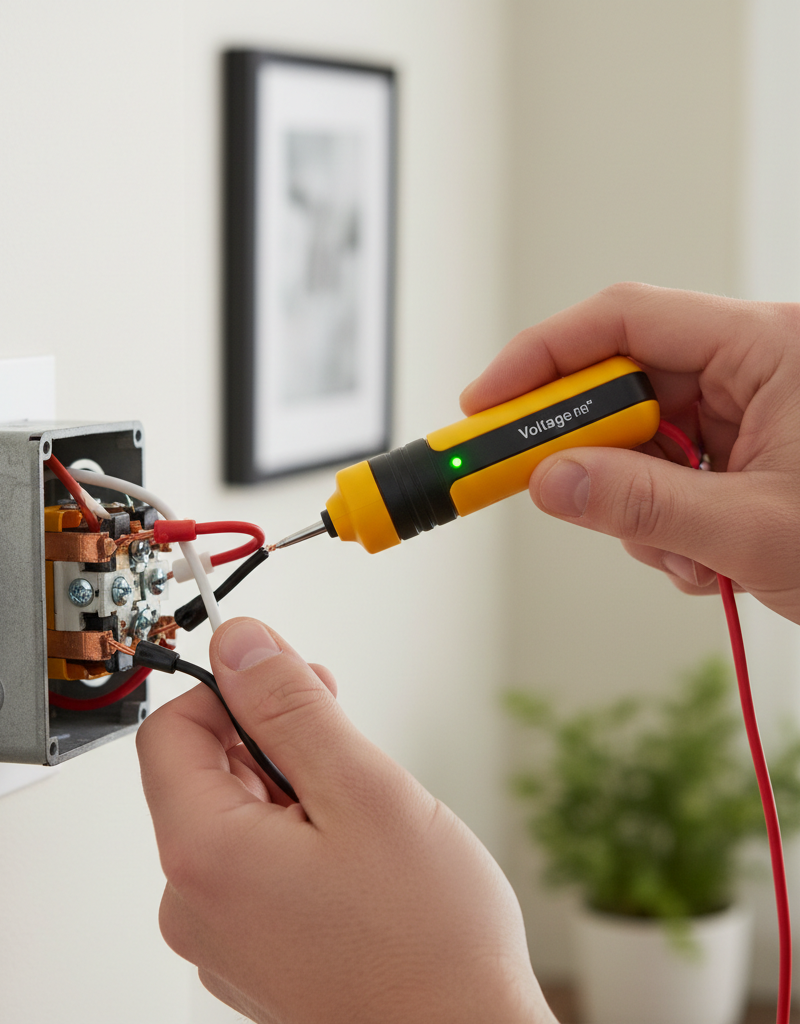
4. Test for Power with a Non-Contact Voltage Tester — Safely determine if any voltage is reaching the outlet box.
A non-contact voltage tester (NCVT) is an essential, inexpensive tool that detects the presence of voltage without touching bare wires.
- Tool: Non-contact voltage tester.
- Safety: Before testing your target outlet, confirm the NCVT is working by testing it on a known live outlet.
- Action: Insert the tip of the tester into the smaller vertical slot (the hot side) of the dead outlet. If the tester lights up or beeps, it means power is reaching the outlet, but a problem with the neutral or ground connection is preventing a complete circuit. If the tester does not activate, it confirms no power is arriving at the outlet's terminals.
5. Measure Voltage with a Multimeter — Get precise readings to diagnose the electrical fault.
A multimeter provides specific voltage readings that are crucial for pinpointing the exact problem.
- Tool: Digital multimeter.
- Safety: Use probes with insulated shrouds. Never touch the metal tips of the probes while testing.
- Action: Set your multimeter to AC voltage (V~), selecting a range above 120V (usually 200V or auto-ranging).
- Hot to Neutral: Insert one probe into the short (hot) slot and the other into the taller (neutral) slot. A correct reading is 115-125V.
- Hot to Ground: Insert one probe into the short (hot) slot and the other into the round (ground) hole. The reading should also be 115-125V.
- Neutral to Ground: Insert one probe into the tall (neutral) slot and the other into the ground hole. This should read 0V, or very close to it.
- Interpretation:
- All readings are 0V: No power is reaching the outlet. The problem is upstream.
- 120V Hot-to-Ground, but 0V Hot-to-Neutral: This indicates an "open neutral." The neutral wire is disconnected somewhere upstream.
- 120V Hot-to-Neutral, but devices don't work: This points to a very loose connection that can carry voltage but not enough current to power a device. The outlet itself is the primary suspect.
6. Turn Off the Circuit and Verify No Power — This is a non-negotiable safety step before opening the outlet.
Return to the breaker panel and switch the correct breaker to the "OFF" position. To be absolutely certain the outlet is de-energized, perform a "live-dead-live" test with your NCVT.
- Test a known working outlet to confirm the NCVT works.
- Test the target outlet to confirm it is dead (no beeping/lights).
- Test the known working outlet again to ensure your NCVT didn't fail during the process.
7. Open the Outlet and Inspect the Wiring — Look for the physical cause of the failure inside the electrical box.
Unscrew and remove the outlet’s faceplate. Then, unscrew the two mounting screws holding the outlet to the electrical box. Carefully and gently pull the outlet straight out from the box. Look for obvious signs of trouble:
- Wires that have come completely loose from their terminal screws.
- Broken or frayed wires.
- Black scorch marks or melted plastic on the outlet or wiring, indicating arcing.
- Loose wire nuts connecting pass-through wiring.
- Corrosion on the terminals or wires.
8. Check for and Correct Backstabbed Connections — This common wiring shortcut is a frequent point of failure.
Inspect the back of the outlet. If the wires are pushed into small, spring-loaded holes instead of being wrapped around the side terminal screws, they are "backstabbed." These connections are notorious for loosening over time, causing intermittent power or complete failure.
- Action: To release a backstabbed wire, insert a small flathead screwdriver or wire stripper tip into the release slot next to the hole. Gently pull the wire out.
- Correction: Use needle-nose pliers or a wire stripper to form a C-shaped hook at the end of the wire. Hook it clockwise around the appropriate terminal screw (black to brass, white to silver) and tighten the screw firmly.
9. Replace the Outlet Receptacle — When in doubt, replace the component.
If the outlet appears old, discolored, cracked, or if plugs fit loosely into it, replace it. Outlets are inexpensive and replacing a faulty one is good practice.
- Purchase: Buy a new outlet that matches the circuit's amperage (15A is standard for most rooms; 20A has a T-shaped neutral slot and is used in kitchens/garages).
- Installation: Connect the wires to the new outlet, ensuring the black wire goes to the brass screw, the white wire to the silver screw, and the bare copper/green wire to the green ground screw. Tighten all screws securely.
10. Investigate the Upstream Outlet — The problem may lie in the last working outlet on the circuit.
If you've tightened all connections on the dead outlet and it still doesn't work, the fault is likely in the "upstream" outlet—the one that feeds it power.
- Action: With the breaker still off, identify the nearest working outlet that is on the same circuit.
- Repeat: Remove that outlet from its box and repeat the inspection process (Steps 7, 8, and 9). A loose connection on the "load" terminals of this upstream outlet is the probable cause for the power loss downstream. Pay close attention to any wire nuts within the box.
Common mistakes
- Forgetting to Look for External Switches. Many DIYers spend hours testing wires only to discover the outlet is controlled by a forgotten wall switch. Always rule this out first.
- Only Checking GFCIs in the Same Room. A home's circuit layout is not always intuitive. A GFCI in the garage can legally protect an outdoor outlet, or a GFCI in a basement bathroom can protect outlets in an adjacent finished room. You must find and test all GFCIs in the house.
- Assuming a Breaker is On By Sight. A breaker that has tripped can sometimes rest in a position very close to "ON." It must be pushed firmly to "OFF" before being reset to "ON" to re-engage the internal mechanism.
- Working Without Verifying Power is Off. Trusting the breaker alone is a dangerous shortcut. Always use a voltage tester directly at the outlet just before you touch any wires. The "live-dead-live" verification method is professional best practice for a reason.
- Replacing a GFCI Outlet with a Standard One. If an outlet is a GFCI, it was installed for safety and is likely required by electrical code. Replacing it with a cheaper standard outlet removes this protection for both that location and any downstream outlets, creating a serious safety hazard.
- Creating a Poor Screw-Terminal Connection. Simply placing a straight wire under a screw head and tightening is unreliable. The wire must be stripped to the correct length (use the strip gauge on the back of the outlet) and bent into a clockwise hook so that tightening the screw also tightens the loop of wire.
Cost & time breakdown
This table outlines typical costs and time investments. "Pro cost" includes a trip charge and labor for diagnosis and repair of a single outlet issue.
| Task | DIY cost | Pro cost | Time |
|---|---|---|---|
| Resetting a GFCI Outlet | $0 | $75 - $150 (trip charge) | 5-15 minutes |
| Replacing a Standard 15A Outlet | $3 - $10 | $125 - $250 | 20-45 minutes |
| Replacing a 15A GFCI Outlet | $15 - $25 | $150 - $300 | 20-45 minutes |
| Diagnosing & Tightening Loose Wire | $0 - $5 (for wire nuts) | $150 - $350 | 30-90 minutes |
| Tracing an "Open Neutral" Fault | $15+ (multimeter) | $200 - $500+ | 1-4 hours |
| Replacing a Faulty Circuit Breaker | $10 - $25 (part only) | $175 - $350 | 30-60 minutes |
When to call a pro
While many single-outlet issues are DIY-friendly, certain signs indicate the problem requires a licensed electrician. Safety should always be your primary consideration. Call a professional if you encounter any of the following:
- You see any evidence of burning, melting plastic, or scorch marks on wires, outlets, or inside the electrical box. This suggests a dangerous arcing condition that must be professionally assessed.
- The circuit breaker trips immediately and repeatedly after you reset it. This signals a direct short circuit that could cause a fire.
- Multiple outlets, lights, or an entire room is without power. This can point to a more serious issue with the circuit's main wiring or in the breaker panel.
- Your tests indicate an "open neutral," but you cannot find the loose connection in the first few outlets you inspect. An electrician has specialized tools to trace these faults efficiently.
- Your home has aluminum wiring (common in houses built from the mid-1960s to mid-1970s). Aluminum wiring requires specific connectors and handling techniques to prevent fire hazards.
- You are not completely confident in your ability to perform the work safely. There is no shame in deferring to an expert when dealing with potentially lethal voltage.
Prevention & maintenance
Proactive checks can prevent outlet failures and catch dangerous conditions early.
- Test GFCIs Monthly. Press the "TEST" button on every GFCI outlet each month. The "RESET" button should pop out, cutting power. Then, press "RESET" to restore it. If the test fails, replace the GFCI immediately.
- Check Plug Tension. As you plug and unplug devices, pay attention to how snugly the plug fits. If an outlet feels loose and can't hold a plug firmly, the internal contacts are worn. This can cause poor connection and dangerous heat buildup. Replace any loose outlets.
- Avoid Circuit Overload. Know which outlets are on which circuits. Avoid running multiple high-power devices, like a space heater and a microwave, on the same circuit simultaneously. This stresses the wiring and the breaker.
- Listen for Buzzing or Sizzling. An outlet or switch that makes any audible noise is a major red flag for a loose wire and an imminent arcing fault. Turn off the circuit and do not use it until it has been inspected and repaired.
- Conduct an Annual Visual Inspection. Once a year, take a quick look at the faceplates of your most-used outlets. Check for any cracks, discoloration (especially brownish tints from heat), or other signs of damage.
Related Articles
Keep troubleshooting with these hand-picked guides from FixlyGuide:
- The 7 Head-Scratching Reasons Your Outlet Died (Even With The Breaker On) — Discover the surprising reasons why an electrical outlet might stop working even when its circuit breaker is fully engaged, and how to safe…
- GFCI Outlet Won't Reset? Fix It With These Simple Steps — A GFCI outlet that won't reset usually indicates a tripped circuit, a ground fault, or a faulty outlet. Learn how to diagnose and fix the p…
- [Outlet Not Working? Here’s How to Troubleshoot (Breaker On)](/article/out
Get the print-ready PDF of this guide
A clean, ad-free, printable version you can keep on your phone or pin to the workshop wall. Free with a FixlyGuide account.
- Print-optimized layout
- Tools, materials & every step included
- Saved to your account
Frequently asked questions
Can a breaker be on but still be tripped?+
In most residential panels, a breaker that is truly tripped will visibly move to an 'OFF' or a middle position. However, some older or less common breakers might appear to be in the 'ON' position but still have an internal fault. The best way to confirm is to firmly switch it to 'OFF' and then back to 'ON'.
How do I know if an outlet is GFCI protected?+
GFCI outlets are easily identifiable by the 'TEST' and 'RESET' buttons located on their face. If you see these buttons, it's a GFCI. Sometimes, a standard outlet can be protected by a GFCI outlet located upstream on the same circuit, often in a bathroom, kitchen, or garage.
Can a loose wire cause an outlet to stop working?+
Absolutely. Loose wire connections, particularly at the terminal screws inside the outlet box, are a very common reason for an outlet to lose power. Vibrations, improper installation, or even corrosion can cause wires to loosen over time, breaking the electrical path and preventing current flow.
Is it safe to open an outlet to check wiring?+
Only if you are comfortable and skilled with basic electrical work. Always prioritize safety: turn off the power to the circuit at the main breaker panel *before* removing the outlet cover or touching any wires. Verify the power is off with a non-contact voltage tester. If you are unsure, it's always safer to call a qualified electrician.


Discussion
Loading comments…