
Tools & materials you'll need
Affiliate linksAs an Amazon Associate FixlyGuide earns from qualifying purchases — at no extra cost to you. Prices and availability are accurate as of publication and subject to change.
How it works
A Ground Fault Circuit Interrupter (GFCI) is a specialized electrical outlet engineered for personal safety. Its function is not to protect equipment from power surges or to prevent circuit overloads—that is the job of a circuit breaker. Instead, a GFCI’s sole purpose is to protect people from severe electrical shock. It achieves this by constantly monitoring the flow of electricity through a circuit.
In a properly functioning circuit, the amount of current flowing out on the hot wire (typically black) should be exactly equal to the amount of current returning on the neutral wire (typically white). A GFCI contains a small sensor, a differential current transformer, that precisely measures this balance. If an imbalance occurs, it means some of the current is "leaking" and returning to ground through an unintended path. This unintended path could be a frayed wire touching a metal appliance casing, moisture inside an electrical box, or, most critically, a person’s body.
When the GFCI sensor detects a minuscule current imbalance—as little as 4 to 6 milliamps—it triggers an internal relay. This action physically disconnects the circuit in as little as 1/40th of a second, far faster than a standard circuit breaker would react and quick enough to prevent a fatal electrical shock. For the "Reset" button to work, two conditions must be met: the GFCI must be receiving power from the circuit breaker, and it must not be detecting a ground fault. If either condition fails, the button will not engage, indicating an active problem.
Step-by-Step Fix
Follow these steps in sequence to diagnose and resolve why your GFCI outlet will not reset. Do not skip steps, as they are ordered from most common and simplest to most complex.
Safety Prerequisite: Electrical work is inherently dangerous. If you are ever uncertain about a step or lack the proper tools, stop and consult a licensed electrician. Always assume circuits are live until you have personally verified they are de-energized.
Tools You May Need:
- Non-contact voltage tester (NCVT)
- Plug-in GFCI outlet tester
- Flat-head and Phillips-head screwdrivers
- Wire strippers
- Needle-nose pliers
-
Check the Circuit Breaker — The most common reason a GFCI will not reset is that it isn't receiving power. Go to your home's main electrical panel and locate the breaker that controls the circuit for the dead outlet. A tripped breaker will be positioned in the middle, between "ON" and "OFF." To properly reset it, you must first push the breaker handle firmly to the full "OFF" position, then flip it back to "ON."
-
Disconnect All Appliances — A faulty device plugged into the circuit is a primary cause of ground faults. Unplug every single appliance, cord, and power strip from the GFCI outlet itself. Critically, you must also unplug everything from any other standard outlets that are "downstream" from the GFCI (i.e., outlets that also lost power when the GFCI tripped). These are protected by the GFCI and a fault in any one of them will prevent a reset.
-
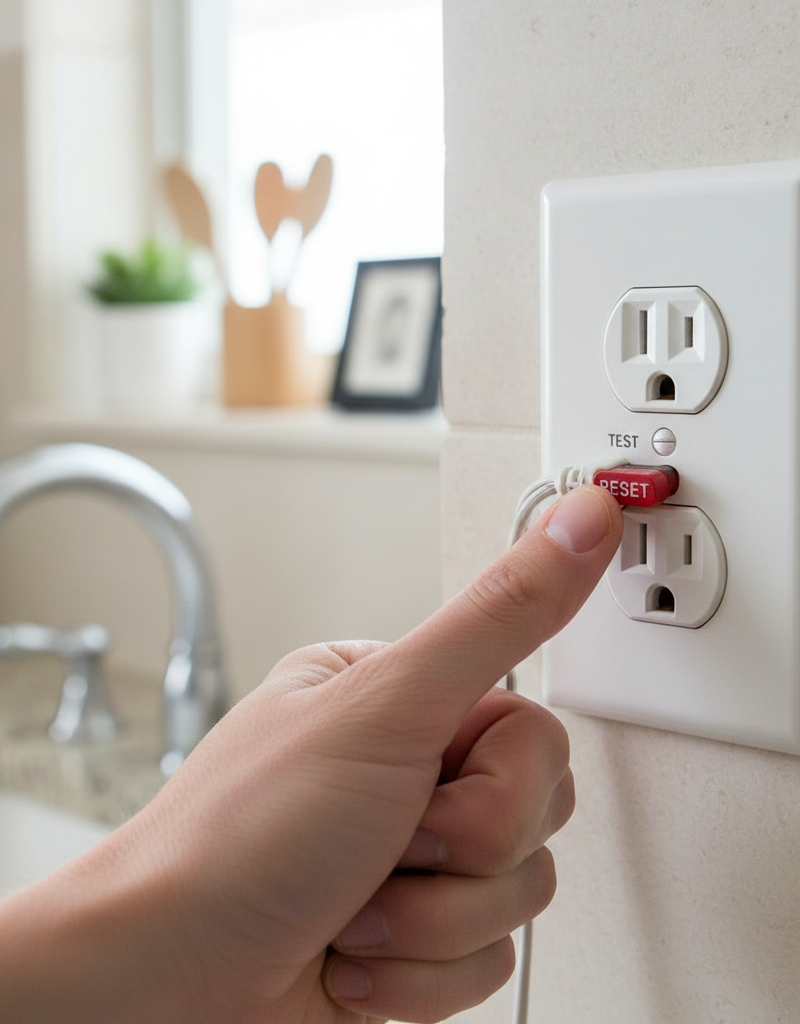
Attempt a Bare Reset — With the circuit breaker "ON" and all appliances disconnected from the circuit, press the "RESET" button on the GFCI outlet firmly. You should hear a distinct "click," and the button should stay depressed.
- If it resets: The problem is likely one of the appliances you unplugged. Proceed to the next step.
- If it does not reset: The outlet may have no power, it may have an internal fault, or there may be a fault in the downstream wiring. Proceed to Step 6.
-
Isolate the Faulty Appliance — If the GFCI successfully reset in the previous step, the fault lies with one of your devices. Start by plugging one item back into the GFCI outlet and turn it on. If the GFCI does not trip, unplug that item and plug in the next one. Repeat this process for every device that was connected to the circuit. The appliance that causes the GFCI to trip is the source of the ground fault and should be repaired or discarded.
-
Isolate a Faulty Downstream Outlet Location — If all your appliances test fine when plugged directly into the GFCI, the issue could be with the wiring of a downstream outlet. Take a known-good device, like a small lamp, and plug it into each of the other outlets on the circuit, one by one. If plugging it into a specific downstream outlet causes the GFCI to trip, that outlet or its wiring is the likely culprit.
-
Inspect for Moisture — Carefully inspect the GFCI faceplate, the surrounding wall, and the interior of the electrical box (if you can see it) for any signs of moisture, condensation, or corrosion. Water provides a direct path for current to leak to ground. This is common in kitchens, bathrooms, laundry rooms, basements, and with exterior outlets. If moisture is present, you must completely dry the area before proceeding. Use a hair dryer on a low setting, but first, turn off the power at the circuit breaker.
-
Verify Power at the Outlet — This step confirms if the outlet is receiving electricity from the panel.
- Safety: Ensure the circuit breaker is in the "ON" position.
- Tool: Use a non-contact voltage tester (NCVT).
- Procedure: Carefully bring the tip of the NCVT near the vertical slots on the face of the GFCI outlet. The tester should beep or light up, indicating the presence of voltage (typically 120V). If it does not detect any power, the problem is upstream in the wiring or at the breaker panel, and you will likely need an electrician.
-
De-Energize the Circuit for Inspection — Before opening the outlet, you must ensure it is completely de-energized. Go to the breaker panel and switch the correct breaker to the full "OFF" position. Place a piece of tape over it with a note so no one accidentally turns it back on while you are working.
-
Confirm Power is Off at the Box — An essential final safety check. Use your non-contact voltage tester again on the outlet's slots to confirm there is no power. Then, unscrew the faceplate and the outlet mounting screws. Gently pull the outlet from the box and use the NCVT to test the actual wires inside the box before you touch anything.
-
Inspect the Wiring and Terminals — With the outlet pulled out, visually inspect all connections. Look for loose wires under the terminal screws, nicked or cracked wire insulation, signs of scorching or melting, or any bare ground wire touching a hot or neutral terminal screw. Gently tug on each wire to ensure it is secure under its terminal. If you find loose connections, tighten the screws securely.
-
Identify LINE and LOAD Terminals — Look at the back of the GFCI. It will have one pair of terminals marked "LINE" and another pair marked "LOAD" (this set is often covered by a piece of yellow tape on new outlets). The LINE terminals are for the wires bringing power from the breaker panel. The LOAD terminals are for the wires that carry protected power to other downstream outlets. An incorrect connection here is a very common failure point.
-
Replace the GFCI Outlet — If all previous steps fail, the GFCI unit itself is likely defective.
- Procedure: Take a clear photo of the existing wiring configuration. Disconnect the wires from the old outlet. Connect the new GFCI, ensuring the incoming power wires go to the LINE terminals (black wire to the brass screw, white wire to the silver screw) and the downstream wires (if any) go to the LOAD terminals. Connect the bare copper or green ground wire to the green screw.
- Final Test: Carefully fold the wires back into the box, mount the new outlet, and install the faceplate. Restore power at the breaker. Press the "RESET" button. Use the "TEST" button to confirm it trips, then press "RESET" again. For a definitive check, use a plug-in GFCI tester.
Common mistakes
- Confusing LINE and LOAD Terminals: Wiring the incoming power feed to the
LOADside is the most frequent installation error. This starves the GFCI's internal circuitry of power, making it impossible to reset. Always identify the incoming power wires and connect them exclusively to theLINEterminals. - Resetting Without Isolation: Repeatedly pressing the reset button without first unplugging all appliances from the entire circuit. This provides no diagnostic information and can be frustrating. You must remove all potential fault sources to determine if the GFCI itself is functional.
- Ignoring Downstream Outlets: Forgetting that a GFCI protects other standard outlets connected to its
LOADterminals. A ground fault in a seemingly unrelated outlet in another part of the room or even an adjacent room will prevent the main GFCI from resetting. - Neglecting to Verify Power is Off: Flipping a breaker and immediately assuming the circuit is dead is a dangerous shortcut. Always use a voltage tester to verify zero power at the outlet both before and after opening the electrical box. Breakers can be mislabeled, or another circuit may be feeding the box.
- Painting Over the Outlet: Allowing paint to seep into the "Test" and "Reset" buttons or the outlet slots can jam the mechanical components or create a conductive path, causing a fault. When painting, always remove the faceplate and carefully tape over the entire GFCI device.
- Assuming the Outlet is Bad First: Many people replace the GFCI outlet as a first step, wasting time and money. The outlet itself is often the last point of failure after tripped breakers, faulty appliances, and wiring issues have been ruled out.
Cost & time breakdown
Costs are estimates and can vary by region and the specific complexity of the job. Pro costs include labor and a typical service call fee.
| Task | DIY Cost | Pro Cost | Time |
|---|---|---|---|
| Diagnosing the problem (no parts required) | $15 (for NCVT) | $100 – $200 (service call) | 30–60 minutes |
| Replacing a single GFCI outlet | $20 – $40 (outlet + tester) | $125 – $250 | 30–45 minutes |
| Replacing a defective circuit breaker | $15 – $30 (breaker part) | $150 – $300 | 30 minutes |
| Tracing and fixing a fault in downstream wiring | $25 – $50 (materials) | $250 – $600+ | 2–5+ hours |
| Replacing a faulty appliance cord/plug | $5 – $15 (parts) | N/A | 20–30 minutes |
When to call a pro
While many GFCI issues are simple fixes, certain symptoms warrant an immediate call to a licensed electrician. Do not attempt to diagnose these situations yourself, as they indicate more complex and potentially hazardous problems.
Call a professional if:
- A brand new, correctly wired GFCI outlet continues to trip with nothing plugged into the circuit. This points to a persistent ground fault within the building's wiring itself, which requires specialized tools to trace.
- You smell burning plastic, ozone, or see any scorch marks on the outlet, in the electrical box, or at your circuit breaker panel. This signifies a dangerous overheating condition that could lead to a fire. Turn off the breaker immediately.
- Your non-contact voltage tester indicates there is no power reaching the
LINEside of the GFCI, even after you have confirmed the circuit breaker is on. The fault lies somewhere in the wiring between the panel and the outlet box. - The GFCI tripping causes flickering lights or power issues on other, seemingly unrelated circuits in your home. This can be a sign of a hazardous shared neutral or a serious problem within the main electrical panel.
Prevention & maintenance
Proactive maintenance can prevent most GFCI-related headaches and ensure these critical safety devices are ready to protect you.
- Test Monthly: Once a month, manually press the "TEST" button on every GFCI outlet in your home. The "RESET" button should pop out, and power to the outlet should be cut. Firmly press "RESET" to restore function. If it fails this test, replace it immediately.
- Perform an Annual Plug-In Test: Purchase an inexpensive plug-in GFCI tester. This tool simulates an actual ground fault to verify that the GFCI trips within the correct parameters. It also checks for other wiring issues like open grounds or reversed polarity.
- Protect from Moisture: For outdoor outlets, use "in-use" or "bubble" style weatherproof covers that protect the connection even when something is plugged in. In kitchens and bathrooms, be mindful of water and use caution with appliances near sinks.
- Respect the Lifespan: GFCI outlets have internal electronic components that wear out. A GFCI's functional lifespan is typically 10-15 years. If your GFCIs are older, consider a proactive replacement plan. Modern GFCIs manufactured after 2006 are designed to be non-functional if their safety components fail.
- Inspect Appliance Cords: Routinely check the power cords of devices frequently used with GFCI outlets (hair dryers, blenders, shop tools). Look for cracking insulation, exposed wires, or damage near the plug, as these are common sources of ground faults.
Related Articles
Keep troubleshooting with these hand-picked guides from FixlyGuide:
- The Hidden Reason Your GFCI Won't Reset (And It's Not Always a Short) — Uncover the mysterious reasons your GFCI outlet refuses to reset and learn the exact steps to diagnose and fix the problem safely, preventi…
- Why Does Only One Outlet Have No Power (When the Breaker Is On)? — Discover the surprisingly common reasons a single electrical outlet stops working while its circuit breaker remains on, and learn how to sa…
- How to Reset a GFCI Outlet (and What to Do When It Won't Reset) — GFCI outlets trip to protect you from shock. Here's how to reset one in 10 seconds — plus the 6 reasons yours won't reset and what to do ab…
- Extension Cord Keeps Tripping Breaker? Easy Fixes for Homeowners — An extension cord tripping a breaker usually indicates an overloaded circuit or a faulty cord/appliance, a problem often solvable with simp…
- Why Your Extension Cord Keeps Tripping the Breaker (And the Simple Test to Find the Hidden Cause) — Discover why your extension cord keeps tripping the circuit breaker and learn how to safely diagnose and fix the real problem with a simple…
- The Hidden Reason Your GFCI Trips (It’s Not Always a Bad Outlet) — A tripping GFCI outlet is a safety mechanism doing its job, often indicating a problem like moisture, a faulty appliance, or a wiring issue…
Get the print-ready PDF of this guide
A clean, ad-free, printable version you can keep on your phone or pin to the workshop wall. Free with a FixlyGuide account.
- Print-optimized layout
- Tools, materials & every step included
- Saved to your account
Frequently asked questions
Why won't my GFCI outlet reset?+
A GFCI outlet typically won't reset due to a tripped circuit breaker, an overloaded circuit, a ground fault somewhere on the circuit it protects, or a fault within the GFCI outlet itself.
How do I know if my GFCI is bad?+
If your GFCI outlet receives power, isn't tripped at the breaker, and doesn't reset after you've unplugged all connected devices and tried firmly pressing the reset button, it's likely faulty and needs replacement.
Can a GFCI reset button get stuck?+
Yes, a GFCI reset button can get stuck or simply fail to engage if the internal mechanism is worn out, if there's no power to the outlet, or if it's continuously detecting a ground fault.
Should I call an electrician if my GFCI won't reset?+
You can often troubleshoot a GFCI yourself. However, if you've followed all troubleshooting steps and it still won't reset, if you're uncomfortable with electrical work, or if you suspect a larger wiring issue, it's always best to call a licensed electrician.


Discussion
Loading comments…