Tools & materials you'll need
Affiliate links- AmazonStep ladderSturdy, for safe access to higher areas
- AmazonFlashlightEssential for angled inspection
- AmazonGoggles or safety glasses
- AmazonWork gloves
- AmazonNotepad and penFor documenting damage
- AmazonCamera/SmartphoneFor photo evidence, with a ruler or coin
- AmazonSiding removal tool (zip tool)Specifically for vinyl siding
- AmazonFlat bar or pry barFor nail removal
- AmazonHammer
- AmazonReplacement siding panels2-3 panels · Matching existing color and style
As an Amazon Associate FixlyGuide earns from qualifying purchases — at no extra cost to you. Prices and availability are accurate as of publication and subject to change.
Quick Answer
Hail damage to siding can range from subtle cosmetic imperfections to severe structural compromise, often going unnoticed until significant issues arise. The key to addressing it effectively is a meticulous inspection process, ideally conducted at various angles and lighting conditions to reveal hidden impacts. While light hail might only leave superficial marks, larger hailstones can cause dents, cracks, and even punctures, compromising your home's weather barrier. For minor, localized damage, homeowners can often perform targeted repairs by replacing individual siding panels. However, extensive or severe damage frequently warrants a professional assessment and could lead to an insurance claim for full replacement to protect your home's integrity and value.
The Problem
You wake up to a pristine, clear day, but a memory of last night's violent hailstorm lingers. Your roof might be the first thing a homeowner checks, but what about the vertical surfaces of your home? Siding, whether vinyl, aluminum, or fiber cement, is highly susceptible to hail damage, which isn't always immediately obvious. Unlike a broken window, hail damage to siding often appears as subtle dimples, chips, or cracks, easily overlooked from ground level. This hidden damage, if left unaddressed, can lead to a cascade of problems including moisture intrusion, mold growth, reduced insulation efficiency, and ultimately, accelerated deterioration of your home's exterior. Over time, what started as cosmetic damage can become a significant structural and financial headache. Recognizing and accurately assessing this damage early is critical to preventing these escalating issues and maintaining your home's protective envelope.
How It Works
When hailstones strike a surface, the energy of impact is transferred in a localized area. The extent of the damage depends on several factors: the size and density of the hailstone, the velocity at which it falls (influenced by wind speed), and the type and age of the siding material.
Vinyl Siding: Vinyl siding is a thermoplastic material. When struck by hail, it can respond in a few ways. Smaller hailstones might leave minor scuffs or abrasions. Larger, harder hailstones can create impact marks ranging from shallow dents (often called "bruising," where the impact compresses the vinyl without breaking it) to actual fractures, cracks, or even holes. The material becomes more brittle in colder temperatures, making it more susceptible to cracking during winter hailstorms. The color and thickness of the vinyl also play a role; darker colors absorb more solar radiation and can become softer, potentially showing more pronounced dents, while thicker gauges offer slightly more resistance.
Aluminum Siding: Aluminum is a metal, and its response to hail is different. Hail impact on aluminum siding typically results in dents or dings. These can range from small, imperceptible dimples to significant indentations. Unlike vinyl, aluminum doesn't crack easily from hail impact, but the dents are permanent deformations of the metal. The paint or coating on aluminum siding can also be chipped or scuffed, exposing the bare metal to the elements and potentially leading to corrosion over time if not addressed.
Fiber Cement Siding: Fiber cement siding, a composite material made of cement, sand, and cellulose fibers, is generally more durable and impact-resistant than vinyl or aluminum. However, it's not impervious to severe hail. Hail impact on fiber cement can cause chips, cracks, or spalling (flaking off of the surface material). The finish coat is often the first to show damage, but severe impacts can compromise the underlying cementitious board, affecting its structural integrity and water resistance.
Regardless of the material, damaged siding compromises the entire building envelope. Even a small crack or dent can allow water to penetrate behind the siding, reaching the sheathing and framing. This moisture can lead to rot, mold, and mildew, which not only degrade the structural components of your home but also pose health risks. Additionally, damaged siding can reduce your home's insulation effectiveness, leading to higher energy bills. Understanding these material-specific responses helps in both identifying the damage and planning the appropriate repair strategy.
Step-by-Step Fix
Safety First: Before you begin any exterior inspection or repair, always prioritize safety. Use a stable ladder on level ground, wear appropriate safety glasses to protect against debris, and sturdy gloves. If working at heights, consider a fall arrest system or have a spotter. Always be aware of power lines and keep clear of them.
-
Preparation and Initial Assessment — Before diving into a detailed inspection, gather your tools. Walk around your home from a distance to get an overall view. Look for any obviously detached or severely cracked panels from ground level. Note the direction from which the storm hit – the worst damage will likely be on the side of the house facing the hail.
- Tools: Notepad, pen, measuring tape.
-
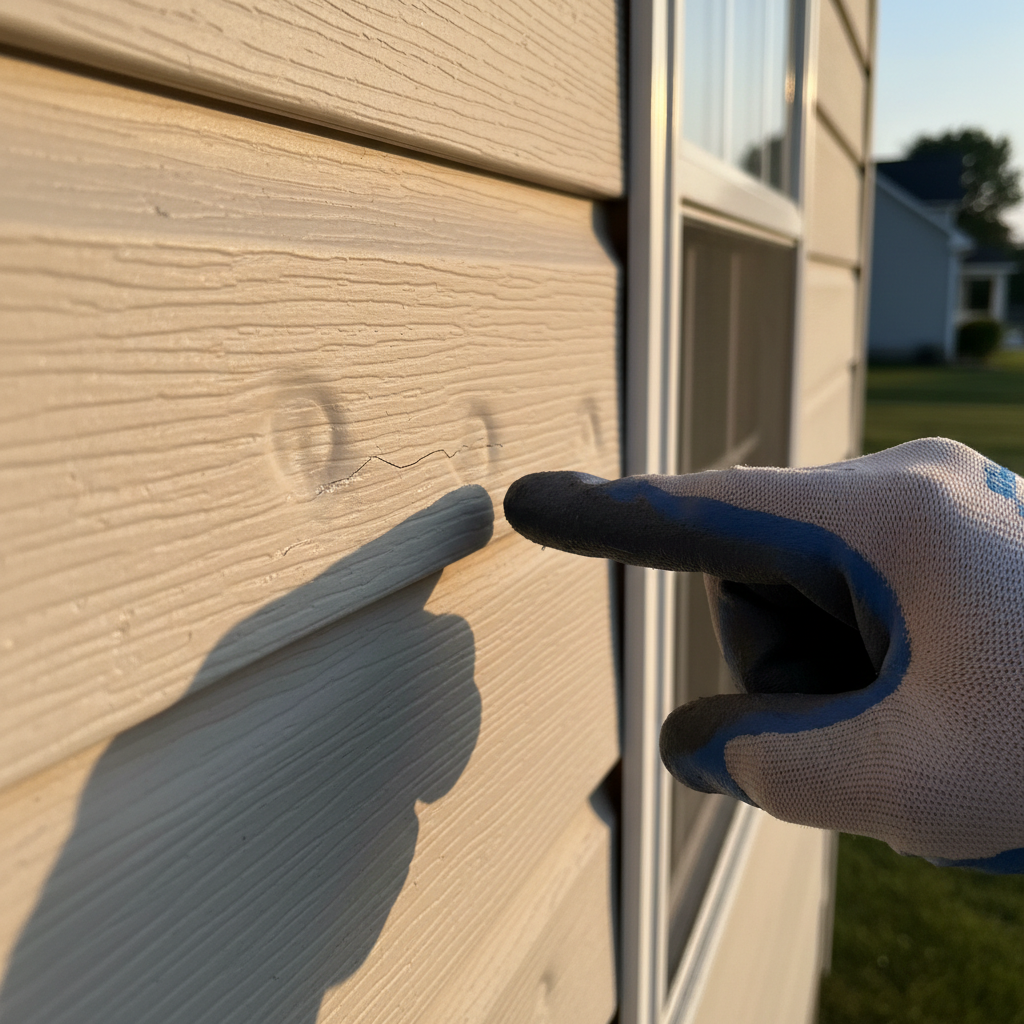
Detailed Eye-Level Inspection (Angle is Key!) — This is where most homeowners miss critical damage. Hail marks are often only visible when light hits them at a specific angle. Inspect siding panels section by section, getting as close as safely possible. Use a flashlight, even during the day, to create angled shadows that highlight dents and impacts. Walk slowly, examining each panel both head-on and from acute angles (e.g., 30-45 degrees). Look for:
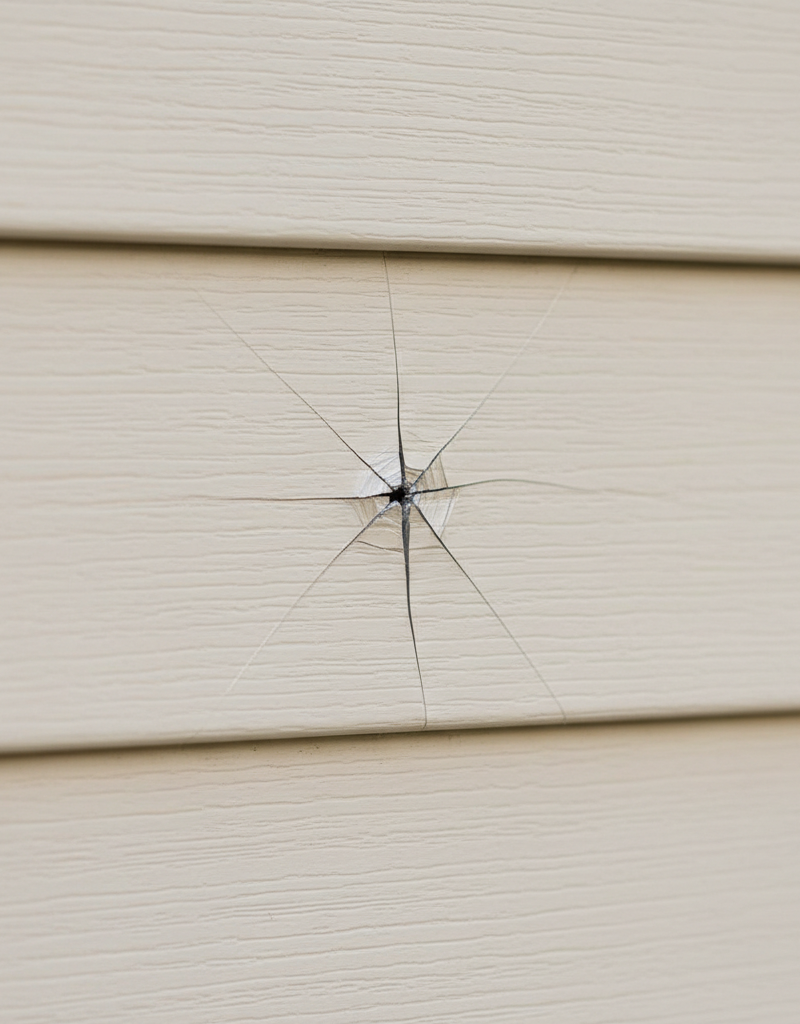
- Vinyl: Small indentations, star-shaped cracks, small holes, or areas where the vinyl appears "bruised" or discolored from impact. Check around windows and door frames, as these areas can absorb more impact.
- Aluminum: Small dimples, creased dents, or chipped paint where the hail struck.
- Fiber Cement: Surface chips, hairline cracks, or areas where the top layer has flaked off.
- Tip: Take photos with a ruler or coin next to the damage for scale. This is crucial for insurance claims.
-
Check All Sides of the Home — While the prevailing wind direction during a storm usually dictates the most severe damage, hail can bounce and strike surfaces on all sides of your home. Do not neglect the less exposed sides. Small, ricocheting hailstones can still cause damage.
-
Assess Severity and Scope — Once you've cataloged the damage, determine its extent. Is it isolated to a few panels, or is it widespread across multiple walls? Minor, scattered cosmetic damage might be a DIY repair. Extensive or structural damage (large cracks, holes, widespread detached sections) almost always warrants a professional assessment and potentially an insurance claim.
-
Gather Materials for Repair (If DIY) — For localized damage on vinyl or aluminum, individual panel replacement is often the most feasible DIY repair. Fiber cement typically requires more advanced tools and techniques for seamless panel replacement.
- Materials: Replacement siding panels (ensure an exact match in color, profile, and length – bring a damaged piece to the store), siding removal tool (zip tool) for vinyl, flat bar, hammer, galvanized siding nails or screws, caulk if needed for fiber cement, utility knife, tin snips (for aluminum).
- If your home is older, matching siding can be difficult. Check inconspicuous areas (like behind a bush or covered by a deck) for spare pieces, or consider ordering samples from manufacturers.
-
Removing Damaged Siding Panels (Vinyl & Aluminum)
- Vinyl: Gently slide a vinyl siding zip tool under the bottom lip of the damaged panel and the panel above it. Pull down to unlock the interlocked sections. Work your way along the length of the panel, releasing the lock. Once unlocked, pry out the nails securing the damaged panel using a flat bar. Be careful not to damage adjacent panels. If the panel is cracked, you may need to cut it into smaller sections with a utility knife to aid removal. Take care when re-nailing to ensure nails are centered in the slots and not driven too tight, allowing for thermal expansion and contraction.
- Aluminum: Carefully remove any trim or adjacent pieces that might overlap the damaged panel. Use a flat bar to gently pry out the nails securing the damaged panel. Aluminum can bend easily, so work slowly. Use tin snips to cut around obstructions if necessary.
-
Installing Replacement Siding Panels (Vinyl & Aluminum)
- Vinyl: Slide the top lock of the new panel under the bottom lip of the panel above it. Gently press upwards until the locking mechanism clicks into place. Work from one end to the other. Ensure the new panel is plumb and level before nailing it into the studs, leaving about 1/32-inch gap between the nail head and the siding to allow for movement. Do not nail too tightly.
- Aluminum: Position the new panel precisely, ensuring it aligns with adjacent panels. Secure it with new galvanized siding nails, driving them straight and flush, but not overtightening. If paint was chipped on surrounding panels, use exterior-grade touch-up paint.
-
Repairing Fiber Cement (Minor Chips/Cracks) — For small chips or hairline cracks in fiber cement, use exterior-grade caulk or a patch kit specifically designed for fiber cement. Clean the area thoroughly, apply the patch, smooth it, and allow it to dry before painting to match. For larger cracks or compromised panels, professional replacement is often recommended.
-
Post-Repair Inspection and Cleanup — Once repairs are complete, step back and inspect your work. Ensure new panels are flush, level, and securely fastened. Clean up any debris, old siding pieces, and tools. Properly dispose of damaged materials.
Common Causes
- Hail Impact: The most direct and obvious cause. Hailstones falling at terminal velocity can possess significant kinetic energy, especially larger stones (1 inch diameter or more), causing dents, cracks, and punctures in siding materials. The damage pattern often indicates the direction and intensity of the hailstorm. High winds during a hailstorm can also increase the impact force and spread damage to multiple sides of a structure.
- Material Brittleness (Vinyl): Vinyl siding can become more brittle in cold temperatures. A hailstorm occurring during winter or early spring in a cold climate can lead to more severe cracking or shattering than a similar storm in warmer weather.
- Aging Siding: Older siding, regardless of material, becomes more susceptible to damage. Vinyl can become faded and more brittle from prolonged UV exposure, while aluminum coatings can degrade, and fiber cement can lose some of its original flexibility and impact resistance. This makes it more vulnerable to even moderate hail.
- Improper Installation: Siding not installed according to manufacturer specifications (e.g., vinyl nailed too tightly without allowing for thermal expansion, or incorrect spacing for fiber cement) can be more prone to damage. Stressed or incorrectly fastened panels can crack or detach more easily under impact.
- Wind-Driven Debris: While not direct hail damage, strong winds accompanying a hailstorm can pick up branches, gravel, or other debris and propel them into the siding, causing similar impact damage that might be mistaken for hail.
Common Mistakes
- Ignoring Subtle Damage: Many homeowners inspect quickly from the ground and miss subtle dents or hairline cracks. These seemingly minor issues can worsen over time, allowing water penetration and leading to costly secondary damage like rot or mold. Instead: Perform a thorough, close-up inspection from multiple angles, ideally with a flashlight, to catch all impacts.
- Delaying Inspection/Repair: Waiting too long to inspect after a storm or to undertake repairs can void insurance claims (most require reporting within a specific timeframe, typically 6-12 months) and allow water damage to begin. Instead: Inspect your property promptly after any significant storm and address repairs as soon as feasible.
- Improper Siding Replacement Techniques: Forcing panels, overtightening nails, or using mismatched siding can lead to poor aesthetics and functional issues like buckling, warping, or further damage. Instead: Familiarize yourself with manufacturer installation guidelines for your specific siding type, ensure proper nailing techniques, and prioritize matching existing siding.
- Assuming All Damage is Cosmetic: Even small dents or cracks can compromise the weather barrier. What looks "just cosmetic" could be an entryway for moisture, leading to unseen structural damage. Instead: Treat any breach in the siding as a potential water intrusion point and assess its risk carefully.
- Neglecting Adjacent Components: Hail rarely hits siding in isolation. Homeowners often forget to check gutters, downspouts, windows, window screens, and even exterior light fixtures for allied damage. Instead: Expand your inspection to all exterior elements, as their damage may indicate indirect effects or provide supporting evidence for an insurance claim.
- Disregarding Professional Assessment: When damage is widespread, severe, or you suspect structural involvement, trying to DIY the entire repair can be overwhelming, costly, and ineffective. Instead: If in doubt, especially with significant damage, consult a reputable local siding contractor or an independent public adjuster to get an expert opinion and assistance with insurance claims.
Cost & Time Breakdown
| Task | DIY Cost | Pro Cost | Time |
|---|---|---|---|
| Initial Inspection | $0 | $0–$200 (inspection fee) | 30 mins – 1 hour |
| Replace 1-2 Vinyl Panels | $10–$50 | $150–$300 (minimum call-out) | 1–2 hours |
| Replace 1-2 Aluminum Panels | $20–$70 | $200–$400 | 1.5–2.5 hours |
| Patch Fiber Cement (minor) | $15–$40 | $100–$250 | 1 hour |
| Extensive Siding Repair | Not Recommended | $500–$5,000+ | 1–3 days or more |
| Full Siding Replacement | Not Recommended | $10,000–$30,000+ | 1–2 weeks |
Tips & Prevention
- Regular Visual Inspections: Perform a quick visual check of your siding at least twice a year, and immediately after any severe storm, especially those with hail. Look for anything out of the ordinary, even minor scuffs or dents.
- Maintain Gutters and Downspouts: Clear and properly functioning gutters and downspouts prevent water from overflowing and eroding siding or directing water into damaged areas. Damaged gutters themselves can be a sign of hail impact.
- Trim Overhanging Trees: Branches can become projectiles during severe storms. Keeping trees trimmed away from your house reduces the risk of impact damage from both branches and larger hail caught in tree canopies being dislodged.
- Consider Impact-Resistant Siding: If you live in an area prone to severe weather, consider upgrading to impact-resistant siding materials (e.g., thicker gauge vinyl, specific fiber cement products designed for high impact) when it
Related Articles
Keep troubleshooting with these hand-picked guides from FixlyGuide:
- The Invisible Hail Damage Mistake Most Homeowners Make (And How to Spot It) — Discover how to accurately assess hail damage on your home's siding, understand its hidden impacts, and perform essential repairs to protec…
- Is That Hail Damage to Your Siding—Or Something Worse? (And How to Know For Sure) — Distinguishing hail damage from other siding issues is crucial for proper repair and insurance claims. Learn how to identify hail damage an…
- Wind Tore Off Your Shingles? The 7 Critical Steps Most Homeowners Miss — Discover the essential steps to take when roof shingles go missing after a storm, from immediate safety checks to temporary repairs and ins…
- The #1 Mistake That Makes Deck Boards Warp (And the Easy Fix) — Discover the most common reason deck boards warp and how a simple, proactive fix can restore your deck's appearance and longevity.
- The One Shingle Mistake That Creates Roof Leaks (And How to Fix It Fast) — Missing roof shingles after a storm can quickly lead to extensive water damage if not addressed correctly. Learn how to safely inspect and…
- The 7 Critical Home Inspection Checks Most Homeowners Miss (And How to Spot Them) — Discover the crucial annual home inspection checks often overlooked by homeowners, and learn how to identify potential issues before they b…
Get the print-ready PDF of this guide
A clean, ad-free, printable version you can keep on your phone or pin to the workshop wall. Free with a FixlyGuide account.
- Print-optimized layout
- Tools, materials & every step included
- Saved to your account
Frequently asked questions
How do you check siding for hail damage?+
Check siding for hail damage by getting close and inspecting from various angles, especially with a flashlight, to highlight small dents, chips, or cracks. Walk slowly, paying attention to all sides of the house, and look for consistent impact patterns. Compare damaged areas to undamaged ones, like those protected by eaves.
What does hail damage look like on vinyl siding?+
On vinyl siding, hail damage can appear as small, subtle dents or dimples, often called 'bruising.' More severe impacts can cause star-shaped cracks, small holes, or areas where the vinyl has fractured or chipped, especially in colder temperatures when the material is more brittle.
Can I fix hail-damaged siding myself?+
Minor, localized hail damage on vinyl or aluminum siding can often be repaired by a homeowner by replacing individual panels. However, extensive or structural damage, or damage to fiber cement siding, usually requires professional expertise and may warrant an insurance claim.
Will insurance cover hail damage to siding?+
Most homeowners' insurance policies cover hail damage to siding as part of their dwelling coverage, provided the damage is sudden and accidental. It's crucial to document the damage thoroughly with photos and report the claim to your insurer promptly, typically within 6-12 months of the storm.
How do I prevent future hail damage to my siding?+
Prevent future hail damage by regularly inspecting and maintaining your siding, trimming overhanging trees, and considering impact-resistant siding materials if you live in a hail-prone area. Prompt repairs after a storm also prevent minor damage from escalating.


Discussion
Loading comments…