
Tools & materials you'll need
Affiliate linksAs an Amazon Associate FixlyGuide earns from qualifying purchases — at no extra cost to you. Prices and availability are accurate as of publication and subject to change.
Quick Answer
Many common household problems homeowners routinely pay professionals to fix are surprisingly simple to tackle yourself. From replacing a dirty HVAC filter to cleaning a clogged dryer vent or fixing a running toilet, a little DIY know-how can save you hundreds, even thousands, of dollars annually. This guide will walk you through several common scenarios where a few minutes of your time and minimal investment can cut recurring costs and prevent larger, more expensive issues down the road.
The Problem
Homeowners often find themselves in a cycle of paying for professional services for issues that are well within their own capabilities to resolve. A dripping faucet, a slow-draining sink, or even a furnace that won't kick on can trigger a call to a plumber or HVAC technician, incurring a service charge that swiftly escalates with labor and parts. This isn't just about the immediate cost; it's about fostering a dependency that can empty your wallet over time. Many of these issues are not complex malfunctions but rather simple maintenance tasks or minor repairs that don't require specialized tools or extensive training. By understanding the root causes and learning basic diagnostic steps, you can avoid unnecessary service calls and allocate your home maintenance budget more effectively.
How It Works
Take, for instance, a common household complaint: low water pressure or a dripping faucet. These are often not signs of a catastrophic plumbing failure but rather indicators of a worn-out washer, a corroded aerator, or sediment buildup within the faucet itself. Water flows through your home's pipes under pressure, passing through various fixtures. Over time, mineral deposits from hard water can accumulate in aerators (the screen at the end of your faucet) or showerheads, restricting flow. Washers and O-rings, designed to create a watertight seal, can degrade and harden, leading to drips. Understanding that these components are designed to be replaceable, rather than requiring an entire fixture overhaul, is key. Similarly, an HVAC system relies on unobstructed airflow to operate efficiently. The air filter catches dust, pet dander, and other particulates before they can enter the furnace or air handler. When this filter becomes clogged, the system has to work harder to pull air through, leading to reduced efficiency, increased energy bills, and potentially system damage or even freezing of the evaporator coil. The simple act of checking and replacing this filter regularly restores proper airflow, ensuring your system runs optimally. Another example is the dryer vent. Hot, moist air laden with lint is expelled from your dryer through a vent to the outside. If this vent becomes clogged, not only does your dryer take longer to dry clothes (wasting energy), but it also creates a significant fire hazard as lint is highly flammable. The mechanical process is straightforward: dryer tumbles clothes, heats air, pushes it through the clothes, picks up lint and moisture, and expels it. A blockage at any point in the vent path disrupts this airflow. Recognizing these basic mechanisms empowers you to intervene with simple, effective solutions before a minor annoyance escalates into a costly professional repair.
Step-by-Step Fix
Here are several common homeowner problems you can easily fix yourself, saving significant money:
-
Replace a Clogged HVAC Filter — Restoring airflow and efficiency.
- Safety First: Turn off your furnace or AC unit at the thermostat and the breaker box. This prevents the unit from cycling on while you're working.
- Locate your air filter. It's usually in the return air duct, often near the furnace or air handler. It might be in a dedicated slot or inside the unit itself.
- Note the size printed on the filter (e.g., 20x25x1). Purchase a new filter of the same size and MERV rating (or slightly higher for better filtration, but avoid significantly higher MERV ratings if your system isn't designed for it, as it can restrict airflow).
- Slide out the old filter, noting the direction of the airflow arrow. The arrow should point towards the furnace/air handler.
- Slide in the new filter, ensuring the airflow arrow points in the correct direction.
- If this doesn't work: If your system is still struggling or air quality doesn't improve, consider a more thorough duct cleaning, but this is a professional job.
-
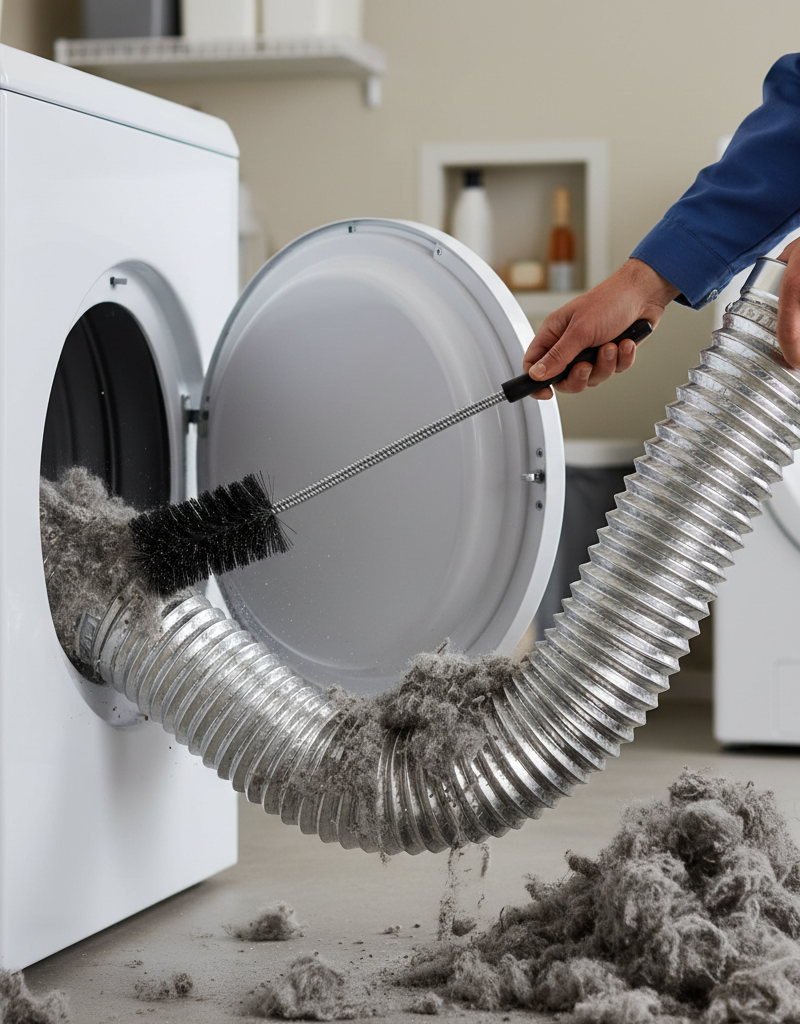
Clean a Dryer Vent — Preventing fire hazards and improving efficiency.
- Safety First: Unplug the dryer from the wall outlet. If it's a gas dryer, turn off the gas supply valve.
- Pull the dryer away from the wall to access the vent hose at the back.
- Disconnect the flexible vent hose from both the dryer and the wall vent.
- Use a dryer vent brush kit (often found at hardware stores) to clean out both the flexible hose and the rigid vent pipe inside the wall, feeding the brush as far as it will go.
- Clean the lint trap housing inside the dryer itself with a vacuum cleaner hose attachment.
- Reconnect the vent hose, ensuring a tight seal with foil tape or clamps.
- Push the dryer back into place, avoiding kinks in the vent hose.
- If this doesn't work: If clothes are still not drying efficiently, check the heating element, but this may require a professional appliance technician.
-
Fix a Dripping Faucet — Stopping water waste and annoying drips.
- Safety First: Turn off the water supply to the faucet. The shut-off valves are usually under the sink. Turn the faucet on briefly to relieve any pressure.
- For most single-handle faucets, remove the decorative cap, then unscrew the screw holding the handle in place. Lift off the handle.
- Remove the escutcheon cap and cartridge nut. Carefully pull out the old cartridge or stem assembly. Note its orientation.
- Replace the O-rings and springs if it's a compression faucet, or replace the entire ceramic cartridge for a disc faucet. Take the old part to the hardware store to ensure you get an exact match.
- Install the new parts in reverse order. Tighten everything securely, but don't overtighten.
- Turn the water supply back on slowly and check for leaks.
- If this doesn't work: If the drip persists, you may have incorrect parts or deeper issues requiring a plumber.
-
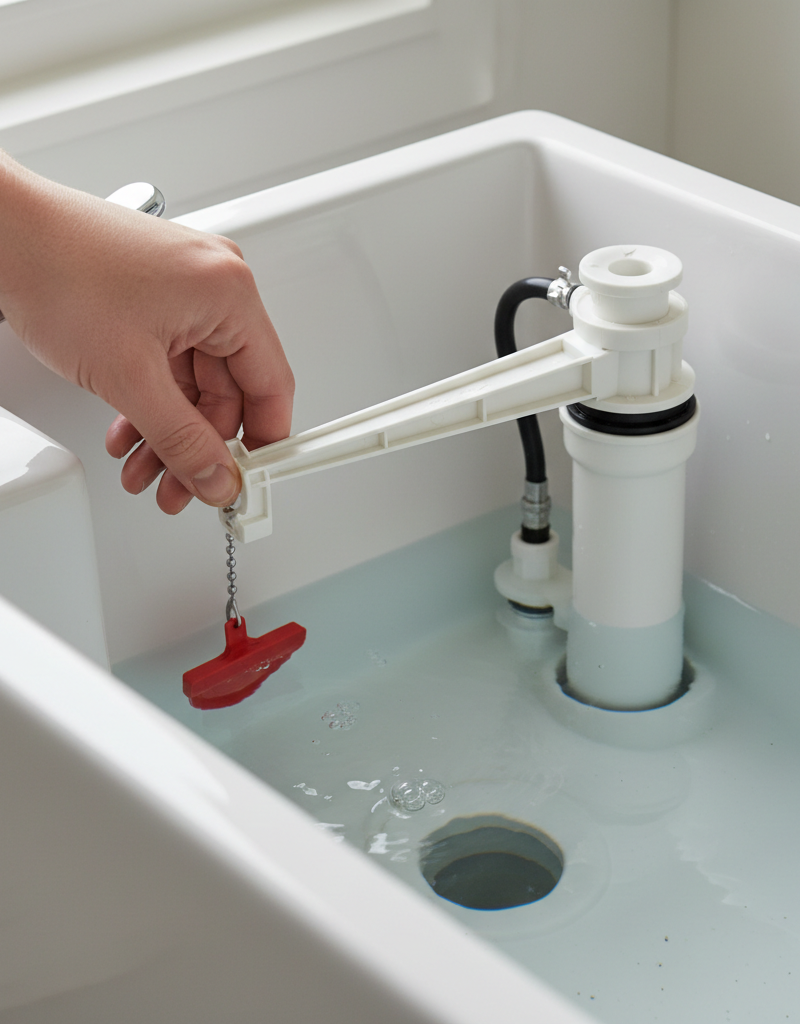
Silence a Running Toilet — Ending water waste and phantom flushes.
- Safety First: Turn off the water supply valve beneath the toilet tank.
- Remove the tank lid. Flush the toilet to empty the tank.
- Identify the cause: Is the flapper not sealing? Is the fill valve running constantly? Is the float not set correctly?
- If the flapper (the rubber seal at the bottom of the tank) is worn or has deteriorated, simply unhook it from the chain and replace it with a universal flapper from a hardware store. Ensure the chain has slight slack but isn't too long or too short.
- If the fill valve is perpetually running, it might indicate a failing valve or an improperly set float. Adjust the float arm so the water level is about an inch below the fill valve overflow tube. If the fill valve still runs, replace the entire fill valve assembly (a relatively easy DIY job for most).
- Turn the water supply back on and test the flush.
- If this doesn't work: If replacing the flapper and adjusting the float doesn't work, ensure the fill valve is properly seated and tightened.
-
Unclog a Slow Drain — Restoring proper drainage.
- Safety First: Avoid using chemical drain cleaners, as they can damage pipes and are hazardous. Start with non-corrosive methods.
- For sinks, remove the stopper. Use needle-nose pliers or a hook to pull out any hair or debris visible down the drain.
- Next, try a plunger. Ensure there's enough water in the sink to cover the plunger cup. Create a tight seal and make several firm plunges.
- If plunging doesn't work, remove the P-trap directly beneath the sink. Place a bucket underneath to catch water. Unscrew the slip nuts on both ends of the P-trap and gently remove it. Clean out any gunk with a brush or old coat hanger. Reassemble, ensuring washers are correctly seated and nuts are hand-tightened, then slightly snugged with pliers.
- For bathtubs, remove the overflow plate and use a snake tool to clear the clog.
- If this doesn't work: If the clog is persistent or affects multiple drains, it suggests a mainline issue, which requires a professional plumber.
Common Causes
- Neglected Maintenance: The most frequent culprit. Skipping routine tasks like filter replacements or vent cleaning leads to inefficiencies and wear.
- Hard Water & Mineral Buildup: Calcium and magnesium deposits can corrode fixtures, clog aerators, and stiffen O-rings, leading to leaks and reduced flow.
- Accumulated Debris: Hair, grease, soap scum, and lint are primary offenders in drains and dryer vents.
- Worn-Out Components: Seals, washers, and cartridges simply degrade over time and with use. They are designed to be sacrificial parts.
- Improper Installation or Adjustment: A toilet float set too high, or a flapper chain that's too tight, can cause continuous running.
Common Mistakes
- Using Chemical Drain Cleaners: These are harsh, can damage pipes (especially older ones), and pose a safety risk. They often only create a temporary fix.
- Ignoring the Problem: A small drip or a slightly slow drain can quickly escalate into larger, more expensive problems, including water damage or higher utility bills.
- Not Shutting Off Water/Power: Essential safety step that many DIYers overlook, leading to potential electrocution or floods.
- Overtightening: Stripping screws or cracking plastic components by applying too much force is a common error, especially with plumbing fixtures.
- Buying the Wrong Part: Guessing on replacement parts often leads to multiple trips to the hardware store and frustration. Always take the old part with you if possible.
- Misdiagnosing the Issue: Assuming a complex problem when it's a simple fix can lead to unnecessary expenses or misdirected efforts.
Cost & Time Breakdown
| Task | DIY Cost | Pro Cost | Time |
|---|---|---|---|
| HVAC Filter Replacement | $10–$30 | $75–$150 | 5–10 minutes |
| Dryer Vent Cleaning | $15–$30 | $150–$250 | 30–60 minutes |
| Dripping Faucet Fix | $5–$25 | $100–$250 | 20–40 minutes |
| Running Toilet Fix | $10–$40 | $100–$250 | 30–60 minutes |
| Slow Drain Unclogging | $0–$15 | $100–$300+ | 15–45 minutes |
Tips & Prevention
- Regular Filter Checks: Check your HVAC filter monthly and replace it every 1–3 months, or more often if you have pets or allergies.
- Annual Dryer Vent Cleaning: Schedule a thorough cleaning of your dryer vent system at least once a year.
- Inspect Faucets & Toilets: Periodically check under sinks for small leaks and listen for running toilets. Address them immediately.
- Use Drain Screens: Install drain screens in all sinks and showers to catch hair and debris before it enters the drainpipe.
- Educational Resources: Invest time in learning basic home repair skills. Online tutorials and local workshops are excellent resources.
When to Call a Professional
While many household issues are DIY-friendly, certain situations warrant calling a licensed professional. For any persistent electrical issues, especially flickering lights in multiple rooms, burning smells, or hot outlets, consult a licensed electrician immediately due to serious fire risk. If you suspect a gas leak (smell of rotten eggs), evacuate your home and call your gas company and a licensed HVAC technician from a safe location. For plumbing, if you have no water pressure throughout the house, burst pipes, significant water damage, or raw sewage backing up, call a licensed plumber right away. Similarly, if a drain clog affects all your fixtures, it indicates a main line blockage that requires professional diagnosis and specialized equipment. Avoid attempting DIY fixes for gas appliances or main electrical panels, as these jobs carry significant risks of injury, fire, or further damage without proper training and tools. If a repair feels beyond your comfort level or expertise, or if you've attempted a fix and the problem persists or worsens, don't hesitate to call a professional. Investing in a professional when the situation demands it can save you greater costs and hazards in the long run.
Related Articles
Keep troubleshooting with these hand-picked guides from FixlyGuide:
- The Hidden Reason Your AC Isn't Cooling (And 7 Fixes Homeowners Miss) — If your central AC isn't cooling your home, the culprit often lies in an overlooked issue that's simple to fix, preventing costly professio…
- 7 Hidden Equity Drains Costing You Thousands Annually — Your home is an asset, but silent problems like minor leaks, poor insulation, and deferred maintenance can drain its value. Discover the se…
- The 12 Checks That Prevent 80% of Costly Home Repairs — Don't wait for a disaster. Our comprehensive monthly home maintenance checklist reveals the surprising, simple tasks that catch small issue…
- The Hidden Culprit Behind Your AC Not Cooling (and How to Find It) — If your central AC isn't cooling your home, the issue often stems from a surprisingly simple problem that's easy to overlook. Learn how to…
- 7 Inspection Red Flags That Secretly Signal a $20,000 Bill — Don't let your dream home become a money pit. Many buyers and even some inspectors overlook subtle home inspection red flags that lead to f…
- Your Refrigerator's Loud Hum? The Fix Most People Miss — A constant, loud refrigerator hum is more than annoying—it's a warning sign. Before you call a pro, discover the #1 most overlooked cause a…
Get the print-ready PDF of this guide
A clean, ad-free, printable version you can keep on your phone or pin to the workshop wall. We'll also send occasional weekly tips matched to your home situation.
- Print-optimized layout
- Tools, materials & every step included
- Unsubscribe anytime
This article was independently written by FixlyGuide based on the source topic.
Frequently asked questions
How often should I clean my dryer vent?+
You should clean your dryer vent at least once a year. If you have a large family, pets, or use your dryer frequently, consider cleaning it every 6 months to prevent lint buildup and fire hazards.
Can a dirty HVAC filter really increase my energy bill?+
Yes, absolutely. A dirty HVAC filter restricts airflow, forcing your heating and cooling system to work harder to maintain the desired temperature. This increased effort uses more energy, leading to higher electricity or gas bills and can even damage your HVAC unit over time.
Is it safe to use chemical drain cleaners?+
It is generally not recommended to use chemical drain cleaners. They can be very harsh, potentially damaging your pipes, especially older ones, and are highly corrosive, posing a safety risk to you and your plumbing system. Manual methods like plungers or drain snakes are safer and often more effective.
When should I call a professional plumber for a leaky faucet?+
You should call a professional plumber if you've attempted to fix a leaky faucet by replacing washers or cartridges and the leak persists. Also, if you're uncomfortable turning off your main water supply or working with plumbing, or if the leak is severe and causing water damage, it's best to call a pro.

Discussion
Loading comments…