Tools & materials you'll need
Affiliate linksAs an Amazon Associate FixlyGuide earns from qualifying purchases — at no extra cost to you. Prices and availability are accurate as of publication and subject to change.
Quick Answer
A running toilet is a common household nuisance that wastes hundreds of gallons of water per day and can silently inflate your water bill. Fortunately, most running toilet issues are simple to diagnose and fix with basic tools and minimal DIY experience. The most frequent culprits are a faulty flapper, an improperly adjusted float, or a refill tube that's too long. A simple adjustment or a quick part replacement can restore your toilet to silent, efficient operation in under 30 minutes.
The Problem
You hear it: that constant, low-level hiss of water, or the toilet spontaneously refilling itself at odd intervals even when it hasn't been flushed. This sound signifies that water is continuously leaking from the tank into the bowl, and then down the drain. This isn't just annoying; it's wasteful. A toilet running continuously can add hundreds, or even thousands, of gallons to your quarterly water bill, costing you anywhere from $50 to $500 annually depending on water rates and the severity of the leak. Beyond the financial drain, it's also an unnecessary burden on an increasingly strained water supply. Identifying the exact cause quickly is key to both environmental responsibility and financial savings.
How It Works
Understanding how your toilet works is the first step to fixing it. When you flush, the handle lifts a chain connected to a rubber flapper at the bottom of the tank. This flapper opens, allowing water to rush from the tank into the toilet bowl, creating the siphoning action that carries waste away. As the water level in the tank drops, the flapper closes, sealing the tank. Simultaneously, a float mechanism (either a ball float on a arm or a cylinder float that slides up and down the fill valve shaft) drops. This signals the fill valve to open and begin refilling the tank with fresh water from your home's supply line. As the tank refills, the float rises. Once the water reaches a predetermined level, the float mechanism triggers the fill valve to shut off, stopping the water flow. A small refill tube also diverts a portion of this incoming water into the overflow tube, ensuring the bowl refills after the flush. If any component in this delicate dance—the flapper, the chain, the float, or the fill valve itself—fails to perform correctly, water will either leak from the tank or the fill valve won't shut off, leading to a continuously running toilet.
Step-by-Step Fix
1. Remove the Tank Lid — *Access the internal components.
Carefully lift the ceramic tank lid and set it aside on a soft, stable surface like a bath mat. This gives you full visibility and access to the flapper, float, and fill valve assembly. Avoid dropping the lid, as it can easily crack or shatter.
2. Check the Flapper Seal — *Identify a common cause of leaks.
Observe the water level in the tank. Is it above the overflow tube? If so, the issue is likely with the fill valve. If the water level is below the overflow tube, the flapper is the prime suspect. Drop a few drops of food coloring into the tank (avoiding the overflow tube). Wait 15-20 minutes without flushing. If color appears in the toilet bowl, your flapper isn't sealing correctly. Examine the flapper for signs of wear, cracks, or mineral buildup. Ensure the chain has enough slack so the flapper can close fully.
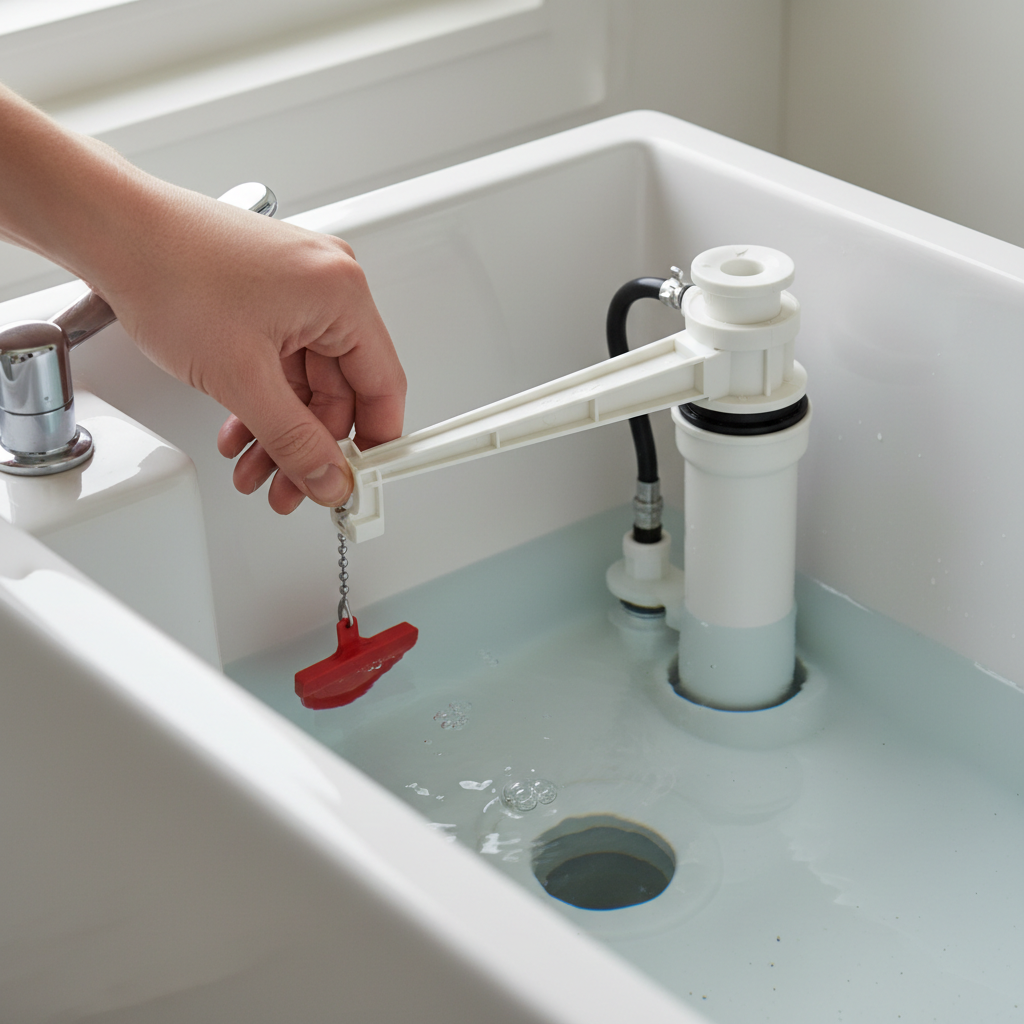
3. Adjust the Float Arm — *Correct an excessively high water level.
If the water level in the tank is too high, often spilling into the overflow tube, the float needs adjustment. For traditional ball floats, gently bend the metal or plastic arm downwards. For cylinder floats, pinch the clip on the side of the fill valve shaft and slide the float down a quarter-inch at a time. The goal is for the water level to stop about 1 inch below the top of the overflow tube. Flush the toilet to test the new water level.
4. Inspect the Refill Tube — *Ensure proper water flow to the bowl.
The small, flexible refill tube connects the fill valve to the overflow tube. Ensure this tube is inserted into the overflow tube without being submerged in the tank water. If it's too long and dips into the water, it can create a siphoning effect that causes the toilet to run intermittently. Trim the tube with scissors if necessary, ensuring it's above the water line but still directing water into the overflow tube.
5. Clear Obstructions Around the Flapper — *Remove debris that prevents sealing.
Sometimes, small pieces of sediment, mineral deposits, or even fragments of the old flapper itself can get lodged under the flapper, preventing a tight seal. With the water supply turned off (turn the valve behind the toilet clockwise), drain the tank by flushing. Use gloves to carefully feel around the flapper's seat for any debris. Clean the rim of the flapper seat with a sponge or old toothbrush.
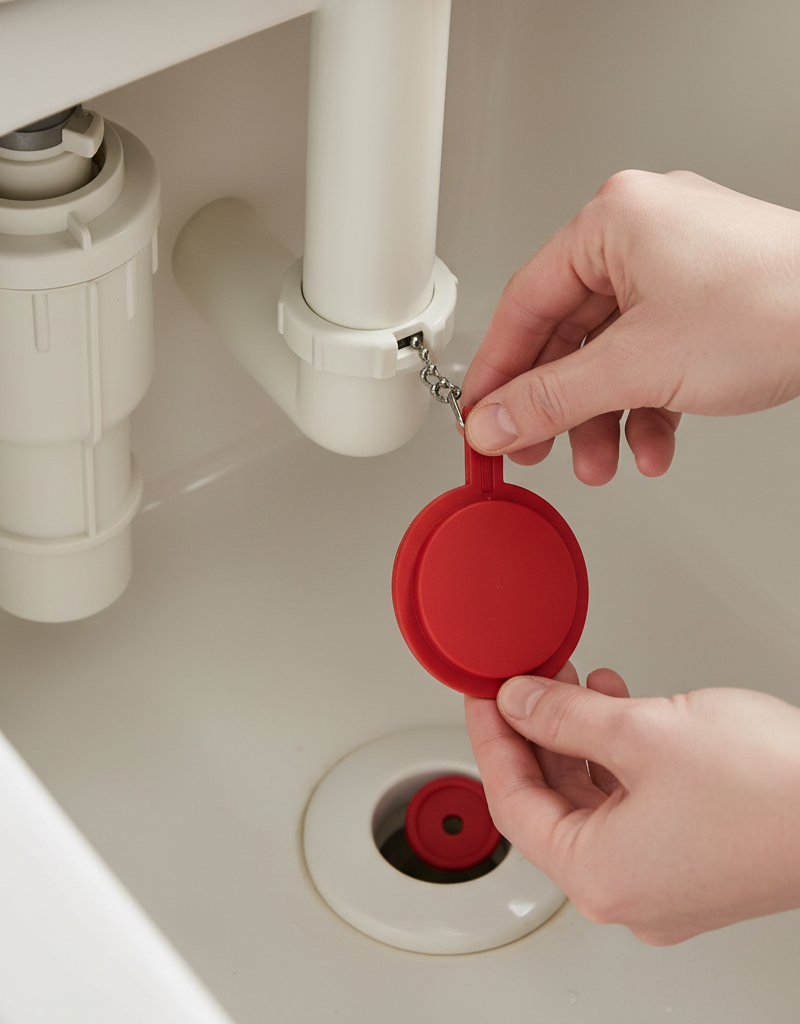
6. Replace a Worn Flapper — *Install a new, pliable seal.
If your flapper is visibly cracked, stiff, or otherwise damaged, replacement is necessary. Turn off the water supply valve behind the toilet. Flush to empty the tank. Disconnect the flapper chain from the flush lever and unhook the flapper's 'ears' from the pegs at the base of the overflow tube. Take the old flapper to a hardware store to ensure you get an exact match, as flappers vary in size and design. Install the new flapper by reversing the removal steps, ensuring it's seated properly and the chain has slight slack (about 1/2 inch) when the flapper is closed.
7. Check the Flush Handle and Chain — *Ensure free movement.
Sometimes, the flush handle can get stuck in the downward position, or the chain can be too short, holding the flapper slightly open. Wiggle the handle to ensure it returns to the 'up' position freely after a flush. Adjust the chain length to have about half an inch of slack when the flapper is fully closed. A too-tight chain will prevent the flapper from sealing, while a too-loose chain might cause it to get caught.
8. Test for Leaks Again — *Confirm the fix.
Once you've made adjustments or replacements, turn the water supply back on. Allow the tank to fill completely and the fill valve to shut off. Listen carefully for any running water. If you used food coloring, check the bowl again after 15-20 minutes. If no color appears, and the toilet remains silent, you've likely fixed the problem.
Common Causes
- Worn or Damaged Flapper: The most frequent culprit. Over time, rubber flappers degrade, become stiff, crack, or accumulate mineral deposits, preventing a watertight seal against the flush valve opening.
- Improper Float Height: If the float is set too high, the tank fills past the overflow tube's height, causing water to continuously spill into it, mimicking a leak.
- Misaligned or Kinked Refill Tube: The small refill tube directs water into the overflow pipe to refill the bowl. If it's too long and dips into the tank water, it can cause a siphoning action. If it's kinked, it can prevent proper bowl refill or cause erratic behavior.
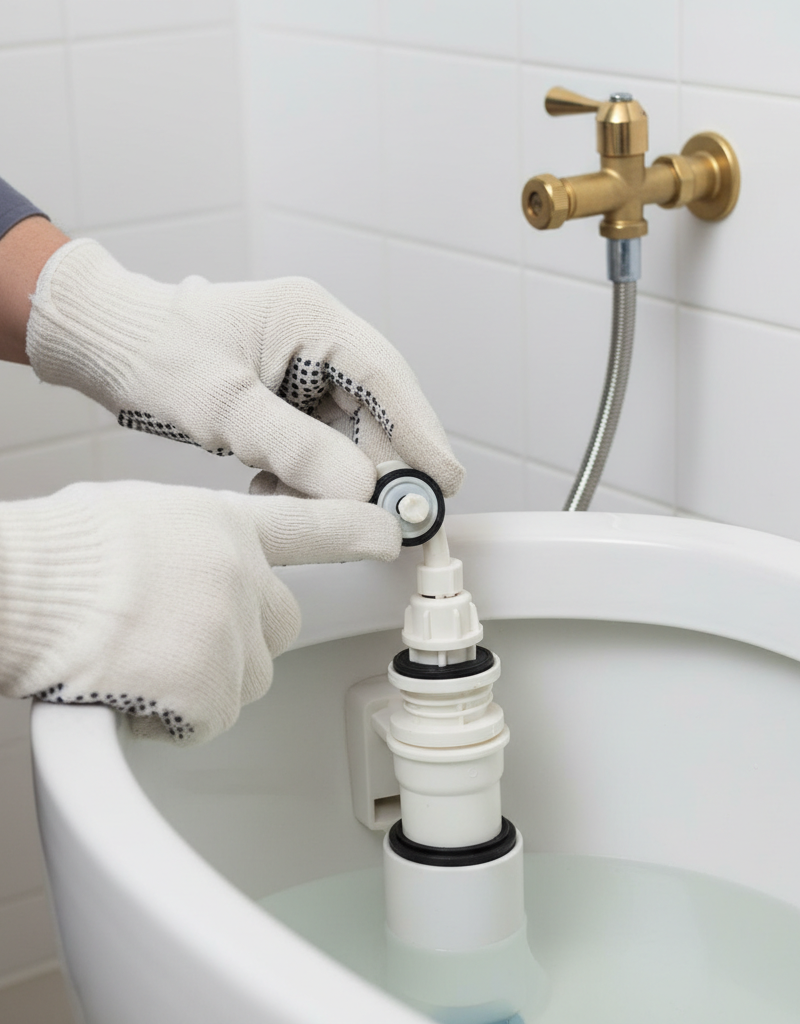
- Faulty Fill Valve: Less common, but a fill valve that doesn't shut off completely is defective and will need replacement. This often manifests as a continuous trickle directly from the fill valve even when the tank is full.
- Too Short or Tangled Flapper Chain: If the chain connecting the flush lever to the flapper is too short, it can hold the flapper slightly open. If it's tangled, it can prevent the flapper from fully closing.
- Sediment or Debris on Flapper Seat: Small particles can sit directly on the flapper's sealing surface, breaking the watertight seal and allowing water to leak into the bowl.
Common Mistakes
- Ignoring the problem: Many homeowners tolerate a running toilet for weeks or months, assuming it's a minor issue. This wastes significant water and money. Address it immediately.
- Buying the wrong flapper: Flappers are not universal. Different toilet manufacturers and models use specific flappers. Always take your old flapper to the store or measure it precisely to ensure a correct fit.
- Over-tightening the fill valve nut: When replacing a fill valve, over-tightening the nut that secures it to the tank can crack the ceramic, leading to a much more expensive repair.
- Adjusting the chain too short: A common mistake is leaving the flapper chain too taut. This will prevent the flapper from closing completely, causing a continuous leak. Ensure at least 1/2 inch of slack.
- Not turning off the water supply: Before attempting any internal repairs or replacements, always turn off the water supply to the toilet to prevent accidental flooding.
- Confusing the fill valve with the flush valve: These are distinct components. The fill valve brings water into the tank; the flush valve is the large opening at the bottom of the tank that the flapper seals. Misdiagnosing which is faulty leads to unnecessary work.
Cost & Time Breakdown
| Task | DIY Cost | Pro Cost | Time |
|---|---|---|---|
| Flapper replacement | $8–$20 | $75–$150 | 15–30 minutes |
| Float adjustment | $0 | Included w/ service | 5–10 minutes |
| Refill tube adjustment/trim | $0 | Included w/ service | 5–10 minutes |
| Fill valve replacement | $20–$40 | $150–$300 | 30–60 minutes |
| Leak diagnosis (DIY) | $0 | $75–$100 (trip) | 10–15 minutes |
Tips & Prevention
- Regular Visual Checks: Periodically lift your tank lid and inspect the components for wear, especially the flapper. Look for discoloration, stiffness, or cracks in the rubber.
- Listen for Running Water: Get into the habit of listening for background noises in your home. A running toilet often announces itself with a subtle hiss or periodic refilling.
- Perform the Food Coloring Test: Do this test at least once a year. It's a quick, easy, and effective way to detect silent leaks from the flapper.
- Avoid Harsh Chemical Cleaners: Drop-in chemical toilet bowl cleaners can corrode rubber flappers and other internal components over time, leading to premature failure.
- Check Flush Handle Movement: Ensure the flush handle moves freely and returns to its resting position without sticking. Lubricate with a silicone spray if it feels stiff.
- Consider a Bidet Attachment: While not directly preventing running toilets, bidets can reduce toilet paper usage, which in turn can prevent paper fragments from interfering with the flapper seal.
- Install a Fluidmaster 400A: If you have an older, inefficient fill valve, consider upgrading to a modern, universal model like the Fluidmaster 400A. These are highly reliable and efficient.
When to Call a Professional
While most running toilet issues are DIY-friendly, some situations warrant calling a licensed plumber. If you've replaced the flapper and fill valve, adjusted the float, and checked the chain, but the toilet continues to run, there might be a more complex diagnostic issue. Also, if you notice water leaking from the base of the toilet or cracks in the ceramic tank or bowl, turn off the water supply immediately and call a plumber, as these indicate serious structural damage. Persistent issues with multiple toilets, very old plumbing systems (e.g., pre-1980s), or if you lack confidence in working with plumbing components are also good reasons to seek professional help. A plumber can efficiently diagnose obscure problems, such as issues with the main water pressure regulator, faulty supply lines, or a clogged toilet trap, ensuring a lasting repair without risking further damage to your bathroom.
Related Articles
Keep troubleshooting with these hand-picked guides from FixlyGuide:
- The 30-Second Toilet Fix Plumbers Don't Want You to Know — A running toilet can waste hundreds of gallons of water per day, but often the fix is incredibly simple and takes under a minute.
- The $5 Secret to Silencing a Running Toilet (Plumbers Hope You Don't Know) — A running toilet is usually caused by a simple issue with the flapper or its chain, leading to constant water waste and higher utility bill…
- The $5 Flapper Trick Plumbers Hope You Don't Know About Your Running Toilet — Discover the secret $5 flapper trick that often fixes a running toilet, saving you money on parts and plumber call-outs.
- The $2 Trick to Stop a Running Toilet (Plumbers Don't Want You to Know) — Discover the simple, two-dollar fix that can stop your running toilet in minutes, saving water and preventing costly repairs.
- The 3 Hidden Reasons Your Toilet Clogs Repeatedly (And How to Fix Each One) — Uncover the surprising culprits behind your constantly clogging toilet and learn homeowner-friendly fixes to restore flush power.
- Is Your Gutter Sagging After Every Storm? The Hidden Flaw Most Homeowners Miss — Discover the overlooked reason your gutters sag after every storm and learn the lasting fix that most homeowners miss.
Frequently asked questions
Why is my toilet constantly running?+
The most common reasons are a worn-out flapper that doesn't seal properly, a float mechanism set too high causing water to overflow, or a refill tube that's positioned incorrectly. Less common causes include a faulty fill valve or issues with the flush handle linkage.
How do I know if my toilet flapper is bad?+
You can perform a food coloring test. Drop a few drops into the toilet tank (away from the overflow tube) and wait 15-20 minutes without flushing. If color appears in the toilet bowl, your flapper isn't sealing correctly and likely needs replacement.
Can a running toilet increase my water bill significantly?+
Yes, absolutely. Even a small, continuous leak can waste hundreds of gallons of water per day, leading to a significant increase in your water bill, potentially costing hundreds of dollars annually depending on local water rates and the severity of the leak.
How do I adjust the water level in my toilet tank?+
For most toilets, you adjust the float. If you have a ball float on an arm, gently bend the arm down. If you have a cylinder float, pinch the clip on the side of the fill valve shaft and slide the float down until the water level is about 1 inch below the top of the overflow tube.

Discussion
Loading comments…